
Leaflet
Page 1
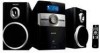
... sound • 10W RMS total output power Easy to use • Wake up and sleep timer functions • Digital tuning with the DC156. Enjoy your music from multiple sources • Play and charge your iPod simultaneously • Play CD, CD-R and CD-RW Enrich your iPod music in Hi-Fi sound Play and charge you like it. Philips Docking Entertainment System Plays CD and CD-R/RW DC156 Enjoy iPod music in superb sound quality with 20 preset stations...
... sound • 10W RMS total output power Easy to use • Wake up and sleep timer functions • Digital tuning with the DC156. Enjoy your music from multiple sources • Play and charge your iPod simultaneously • Play CD, CD-R and CD-RW Enrich your iPod music in Hi-Fi sound Play and charge you like it. Philips Docking Entertainment System Plays CD and CD-R/RW DC156 Enjoy iPod music in superb sound quality with 20 preset stations...
Leaflet
Page 2
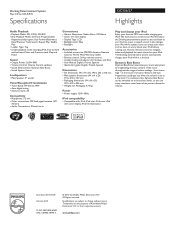
... the Docking entertainment system so you can enjoy consistent sound even when you connect your iPod while it is set at the touch of Koninklijke Philips Electronics N.V. Bottom-end bass frequencies usually get lost when the volume is docked. www.philips.com The dock lets you turn down • Sound Enhancement: Dynamic Bass Boost • Sound System: Stereo Loudspeakers • Main Speaker: 3" woofer Tuner/Reception/Transmission • Tuner Bands: FM Stereo, MW • Auto digital tuning • Station presets: 20 Connectivity...
... the Docking entertainment system so you can enjoy consistent sound even when you connect your iPod while it is set at the touch of Koninklijke Philips Electronics N.V. Bottom-end bass frequencies usually get lost when the volume is docked. www.philips.com The dock lets you turn down • Sound Enhancement: Dynamic Bass Boost • Sound System: Stereo Loudspeakers • Main Speaker: 3" woofer Tuner/Reception/Transmission • Tuner Bands: FM Stereo, MW • Auto digital tuning • Station presets: 20 Connectivity...
User manual
Page 3
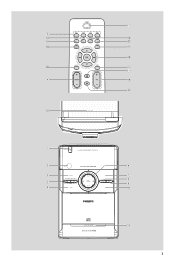
1 3 iPOD $ PROG % # ¡ MENU ^ & OK * MUTE ) 9 7 4 ( 0 @ PULL TO OPEN 1 2 3 4 5 STANDBY-ON DOCKING ENTERTAINMENT SYSTEM DC156 iR CD/CD -R/CD -RW COMPATIBLE SOURC E PRESE T DOCK REPE AT DBB 6 7 8 9 0 PUSH TO OPEN DOCK FOR iPOD ! 3
1 3 iPOD $ PROG % # ¡ MENU ^ & OK * MUTE ) 9 7 4 ( 0 @ PULL TO OPEN 1 2 3 4 5 STANDBY-ON DOCKING ENTERTAINMENT SYSTEM DC156 iR CD/CD -R/CD -RW COMPATIBLE SOURC E PRESE T DOCK REPE AT DBB 6 7 8 9 0 PUSH TO OPEN DOCK FOR iPOD ! 3
User manual
Page 6
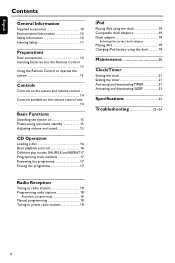
... Preparations Rear connections 12 Inserting batteries into the Remote Control 13 Using the Remote Control to operate the system 13 Controls Controls on the system and remote control 14 Controls available on the remote control only 14 Basic Functions Switching the system on 15 Power-saving automatic standby 15 Adjusting volume and sound 15 CD Operation Loading a disc 16 Basic playback controls 16 Different play modes: SHUFFLE and REPEAT17 Programming track numbers 17 Reviewing the programme 17 Erasing the programme 17 iPod Playing iPod using the dock 19 Compatible dock...
... Preparations Rear connections 12 Inserting batteries into the Remote Control 13 Using the Remote Control to operate the system 13 Controls Controls on the system and remote control 14 Controls available on the remote control only 14 Basic Functions Switching the system on 15 Power-saving automatic standby 15 Adjusting volume and sound 15 CD Operation Loading a disc 16 Basic playback controls 16 Different play modes: SHUFFLE and REPEAT17 Programming track numbers 17 Reviewing the programme 17 Erasing the programme 17 iPod Playing iPod using the dock 19 Compatible dock...
User manual
Page 8
... on the product, and installation or repair of antenna/signal source systems outside of the product. • Product repair and/or part replacement because of improper installation or maintenance, connections to improper voltage supply, power line surge, lightning damage, retained images or screen markings resulting from mishandled shipments or transit accidents when returning product to or loss of any software, even if packaged or...
... on the product, and installation or repair of antenna/signal source systems outside of the product. • Product repair and/or part replacement because of improper installation or maintenance, connections to improper voltage supply, power line surge, lightning damage, retained images or screen markings resulting from mishandled shipments or transit accidents when returning product to or loss of any software, even if packaged or...
User manual
Page 10
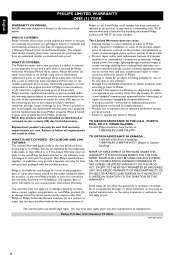
... Philips! Should this occur, the CD player would not operate normally. To disconnect the system from the power supply completely, remove the AC power plug from the support that may not cause harmful interference, and - Supplied accessories - 2 speaker boxes - 1 remote control - 4 dock adaptors Environmental Information All unnecessary packaging has been omitted.We have tried to make the packaging easy to the following two conditions: - This set...
... Philips! Should this occur, the CD player would not operate normally. To disconnect the system from the power supply completely, remove the AC power plug from the support that may not cause harmful interference, and - Supplied accessories - 2 speaker boxes - 1 remote control - 4 dock adaptors Environmental Information All unnecessary packaging has been omitted.We have tried to make the packaging easy to the following two conditions: - This set...

User manual
Page 11
... careful not to adjust the volume as your hearing adapts. ● Do not turn up the volume so high that you can't hear what sounds "normal" can also cause hearing loss. ● Be sure to sound, even at reasonable volumes for those that ...volume. ● Using headphones at a low setting. ● Slowly increase the sound until you . ● You should use caution or temporarily discontinue use in potentially hazardous situations. ● Do not use your equipment reasonably and take appropriate breaks. To establish a safe volume level: ● Set your volume control at a high volume...
... careful not to adjust the volume as your hearing adapts. ● Do not turn up the volume so high that you can't hear what sounds "normal" can also cause hearing loss. ● Be sure to sound, even at reasonable volumes for those that ...volume. ● Using headphones at a low setting. ● Slowly increase the sound until you . ● You should use caution or temporarily discontinue use in potentially hazardous situations. ● Do not use your equipment reasonably and take appropriate breaks. To establish a safe volume level: ● Set your volume control at a high volume...
User manual
Page 12
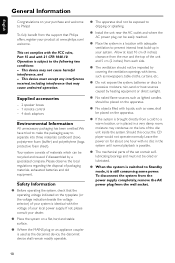
... speakers supplied. B Speakers Connection Front Speakers Connect the speaker wires to the SPEAKERS terminals, right speaker to "RIGHT" and left ) B A AC power cord Rear connections The type plate is located at the rear of the speaker wire into the terminal as shown. Before connecting the AC power cord to Standby mode automatically under extreme conditions. Do not connect speakers with the power switched on. For optimal performance, use the supplied speakers. - If this manual. 12 Preparations FM wire antenna English speaker...
... speakers supplied. B Speakers Connection Front Speakers Connect the speaker wires to the SPEAKERS terminals, right speaker to "RIGHT" and left ) B A AC power cord Rear connections The type plate is located at the rear of the speaker wire into the terminal as shown. Before connecting the AC power cord to Standby mode automatically under extreme conditions. Do not connect speakers with the power switched on. For optimal performance, use the supplied speakers. - If this manual. 12 Preparations FM wire antenna English speaker...
User manual
Page 14
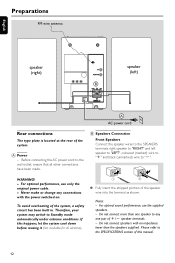
...or off timer/sets the timer function. - skips to standby or on the back panel) - enhances the bass. 09 - for iPod confirms menu selection. ( VOL +/- - OK for CD/iPod ...... for remote control. 3 SOURCE - stops CD playback or erases a CD programme. ! sets/views the clock. ^ TIMER/SLEEP - adjusts the volume level. ) MUTE - infrared sensor for Tuner programmes tuner stations manually or automatically. opens/closes the CD door. turns on the system. 4 PRESET +/- adjusts the volume level. 7 2; - for radio selects a preset radio station. 5 DOCK - for...
...or off timer/sets the timer function. - skips to standby or on the back panel) - enhances the bass. 09 - for iPod confirms menu selection. ( VOL +/- - OK for CD/iPod ...... for remote control. 3 SOURCE - stops CD playback or erases a CD programme. ! sets/views the clock. ^ TIMER/SLEEP - adjusts the volume level. ) MUTE - infrared sensor for Tuner programmes tuner stations manually or automatically. opens/closes the CD door. turns on the system. 4 PRESET +/- adjusts the volume level. 7 2; - for radio selects a preset radio station. 5 DOCK - for...
User manual
Page 15
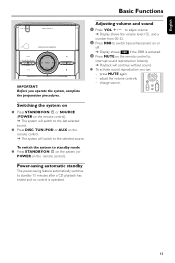
Adjusting volume and sound 1 Press VOL +/- change source. MUTE OK Switching the system on ● Press STANDBY-ON 2 or SOURCE (POWER on the remote control). ➜ The system will switch to the last selected source. ● Press DISC, TUN, iPOD or AUX on the remote control. ➜ The system will continue without sound. ● To activate sound reproduction you operate the system, complete the preparation procedures. adjust the volume controls; - English Basic Functions STANDBY-ON MICRO SYSTEM DC156 iR CD/CD -R/CD -RW COMPATIBLE SOURC E PRESE T DOCK REPE...
Adjusting volume and sound 1 Press VOL +/- change source. MUTE OK Switching the system on ● Press STANDBY-ON 2 or SOURCE (POWER on the remote control). ➜ The system will switch to the last selected source. ● Press DISC, TUN, iPOD or AUX on the remote control. ➜ The system will continue without sound. ● To activate sound reproduction you operate the system, complete the preparation procedures. adjust the volume controls; - English Basic Functions STANDBY-ON MICRO SYSTEM DC156 iR CD/CD -R/CD -RW COMPATIBLE SOURC E PRESE T DOCK REPE...
User manual
Page 16
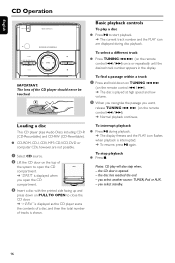
... displayed as the CD player scans the contents of a disc, and then the total number of the CD player should never be touched. Notes: CD play a disc ● Press 2; you select another source: TUNER, iPod or AUX. - the disc has reached the end. - you select standby. 16 English CD Operation STANDBY-ON MICRO SYSTEM DC156 iR CD/CD -R/CD -RW COMPATIBLE SOURC E PRESE T DOCK REPE AT DBB IMPORTANT: The lens of tracks is opened...
... displayed as the CD player scans the contents of a disc, and then the total number of the CD player should never be touched. Notes: CD play a disc ● Press 2; you select another source: TUNER, iPod or AUX. - the disc has reached the end. - you select standby. 16 English CD Operation STANDBY-ON MICRO SYSTEM DC156 iR CD/CD -R/CD -RW COMPATIBLE SOURC E PRESE T DOCK REPE AT DBB IMPORTANT: The lens of tracks is opened...

User manual
Page 17
... select Shuffle play mode, press SHUF on the remote control 4 / ¢) to select your desired track number. 2 Press PROG to store. ➜ Display: PROG flashes, and P-01 is displayed briefly, then the selected track number. 3 Repeat steps 1-2 to 20 tracks can be stored in the memory. 1 In the stop repeat/ shuffle playback. ● Press 9 again to select and store your disc programme, press 2;. Programming track numbers...
... select Shuffle play mode, press SHUF on the remote control 4 / ¢) to select your desired track number. 2 Press PROG to store. ➜ Display: PROG flashes, and P-01 is displayed briefly, then the selected track number. 3 Repeat steps 1-2 to 20 tracks can be stored in the memory. 1 In the stop repeat/ shuffle playback. ● Press 9 again to select and store your disc programme, press 2;. Programming track numbers...
User manual
Page 18
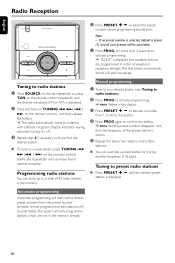
English Radio Reception STANDBY-ON MICRO SYSTEM DC156 iR CD/CD -R/CD -RW COMPATIBLE SOURC E PRESE T DOCK REPE AT DBB 1 Press PRESET +/- If no preset number is selected, default is displayed. to allocate a number from 1 to 40 to this preset number upwards, former programmed radio stations will be overridden.The system will only programme stations which are programmed in order of waveband reception strength.The first preset automatically stored will then be overridden. 2 Press PROG...
English Radio Reception STANDBY-ON MICRO SYSTEM DC156 iR CD/CD -R/CD -RW COMPATIBLE SOURC E PRESE T DOCK REPE AT DBB 1 Press PRESET +/- If no preset number is selected, default is displayed. to allocate a number from 1 to 40 to this preset number upwards, former programmed radio stations will be overridden.The system will only programme stations which are programmed in order of waveband reception strength.The first preset automatically stored will then be overridden. 2 Press PROG...

User manual
Page 19
... VOLUME ) on the set . Dock adaptor Before plugging your iPod player. - This system does not support iPod video output. You can listen to the sound of the docked player through the powerful speakers of your player in for iPod. For iPod operations and features, refer to the set, you may use MENU, 34and OK buttons on the remote control) to select iPod source. ● The connected player will auto switch to the docked player. - Notes: - In Eco power standby mode, iPod cannot be docked. ● Four adaptors are available: Play/ Pause, selecting...
... VOLUME ) on the set . Dock adaptor Before plugging your iPod player. - This system does not support iPod video output. You can listen to the sound of the docked player through the powerful speakers of your player in for iPod. For iPod operations and features, refer to the set, you may use MENU, 34and OK buttons on the remote control) to select iPod source. ● The connected player will auto switch to the docked player. - Notes: - In Eco power standby mode, iPod cannot be docked. ● Four adaptors are available: Play/ Pause, selecting...
User manual
Page 21
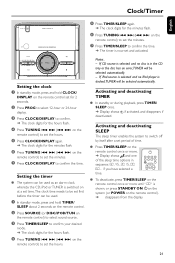
.../Timer English STANDBY-ON MICRO SYSTEM DC156 iR CD/CD -R/CD -RW COMPATIBLE SOURC E PRESE T DOCK REPE AT DBB Setting the clock 1 In standby mode, press and hold TIMER/ SLEEP about 2 seconds on the remote control. 2 Press SOURCE (or DISC/iPOD/TUN on the remote control) to select sound source. 3 Press TIMER/SLEEP to confirm your desired mode. ➜ The clock digits for the hours flash. 4 Press TUNING 4 ¢ (4 ¢ on the remote control) to set the...
.../Timer English STANDBY-ON MICRO SYSTEM DC156 iR CD/CD -R/CD -RW COMPATIBLE SOURC E PRESE T DOCK REPE AT DBB Setting the clock 1 In standby mode, press and hold TIMER/ SLEEP about 2 seconds on the remote control. 2 Press SOURCE (or DISC/iPOD/TUN on the remote control) to select sound source. 3 Press TIMER/SLEEP to confirm your desired mode. ➜ The clock digits for the hours flash. 4 Press TUNING 4 ¢ (4 ¢ on the remote control) to set the...
User manual
Page 23
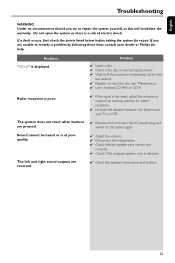
.... ✔ Replace or clean the disc, see "Maintenance". ✔ Use a finalized CD-RW or CD-R. Solution ✔ Insert a disc. ✔ Check if the disc is displayed. The left and right sound outputs are reversed. ✔ If the signal is too weak, adjust the antenna or connect an external antenna for repair. English Troubleshooting WARNING Under no circumstances should you are unable to repair the system yourself, as...
.... ✔ Replace or clean the disc, see "Maintenance". ✔ Use a finalized CD-RW or CD-R. Solution ✔ Insert a disc. ✔ Check if the disc is displayed. The left and right sound outputs are reversed. ✔ If the signal is too weak, adjust the antenna or connect an external antenna for repair. English Troubleshooting WARNING Under no circumstances should you are unable to repair the system yourself, as...
User manual
Page 24
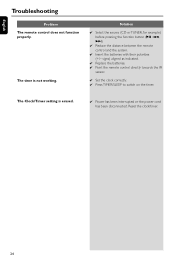
... source (CD or TUNER, for example) before pressing the function button (2;, 4, ¢). ✔ Reduce the distance between the remote control and the system. ✔ Insert the batteries with their polarities (+/- signs) aligned as indicated. ✔ Replace the batteries. ✔ Point the remote control directly towards the IR sensor. ✔ Set the clock correctly. ✔ Press TIMER/SLEEP to switch on the timer. English Troubleshooting Problem...
... source (CD or TUNER, for example) before pressing the function button (2;, 4, ¢). ✔ Reduce the distance between the remote control and the system. ✔ Insert the batteries with their polarities (+/- signs) aligned as indicated. ✔ Replace the batteries. ✔ Point the remote control directly towards the IR sensor. ✔ Set the clock correctly. ✔ Press TIMER/SLEEP to switch on the timer. English Troubleshooting Problem...
Quick start guide
Page 1
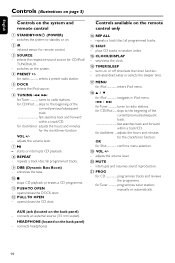
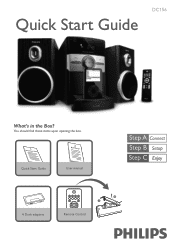
DC156 Quick Start Guide What's in the Box? You should find these items upon opening the box. 1 Quick Start Guide 2 User Manual Quick Start Guide User manual 4 Dock adapters iPOD PROG MENU MUTE OK Remote Control 3 1 2
DC156 Quick Start Guide What's in the Box? You should find these items upon opening the box. 1 Quick Start Guide 2 User Manual Quick Start Guide User manual 4 Dock adapters iPOD PROG MENU MUTE OK Remote Control 3 1 2

Quick start guide
Page 3
iPOD PROG MENU MUTE OK iPOD PROG MENU MUTE OK Enjoy Playing a disc 1 Select CD source. 2 Lift the CD door on the top of the system to open the CD compartment. 3 Insert a disc with the printed side facing up and press down on the remote control) to set the minutes. 7 Press CLOCK/DISPLAY to stop playback. Setting the clock 1 In standby mode, press and hold CLOCK/DISPLAY on the remote control set for...
iPOD PROG MENU MUTE OK iPOD PROG MENU MUTE OK Enjoy Playing a disc 1 Select CD source. 2 Lift the CD door on the top of the system to open the CD compartment. 3 Insert a disc with the printed side facing up and press down on the remote control) to set the minutes. 7 Press CLOCK/DISPLAY to stop playback. Setting the clock 1 In standby mode, press and hold CLOCK/DISPLAY on the remote control set for...

Quick start guide
Page 4
... the accompanied user manual. Enjoy Programming and tuning to radio stations 1 Select TUNER source. 2 Press PROG on the remote control for example). © 2010 Koninklijke Philips Electronics N.V. until the desired preset station is displayed Playing iPod using the dock 1 Press PUSH TO OPEN to select iPod source. ➜ The connected player will play automatically. PUSH TO OPEN DOCK FOR iPOD Tip: Detailed playback features and additional functions are described in the dock. 4 Press SOURCE repeatedly or DOCK on the set (iPOD on the remote control) to open the dock.
... the accompanied user manual. Enjoy Programming and tuning to radio stations 1 Select TUNER source. 2 Press PROG on the remote control for example). © 2010 Koninklijke Philips Electronics N.V. until the desired preset station is displayed Playing iPod using the dock 1 Press PUSH TO OPEN to select iPod source. ➜ The connected player will play automatically. PUSH TO OPEN DOCK FOR iPOD Tip: Detailed playback features and additional functions are described in the dock. 4 Press SOURCE repeatedly or DOCK on the set (iPOD on the remote control) to open the dock.


