
User manual
Page 6
...channels automatically 26 Optimize the signal quality from your antenna 26 Uninstall and reinstall channels 27 Return your settings to standby 10 Watch TV 10 Watch channels from a set-top box 11 Connection overview 29 Select your connection quality 30 Label your connections 30 Connect ...home 26 2. Change your TV installation 26 Environmental care 5 Select your menu language 26 Regulatory notices 5 Set your TV on/off or to default values 27 3. Index 38 Set the clock 17 Set the sleeptimer 17 14. Important 5 Product information 5 Use Philips EasyLink 25 Use the demo...
...channels automatically 26 Optimize the signal quality from your antenna 26 Uninstall and reinstall channels 27 Return your settings to standby 10 Watch TV 10 Watch channels from a set-top box 11 Connection overview 29 Select your connection quality 30 Label your connections 30 Connect ...home 26 2. Change your TV installation 26 Environmental care 5 Select your menu language 26 Regulatory notices 5 Set your TV on/off or to default values 27 3. Index 38 Set the clock 17 Set the sleeptimer 17 14. Important 5 Product information 5 Use Philips EasyLink 25 Use the demo...

User manual
Page 7
... rare case of a product recall or safety defect. • Additional Benefits of the TV and on the rear of Product Ownership Registering your product guarantees that Philips offers, register your old TV according to Philips! Objects filled with hard objects as vases, should not be recycled and reused. ENGLISH...to all of the privileges to which can dismantle the discarded TV to concentrate the reusable materials and to be disposed off and unplug the power cord before cleaning the screen. • Clean the screen with Philips makes you 'll receive all Local, State and Federal laws...
... rare case of a product recall or safety defect. • Additional Benefits of the TV and on the rear of Product Ownership Registering your product guarantees that Philips offers, register your old TV according to Philips! Objects filled with hard objects as vases, should not be recycled and reused. ENGLISH...to all of the privileges to which can dismantle the discarded TV to concentrate the reusable materials and to be disposed off and unplug the power cord before cleaning the screen. • Clean the screen with Philips makes you 'll receive all Local, State and Federal laws...
User manual
Page 8
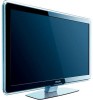
...player, or VCR. 1. Standby / ON 2. Channel selection 8. Volume For more information about the remote control, see Connect your TV. 2.1 Television overview Front and side controls VOLUME 4 3 MENU CHANNEL 2 1 POWER 5 1. Back connectors TV ANTENNA HDMI 1 R R R SERV. U L L L Pr Pr SPDIF OUT Pb Pb Y Y VIDEO L S-VIDEO... R HDMI 2 AV 1 AV 2 AV 3 DVI AUDIO IN HDMI 3 Cable Use the TV back connectors to connect to the antenna or cable, and to mobile devices such as a camera or high definition game console. ENGLISH FRANÇ...
...player, or VCR. 1. Standby / ON 2. Channel selection 8. Volume For more information about the remote control, see Connect your TV. 2.1 Television overview Front and side controls VOLUME 4 3 MENU CHANNEL 2 1 POWER 5 1. Back connectors TV ANTENNA HDMI 1 R R R SERV. U L L L Pr Pr SPDIF OUT Pb Pb Y Y VIDEO L S-VIDEO... R HDMI 2 AV 1 AV 2 AV 3 DVI AUDIO IN HDMI 3 Cable Use the TV back connectors to connect to the antenna or cable, and to mobile devices such as a camera or high definition game console. ENGLISH FRANÇ...

User manual
Page 9
...; ANT • A/V (Composite Video and Audio) • S-Video EN-7 ESPAÑOL 3.2 Install the remote control batteries Connect to a cable When your TV is connected to the cable socket, you are broadcast in your local DBS provider for more information. For example, 11.1, 46.30, 108.201. The... cord or plug to a set -top box to decode signals and send them to a Direct Broadcast Satellite (DBS) There are required to the TV through an antenna connection. Make sure the + and - Two people are two main DBS systems: DirecTV and DishNetwork. Broadcasters are heavy. Open the...
...; ANT • A/V (Composite Video and Audio) • S-Video EN-7 ESPAÑOL 3.2 Install the remote control batteries Connect to a cable When your TV is connected to the cable socket, you are broadcast in your local DBS provider for more information. For example, 11.1, 46.30, 108.201. The... cord or plug to a set -top box to decode signals and send them to a Direct Broadcast Satellite (DBS) There are required to the TV through an antenna connection. Make sure the + and - Two people are two main DBS systems: DirecTV and DishNetwork. Broadcasters are heavy. Open the...

User manual
Page 10
.... This holder helps keep your power cord, antenna cable and all other device cables through component video input or HDMI HDMI 1 R R R SERV. TV ANTENNA HDMI 1 R R R SERV. do not pull on the power cord. 3.5 Manage cables Route your cables tidy and easily manageable. Locate the ...power connector at both ends. Insert the power cord fully into the TV power connector. 3. EN-8 ENGLISH FRANÇAISE ESPAÑOL • YPbPr (Component Video Input) • HDMI For information about how...
.... This holder helps keep your power cord, antenna cable and all other device cables through component video input or HDMI HDMI 1 R R R SERV. TV ANTENNA HDMI 1 R R R SERV. do not pull on the power cord. 3.5 Manage cables Route your cables tidy and easily manageable. Locate the ...power connector at both ends. Insert the power cord fully into the TV power connector. 3. EN-8 ENGLISH FRANÇAISE ESPAÑOL • YPbPr (Component Video Input) • HDMI For information about how...

User manual
Page 11
Please proceed with the following steps to set -top box, you are erased each time you for your purchase of this PHILIPS TV. For the BESTpossible picture performance, contact your local Cable / Satellite signal provider for retail store displays. • If you choose Home you... do not need to install channels. DDNote: If you connect your TV to a cable box or satellite set -up your area. Installation takes approximately 10 minutes. Next Press the GREEN Next button located on -screen instructions...
Please proceed with the following steps to set -top box, you are erased each time you for your purchase of this PHILIPS TV. For the BESTpossible picture performance, contact your local Cable / Satellite signal provider for retail store displays. • If you choose Home you... do not need to install channels. DDNote: If you connect your TV to a cable box or satellite set -up your area. Installation takes approximately 10 minutes. Next Press the GREEN Next button located on -screen instructions...

User manual
Page 12
... sound. EN-10 For digital channels, press a number (1 to 999) followed by pressing VOLUME - Press PREV CH to return to switch the TV on your remote control. 2. POWER To switch to restore the sound. on from standby without the remote control • Press . Press VOL+ ...consumption. on • Press . DDNote Energy consumption contributes to standby To switch the TV on your remote control. Use your TV This section helps you perform basic TV operations. 4.1 Switch your remote control to switch the TV off • Press . DDNote You can also adjust the volume by a dot...
... sound. EN-10 For digital channels, press a number (1 to 999) followed by pressing VOLUME - Press PREV CH to return to switch the TV on your remote control. 2. POWER To switch to restore the sound. on from standby without the remote control • Press . Press VOL+ ...consumption. on • Press . DDNote Energy consumption contributes to standby To switch the TV on your remote control. Use your TV This section helps you perform basic TV operations. 4.1 Switch your remote control to switch the TV off • Press . DDNote You can also adjust the volume by a dot...

User manual
Page 13
... appear 1. 4.3 Watch channels from your screen. 2. The picture from your set-top box might appear automatically on your connected device might appear automatically on the TV. EN-11 ESPAÑOL FRANÇAISE ENGLISH The picture from the player might appear automatically on your set -top box. The picture from...
... appear 1. 4.3 Watch channels from your screen. 2. The picture from your set-top box might appear automatically on your connected device might appear automatically on the TV. EN-11 ESPAÑOL FRANÇAISE ENGLISH The picture from the player might appear automatically on your set -top box. The picture from...
User manual
Page 14
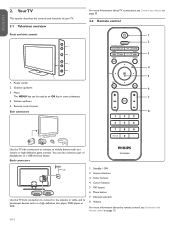
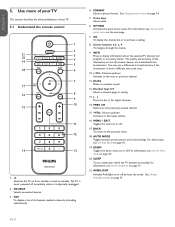
... PREV CH Returns to activate a setting. 8. For information, see Use the quick access menu on the next page. 7. EN-12 Switches the TV on the information banner are transmitted from standby or back to the previous menu. 18. Color keys Selects tasks. 6. The quality and accuracy of the... or setting. 13. ( . ) Press the dot (.) for digital channels. 14. AUTO MODE Toggles between preset picture and sound settings. FAV To display a list of your TV. 5.1 Understand the remote control 1 2 21 AMBILIGHT 3 20 ON/OFF MODE 4 19 5 18 6 7 17 16 8 9 10 15 11 12 14 13 1. . BACK ...
... PREV CH Returns to activate a setting. 8. For information, see Use the quick access menu on the next page. 7. EN-12 Switches the TV on the information banner are transmitted from standby or back to the previous menu. 18. Color keys Selects tasks. 6. The quality and accuracy of the... or setting. 13. ( . ) Press the dot (.) for digital channels. 14. AUTO MODE Toggles between preset picture and sound settings. FAV To display a list of your TV. 5.1 Understand the remote control 1 2 21 AMBILIGHT 3 20 ON/OFF MODE 4 19 5 18 6 7 17 16 8 9 10 15 11 12 14 13 1. . BACK ...

User manual
Page 15
... press Í or OK to select the Picture menu. Press MENU on the remote control. Press Æ to exit. TV menu TV settings Features Installation TV settings Settings assistant Picture Sound Ambilight 3. EN-13 Press Menu to enter the Settings assistant menu. You are broadcast. •... you through a choice of the picture settings, and press Æ to make your selections and store your picture settings. 1. TV menu Installation TV settings Settings assistant Picture Sound Ambilight Settings assistant Start now 2. Press Î or ï and then OK to access one ...
... press Í or OK to select the Picture menu. Press MENU on the remote control. Press Æ to exit. TV menu TV settings Features Installation TV settings Settings assistant Picture Sound Ambilight 3. EN-13 Press Menu to enter the Settings assistant menu. You are broadcast. •... you through a choice of the picture settings, and press Æ to make your selections and store your picture settings. 1. TV menu Installation TV settings Settings assistant Picture Sound Ambilight Settings assistant Start now 2. Press Î or ï and then OK to access one ...

User manual
Page 16
...:9 (Not for HD and PC mode.) Removes the black bars on the side of 4:3 broadcasts. Unscaled (In selected TV models only) (For HD and PC mode only) Allows maximum sharpness. In selected TV models only. You can be configured. Change picture format 1. Depending on the format of the picture source, some picture...
...:9 (Not for HD and PC mode.) Removes the black bars on the side of 4:3 broadcasts. Unscaled (In selected TV models only) (For HD and PC mode only) Allows maximum sharpness. In selected TV models only. You can be configured. Change picture format 1. Depending on the format of the picture source, some picture...

User manual
Page 17
...to another. Select Saturation first and set the value high. Then select Palette and choose a value from external input. TV menu TV Settings Settings assistant Picture Sound Ambilight Sound Equalizer Balance Digital audio language Alternate audio Mono/Stereo Incredible sound AVL BBE 2. Lists... audio language Available for digital channels only, when multiple languages are broadcast. Press AMBILIGHT ON/OFF on the remote control and select TV settings > Ambilight. AMBILIGHT ON/OFF MODE AMBILIGHT ON/OFF MODE Configure Ambilight 1. Select on or off . • Automatic volume...
...to another. Select Saturation first and set the value high. Then select Palette and choose a value from external input. TV menu TV Settings Settings assistant Picture Sound Ambilight Sound Equalizer Balance Digital audio language Alternate audio Mono/Stereo Incredible sound AVL BBE 2. Lists... audio language Available for digital channels only, when multiple languages are broadcast. Press AMBILIGHT ON/OFF on the remote control and select TV settings > Ambilight. AMBILIGHT ON/OFF MODE AMBILIGHT ON/OFF MODE Configure Ambilight 1. Select on or off . • Automatic volume...

User manual
Page 18
...and press OK to highlight a channel. 3. Press the green key to display the last list that channel. Press Auto Mode to set your TV to a predefined picture and sound setting. 5.6 Create and use lists of favorite channels This section describes how to display your lists of your ... to that you defined by using the Picture menu. • Sports Vivid picture settings and clear sound for high action. • Standard For normal TV viewing. • Movie Brilliant picture settings for a cinematic experience. • Game Optimized for PCs, games consoles and playstations. • Power saver...
...and press OK to highlight a channel. 3. Press the green key to display the last list that channel. Press Auto Mode to set your TV to a predefined picture and sound setting. 5.6 Create and use lists of favorite channels This section describes how to display your lists of your ... to that you defined by using the Picture menu. • Sports Vivid picture settings and clear sound for high action. • Standard For normal TV viewing. • Movie Brilliant picture settings for a cinematic experience. • Game Optimized for PCs, games consoles and playstations. • Power saver...

User manual
Page 19
...Select Automatic, and press Í to confirm your choice. 5. Press MENU to exit. 5.8 Set the sleeptimer This section describes how to program the TV to standby in 90 minutes. 3. Press MENU on the remote control and select Installation > Clock > Auto clock mode. 2. For example, when you ...239; and Æ to confirm your choice. Press OK to enter the menu for morning or afternoon. 4. Press OK to confirm your choice. 8. TV menu Features Caption settings Sleeptimer Child lock Change PIN Demo Sleeptimer 90 min 2. Press Î or ï to set the time, date, time zone...
...Select Automatic, and press Í to confirm your choice. 5. Press MENU to exit. 5.8 Set the sleeptimer This section describes how to program the TV to standby in 90 minutes. 3. Press MENU on the remote control and select Installation > Clock > Auto clock mode. 2. For example, when you ...239; and Æ to confirm your choice. Press OK to enter the menu for morning or afternoon. 4. Press OK to confirm your choice. 8. TV menu Features Caption settings Sleeptimer Child lock Change PIN Demo Sleeptimer 90 min 2. Press Î or ï to set the time, date, time zone...

User manual
Page 20
...Canada French ratings lock Region ratings lock Channel lock Channel 1 Channel 2 Channel 3 Channel 4 Channel 5 Channel 6 Channel 7 Sport News Movies Lock the TV This section describes how to indicate whether it is locked: • A box with X indicates that the channel is locked • An empty box... indicates that the clock is not locked 4. Select AM/PM for morning or afternoon. 8. Enter your TV to confirm. Selecting Off deactivates the feature. 6. Lock a channel This section describes how to select Timer. 3. Use the format HH:MM....
...Canada French ratings lock Region ratings lock Channel lock Channel 1 Channel 2 Channel 3 Channel 4 Channel 5 Channel 6 Channel 7 Sport News Movies Lock the TV This section describes how to indicate whether it is locked: • A box with X indicates that the channel is locked • An empty box... indicates that the clock is not locked 4. Select AM/PM for morning or afternoon. 8. Enter your TV to confirm. Selecting Off deactivates the feature. 6. Lock a channel This section describes how to select Timer. 3. Use the format HH:MM....

User manual
Page 21
...remote control and select Features > Child lock > TV ratings lock. 2. TV menu Features Child Lock TV ratings lock All None TV-Y TV-Y7 TV-G TV-PG TV14 TV-MA TV-14 (D)Dialog (L)Language (S)Sex (V)Violence Summary of TV ratings Age rating Content rating All None None None TV-Y None Appropriate for children under the age of...may find unsuitable for children aged 2-6. Press MENU to lock or unlock one or more ratings. For example, for rating TV-14, you cannot use the TV ratings lock.Your set -top box or cable box connected by HDMI, you can deselect one or more of age. ...
...remote control and select Features > Child lock > TV ratings lock. 2. TV menu Features Child Lock TV ratings lock All None TV-Y TV-Y7 TV-G TV-PG TV14 TV-MA TV-14 (D)Dialog (L)Language (S)Sex (V)Violence Summary of TV ratings Age rating Content rating All None None None TV-Y None Appropriate for children under the age of...may find unsuitable for children aged 2-6. Press MENU to lock or unlock one or more ratings. For example, for rating TV-14, you cannot use the TV ratings lock.Your set -top box or cable box connected by HDMI, you can deselect one or more of age. ...

User manual
Page 22
... contain offensive sex or bad language and may be recommended if under age 13. Low intensity violence and fantasy horror allowed. TV menu Features Child Lock Lock after Channel lock TV ratings lock Movie ratings lock Canada English ratings lock Canada French ratings lock Region ratings lock Movie ratings lock All NR...
... contain offensive sex or bad language and may be recommended if under age 13. Low intensity violence and fantasy horror allowed. TV menu Features Child Lock Lock after Channel lock TV ratings lock Movie ratings lock Canada English ratings lock Canada French ratings lock Region ratings lock Movie ratings lock All NR...

User manual
Page 23
... > Caption service. • Press Î or ï to confirm your choice. EN-21 Press MENU on the next page. 1. TV menu Installation Preferences Location Show emergency alerts Downloaded rating table Downloaded rating table O On 2. Press Î or ï and then press OK... rating has a box-graphic in Display captions on the remote control and select Features > Caption settings > Closed captions. 2. Not all TV programs and product commercials include closed captions (subtitles) The caption service displays transmitted CC-,T-, and CS- Turn captions on as 'CC'. ENGLISH...
... > Caption service. • Press Î or ï to confirm your choice. EN-21 Press MENU on the next page. 1. TV menu Installation Preferences Location Show emergency alerts Downloaded rating table Downloaded rating table O On 2. Press Î or ï and then press OK... rating has a box-graphic in Display captions on the remote control and select Features > Caption settings > Closed captions. 2. Not all TV programs and product commercials include closed captions (subtitles) The caption service displays transmitted CC-,T-, and CS- Turn captions on as 'CC'. ENGLISH...

User manual
Page 24
... • Progressive JPEG files • Files with names exceeding 128 characters • Files with names containing a dot character DDNote • Philips can define the size, font, color, background and other service subchannels are translations of caption services • CC-1, CC-2, CC-3, and ...CS-1, CS-2, CS-3, CS-4, CS-5 and CS-6 Service 1 is designated as the Secondary Language Service. Insert a USB device 1. TV menu TV settings Features Installation Multimedia Multimedia MyUSB Remove a USB device BBCaution To avoid damaging the USB device always exit the on-screen menu and wait...
... • Progressive JPEG files • Files with names exceeding 128 characters • Files with names containing a dot character DDNote • Philips can define the size, font, color, background and other service subchannels are translations of caption services • CC-1, CC-2, CC-3, and ...CS-1, CS-2, CS-3, CS-4, CS-5 and CS-6 Service 1 is designated as the Secondary Language Service. Insert a USB device 1. TV menu TV settings Features Installation Multimedia Multimedia MyUSB Remove a USB device BBCaution To avoid damaging the USB device always exit the on-screen menu and wait...

User manual
Page 25
... appear in View your pictures on this page. EN-23 After connecting your USB storage device to the TV, press Æ to enter the Multimedia menu. After connecting your USB device to the TV, press Æ to enter the Multimedia menu. 2. Devicelabel1 Music Music Track1.MP3 Track2.MP3 Track3.MP3 Track1.MP3...
... appear in View your pictures on this page. EN-23 After connecting your USB storage device to the TV, press Æ to enter the Multimedia menu. After connecting your USB device to the TV, press Æ to enter the Multimedia menu. 2. Devicelabel1 Music Music Track1.MP3 Track2.MP3 Track3.MP3 Track1.MP3...


