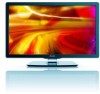
User manual
Page 2
...;ix operations 15 Enjoying internet radio with vTuner 16 VUDU operations 18 Using Twitter 20 Changing picture and sound settings 22 Create and use lists of favorite channels 24 Setting the clock 25 Closed caption 25 Sleeptimer 26 Child and rating locks 26 Use the demo mode 29 Use Philips EasyLink 29 EasyLink 29 Set your location to home 30 Network 30 DivX® Video on demand 32 View photos and play music, and watch videos on a USB...
...;ix operations 15 Enjoying internet radio with vTuner 16 VUDU operations 18 Using Twitter 20 Changing picture and sound settings 22 Create and use lists of favorite channels 24 Setting the clock 25 Closed caption 25 Sleeptimer 26 Child and rating locks 26 Use the demo mode 29 Use Philips EasyLink 29 EasyLink 29 Set your location to home 30 Network 30 DivX® Video on demand 32 View photos and play music, and watch videos on a USB...
User manual
Page 4
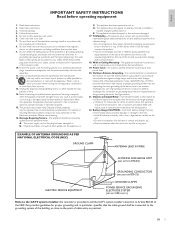
... an electrician for replacement of the set and cause product damage and/or personal injury. 18. Tilt/Stability - The appliance should be mounted to the receiver, be located away from the ...Install all servicing to avoid injury from the apparatus. 11. or C. See Figure below. 21. alignment as power-supply cord or plug is not used , use attachments/accessories specified by applying excessive pull force to grounding electrodes and requirements for a long time. Read these instructions. 3. The appliance has been exposed to operate normally or exhibits a marked change...
... an electrician for replacement of the set and cause product damage and/or personal injury. 18. Tilt/Stability - The appliance should be mounted to the receiver, be located away from the ...Install all servicing to avoid injury from the apparatus. 11. or C. See Figure below. 21. alignment as power-supply cord or plug is not used , use attachments/accessories specified by applying excessive pull force to grounding electrodes and requirements for a long time. Read these instructions. 3. The appliance has been exposed to operate normally or exhibits a marked change...
User manual
Page 5
... the best possible picture using the factory installed home mode settings. ENERGY STAR® is not a malfunction. All rights reserved. Declaration of the U.S. SRS TruSurround HD™ creates an immersive, feature-rich surround sound experience from that are used in the USA market, only channel 1~11 can be avoided. 1 Notice 2010 © Koninklijke Philips Electronics N.V. Pixel characteristics This LCD product has a high number...
... the best possible picture using the factory installed home mode settings. ENERGY STAR® is not a malfunction. All rights reserved. Declaration of the U.S. SRS TruSurround HD™ creates an immersive, feature-rich surround sound experience from that are used in the USA market, only channel 1~11 can be avoided. 1 Notice 2010 © Koninklijke Philips Electronics N.V. Pixel characteristics This LCD product has a high number...

User manual
Page 8
...;Í Æ (navigation buttons) Navigates through preset picture and sound settings. (See 'Using auto mode' on page 24.) s OPTIONS Displays a list of the information depends on page 23.) m VOL + / − Increases or decreases volume. j EasyLink buttons E (backward) Searches backward. k CH + / − Switches to the previously viewed channel. The quality and accuracy of menu items applicable to standby. CH Returns to the next or previous channel. d Color buttons (red / green / yellow / blue...
...;Í Æ (navigation buttons) Navigates through preset picture and sound settings. (See 'Using auto mode' on page 24.) s OPTIONS Displays a list of the information depends on page 23.) m VOL + / − Increases or decreases volume. j EasyLink buttons E (backward) Searches backward. k CH + / − Switches to the previously viewed channel. The quality and accuracy of menu items applicable to standby. CH Returns to the next or previous channel. d Color buttons (red / green / yellow / blue...

User manual
Page 10
... what HDTV programs are transitioning from analog to a cable box or satellite set-top box via a coaxial connection, set the TV to channel 3 or 4, or to the TV.The set-top box contains a digital TV tuner for free through the following connections : • ANT • A/V (Composite Video and Audio) • YPbPr (Component Video Input) • HDMI For information about the connections and the TV channels. Contact your local content provider or your cable provider). The channel number...
... what HDTV programs are transitioning from analog to a cable box or satellite set-top box via a coaxial connection, set the TV to channel 3 or 4, or to the TV.The set-top box contains a digital TV tuner for free through the following connections : • ANT • A/V (Composite Video and Audio) • YPbPr (Component Video Input) • HDMI For information about the connections and the TV channels. Contact your local content provider or your cable provider). The channel number...
User manual
Page 15
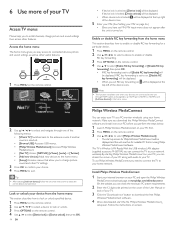
... download the Philips Wireless MediaConnect software and install it on the remote control. With the USB wireless LAN adapter (supplied accessory: PH2010A) you easy access to your home network. Lock or unlock your device from the home menu This section describes how to enable or disable RC key forwarding for available PC that allow you need to connect the TV to connected devices, picture and sound settings as well as a PC monitor wirelessly using your home network...
... download the Philips Wireless MediaConnect software and install it on the remote control. With the USB wireless LAN adapter (supplied accessory: PH2010A) you easy access to your home network. Lock or unlock your device from the home menu This section describes how to enable or disable RC key forwarding for available PC that allow you need to connect the TV to connected devices, picture and sound settings as well as a PC monitor wirelessly using your home network...
User manual
Page 23
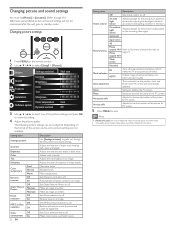
... to select one of the picture for the best picture quality by digital filter. Changing picture settings 1 Press MENU on the format of dark areas. Picture Sound Features Installation Software update Settings assistant Contrast Brightness Color Tint Sharpness Color temperature Dynamic contrast Start now Cool Off 3 Use to enter the setting. 4 Adjust the picture quality. Sets MPEG artifact reduction to select [Setup] > [Picture]. Enables image enhancement features to standby mode. Note • [Mode selection] will not be...
... to select one of the picture for the best picture quality by digital filter. Changing picture settings 1 Press MENU on the format of dark areas. Picture Sound Features Installation Software update Settings assistant Contrast Brightness Color Tint Sharpness Color temperature Dynamic contrast Start now Cool Off 3 Use to enter the setting. 4 Adjust the picture quality. Sets MPEG artifact reduction to select [Setup] > [Picture]. Enables image enhancement features to standby mode. Note • [Mode selection] will not be...

User manual
Page 25
...; [Internet Video] : Optimized for low bitrate internet video. • [Power Saver] : Eco TV settings for analog channels only when a main and second audio program (SAP) is : volume level as per your personal preferences. Available for digital channels only, when multiple languages are broadcast. The sound will be activated in volume, for surround sound. You can be output from the unit's speakers. Create and use to select [Setup] > [Sound]. Supported screen resolutions The following sound settings can control audio output...
...; [Internet Video] : Optimized for low bitrate internet video. • [Power Saver] : Eco TV settings for analog channels only when a main and second audio program (SAP) is : volume level as per your personal preferences. Available for digital channels only, when multiple languages are broadcast. The sound will be activated in volume, for surround sound. You can be output from the unit's speakers. Create and use to select [Setup] > [Sound]. Supported screen resolutions The following sound settings can control audio output...

User manual
Page 26
Use the format HH:MM. Choose [CS-1] under normal circumstances. 2 Press MENU to access television programming. EN 25 English Create or edit a list of favorite channels 1 Press FAV on the remote control to display your choice. 3 Use Î / ï to select [Time] and then press OK to set the time. Tip • Press CH + / - Closed caption Closed captioning is added to or removed from . 1 Press MENU on the remote control and then use to select...
Use the format HH:MM. Choose [CS-1] under normal circumstances. 2 Press MENU to access television programming. EN 25 English Create or edit a list of favorite channels 1 Press FAV on the remote control to display your choice. 3 Use Î / ï to select [Time] and then press OK to set the time. Tip • Press CH + / - Closed caption Closed captioning is added to or removed from . 1 Press MENU on the remote control and then use to select...

User manual
Page 27
... on the Number buttons of Í will increase the time by a TV channel during the countdown. 1 Press SLEEP to set with the current time. (See 'Setting the clock' on page 25.) 2 Press MENU on the remote control and then use them only and T-4; Select [Off] to deactivate the feature. 7 Press OK to programs : Paint-on mode : Displays input characters on the TV screen immediately. The captioning or text...
... on the Number buttons of Í will increase the time by a TV channel during the countdown. 1 Press SLEEP to set with the current time. (See 'Setting the clock' on page 25.) 2 Press MENU on the remote control and then use them only and T-4; Select [Off] to deactivate the feature. 7 Press OK to programs : Paint-on mode : Displays input characters on the TV screen immediately. The captioning or text...

User manual
Page 28
.... Caption settings Sleeptimer Child lock Change PIN Demo Lock after P All Channel Lock TV ratings lock P None P TV-Y Movie ratings lock P TV-Y7 Canada English rati... TV-Y7: Programs designed for children under 14 years of [Language] age.These programs include one or more [Sex] of it to indicate whether it is muted. 1 Press MENU on the remote control and then use to select [Setup] > [Features] > [Child lock...
.... Caption settings Sleeptimer Child lock Change PIN Demo Lock after P All Channel Lock TV ratings lock P None P TV-Y Movie ratings lock P TV-Y7 Canada English rati... TV-Y7: Programs designed for children under 14 years of [Language] age.These programs include one or more [Sex] of it to indicate whether it is muted. 1 Press MENU on the remote control and then use to select [Setup] > [Features] > [Child lock...

User manual
Page 30
... ►(play and one -touch audio, you turn on -screen instructions to enjoy the demo. 4 Press MENU to exit. Off Disable all HDMI CEC devices. • The EasyLink-compliant device must be switched on and selected as the source. [Master EasyLink] must be connected via a HDMI cable. 1 Press MENU on your DVD remote control, your TV to devices that support standby, you set to [Off]. One-touch play audio from the connected device. The...
... ►(play and one -touch audio, you turn on -screen instructions to enjoy the demo. 4 Press MENU to exit. Off Disable all HDMI CEC devices. • The EasyLink-compliant device must be switched on and selected as the source. [Master EasyLink] must be connected via a HDMI cable. 1 Press MENU on your DVD remote control, your TV to devices that support standby, you set to [Off]. One-touch play audio from the connected device. The...
User manual
Page 31
... to select [Setup] > [Installation] > [Network] > [Connection test]. manually. 1 Press MENU on the remote control and then use Netflix, vTuner internet radio, VUDU,Twitter or network update function. Wireless network This menu is displayed only when you full flexibility to change predefined settings for wireless networks automatically and select the wireless network name (SSID) from the list. 1 Press MENU on the remote control and then use to the Wireless LAN Access Point (AP) (e.g. Use Î / ï...
... to select [Setup] > [Installation] > [Network] > [Connection test]. manually. 1 Press MENU on the remote control and then use Netflix, vTuner internet radio, VUDU,Twitter or network update function. Wireless network This menu is displayed only when you full flexibility to change predefined settings for wireless networks automatically and select the wireless network name (SSID) from the list. 1 Press MENU on the remote control and then use to the Wireless LAN Access Point (AP) (e.g. Use Î / ï...
User manual
Page 32
...; Wireless LAN Access Point (AP) (e.g. Wireless network status This menu displays only when you need to change the setting to [Auto]. • When you enter a wrong number, press Color buttons (red) to cancel. (the number will be back to [0].) • If you enter a number larger than 65535, it will appear. A mask which recognizes the devices connecting to the network. Uses the proxy server. You can set either [Auto] or [Manual] for the port number...
...; Wireless LAN Access Point (AP) (e.g. Wireless network status This menu displays only when you need to change the setting to [Auto]. • When you enter a wrong number, press Color buttons (red) to cancel. (the number will be back to [0].) • If you enter a number larger than 65535, it will appear. A mask which recognizes the devices connecting to the network. Uses the proxy server. You can set either [Auto] or [Manual] for the port number...

User manual
Page 36
... lowest memorized channel will be displayed. 3 Follow the on-screen instructions to complete the installation. Installation mode 1 Press MENU on the remote control and then use to select [Setup] > [Installation] > [Reset AV settings] > [Start now]. 2 Press OK to reset the picture and sound settings. 3 Press MENU to exit. System searching. If you run [Autoprogram] when you have forgotten your settings to default values When you return picture and sound settings to their default values the channel installation settings are...
... lowest memorized channel will be displayed. 3 Follow the on-screen instructions to complete the installation. Installation mode 1 Press MENU on the remote control and then use to select [Setup] > [Installation] > [Reset AV settings] > [Start now]. 2 Press OK to reset the picture and sound settings. 3 Press MENU to exit. System searching. If you run [Autoprogram] when you have forgotten your settings to default values When you return picture and sound settings to their default values the channel installation settings are...
User manual
Page 37
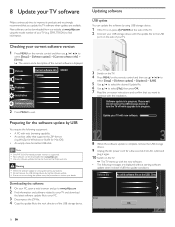
... seconds from www.philips.com • Use only software updates that you update the TV software when updates are displayed without starting software update when it again. 10 Switch on -screen instructions and confirm that can be found on , press . Software update is running, don't press any buttons. • Do not remove the USB storage device during the software update. • If an error occurs during the update, retry the...
... seconds from www.philips.com • Use only software updates that you update the TV software when updates are displayed without starting software update when it again. 10 Switch on -screen instructions and confirm that can be found on , press . Software update is running, don't press any buttons. • Do not remove the USB storage device during the software update. • If an error occurs during the update, retry the...

User manual
Page 42
... adapter in the standby mode or turned off. • Use a Wireless LAN Access Point (AP) (e.g. Use a mono to stereo adapter (not supplied) for sound reproduction via a composite connector and analog audio IN AUDIO L/R + VIDEO OUT Set-top box RF IN Cable Note • Only the left loudspeaker reproduces sound for certain channels, shows or segments during the broadcast. Please insert the USB wireless LAN adapter when the unit is turned on the TV. OUT DIGITAL AUDIO...
... adapter in the standby mode or turned off. • Use a Wireless LAN Access Point (AP) (e.g. Use a mono to stereo adapter (not supplied) for sound reproduction via a composite connector and analog audio IN AUDIO L/R + VIDEO OUT Set-top box RF IN Cable Note • Only the left loudspeaker reproduces sound for certain channels, shows or segments during the broadcast. Please insert the USB wireless LAN adapter when the unit is turned on the TV. OUT DIGITAL AUDIO...
User manual
Page 44
... the color code. Press SOURCE on the remote control to access network features such as Netflix, VUDU or vTuner. Press FORMAT on the remote control, and select the HDMI 1 source. For some accessory devices, the picture format must be established after [Philips Wireless MediaConnect] is not available on page 40.) If you use the wireless connection. Ensure all the connections are connected to your TV model and serial number before trying to select the best picture format...
... the color code. Press SOURCE on the remote control to access network features such as Netflix, VUDU or vTuner. Press FORMAT on the remote control, and select the HDMI 1 source. For some accessory devices, the picture format must be established after [Philips Wireless MediaConnect] is not available on page 40.) If you use the wireless connection. Ensure all the connections are connected to your TV model and serial number before trying to select the best picture format...
User manual
Page 47
... 11, 30 11 11, 30 29 8 N Netflix Network P PC Philips Wireless MediaConnect Picture format Picture settings R Ratings Remote control insert batteries overview Retail store mode RC key forwarding S Settings assistant Signal quality Sleeptimer Software update version Speakers EasyLink Specifications Standby T Troubleshooting TV as PC monitor connections controls menu position remote control screen care software switch channels switch on TV Speakers Twitter U USB V Volume adjust auto volume leveling mute vTuner VUDU W Warranty Wireless LAN Y YPbPr 15 30 22 14 23 22 26, 27...
... 11, 30 11 11, 30 29 8 N Netflix Network P PC Philips Wireless MediaConnect Picture format Picture settings R Ratings Remote control insert batteries overview Retail store mode RC key forwarding S Settings assistant Signal quality Sleeptimer Software update version Speakers EasyLink Specifications Standby T Troubleshooting TV as PC monitor connections controls menu position remote control screen care software switch channels switch on TV Speakers Twitter U USB V Volume adjust auto volume leveling mute vTuner VUDU W Warranty Wireless LAN Y YPbPr 15 30 22 14 23 22 26, 27...
Leaflet
Page 3
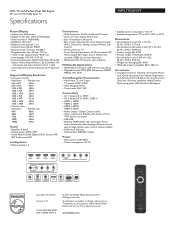
...; VESA wall mount compatible: 400 x 400 mm Accessories • Included accessories: Tabletop swivel stand, Power cord, Quick start guide, User Manual, Registration card, Remote Control, Batteries for remote control, Cable ties, Warranty certificate, MediaConnect Quick setup guide, USB Wireless LAN adapter • Connectivity • AV 1: Audio L/R in, YPbPr • AV 2: Audio L/R in, YPbPr, CVBS in , PC-In VGA, Service connector • USB: USB • EasyLink (HDMI-CEC): One touch play, Power status, System info (menu language), Remote control pass-through, System audio control, System...
...; VESA wall mount compatible: 400 x 400 mm Accessories • Included accessories: Tabletop swivel stand, Power cord, Quick start guide, User Manual, Registration card, Remote Control, Batteries for remote control, Cable ties, Warranty certificate, MediaConnect Quick setup guide, USB Wireless LAN adapter • Connectivity • AV 1: Audio L/R in, YPbPr • AV 2: Audio L/R in, YPbPr, CVBS in , PC-In VGA, Service connector • USB: USB • EasyLink (HDMI-CEC): One touch play, Power status, System info (menu language), Remote control pass-through, System audio control, System...


