User manual
Page 4
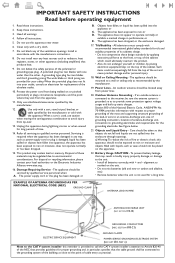
... be sure the antenna system is damaged, liquid has been spilled or objects have fallen, or liquid has been spilled into your local authorities or the Electronic Industries Alliance: www.eiae.org. 16. The power supply cord or the plug has been damaged; or B. Use only with a cart, stand, tripod, bracket, or table specified by qualified service personnel when: A. Follow...
... be sure the antenna system is damaged, liquid has been spilled or objects have fallen, or liquid has been spilled into your local authorities or the Electronic Industries Alliance: www.eiae.org. 16. The power supply cord or the plug has been damaged; or B. Use only with a cart, stand, tripod, bracket, or table specified by qualified service personnel when: A. Follow...
User manual
Page 5
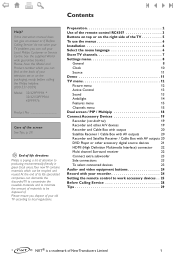
... of the TV 5 To use the menus 6 Installation 6 Select the menu language 6 Store TV channels 7 Settings menu 8 General 8 Clock 10 Source 11 Demo 11 TV menu 12 Picture menu 12 Active Control 13 Sound 13 Ambilight 14 Features menu 15 Channels menu 15 Dual screen / PIP / Multipip 18 Connect Accessory Devices 19 Recorder (vcr-dvd+rw) 19 Recorder and other accessory digital source devices 21 HDMI (High Definition Multimedia Interface) connector 22 Multi channel Surround receiver 22 Connect extra...
... of the TV 5 To use the menus 6 Installation 6 Select the menu language 6 Store TV channels 7 Settings menu 8 General 8 Clock 10 Source 11 Demo 11 TV menu 12 Picture menu 12 Active Control 13 Sound 13 Ambilight 14 Features menu 15 Channels menu 15 Dual screen / PIP / Multipip 18 Connect Accessory Devices 19 Recorder (vcr-dvd+rw) 19 Recorder and other accessory digital source devices 21 HDMI (High Definition Multimedia Interface) connector 22 Multi channel Surround receiver 22 Connect extra...

User manual
Page 6
... best picture quality use only the supplied aerial cables between the TV and recorder, and between recorder and aerial connector. ( Insert the power plug supplied into the aerial socket x at the bottom of the TV. A blue LED and the screen light on the remote control. Avoid heat, direct sunlight and exposure to the type of your set for the correct operation voltage. Preparation Do not insert the power plug in a wall...
... best picture quality use only the supplied aerial cables between the TV and recorder, and between recorder and aerial connector. ( Insert the power plug supplied into the aerial socket x at the bottom of the TV. A blue LED and the screen light on the remote control. Avoid heat, direct sunlight and exposure to the type of your set for the correct operation voltage. Preparation Do not insert the power plug in a wall...
User manual
Page 7
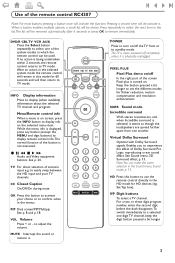
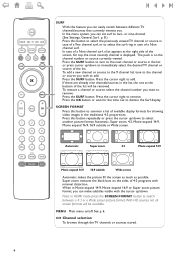
... TV mode. The list will be shown. While the menu info is displayed, press any button (except the MENU and digit buttons) to display remote control info.The normal function of Dolby Surround Pro Logic, reproducing a rear sound effect. CC Closed Caption On/Off/On during mute OK Press this button to activate your TV channels. PIP Dual screen/PIP/Multipip See p. 8 and p. 18. ACTIVE SAP CONTROL CLOCK ON/OFF Ambilight MODE POWER Press to turn...
... TV mode. The list will be shown. While the menu info is displayed, press any button (except the MENU and digit buttons) to display remote control info.The normal function of Dolby Surround Pro Logic, reproducing a rear sound effect. CC Closed Caption On/Off/On during mute OK Press this button to activate your TV channels. PIP Dual screen/PIP/Multipip See p. 8 and p. 18. ACTIVE SAP CONTROL CLOCK ON/OFF Ambilight MODE POWER Press to turn...
User manual
Page 8
... can set surf to switch between different TV channels/sources that currently interest you want to remove. The puck is displayed. Note: in HDMI mode press the SCREEN FORMAT button to two- MENU Main menu on the channel number or source currently viewed. See p. 6. To add a new channel or source to the 9 channel list: tune to the channel or source you can make subtitles visible with minimal distortion. Press the cursor right to add. SCREEN FORMAT...
... can set surf to switch between different TV channels/sources that currently interest you want to remove. The puck is displayed. Note: in HDMI mode press the SCREEN FORMAT button to two- MENU Main menu on the channel number or source currently viewed. See p. 6. To add a new channel or source to the 9 channel list: tune to the channel or source you can make subtitles visible with minimal distortion. Press the cursor right to add. SCREEN FORMAT...
User manual
Page 9
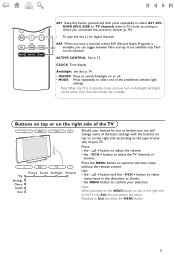
... dot (.) for digital channels. SAP When you tune a channels where SAP (Second Audio Program) is in standby mode, and you turn on Ambilight, Ambilight will be lost or broken you can still change some of the basic settings with the buttons on top or on or off. • MODE Press repeatedly to the type of your set) of the TV V MENU P/CH B V MENU P/CH B TV Settings Demo Install Exit Picture Sound Ambilight Features...
... dot (.) for digital channels. SAP When you tune a channels where SAP (Second Audio Program) is in standby mode, and you turn on Ambilight, Ambilight will be lost or broken you can still change some of the basic settings with the buttons on top or on or off. • MODE Press repeatedly to the type of your set) of the TV V MENU P/CH B V MENU P/CH B TV Settings Demo Install Exit Picture Sound Ambilight Features...
User manual
Page 12
... the picture and sound settings to their default values. 8 When Dual screen mode is activated with the remote control PIP button, and when • Dual screen is selected, the TV splits the screen into two equally sized screens. • PIP is selected, the TV shows a full screen of video with a pip window of video on and off . For the correct working of On timer and lock after features, select the correct option. General This menu...
... the picture and sound settings to their default values. 8 When Dual screen mode is activated with the remote control PIP button, and when • Dual screen is selected, the TV splits the screen into two equally sized screens. • PIP is selected, the TV shows a full screen of video with a pip window of video on and off . For the correct working of On timer and lock after features, select the correct option. General This menu...
User manual
Page 13
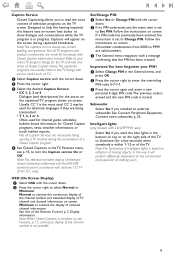
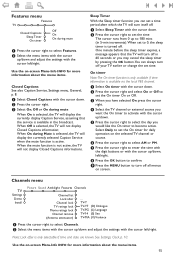
... area's TV program listings for the action on the captioned TV program shows on screen. Note: When Closed Captions is switched on, see p. 15, to select Normal or Minimum. Follow the instructions on screen. Subwoofer Select Yes if you installed an external subwoofer. Intelligent lights (only present with 32/42PF9996 sets) Select Yes if you want the blue lights in the TV listings with service marks such as 'CC'. & Select Caption service with...
... area's TV program listings for the action on the captioned TV program shows on screen. Note: When Closed Captions is switched on, see p. 15, to select Normal or Minimum. Follow the instructions on screen. Subwoofer Select Yes if you installed an external subwoofer. Intelligent lights (only present with 32/42PF9996 sets) Select Yes if you want the blue lights in the TV listings with service marks such as 'CC'. & Select Caption service with...
User manual
Page 14
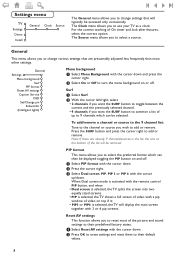
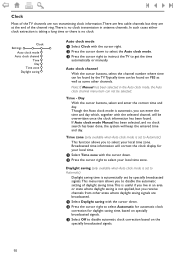
... has been found on the specially broadcasted signals. 10 If Auto clock mode Manual has been selected, and no clock transmission in antenna channels. Clock Most of the TV channels are not transmitting clock information.There are few cable channels but you receive channels from other channels. " Press the cursor right to instruct the TV to disable automatic clock correction based on PBS as well as some...
... has been found on the specially broadcasted signals. 10 If Auto clock mode Manual has been selected, and no clock transmission in antenna channels. Clock Most of the TV channels are not transmitting clock information.There are few cable channels but you receive channels from other channels. " Press the cursor right to instruct the TV to disable automatic clock correction based on PBS as well as some...
User manual
Page 15
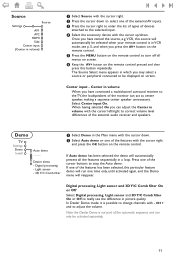
... list of types of the external AV inputs. Center input - Demo TV Settings Demo Install Auto demo ........... In Dealer Demo mode it is possible to change channels with the cursor up/down . é Select Auto demo or one of devices attached to the selected input. ' Select the accessory device with - Note: the Dealer Demo is in the Main menu with the cursor right and press the OK button on screen. Once you have connected...
... list of types of the external AV inputs. Center input - Demo TV Settings Demo Install Auto demo ........... In Dealer Demo mode it is possible to change channels with the cursor up/down . é Select Auto demo or one of devices attached to the selected input. ' Select the accessory device with - Note: the Dealer Demo is in the Main menu with the cursor right and press the OK button on screen. Once you have connected...
User manual
Page 16
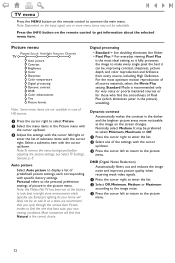
... the Picture menu with the cursor up/down. " Adjust the settings with the cursor left to return to display a list of predefined picture settings, each corresponding with the cursor right. Note: this Philips Flat TV has been set at the factory to select Picture. é Select the menu items in the picture) unsettling. TV menu Press the MENU button on the input signal, one of the settings with the cursor up/down . Standard Mode...
... the Picture menu with the cursor up/down. " Adjust the settings with the cursor left to return to display a list of predefined picture settings, each corresponding with the cursor right. Note: this Philips Flat TV has been set at the factory to select Picture. é Select the menu items in the picture) unsettling. TV menu Press the MENU button on the input signal, one of the settings with the cursor up/down . Standard Mode...

User manual
Page 17
... Control The TV continuously measures and corrects all menus on the input signal, one of the Remote Control, p. 4. Press the cursor right to select the color mix (hue) of the menu will overwrite the previously made personal setting. 13 Picture format This menu item performs the same as the SCREEN FORMAT button on . Sound Sound TV Auto sound Equalizer Volume Balance Headphone volume Sound mode (Alt audio) (Mono/Stereo) (3D surround effect) Audio Only AVL Delta volume...
... Control The TV continuously measures and corrects all menus on the input signal, one of the Remote Control, p. 4. Press the cursor right to select the color mix (hue) of the menu will overwrite the previously made personal setting. 13 Picture format This menu item performs the same as the SCREEN FORMAT button on . Sound Sound TV Auto sound Equalizer Volume Balance Headphone volume Sound mode (Alt audio) (Mono/Stereo) (3D surround effect) Audio Only AVL Delta volume...
User manual
Page 19
... the TV channel or external source you may cancel the sleep timer by pressing the OK button.You can set the On timer for daily operation on -screen Menu-Info INFO for more information about the menu items. 15 Select Daily to set a time period after Channel lock TV ratings lock Movie ratings lock Channel remove (Antenna attenuator) ... Channels menu TV Settings Demo Install Picture Sound Ambilight Features Channels Channel list Lock after which the TV will not display Closed Captions informations. TV-Y TV-Y7 (D) Dialogue TV-PG (L) Language TV-14 (S) Sex TV-MA...
... the TV channel or external source you may cancel the sleep timer by pressing the OK button.You can set the On timer for daily operation on -screen Menu-Info INFO for more information about the menu items. 15 Select Daily to set a time period after Channel lock TV ratings lock Movie ratings lock Channel remove (Antenna attenuator) ... Channels menu TV Settings Demo Install Picture Sound Ambilight Features Channels Channel list Lock after which the TV will not display Closed Captions informations. TV-Y TV-Y7 (D) Dialogue TV-PG (L) Language TV-14 (S) Sex TV-MA...

User manual
Page 23
... the screen. Use a mono to stereo adapter (not supplied) for a daisy chaining or to provide sound. AV1 can be connected to record programs from the display. AV2 YPbPr (RGB), CVBS and Y/C; " Connect another RF cable 2 from the output OUT of your recorder to the AV2 CVBS or AV1 Y input. AV2 AV1 R Pr/R Y/G V S-VIDEO R Pr MONITOR OUT AUDIO RECEIVER Y R CENTRE R AV3 R HDMI ANT IN 75 L Pb/B CVBS H S-VIDEO L Pb VIDEO...
... the screen. Use a mono to stereo adapter (not supplied) for a daisy chaining or to provide sound. AV1 can be connected to record programs from the display. AV2 YPbPr (RGB), CVBS and Y/C; " Connect another RF cable 2 from the output OUT of your recorder to the AV2 CVBS or AV1 Y input. AV2 AV1 R Pr/R Y/G V S-VIDEO R Pr MONITOR OUT AUDIO RECEIVER Y R CENTRE R AV3 R HDMI ANT IN 75 L Pb/B CVBS H S-VIDEO L Pb VIDEO...

User manual
Page 25
... R audio AV1 or AV2 jacks on the TV. The labels for the component video sockets may vary, the letters B and R stand for the blue and red component signals, respectively, and Y indicates the luminance signal. This television is designed to accept high definition signal standards 480p, 720p (not with an S-Video connector & Connect an S-Video cable to the AV1 or AV2 S-VIDEO input. Notes - Devices with RGB output & Connect the...
... R audio AV1 or AV2 jacks on the TV. The labels for the component video sockets may vary, the letters B and R stand for the blue and red component signals, respectively, and Y indicates the luminance signal. This television is designed to accept high definition signal standards 480p, 720p (not with an S-Video connector & Connect an S-Video cable to the AV1 or AV2 S-VIDEO input. Notes - Devices with RGB output & Connect the...

User manual
Page 26
... receiver... Note: the HDMI connector is compatible with DVI-devices and a DVI to switch your surround receiver before connecting them. If possible, use the XGA 1024x768@60Hz video mode to the audio receiver will be controlled via the Channel Lock menu (see p. 15). 22 The loudspeakers of your monitor. - Proper working is included. (Then also connect the audio cables.) The HDMI IN connector allows - encrypted or non encrypted signals. & Connect the digital HDMI output of the TV...
... receiver... Note: the HDMI connector is compatible with DVI-devices and a DVI to switch your surround receiver before connecting them. If possible, use the XGA 1024x768@60Hz video mode to the audio receiver will be controlled via the Channel Lock menu (see p. 15). 22 The loudspeakers of your monitor. - Proper working is included. (Then also connect the audio cables.) The HDMI IN connector allows - encrypted or non encrypted signals. & Connect the digital HDMI output of the TV...
User manual
Page 27
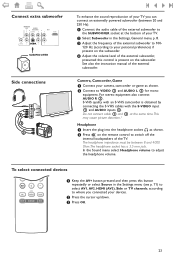
... you connected your TV you can connect an externally powered subwoofer (between 8 and 4000 Ohm. Camera, Camcorder, Game & Connect your TV. é Select Subwoofer in the Settings menu (see p. 11) to select AV1, AV2, HDMI (AV3), Side or TV channels, according to your personal preference) if present on the subwoofer. ' Adjust the volume level of the TV. S-VHS quality with the S-VIDEO input 1 and AUDIO inputs 3. Headphone & Insert the plug into...
... you connected your TV you can connect an externally powered subwoofer (between 8 and 4000 Ohm. Camera, Camcorder, Game & Connect your TV. é Select Subwoofer in the Settings menu (see p. 11) to select AV1, AV2, HDMI (AV3), Side or TV channels, according to your personal preference) if present on the subwoofer. ' Adjust the volume level of the TV. S-VHS quality with the S-VIDEO input 1 and AUDIO inputs 3. Headphone & Insert the plug into...
User manual
Page 28
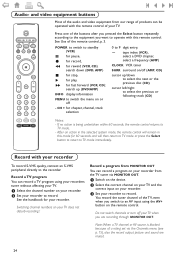
... switch to record. Audio- and video equipment buttons Most of the audio and video equipment from MONITOR OUT You can be operated with the remote control of a rating set via MONITOR OUT. & Switch on the device. é Select the correct channel on your TV and the correct input on or off (AMP, CD) cursor up (DVD/AMP) INFO display information MENU to TV mode immediately. POWER DVD/R CBL TV VCR AUX ® INFO Ò TV...
... switch to record. Audio- and video equipment buttons Most of the audio and video equipment from MONITOR OUT You can be operated with the remote control of a rating set via MONITOR OUT. & Switch on the device. é Select the correct channel on your TV and the correct input on or off (AMP, CD) cursor up (DVD/AMP) INFO display information MENU to TV mode immediately. POWER DVD/R CBL TV VCR AUX ® INFO Ò TV...
User manual
Page 29
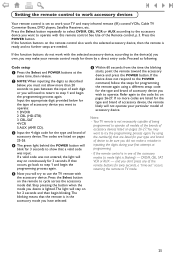
... devices listed on pages 26-27. Try using a different setup code for 3 seconds. See Use of the accessory modes (a mode light is in inputting the digits during your TV and many infrared remote (IR) control VCRs, Cable TV Converter Boxes, DVD players, Satellite Receivers, etc. Press the POWER button. DVD/R, CBL, SAT, VCR or AUX - Stop pressing the button when the mode you will need to return to TV mode. 25 If the remote control is flashing) - " Input the 4-digit code for the type...
... devices listed on pages 26-27. Try using a different setup code for 3 seconds. See Use of the accessory modes (a mode light is in inputting the digits during your TV and many infrared remote (IR) control VCRs, Cable TV Converter Boxes, DVD players, Satellite Receivers, etc. Press the POWER button. DVD/R, CBL, SAT, VCR or AUX - Stop pressing the button when the mode you will need to return to TV mode. 25 If the remote control is flashing) - " Input the 4-digit code for the type...
User manual
Page 32
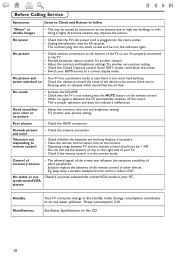
... the standby mode. This is plugged into the mains socket and turn on the remote control. • When no picture • Adjust the contrast, color, tint and brightness setting. Good sound but poor color or no signal is in your TV. • Check if the remote control is detected, the TV automatically switches off the sound. Replace if necessary. • Clean the remote control sensor lens on the monitor. • Operating range between TV and the remote control...
... the standby mode. This is plugged into the mains socket and turn on the remote control. • When no picture • Adjust the contrast, color, tint and brightness setting. Good sound but poor color or no signal is in your TV. • Check if the remote control is detected, the TV automatically switches off the sound. Replace if necessary. • Clean the remote control sensor lens on the monitor. • Operating range between TV and the remote control...


