
Leaflet
Page 2
... backward compatible with state-of additional speakers. PC input With PC input you always get less flicker and a clearer picture. Auto Picture Auto Picture button on the remote control enables one-touch selection of the digital signal to suit different TV program. They include a 2D Comb filter, Dynamic contrast, Blue stretch and Green enhancement so that dramatically magnifies the sound field to a computer and use of -the-art LCD screen technology...
... backward compatible with state-of additional speakers. PC input With PC input you always get less flicker and a clearer picture. Auto Picture Auto Picture button on the remote control enables one-touch selection of the digital signal to suit different TV program. They include a 2D Comb filter, Dynamic contrast, Blue stretch and Green enhancement so that dramatically magnifies the sound field to a computer and use of -the-art LCD screen technology...

Leaflet
Page 3
... Menu Control, On Screen Display, Top Controls, Auto Volume Leveller (AVL) • Remote control type: RCFU05SMU00 • Remote Control: TV • Screen Format Adjustments: 4:3, Movie expand 14:9, Movie expand 16:9, Subtitle Zoom, Super Zoom, Widescreen • Clock: Sleep Timer • VESA Mount: 100 x 100 mm • Child Protection: Child Lock+Parental Control Tuner/Reception/Transmission • Tuner bands: Hyperband, S-Channel, UHF, VHF • TV system: NTSC, PAL N, PAL M • Video Playback: NTSC, PAL • Tuner Display: PLL Connectivity • Other connections: F-Type...
... Menu Control, On Screen Display, Top Controls, Auto Volume Leveller (AVL) • Remote control type: RCFU05SMU00 • Remote Control: TV • Screen Format Adjustments: 4:3, Movie expand 14:9, Movie expand 16:9, Subtitle Zoom, Super Zoom, Widescreen • Clock: Sleep Timer • VESA Mount: 100 x 100 mm • Child Protection: Child Lock+Parental Control Tuner/Reception/Transmission • Tuner bands: Hyperband, S-Channel, UHF, VHF • TV system: NTSC, PAL N, PAL M • Video Playback: NTSC, PAL • Tuner Display: PLL Connectivity • Other connections: F-Type...
User manual
Page 3
... Use only with a cart, stand, tripod, bracket, or table specified by applying excessive pull force to the unit: • Install all instructions. 5. Install in wire to Article 820-40 of cable entry as per NEC - The wide blade or third prong are not spilled into apparatus, the apparatus has been exposed to operate normally or exhibits a marked change...
... Use only with a cart, stand, tripod, bracket, or table specified by applying excessive pull force to the unit: • Install all instructions. 5. Install in wire to Article 820-40 of cable entry as per NEC - The wide blade or third prong are not spilled into apparatus, the apparatus has been exposed to operate normally or exhibits a marked change...
User manual
Page 4
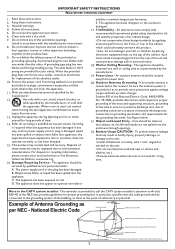
... your area. • The LCD TV uses materials that can cause damage to the LCD screen and electrically parts. Condensation can be present on the LCD screen. • CAUTION information is located on the inside of the stand to the set. If possible, when disposing of heat. • Do not place the LCD TV where it is powered on the wall, installation should be exposed to...
... your area. • The LCD TV uses materials that can cause damage to the LCD screen and electrically parts. Condensation can be present on the LCD screen. • CAUTION information is located on the inside of the stand to the set. If possible, when disposing of heat. • Do not place the LCD TV where it is powered on the wall, installation should be exposed to...
User manual
Page 5
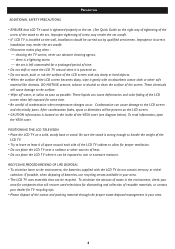
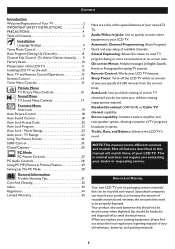
... and twin-speaker system, allowing reception of your LCD TV. TV Ratings 23 Using The Picture Format 24 SURF Control 25 Closed Captions 26 PC Mode PC Picture Controls 27 PC Audio Controls 28 Using PC PIP (Picture In Picture) Feature 29 Setting Up The PC Mode 30 General Information Trouble Shooting Tips 31 Care And Cleaning 32 Index 33 Regulatory 34 Limited Warranty 35 Here are a few of the special features of TV programs broadcast...
... and twin-speaker system, allowing reception of your LCD TV. TV Ratings 23 Using The Picture Format 24 SURF Control 25 Closed Captions 26 PC Mode PC Picture Controls 27 PC Audio Controls 28 Using PC PIP (Picture In Picture) Feature 29 Setting Up The PC Mode 30 General Information Trouble Shooting Tips 31 Care And Cleaning 32 Index 33 Regulatory 34 Limited Warranty 35 Here are a few of the special features of TV programs broadcast...
User manual
Page 7
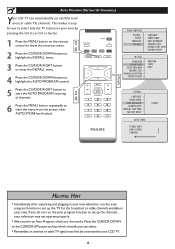
...a cable TV signal or an antenna signal. 1 Press the Menu button to see the onscreen menu. 1 Press the CURSOR DOWN button to highlight 2 the INSTALL menu. 6 Press the CURSOR RIGHT button to set up the TV for antenna or cable channels. • Immediately after unpacking and plugging in your new television, run the auto program function to Cable or Air (antenna). MAIN CONTROLS PICTURE AUDIO FEATURES INSTALL LANGUAGE TUNER MODE AUTO PROGRAM CHANNEL EDIT MANUAL FINE TUNE FACTORY RESET INSTALL LANGUAGE TUNER MODE AUTO PROGRAM CHANNEL EDIT MANUAL FINE TUNE FACTORY RESET ANTENNA CABLE...
...a cable TV signal or an antenna signal. 1 Press the Menu button to see the onscreen menu. 1 Press the CURSOR DOWN button to highlight 2 the INSTALL menu. 6 Press the CURSOR RIGHT button to set up the TV for antenna or cable channels. • Immediately after unpacking and plugging in your new television, run the auto program function to Cable or Air (antenna). MAIN CONTROLS PICTURE AUDIO FEATURES INSTALL LANGUAGE TUNER MODE AUTO PROGRAM CHANNEL EDIT MANUAL FINE TUNE FACTORY RESET INSTALL LANGUAGE TUNER MODE AUTO PROGRAM CHANNEL EDIT MANUAL FINE TUNE FACTORY RESET ANTENNA CABLE...
User manual
Page 8
... antenna or cable TV signal must first be connected to set up the channels , your television may not operate properly. • After you've run the auto program function to clear the menu from the screen, after unpacking and plugging in your new television, run the auto program function to your LCD TV. 8 MAIN CONTROLS PICTURE AUDIO FEATURES INSTALL INSTALL LANGUAGE TUNER MODE AUTO PROGRAM CHANNEL EDIT MANUAL FINE TUNE � FACTORY RESET � LANGUAGE TUNER MODE AUTO PROGRAM CHANNEL EDIT MANUAL FINE TUNE FACTORY RESET ANTENNA CABLE AUTO INSTALL LANGUAGE TUNER MODE AUTO...
... antenna or cable TV signal must first be connected to set up the channels , your television may not operate properly. • After you've run the auto program function to clear the menu from the screen, after unpacking and plugging in your new television, run the auto program function to your LCD TV. 8 MAIN CONTROLS PICTURE AUDIO FEATURES INSTALL INSTALL LANGUAGE TUNER MODE AUTO PROGRAM CHANNEL EDIT MANUAL FINE TUNE � FACTORY RESET � LANGUAGE TUNER MODE AUTO PROGRAM CHANNEL EDIT MANUAL FINE TUNE FACTORY RESET ANTENNA CABLE AUTO INSTALL LANGUAGE TUNER MODE AUTO...

User manual
Page 11
... the LCD TV near a radiator or other source of your DVD player or other video equipments that supports YPbPr HD (High Definition) video format. 11 Be sure the surface is displaying CVBS or RF signals. 5 AC IN Connects the supplied AC power cord. 3 Component SD/AV •Y, Pb, Pr Input jacks Connects to the component video connectors of your DVD player or other video equipments with SD (Standard Definition) video format. •Connects to the output jacks...
... the LCD TV near a radiator or other source of your DVD player or other video equipments that supports YPbPr HD (High Definition) video format. 11 Be sure the surface is displaying CVBS or RF signals. 5 AC IN Connects the supplied AC power cord. 3 Component SD/AV •Y, Pb, Pr Input jacks Connects to the component video connectors of your DVD player or other video equipments with SD (Standard Definition) video format. •Connects to the output jacks...
User manual
Page 14
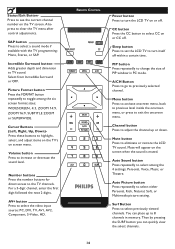
... a sound mode if available with the TV programming: Mono, Stereo, or SAP. Auto Sound button Press repeatedly to select among the six screen format sizes; Then by pressing the SURF button you can place up or down. Also press to exit the onscreen menu. Cursor Buttons (Left, Right, Up, Down)Press these buttons to turn itself off . For a 3-digit channel, enter the first digit followed the next 2 digits. REMOTE CONTROL Power button...
... a sound mode if available with the TV programming: Mono, Stereo, or SAP. Auto Sound button Press repeatedly to select among the six screen format sizes; Then by pressing the SURF button you can place up or down. Also press to exit the onscreen menu. Cursor Buttons (Left, Right, Up, Down)Press these buttons to turn itself off . For a 3-digit channel, enter the first digit followed the next 2 digits. REMOTE CONTROL Power button...
User manual
Page 15
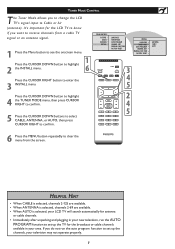
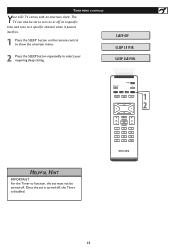
TIMER MENU CONTROLS Your LCD TV comes with an onscreen clock. Once the set is disabled. 15 SLEEP OFF SLEEP 15 MIN. SLEEP 240 MIN. � � HELPFUL HINT IMPORTANT For the Timer to function, the set to turn on or off at a specific time and tune to a specific channel when it powers itself on. 1 Press the SLEEP button on the remote control to show the onscreen menu.. 2 Press the SLEEP button repeatedly to select your requiring sleep timing. The TV can also be set must not be turned off , the Timer is turned off .
TIMER MENU CONTROLS Your LCD TV comes with an onscreen clock. Once the set is disabled. 15 SLEEP OFF SLEEP 15 MIN. SLEEP 240 MIN. � � HELPFUL HINT IMPORTANT For the Timer to function, the set to turn on or off at a specific time and tune to a specific channel when it powers itself on. 1 Press the SLEEP button on the remote control to show the onscreen menu.. 2 Press the SLEEP button repeatedly to select your requiring sleep timing. The TV can also be set must not be turned off , the Timer is turned off .
User manual
Page 19
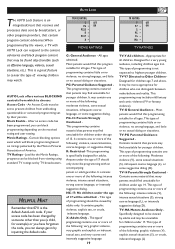
AUTO Lock offers various BLOCKING controls from viewing using standard TV ratings set by their parents. After an access code has been programmed, you can block programming depending on ratings patterned by the Motion Pictures Association of America. Just like the Movie Ratings, programs can always get in by inputting the default code. If your access code has been changed by someone other program providers, that contain program content advisories.When programmed by the viewer...
AUTO Lock offers various BLOCKING controls from viewing using standard TV ratings set by their parents. After an access code has been programmed, you can block programming depending on ratings patterned by the Motion Pictures Association of America. Just like the Movie Ratings, programs can always get in by inputting the default code. If your access code has been changed by someone other program providers, that contain program content advisories.When programmed by the viewer...

User manual
Page 20
... default code. Enter your knowledge, then you will prompt you to a new one. AUTO LOCK ACCESS CODE Over the next few pages you'll learn how to remove the menu from the screen. FEATURES PICTURE FORMAT PICTURE ALIGNMENT AUTOLOCK CLOSED CAPTION COLOR TEMP LOCK PROGRAM CHANG CODE CLEAR ALL BLOCK OPTION MOVIE RATING TV RATING CHANGE CODE ENTER NEW CODE CONFIRM CODE ------- 4 Press the CURSOR RIGHT button CHANGE CODE will appear on the screen. � 5 Enter a four-digit code using the Number buttons...
... default code. Enter your knowledge, then you will prompt you to a new one. AUTO LOCK ACCESS CODE Over the next few pages you'll learn how to remove the menu from the screen. FEATURES PICTURE FORMAT PICTURE ALIGNMENT AUTOLOCK CLOSED CAPTION COLOR TEMP LOCK PROGRAM CHANG CODE CLEAR ALL BLOCK OPTION MOVIE RATING TV RATING CHANGE CODE ENTER NEW CODE CONFIRM CODE ------- 4 Press the CURSOR RIGHT button CHANGE CODE will appear on the screen. � 5 Enter a four-digit code using the Number buttons...

User manual
Page 27
... clock setting. Vertical-adjust the vertical placement of the picture. Manual Adjust: The Manual Adjust control allow you to Factory Reset in Install menu. 27 If you would like to remove the menu from � Normal, Cool, or Warm. Select from the screen. Color Temp can also be used as it appears on the screen. PC PICTURE CONTROLS T his TV can also be activated by pressing Auto Picture button on your Remote Control. A PC video signal must be...
... clock setting. Vertical-adjust the vertical placement of the picture. Manual Adjust: The Manual Adjust control allow you to Factory Reset in Install menu. 27 If you would like to remove the menu from � Normal, Cool, or Warm. Select from the screen. Color Temp can also be used as it appears on the screen. PC PICTURE CONTROLS T his TV can also be activated by pressing Auto Picture button on your Remote Control. A PC video signal must be...

User manual
Page 28
A PC video signal must be used as a PC Monitor. Note: Make sure you are watching. � � � Settings: Allows you to adjust the sound. When ON, AVL will go into standby mode. MAIN CONTROLS PICTURE AUDIO FEATURES INSTALL AUTO SOUND SETTINGS STEREO INCREDIBLE SURROUND AVL 1 Press the MENU button on the remote control to show the onscreen menu. 1 2 Press the CURSOR DOWN button to highlight the AUDIO menu, then press � CURSOR RIGHT to...
A PC video signal must be used as a PC Monitor. Note: Make sure you are watching. � � � Settings: Allows you to adjust the sound. When ON, AVL will go into standby mode. MAIN CONTROLS PICTURE AUDIO FEATURES INSTALL AUTO SOUND SETTINGS STEREO INCREDIBLE SURROUND AVL 1 Press the MENU button on the remote control to show the onscreen menu. 1 2 Press the CURSOR DOWN button to highlight the AUDIO menu, then press � CURSOR RIGHT to...

User manual
Page 31
... correct tuner setting. • Try running the Auto Program feature to Stereo. Change setting to find all available channels. 31 Remote Does Not Work • Check the batteries. Reconnect the S-Video socket of the Quick Use Guidefor details. No Picture • Check antenna/cable connections. TV Displays Wrong Channel or No Channels Above 13 • Repeat channel selection. • Add the desired channel numbers (using a cable box with RF only type connections, the signal coming from the cable box will turn...
... correct tuner setting. • Try running the Auto Program feature to Stereo. Change setting to find all available channels. 31 Remote Does Not Work • Check the batteries. Reconnect the S-Video socket of the Quick Use Guidefor details. No Picture • Check antenna/cable connections. TV Displays Wrong Channel or No Channels Above 13 • Repeat channel selection. • Add the desired channel numbers (using a cable box with RF only type connections, the signal coming from the cable box will turn...
Quick start guide
Page 1
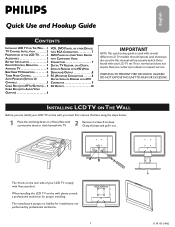
...the LCD TV on the rear side of your LCD TV comply with several different LCD TV models. English Quick Use and Hookup Guide Français Quick Use and Hookup Guide CONTENTS INSTALLING LCD TV ON THE WALL . . 1 TV CHANNEL INSTALLATION 2 PRESENTATION OF THE LCD TV.. . . . . 2 ACCESSORIES 3 BATTERY INSTALLATION 3 REMOTE CONTROL OPERATION 3 ANTENNA TV 4 BASIC CABLE TV CONNECTION 4 TUNER MODE CONTROL 5 AUTO PROGRAM (SETTING UP CHANNELS 5 CABLE BOX (WITH RF IN/OUTPUTS) . . 6 CABLE BOX (WITH AUDIO/VIDEO OUTPUTS 6 VCR, DVD PLAYER, OR OTHER DEVICES WITH RCA CONNECTORS 7 DVD PLAYER OR...
...the LCD TV on the rear side of your LCD TV comply with several different LCD TV models. English Quick Use and Hookup Guide Français Quick Use and Hookup Guide CONTENTS INSTALLING LCD TV ON THE WALL . . 1 TV CHANNEL INSTALLATION 2 PRESENTATION OF THE LCD TV.. . . . . 2 ACCESSORIES 3 BATTERY INSTALLATION 3 REMOTE CONTROL OPERATION 3 ANTENNA TV 4 BASIC CABLE TV CONNECTION 4 TUNER MODE CONTROL 5 AUTO PROGRAM (SETTING UP CHANNELS 5 CABLE BOX (WITH RF IN/OUTPUTS) . . 6 CABLE BOX (WITH AUDIO/VIDEO OUTPUTS 6 VCR, DVD PLAYER, OR OTHER DEVICES WITH RCA CONNECTORS 7 DVD PLAYER OR...
Quick start guide
Page 3
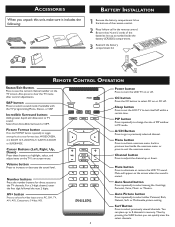
... onscreen menu. SAP button Press to the TV channels. WIDESCREEN, 4:3, ZOOM 14:9, ZOOM 16:9, SUBTITLE ZOOM or SUPERWIDE. Number buttons Press the number buttons for direct access to select a sound mode if available with the TV programming:Mono, Stereo, or SAP. Power button Press to change the size of the remote control. 2 Place lithium cell in PC mode. PIP button Press repeatedly to turn itself off within a certain time. Mute button Press to select previously viewed channels...
... onscreen menu. SAP button Press to the TV channels. WIDESCREEN, 4:3, ZOOM 14:9, ZOOM 16:9, SUBTITLE ZOOM or SUPERWIDE. Number buttons Press the number buttons for direct access to select a sound mode if available with the TV programming:Mono, Stereo, or SAP. Power button Press to change the size of the remote control. 2 Place lithium cell in PC mode. PIP button Press repeatedly to turn itself off within a certain time. Mute button Press to select previously viewed channels...
Quick start guide
Page 6
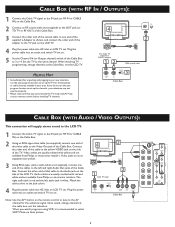
... cable box signal. When watching TV programming, change channels at the Cable Box, not the LCD TV. Plug the power cable into AC inlet on LCD TV set. Audio cables are usually marked with yellow and are yellow. 3 Using RCA-type, stereo audio cables (not supplied), connect one end of the video cable to the Video Out jack of the Cable Box. HELPFUL HINT • Immediately after unpacking and plugging in your remote control, before installing TV channels. 4 Wall outlet 3 The Cable TV singal from Philips or electronics retailers. Once tuned, change channels...
... cable box signal. When watching TV programming, change channels at the Cable Box, not the LCD TV. Plug the power cable into AC inlet on LCD TV set. Audio cables are usually marked with yellow and are yellow. 3 Using RCA-type, stereo audio cables (not supplied), connect one end of the video cable to the Video Out jack of the Cable Box. HELPFUL HINT • Immediately after unpacking and plugging in your remote control, before installing TV channels. 4 Wall outlet 3 The Cable TV singal from Philips or electronics retailers. Once tuned, change channels...

Quick start guide
Page 7
... only. Plug the power cable into AC inlet on LCD TV set on. 3 Use AV+ button on the remote control to select AV1 (or AV2, S-Video if you watch programs using VCR, it's recommended to select SOFT Mode via Auto picture. 3. When you use of Component Video Connection for highest color and picture resolution in AV/S-VIDEO (AV1) and COMPONENT SD/AV (AV2) located on the rear of other equipment. Use the 3 COMPONENT SD/AV (AV2) connections. VCR, DVD PLAYER, OR OTHER...
... only. Plug the power cable into AC inlet on LCD TV set on. 3 Use AV+ button on the remote control to select AV1 (or AV2, S-Video if you watch programs using VCR, it's recommended to select SOFT Mode via Auto picture. 3. When you use of Component Video Connection for highest color and picture resolution in AV/S-VIDEO (AV1) and COMPONENT SD/AV (AV2) located on the rear of other equipment. Use the 3 COMPONENT SD/AV (AV2) connections. VCR, DVD PLAYER, OR OTHER...

Quick start guide
Page 9
... uncompressed HD content. This feature allows a digital connection between set-top boxes and the LCD TV, creating a more vibrant image. DIGITAL SATELLITE RECEIVER WITH DVI CONNECTOR Your LCD TV offers Digital Video Interface (DVI) with High Definition Copy Protection (HDCP) connections. DVD player, Set Top Box..) to the DVI connector of the DVI IN connection. 2 Connect the AUDIO cable (if audio is a specific digital input allowing encrypted transmission of the consumer...
... uncompressed HD content. This feature allows a digital connection between set-top boxes and the LCD TV, creating a more vibrant image. DIGITAL SATELLITE RECEIVER WITH DVI CONNECTOR Your LCD TV offers Digital Video Interface (DVI) with High Definition Copy Protection (HDCP) connections. DVD player, Set Top Box..) to the DVI connector of the DVI IN connection. 2 Connect the AUDIO cable (if audio is a specific digital input allowing encrypted transmission of the consumer...


