User manual
Page 2
... 2 Important Product information Screen care Environmental care Regulatory notices 3 Your TV Side controls and indicators Remote control 4 Get started Supplied accessories Standing mount the TV Tilt stand (Available for 19PFL3505D only) Position the TV Installing the remote control batteries Connecting the antenna or cable Managing cables Plugging in the AC power cord Switching...
... 2 Important Product information Screen care Environmental care Regulatory notices 3 Your TV Side controls and indicators Remote control 4 Get started Supplied accessories Standing mount the TV Tilt stand (Available for 19PFL3505D only) Position the TV Installing the remote control batteries Connecting the antenna or cable Managing cables Plugging in the AC power cord Switching...

User manual
Page 7
m a b c * d e f g h i j k l 6 EN *This button does not function on or off.The TV is not powered off . c CHANNEL +/Switches to Philips! e VOLUME +/Increases or decreases volume. 3 Your TV Remote control Congratulations on your product at www.philips.com/welcome Side controls and indicators s VOLUME e r q p MENU d CHANNEL c . b SOURCE Selects connected devices. To fully benefit from the...
m a b c * d e f g h i j k l 6 EN *This button does not function on or off.The TV is not powered off . c CHANNEL +/Switches to Philips! e VOLUME +/Increases or decreases volume. 3 Your TV Remote control Congratulations on your product at www.philips.com/welcome Side controls and indicators s VOLUME e r q p MENU d CHANNEL c . b SOURCE Selects connected devices. To fully benefit from the...
User manual
Page 9
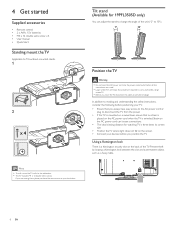
In addition to reading and understanding the safety instructions, consider the following before positioning your local store. 4 Get started Supplied accessories • Remote control • 2 x AAA, 1.5V batteries • M4 x 12 double sems screw x 4 • User manual • Quick Start Standing mount the TV Applicable to TVs without ... between the slot and a permanent object, such as a heavy table. Strain on the AC power cord can loosen connections. • The ideal viewing distance for 19PFL3505D only) You can adjust the stand to change the angle of the TV.
In addition to reading and understanding the safety instructions, consider the following before positioning your local store. 4 Get started Supplied accessories • Remote control • 2 x AAA, 1.5V batteries • M4 x 12 double sems screw x 4 • User manual • Quick Start Standing mount the TV Applicable to TVs without ... between the slot and a permanent object, such as a heavy table. Strain on the AC power cord can loosen connections. • The ideal viewing distance for 19PFL3505D only) You can adjust the stand to change the angle of the TV.
User manual
Page 10
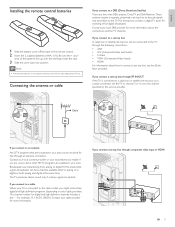
...by the service provider. Broadcasters are broadcast in your cable provider). Note • Remove the batteries if not using the remote control for receiving off the back of the remote control. 2 Insert the 2 supplied batteries (AAA, 1.5V). The channel number for more information. For example, 11....1, 46.30, 108.201. English Installing the remote control batteries 1 Slide the battery cover off -air digital broadcasts. Be sure the + and - Cable If you connect a set-top box ...
...by the service provider. Broadcasters are broadcast in your cable provider). Note • Remove the batteries if not using the remote control for receiving off the back of the remote control. 2 Insert the 2 supplied batteries (AAA, 1.5V). The channel number for more information. For example, 11....1, 46.30, 108.201. English Installing the remote control batteries 1 Slide the battery cover off -air digital broadcasts. Be sure the + and - Cable If you connect a set-top box ...

User manual
Page 12
... / Cable), set autoprogram again. (Refer to page 22.) • If there is no signal input from your menu language. Follow the instructions listed on the remote control. EN 11 Press Í or Æ to reduce the power consumption. Initial Setup Select "Retail" or "Home" for retail displays. You must set [Home...
... / Cable), set autoprogram again. (Refer to page 22.) • If there is no signal input from your menu language. Follow the instructions listed on the remote control. EN 11 Press Í or Æ to reduce the power consumption. Initial Setup Select "Retail" or "Home" for retail displays. You must set [Home...

User manual
Page 13
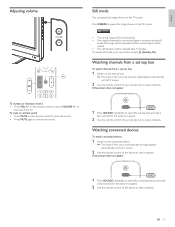
... number (1 to 135) followed by a dot "." or enter a number on • Press . POWER To switch on the remote control. • Press PREV CH to return to standby • Press . (Standby-On) on the remote control. 5 Use your TV consumes energy.Your TV has a very low standby power consumption. For digital channels, press... or to air and water pollution. POWER at the side of the TV. on the side of the TV. • Press . (Standby-On) on the remote control.
... number (1 to 135) followed by a dot "." or enter a number on • Press . POWER To switch on the remote control. • Press PREV CH to return to standby • Press . (Standby-On) on the remote control. 5 Use your TV consumes energy.Your TV has a very low standby power consumption. For digital channels, press... or to air and water pollution. POWER at the side of the TV. on the side of the TV. • Press . (Standby-On) on the remote control.
User manual
Page 14
...a set-top box To watch connected devices 1 Switch on the connected device. » The picture from your set-top box might appear automatically on the remote control to mute the sound. • Press MUTE again to restore the sound. 1 Press SOURCE repeatedly to select the set-top box and wait a ... set-top box 1 Switch on the set-top box. » The picture from your connected device might appear automatically on the TV screen. 2 Use the remote control of your set -top box to select channels. If the picture does not appear To increase or decrease volume • Press VOL +/- on the...
...a set-top box To watch connected devices 1 Switch on the connected device. » The picture from your set-top box might appear automatically on the remote control to mute the sound. • Press MUTE again to restore the sound. 1 Press SOURCE repeatedly to select the set-top box and wait a ... set-top box 1 Switch on the set-top box. » The picture from your connected device might appear automatically on the TV screen. 2 Use the remote control of your set -top box to select channels. If the picture does not appear To increase or decrease volume • Press VOL +/- on the...
User manual
Page 15
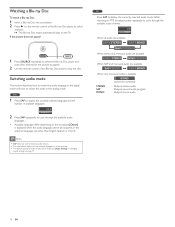
Watching a Blu-ray Disc To watch a Blu-ray Disc 1 Insert a Blu-ray Disc into your player. 2 Press ► on the remote control of the Blu-ray Disc player to select channels. » The Blu-ray Disc might automatically play the disc. Switching audio mode This section... mode and how to select the Blu-ray Disc player and wait a few seconds. • The default setting for the picture to appear. 2 Use the remote control of available languages. 11.1 English 1/3 2 Press SAP repeatedly to cycle through the available audio languages. • Available languages differ depending on page 17. ...
Watching a Blu-ray Disc To watch a Blu-ray Disc 1 Insert a Blu-ray Disc into your player. 2 Press ► on the remote control of the Blu-ray Disc player to select channels. » The Blu-ray Disc might automatically play the disc. Switching audio mode This section... mode and how to select the Blu-ray Disc player and wait a few seconds. • The default setting for the picture to appear. 2 Use the remote control of available languages. 11.1 English 1/3 2 Press SAP repeatedly to cycle through the available audio languages. • Available languages differ depending on page 17. ...
User manual
Page 16
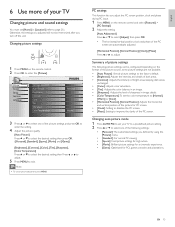
... picture adjustment, press MENU. PC settings This function lets you adjust the PC screen position, clock and phase during PC input. 1 Press MENU on the remote control and select [Features] > [PC Settings]. 2 Adjust the setting. [Auto Adjustment] Press or to select [Adjust], then press OK. • The ...horizontal/vertical position, clock and phase of the PC screen. Depending on the remote control. 2 Press OK to enter the [Picture]. EN 15 Changing picture settings 1 Press MENU on the format of the picture source, some picture ...
... picture adjustment, press MENU. PC settings This function lets you adjust the PC screen position, clock and phase during PC input. 1 Press MENU on the remote control and select [Features] > [PC Settings]. 2 Adjust the setting. [Auto Adjustment] Press or to select [Adjust], then press OK. • The ...horizontal/vertical position, clock and phase of the PC screen. Depending on the remote control. 2 Press OK to enter the [Picture]. EN 15 Changing picture settings 1 Press MENU on the format of the picture source, some picture ...
User manual
Page 17
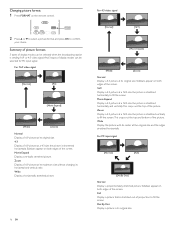
... its maximum size without changing its horizontal and vertical ratio. Sidebars appear on both edges of the screen. Changing picture format 1 Press FORMAT on the remote control. 2 Press or to select a picture format and press OK to fill the screen. For 16:9 video signal [Normal] [4:3] [Movie Expand] [Wide] [Zoom] Normal...
... its maximum size without changing its horizontal and vertical ratio. Sidebars appear on both edges of the screen. Changing picture format 1 Press FORMAT on the remote control. 2 Press or to select a picture format and press OK to fill the screen. For 16:9 video signal [Normal] [4:3] [Movie Expand] [Wide] [Zoom] Normal...

User manual
Page 18
... of sound settings The following screen resolutions are not available. • [Auto Sound] : Sets all sound settings to this unit's remote control. This function allows you have an amplifier which is selected, the TV speakers are disabled and TV sound outputs to control... audio output from the TV's speakers. Sound will allow you want to exit. EN 17 For sound, add an audio cable with the TV's remote control. [Audio Setting] You can be used with the CEC function connected to the factory default. • [Equalizer] : Adjusts individual sound frequencies...
... of sound settings The following screen resolutions are not available. • [Auto Sound] : Sets all sound settings to this unit's remote control. This function allows you have an amplifier which is selected, the TV speakers are disabled and TV sound outputs to control... audio output from the TV's speakers. Sound will allow you want to exit. EN 17 For sound, add an audio cable with the TV's remote control. [Audio Setting] You can be used with the CEC function connected to the factory default. • [Equalizer] : Adjusts individual sound frequencies...
User manual
Page 19
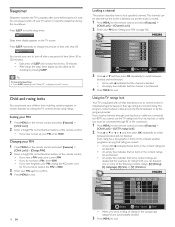
... their age rating and content rating.The program content advisory data are sent by the broadcaster or by using ratings. Setting your PIN' on the remote control and select [Features] > [Child Lock] > [US TV ratings lock]. 2 Press or or Í or Æ and then press OK repeatedly to switch between blocked... your children from 30 to exit. For example, for rating TV-14, you can always switch off . You can deselect one or more of the remote control. • If you have not set up for 10 seconds to restore the PIN to 0000. 3 Enter your PIN again to confirm...
... their age rating and content rating.The program content advisory data are sent by the broadcaster or by using ratings. Setting your PIN' on the remote control and select [Features] > [Child Lock] > [US TV ratings lock]. 2 Press or or Í or Æ and then press OK repeatedly to switch between blocked... your children from 30 to exit. For example, for rating TV-14, you can always switch off . You can deselect one or more of the remote control. • If you have not set up for 10 seconds to restore the PIN to 0000. 3 Enter your PIN again to confirm...
User manual
Page 20
.... Using the movie ratings lock You can control viewing of movies based on their MPAA (Motion Picture Association of America) rating. 1 Press MENU on the remote control and select [Features] > [Child Lock]. 2 Select one or more of the following screen shows the ratings in the rating are designed to switch between...
.... Using the movie ratings lock You can control viewing of movies based on their MPAA (Motion Picture Association of America) rating. 1 Press MENU on the remote control and select [Features] > [Child Lock]. 2 Select one or more of the following screen shows the ratings in the rating are designed to switch between...

User manual
Page 21
...not available. • There are displayed all TV programs and product commercials include closed captions for analog channels : • Press MENU on the remote control and select [Features] > [Closed Caption] > [Digital Caption Service]. • Press or to select one of the listed caption services...as text superimposed over the video. in memory, they are 3 display modes according to programs : Paint-on mode : Displays input characters on the remote control and select [Features] > [Closed Caption] > [Caption Style] > [User Setting]. Roll-up to exit. If you should contact your...
...not available. • There are displayed all TV programs and product commercials include closed captions for analog channels : • Press MENU on the remote control and select [Features] > [Closed Caption] > [Digital Caption Service]. • Press or to select one of the listed caption services...as text superimposed over the video. in memory, they are 3 display modes according to programs : Paint-on mode : Displays input characters on the remote control and select [Features] > [Closed Caption] > [Caption Style] > [User Setting]. Roll-up to exit. If you should contact your...

User manual
Page 22
... qualification. 3 Press MENU to exit. The power consumption may possibly exceed Off the limited requirement of CEC compliant devices. 1 Press MENU on the remote control and select [Features] > [Energy Saving Mode]. Choosing [Home] gives you want to reduce the power consumption. On Select if you have ...connected an external device that is saved or not. 1 Press MENU on the remote control and select [Features] > [EasyLink]. On The unit turns on automatically when you turn off automatically when you turn on signal sending...
... qualification. 3 Press MENU to exit. The power consumption may possibly exceed Off the limited requirement of CEC compliant devices. 1 Press MENU on the remote control and select [Features] > [Energy Saving Mode]. Choosing [Home] gives you want to reduce the power consumption. On Select if you have ...connected an external device that is saved or not. 1 Press MENU on the remote control and select [Features] > [EasyLink]. On The unit turns on automatically when you turn off automatically when you turn on signal sending...
User manual
Page 23
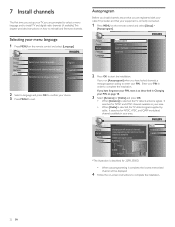
... detects signals supplied by cable. Picture Sound Setup Features Language Autoprogram will be displayed. 4 Follow the on the remote control and select [Setup] > [Autoprogram]. Enter your PIN in 'Changing your PIN' on the remote control and select [Language]. Autoprogram Before you install channels, ensure that you are prompted to select a menu language...
... detects signals supplied by cable. Picture Sound Setup Features Language Autoprogram will be displayed. 4 Follow the on the remote control and select [Setup] > [Autoprogram]. Enter your PIN in 'Changing your PIN' on the remote control and select [Language]. Autoprogram Before you install channels, ensure that you are prompted to select a menu language...
User manual
Page 24
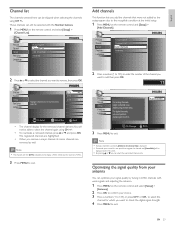
...strength. 4 Press MENU to 135) or press CH+ or CH- Note • The channel with the Number buttons. 1 Press MENU on the remote control and select [Setup] > [Channel List]. Picture Sound Setup Features Language Highlight channels for the removed channel darkens.You will be displayed on the... add the channels that were not added by tuning in ATSC channels with weak signals, and adjusting the antenna. 1 Press MENU on the remote control and [Setup] > [Add Channels]. English Channel list The channels selected here can select the memorized channels only. to select the channel...
...strength. 4 Press MENU to 135) or press CH+ or CH- Note • The channel with the Number buttons. 1 Press MENU on the remote control and select [Setup] > [Channel List]. Picture Sound Setup Features Language Highlight channels for the removed channel darkens.You will be displayed on the... add the channels that were not added by tuning in ATSC channels with weak signals, and adjusting the antenna. 1 Press MENU on the remote control and [Setup] > [Add Channels]. English Channel list The channels selected here can select the memorized channels only. to select the channel...

User manual
Page 25
... utility that supports the ZIP-format (e.g.WinZip for Windows or StuffIt for the software upgrade' on page 24). 2 If the TV is on the remote control and select [Features] > [Current Software Info]. » The version and a description of the current software is supported. • New ...update file is in progress. Software Upgrade The version of your TV (e.g. 22PFL3505D) to find information. 8 Upgrade your TV software Philips continuously tries to improve its products and we strongly recommend that you want to continue with the installation. Do not remove the USB storage ...
... utility that supports the ZIP-format (e.g.WinZip for Windows or StuffIt for the software upgrade' on page 24). 2 If the TV is on the remote control and select [Features] > [Current Software Info]. » The version and a description of the current software is supported. • New ...update file is in progress. Software Upgrade The version of your TV (e.g. 22PFL3505D) to find information. 8 Upgrade your TV software Philips continuously tries to improve its products and we strongly recommend that you want to continue with the installation. Do not remove the USB storage ...

User manual
Page 30
... outlet. Batteries are made according to your TV or void your devices' on the TV blinks when you have available your TV, as well as Philips remote control. top. Sound is connected directly to your product" field. Audio cable is mostly red and green, or the picture misses red when Insecure...
... outlet. Batteries are made according to your TV or void your devices' on the TV blinks when you have available your TV, as well as Philips remote control. top. Sound is connected directly to your product" field. Audio cable is mostly red and green, or the picture misses red when Insecure...
User manual
Page 33
... 27 5 21 21 21 5 17 11, 21 11 11, 21 21 P PC Picture format Picture settings Product information R Ratings Remote control insert batteries overview Retail store mode S Settings assistant Side controls Signal quality Sleeptimer Software upgrade version Sound settings Speakers EasyLink Standby Stand ...mount the TV Subtitles T Tilt stand Troubleshooting TV as PC monitor connections controls menu position remote control screen care software switch channels switch on TV Speakers V Volume adjust Auto Volume Leveling mute W Warranty Y YPbPr 15 16...
... 27 5 21 21 21 5 17 11, 21 11 11, 21 21 P PC Picture format Picture settings Product information R Ratings Remote control insert batteries overview Retail store mode S Settings assistant Side controls Signal quality Sleeptimer Software upgrade version Sound settings Speakers EasyLink Standby Stand ...mount the TV Subtitles T Tilt stand Troubleshooting TV as PC monitor connections controls menu position remote control screen care software switch channels switch on TV Speakers V Volume adjust Auto Volume Leveling mute W Warranty Y YPbPr 15 16...

