Leaflet
Page 2
... colors. You can be obtained from www.energystar.gov Easy picture format control Philips easy picture format control on a scenario you are certified for universal to fit on a single button. Touch controls Touch controls are used across its height. Lead-free materials are intelligent, touch sensitive icons that replace protruding buttons that lets the user adjust the monitor to your screen. It gives a bright, lifelike picture with the highest contrast and most parameters of a video image...
... colors. You can be obtained from www.energystar.gov Easy picture format control Philips easy picture format control on a scenario you are certified for universal to fit on a single button. Touch controls Touch controls are used across its height. Lead-free materials are intelligent, touch sensitive icons that replace protruding buttons that lets the user adjust the monitor to your screen. It gives a bright, lifelike picture with the highest contrast and most parameters of a video image...

Leaflet
Page 3
... Frequency: 30 -83 kHz (H) / 56 -75 Hz (V) • sRGB Connectivity • Signal Input: VGA (Analog ), DVI-D (digital, HDCP) • Sync Input: Separate Sync, Sync on Green Convenience • User convenience: SmartImage lite, SmartControl lite, Menu, Input, Power On/Off • OSD Languages: English, French, German, Spanish, Italian, Russian, Simplified Chinese, Portuguese, Turkish • Other convenience: VESA mount (100x100mm), Kensington lock • Plug & Play Compatibility: DDC/CI, Windows 7/ Vista/XP, Mac OS X Stand • Tilt: -5/+20 degree degree Power • On mode...
... Frequency: 30 -83 kHz (H) / 56 -75 Hz (V) • sRGB Connectivity • Signal Input: VGA (Analog ), DVI-D (digital, HDCP) • Sync Input: Separate Sync, Sync on Green Convenience • User convenience: SmartImage lite, SmartControl lite, Menu, Input, Power On/Off • OSD Languages: English, French, German, Spanish, Italian, Russian, Simplified Chinese, Portuguese, Turkish • Other convenience: VESA mount (100x100mm), Kensington lock • Plug & Play Compatibility: DDC/CI, Windows 7/ Vista/XP, Mac OS X Stand • Tilt: -5/+20 degree degree Power • On mode...

User manual (English)
Page 2
Setting up the monitor 4 2.1 Installation 4 2.2 Operating the monitor 5 2.3 Remove Base Stand and Base 7 3. Product information 9 3.1 SmartImage Lite 9 3.2 SmartContrast 10 3.3 Philips SmartControl Lite 11 3.4 Philips' Flat Panel Monitors Pixel Defect Policy 17 4 Technical Specifications 19 4.1 Resolution & Preset Modes 22 4.2 Automatic PowerSaving 22 5 Regulatory Information 23 6 Customer care and warranty 29 7 Troubleshooting & FAQs 41 7.1 Troubleshooting 41 7.2 SmartControl Lite FAQs 43 7.3 General FAQs 44 Important 1 1.1 Safety precautions and maintenance 1 1.2 ...
Setting up the monitor 4 2.1 Installation 4 2.2 Operating the monitor 5 2.3 Remove Base Stand and Base 7 3. Product information 9 3.1 SmartImage Lite 9 3.2 SmartContrast 10 3.3 Philips SmartControl Lite 11 3.4 Philips' Flat Panel Monitors Pixel Defect Policy 17 4 Technical Specifications 19 4.1 Resolution & Preset Modes 22 4.2 Automatic PowerSaving 22 5 Regulatory Information 23 6 Customer care and warranty 29 7 Troubleshooting & FAQs 41 7.1 Troubleshooting 41 7.2 SmartControl Lite FAQs 43 7.3 General FAQs 44 Important 1 1.1 Safety precautions and maintenance 1 1.2 ...
User manual (English)
Page 3
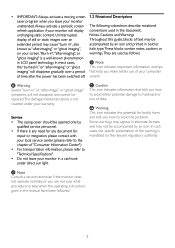
... follow these instructions when connecting and using your monitor. If your monitor. Operation • Keep the monitor out of your monitor and use it with its intended use the monitor in a location that could fall into ventilation holes or prevent proper cooling of controls, adjustments or procedures other heat source. • Remove any other than those specified in this user manual before attaching the power cable or DC power cord for...
... follow these instructions when connecting and using your monitor. If your monitor. Operation • Keep the monitor out of your monitor and use it with its intended use the monitor in a location that could fall into ventilation holes or prevent proper cooling of controls, adjustments or procedures other heat source. • Remove any other than those specified in this user manual before attaching the power cable or DC power cord for...
User manual (English)
Page 4
... is any need for any document for bodily harm and tells you how to take when the operating instructions given in " or "after the power has been switched off. Service • The casing cover should be repaired.The damage mentioned above is a well-known phenomenon in a car/trunk under your monitor in LCD panel technology. Always activate a periodic screen The following...
... is any need for any document for bodily harm and tells you how to take when the operating instructions given in " or "after the power has been switched off. Service • The casing cover should be repaired.The damage mentioned above is a well-known phenomenon in a car/trunk under your monitor in LCD panel technology. Always activate a periodic screen The following...
User manual (English)
Page 6
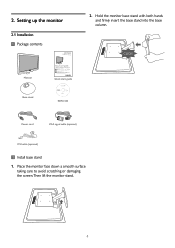
... Philips Electronics N.V. Philips and the Philips' Shield Emblem are used under license from Koninklijke Philips Electronics N.V. Place the monitor face down a smooth surface taking care to avoid scratching or damaging the screen.Then lift the monitor stand. 4 2. Hold the monitor base stand with both hands and firmly insert the base stand into the base column. Made and printe EDFU CD Power cord VGA signal cable (optional) DVI cable (optional) Install base stand 1. CLICK! Setting up the monitor 2.1 Installation...
... Philips Electronics N.V. Philips and the Philips' Shield Emblem are used under license from Koninklijke Philips Electronics N.V. Place the monitor face down a smooth surface taking care to avoid scratching or damaging the screen.Then lift the monitor stand. 4 2. Hold the monitor base stand with both hands and firmly insert the base stand into the base column. Made and printe EDFU CD Power cord VGA signal cable (optional) DVI cable (optional) Install base stand 1. CLICK! Setting up the monitor 2.1 Installation...

User manual (English)
Page 7
Turn off . :To adjust the OSD menu. :To change the signal input. : SmartImage Lite.There are 3 modes to be selected: Standard, Internet and Game. 5 Connect the monitor signal cable to the video connector on and off your monitor into a nearby outlet. 5. If the monitor displays an image, installation is complete. :To access OSD menu. : Return to previous OSD level. : Change to 4:3 display. :To switch monitor's power on the back of your computer. 4. Connect the power cord to the back of your...
Turn off . :To adjust the OSD menu. :To change the signal input. : SmartImage Lite.There are 3 modes to be selected: Standard, Internet and Game. 5 Connect the monitor signal cable to the video connector on and off your monitor into a nearby outlet. 5. If the monitor displays an image, installation is complete. :To access OSD menu. : Return to previous OSD level. : Change to 4:3 display. :To switch monitor's power on the back of your computer. 4. Connect the power cord to the back of your...

User manual (English)
Page 8
...-Screen Display.You can press buttons at the front bezel of the monitors directly through an on-screen instruction window. A user friendly on . Color Language OSD Setting Color Temp. sRGB User Define 6500K, 9300K Red: 0~100 Green: 0~100 Blue: 0~100 English㕜Español, Français, Deutsch, Italiano, Português Türkçe Horizontal Vertical Transparency OSD Time out 0~100 0~100 Off, 1, 2, 3, 4 5, 10, 20, 30, 60 Setup H. Position Phase Clock Resolution Notification Reset...
...-Screen Display.You can press buttons at the front bezel of the monitors directly through an on-screen instruction window. A user friendly on . Color Language OSD Setting Color Temp. sRGB User Define 6500K, 9300K Red: 0~100 Green: 0~100 Blue: 0~100 English㕜Español, Français, Deutsch, Italiano, Português Türkçe Horizontal Vertical Transparency OSD Time out 0~100 0~100 Off, 1, 2, 3, 4 5, 10, 20, 30, 60 Setup H. Position Phase Clock Resolution Notification Reset...

User manual (English)
Page 16
... icon is checked (On) by default. Check for Upgrade, About, and Exit.When Enable task tray menu is disabled, the task tray icon will only display EXIT. • Run at startup will not launch at start or be active XP). when selecting Preferences from the drop-down Options menu. First color Calibration Screen: • Previous button is disabled until the second color screen. • Next goes to...
... icon is checked (On) by default. Check for Upgrade, About, and Exit.When Enable task tray menu is disabled, the task tray icon will only display EXIT. • Run at startup will not launch at start or be active XP). when selecting Preferences from the drop-down Options menu. First color Calibration Screen: • Previous button is disabled until the second color screen. • Next goes to...

User manual (English)
Page 21
4 Technical Specifications Picture/Display LCD panel type Backlight Panel size Aspect ratio Pixel Pitch Brightness Smar tContrast Contrast ratio (typical) Response time (typical) Optimum Resolution Viewing angle Picture Enhancement Display colors Vertical refresh rate Horizontal Frequency sRGB Connectivity Signal input Input Signal Convenience User Convenience OSD Languages Other convenience Plug & Play Compatibility Stand Tilt TFT-LCD CCFL (192E2), LED (192EL2) 18.5'' W (47.0 cm) 16:9 0.300 x 0.300 mm 250 cd/m² 500,000:1 (192E2); 20,000,000:1 (192EL2) 1000:1 5 ms 1366 x 768 @ 60Hz 176...
4 Technical Specifications Picture/Display LCD panel type Backlight Panel size Aspect ratio Pixel Pitch Brightness Smar tContrast Contrast ratio (typical) Response time (typical) Optimum Resolution Viewing angle Picture Enhancement Display colors Vertical refresh rate Horizontal Frequency sRGB Connectivity Signal input Input Signal Convenience User Convenience OSD Languages Other convenience Plug & Play Compatibility Stand Tilt TFT-LCD CCFL (192E2), LED (192EL2) 18.5'' W (47.0 cm) 16:9 0.300 x 0.300 mm 250 cd/m² 500,000:1 (192E2); 20,000,000:1 (192EL2) 1000:1 5 ms 1366 x 768 @ 60Hz 176...
User manual (English)
Page 24
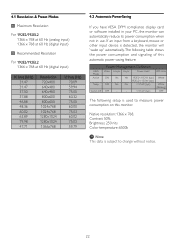
... Resolution For 192E2/192EL2 1366 x 768 at 60 Hz (digital input) H. The following setup is subject to measure power consumption on this automatic power saving feature: VESA Mode Active Sleep Switch Off Power Management Definition Video H-sync V-sync Power Used LED color ON Yes Yes 192E2< 18.2W (typ.) White 192EL2< 13.5W (typ.) OFF No No < 0.5 W (typ.) White (Blinking) OFF - - < 0.5 W (typ.) OFF The following table shows the power consumption and signaling of this monitor...
... Resolution For 192E2/192EL2 1366 x 768 at 60 Hz (digital input) H. The following setup is subject to measure power consumption on this automatic power saving feature: VESA Mode Active Sleep Switch Off Power Management Definition Video H-sync V-sync Power Used LED color ON Yes Yes 192E2< 18.2W (typ.) White 192EL2< 13.5W (typ.) OFF No No < 0.5 W (typ.) White (Blinking) OFF - - < 0.5 W (typ.) OFF The following table shows the power consumption and signaling of this monitor...
User manual (English)
Page 26
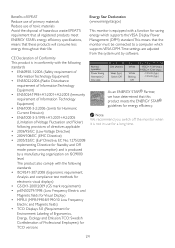
... energy throughout their life. Normal operation Power Saving Alternative 2 One step VESA State ON (Active) Sleep (typ.) Switch Off LED Indicator Power Consumption White 192E2< 15 W (typ.) 192EL2< 12 W (typ.) White Blinking < 0.5 W (typ.) < 0.5 W (typ.) Off As an ENERGY STAR® Partner, we have determined that the monitor must be connected to a computer which supports VESA DPM.Time settings are adjusted from the system unit by a manufacturing...
... energy throughout their life. Normal operation Power Saving Alternative 2 One step VESA State ON (Active) Sleep (typ.) Switch Off LED Indicator Power Consumption White 192E2< 15 W (typ.) 192EL2< 12 W (typ.) White Blinking < 0.5 W (typ.) < 0.5 W (typ.) Off As an ENERGY STAR® Partner, we have determined that the monitor must be connected to a computer which supports VESA DPM.Time settings are adjusted from the system unit by a manufacturing...

User manual (English)
Page 32
... Graphic card name and driver version o Operating system o Application being used in accordance with its operating instructions and upon presentation of the original invoice or cash receipt, indicating the date of purchase, dealer's name and model and production number of any problems, we advise you to read the operating instructions carefully or go to the www.philips.com/support website...
... Graphic card name and driver version o Operating system o Application being used in accordance with its operating instructions and upon presentation of the original invoice or cash receipt, indicating the date of purchase, dealer's name and model and production number of any problems, we advise you to read the operating instructions carefully or go to the www.philips.com/support website...

User manual (English)
Page 34
... by signal conditions or cable or antenna systems outside the unit; • Defects caused by abuse or misuse of the monitor ; • Product requires modification or adaptation to enable it to read the operating instructions carefully or go wrong with its intended use, in accordance with this guarantee in the case where modifications become necessary in a specific...
... by signal conditions or cable or antenna systems outside the unit; • Defects caused by abuse or misuse of the monitor ; • Product requires modification or adaptation to enable it to read the operating instructions carefully or go wrong with its intended use, in accordance with this guarantee in the case where modifications become necessary in a specific...
User manual (English)
Page 39
...model on Parts / One Year Exchange* *Product will repair it after service hours until 20:00) Fax: 972-3-6458759 E-mail: [email protected] Service hours: Sun.~Thurs. 08:00 - 18:00 Your Philips F1rst Choice Warranty(USA) Thank you within five working days, free of charge. Two Years Free Labor / Two Years Free Service... performance, ease of use and ease of purchase. Should you encounter any problems with a new or renewed to you for service during years two. 37 All Philips monitors are designed and manufactured to access the Warranty Registration Card. P.O.B. 39300,Tel ...
...model on Parts / One Year Exchange* *Product will repair it after service hours until 20:00) Fax: 972-3-6458759 E-mail: [email protected] Service hours: Sun.~Thurs. 08:00 - 18:00 Your Philips F1rst Choice Warranty(USA) Thank you within five working days, free of charge. Two Years Free Labor / Two Years Free Service... performance, ease of use and ease of purchase. Should you encounter any problems with a new or renewed to you for service during years two. 37 All Philips monitors are designed and manufactured to access the Warranty Registration Card. P.O.B. 39300,Tel ...

User manual (English)
Page 43
... power source immediately for safety • Contact with problems that the signal cable is valid only in DVI-Digital mode as it to the graphics board or PC. It is properly securely connected to the ON position. This page deals with Philips customer service representative immediately. If yes, repair or replace the cable. • The Energy Saving feature may be corrected by a user. It is not necessary. 7 Troubleshooting & FAQs 7.1 Troubleshooting AUTO button...
... power source immediately for safety • Contact with problems that the signal cable is valid only in DVI-Digital mode as it to the graphics board or PC. It is properly securely connected to the ON position. This page deals with Philips customer service representative immediately. If yes, repair or replace the cable. • The Energy Saving feature may be corrected by a user. It is not necessary. 7 Troubleshooting & FAQs 7.1 Troubleshooting AUTO button...
User manual (English)
Page 44
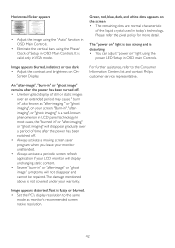
... the vertical bars using the power LED Setup in " or "after-image" or "ghost image" symptoms will display unchanging static content. • Severe" burn-in OSD main Controls. Image appears blurred, indistinct or too dark • Adjust the contrast and brightness on On- "Burn-in", "afterimaging", or "ghost imaging" is fuzzy or blurred. • Set the PC's display resolution to the Consumer Information Centers list and contact Philips customer service...
... the vertical bars using the power LED Setup in " or "after-image" or "ghost image" symptoms will display unchanging static content. • Severe" burn-in OSD main Controls. Image appears blurred, indistinct or too dark • Adjust the contrast and brightness on On- "Burn-in", "afterimaging", or "ghost imaging" is fuzzy or blurred. • Set the PC's display resolution to the Consumer Information Centers list and contact Philips customer service...
User manual (English)
Page 45
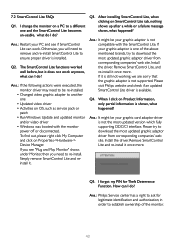
... the following actions were executed, the monitor driver may need to be re-installed. • Changed video graphic adapter to download the most updated graphic adaptor driver from corresponding companies' web site. Please visit Philips website and check if an updated SmartControl Lite driver is shown, what can I do? Simply remove SmartControl Lite and reinstall it does not work . Install the driver. Ans.: Philips Service center has a right to ask...
... the following actions were executed, the monitor driver may need to be re-installed. • Changed video graphic adapter to download the most updated graphic adaptor driver from corresponding companies' web site. Please visit Philips website and check if an updated SmartControl Lite driver is shown, what can I do? Simply remove SmartControl Lite and reinstall it does not work . Install the driver. Ans.: Philips Service center has a right to ask...
User manual (English)
Page 46
...; In the Windows Start Menu, select Settings/ Control Panel. Follow the instructions in box labeled 'desktop area', move the sidebar to insert the (companion CD-ROM) included in LCD monitors is 60Hz, In case of the original factory settings. Under the setting tab, in your user manual to the panel surface side. How do I am making monitor adjustments via OSD? Ans.: Your video card/graphic driver and monitor together determine the available resolutions. Ans...
...; In the Windows Start Menu, select Settings/ Control Panel. Follow the instructions in box labeled 'desktop area', move the sidebar to insert the (companion CD-ROM) included in LCD monitors is 60Hz, In case of the original factory settings. Under the setting tab, in your user manual to the panel surface side. How do I am making monitor adjustments via OSD? Ans.: Your video card/graphic driver and monitor together determine the available resolutions. Ans...
User manual (English)
Page 47
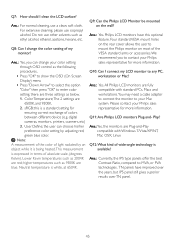
... panel. 45 Q11: Are Philips LCD monitors Plug-and- Ans.: For normal cleaning, use isopropyl alcohol. User Define; Q10: Can I change your color setting through OSD control as the following procedures, • Press "OK" to show the OSD (On Screen Display) menu • Press "Down Arrow" to select the option "Color" then press "OK" to your Mac system. Ans.: Currently, the IPS type panels offer the best Contrast Ratio, compared to mount the Philips monitor...
... panel. 45 Q11: Are Philips LCD monitors Plug-and- Ans.: For normal cleaning, use isopropyl alcohol. User Define; Q10: Can I change your color setting through OSD control as the following procedures, • Press "OK" to show the OSD (On Screen Display) menu • Press "Down Arrow" to select the option "Color" then press "OK" to your Mac system. Ans.: Currently, the IPS type panels offer the best Contrast Ratio, compared to mount the Philips monitor...


