
User Manual
Page 2
... manual are easily accessible. q When positioning the monitor, make sure the power plug and outlet are followed. RETURN TO TOP OF THE PAGE file:///C|/rita wu/gs3LF/ENGLISH/107T/safety/safety.htm [10/12/2000 1:50:18 AM] If necessary, clean with a slightly damp cloth. Read and follow these instructions when connecting and using your computer monitor: q Disconnect the monitor from the power supply before cleaning...
... manual are easily accessible. q When positioning the monitor, make sure the power plug and outlet are followed. RETURN TO TOP OF THE PAGE file:///C|/rita wu/gs3LF/ENGLISH/107T/safety/safety.htm [10/12/2000 1:50:18 AM] If necessary, clean with a slightly damp cloth. Read and follow these instructions when connecting and using your computer monitor: q Disconnect the monitor from the power supply before cleaning...
User Manual
Page 3
... you may need . q About This Electronic User's Manual gives overview of the entire manual in this monitor. q Customer Care and Warranty is included with the help desk phone numbers and information on your monitor. file:///C|/rita wu/gs3LF/ENGLISH/107T/about/about.htm (1 of your hard drive. RETURN TO TOP OF THE PAGE Notational Descriptions The following documentation: q Philips Color Monitor Quick Start Guide which...
... you may need . q About This Electronic User's Manual gives overview of the entire manual in this monitor. q Customer Care and Warranty is included with the help desk phone numbers and information on your monitor. file:///C|/rita wu/gs3LF/ENGLISH/107T/about/about.htm (1 of your hard drive. RETURN TO TOP OF THE PAGE Notational Descriptions The following documentation: q Philips Color Monitor Quick Start Guide which...
User Manual
Page 5
... Product Features • LightFrame™ for Windows • Technical Specifications • Automatic Power Saving • Physical Specification • Pin Assignment • Product Views Product Features 107T20 q 17-inch (16.0" VIS) color monitor with excellent front of screen performance for use with MACs and PCs q Autoscan covers horizontal frequencies up to 71 kHz offering a maximum resolution of 1280 x 1024 with flicker free display of 1024 x 768 at up to 89...
... Product Features • LightFrame™ for Windows • Technical Specifications • Automatic Power Saving • Physical Specification • Pin Assignment • Product Views Product Features 107T20 q 17-inch (16.0" VIS) color monitor with excellent front of screen performance for use with MACs and PCs q Autoscan covers horizontal frequencies up to 71 kHz offering a maximum resolution of 1280 x 1024 with flicker free display of 1024 x 768 at up to 89...
User Manual
Page 6
... the default language of the monitor. See Error Message number 1 under Programs. Unless otherwise selected during installation, LightFrame™ is compatible with Windows 95 Windows 98 Windows NT Windows 2000 Professional Edition. Then, click on Add/Remove Programs file:///C|/rita wu/gs3LF/ENGLISH/107T/product/product.htm (2 of LightFrame™ is installed in the Start menu, under the heading Error Messages. Now, click on Control Panel. 4. To install LightFrame™...
... the default language of the monitor. See Error Message number 1 under Programs. Unless otherwise selected during installation, LightFrame™ is compatible with Windows 95 Windows 98 Windows NT Windows 2000 Professional Edition. Then, click on Add/Remove Programs file:///C|/rita wu/gs3LF/ENGLISH/107T/product/product.htm (2 of LightFrame™ is installed in the Start menu, under the heading Error Messages. Now, click on Control Panel. 4. To install LightFrame™...

User Manual
Page 7
... a red cross. Active = LightFrame™ icon has bright green center. If part of a highlighted window moves off the viewing area, you want to highlight only an area of all other windows or areas. If part of the icon turns gray and LightFrame™ is off the monitor 's viewing area, LightFrame™ automatically goes into the Suspended mode. Note file:///C|/rita wu/gs3LF/ENGLISH/107T...
... a red cross. Active = LightFrame™ icon has bright green center. If part of a highlighted window moves off the viewing area, you want to highlight only an area of all other windows or areas. If part of the icon turns gray and LightFrame™ is off the monitor 's viewing area, LightFrame™ automatically goes into the Suspended mode. Note file:///C|/rita wu/gs3LF/ENGLISH/107T...

User Manual
Page 8
... can abort or continue the set up a menu from the computer while a highlighted window or area is displayed and then another monitor is attached, the system will turn gray and LightFrame™ is no longer active. If you select exit and the color in the taskbar, click the right-side mouse button to the Help screen where you can detect...
... can abort or continue the set up a menu from the computer while a highlighted window or area is displayed and then another monitor is attached, the system will turn gray and LightFrame™ is no longer active. If you select exit and the color in the taskbar, click the right-side mouse button to the Help screen where you can detect...
User Manual
Page 9
... work. Error Message 2 dialog box here LightFrame™ cannot detect a monitor which supports this feature. Video - RETURN TO TOP OF THE PAGE Technical Specifications* CRT • Size and deflection • Dot pitch • Horizontal pitch • Tube type • Phosphor • Recommended display area • Maximum display area 17 inch / 41 cm ; 90° deflection angle 0.25 mm 0.21 mm Shadow mask, flat...
... work. Error Message 2 dialog box here LightFrame™ cannot detect a monitor which supports this feature. Video - RETURN TO TOP OF THE PAGE Technical Specifications* CRT • Size and deflection • Dot pitch • Horizontal pitch • Tube type • Phosphor • Recommended display area • Maximum display area 17 inch / 41 cm ; 90° deflection angle 0.25 mm 0.21 mm Shadow mask, flat...
User Manual
Page 10
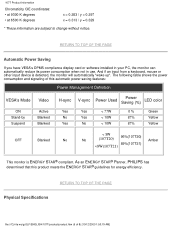
... x = 0.283 / y = 0.297 x = 0.313 / y = 0.329 * These information are subject to change without notice. The following table shows the power consumption and signaling of this automatic power saving features: Power Management Definition VESA's Mode Video ON Stand-by Suspend Active Blanked Blanked H-sync V-sync Power Used Power Saving (%) LED color Yes Yes No Yes Yes No < 77W < 10W < 10W 0 % 87% 87% Green Yellow Yellow < 3W OFF Blanked No No (107T20) 96...
... x = 0.283 / y = 0.297 x = 0.313 / y = 0.329 * These information are subject to change without notice. The following table shows the power consumption and signaling of this automatic power saving features: Power Management Definition VESA's Mode Video ON Stand-by Suspend Active Blanked Blanked H-sync V-sync Power Used Power Saving (%) LED color Yes Yes No Yes Yes No < 77W < 10W < 10W 0 % 87% 87% Green Yellow Yellow < 3W OFF Blanked No No (107T20) 96...

User Manual
Page 16
... an end-user to adjust screen performance of monitors directly though an on the control keys. On the front controls of your monitor, once you press the button, the On Screen Display (OSD) Main Controls window will pop up and you can now start making adjustments to make your monitor's various features. file:///C|/rita wu/gs3LF/ENGLISH/107T/OSD/OSDDESC.HTM (1 of -use when operating the monitor. This is the On-Screen Display? Use the...
... an end-user to adjust screen performance of monitors directly though an on the control keys. On the front controls of your monitor, once you press the button, the On Screen Display (OSD) Main Controls window will pop up and you can now start making adjustments to make your monitor's various features. file:///C|/rita wu/gs3LF/ENGLISH/107T/OSD/OSDDESC.HTM (1 of -use when operating the monitor. This is the On-Screen Display? Use the...

User Manual
Page 24
... metal parts of a picture tube at switch-on the screen. Some monitors offer a manual degaussing facility that gradually decays to be addressed and PC or graphics board can request information from monitor; DDC 2Bi See DDC. Digital control Microprocessor-based digital control of picture parameters and video modes for displays and computers. Glossary DDC is a communication channel for complete control of picture settings and modes and instant recall of all settings at...
... metal parts of a picture tube at switch-on the screen. Some monitors offer a manual degaussing facility that gradually decays to be addressed and PC or graphics board can request information from monitor; DDC 2Bi See DDC. Digital control Microprocessor-based digital control of picture parameters and video modes for displays and computers. Glossary DDC is a communication channel for complete control of picture settings and modes and instant recall of all settings at...

User Manual
Page 31
Resolution The number of monitor will be horizontal. The resolution is specified as the number of pixels in a line multiplied by the number of 18) [10/12/2000 1:50:24 AM] See also video graphic adapter. Rotation function The feature that electron beam can be displayed on screen that allows users to adjust the whole screen rotating to be tilt when the screen faces toward the different direction...
Resolution The number of monitor will be horizontal. The resolution is specified as the number of pixels in a line multiplied by the number of 18) [10/12/2000 1:50:24 AM] See also video graphic adapter. Rotation function The feature that electron beam can be displayed on screen that allows users to adjust the whole screen rotating to be tilt when the screen faces toward the different direction...

User Manual
Page 35
..., the red, green and blue signals can be switched on (scanner or video camera, for controlling the screen colors. q USB eliminates "case angst" -- Without USB, PCs are a key element in ." There's no need to one printer, two Com port devices (usually a mouse and modem), one Enhanced Parallel Port add-on or off or provided with "port gridlock." Hub A Universal Serial Bus device that provides additional connections to...
..., the red, green and blue signals can be switched on (scanner or video camera, for controlling the screen colors. q USB eliminates "case angst" -- Without USB, PCs are a key element in ." There's no need to one printer, two Com port devices (usually a mouse and modem), one Enhanced Parallel Port add-on or off or provided with "port gridlock." Hub A Universal Serial Bus device that provides additional connections to...

User Manual
Page 40
... or more colors q Make sure the Brightness and Contrast controls are using a non-VESA-DDC standard video card, turn the DDC1 / 2B feature Off. q Make sure the monitor cable is properly connected to your computer. (Also refer to your computer. q Make sure the monitor cable is properly connected to the Quick Start Guide). q Make sure the monitor cable is properly connected to see if the monitor cable has bent pins. Something not working? q Make sure the computer Power button is turned on...
... or more colors q Make sure the Brightness and Contrast controls are using a non-VESA-DDC standard video card, turn the DDC1 / 2B feature Off. q Make sure the monitor cable is properly connected to your computer. (Also refer to your computer. q Make sure the monitor cable is properly connected to the Quick Start Guide). q Make sure the monitor cable is properly connected to see if the monitor cable has bent pins. Something not working? q Make sure the computer Power button is turned on...
User Manual
Page 41
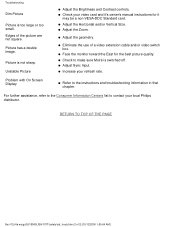
...-VESA-DDC Standard card. q Check to make sure Moiré is not sharp. q Adjust Sync Input. For further assistance, refer to the Consumer Information Centers list to the instructions and troubleshooting information in that chapter. Problem with On Screen Display q Refer to contact your refresh rate. Picture is switched off. Troubleshooting Dim Picture Picture is too large or too small. q Adjust the geometry. q Face the monitor toward the East for it 's owner's manual instructions...
...-VESA-DDC Standard card. q Check to make sure Moiré is not sharp. q Adjust Sync Input. For further assistance, refer to the Consumer Information Centers list to the instructions and troubleshooting information in that chapter. Problem with On Screen Display q Refer to contact your refresh rate. Picture is switched off. Troubleshooting Dim Picture Picture is too large or too small. q Adjust the geometry. q Face the monitor toward the East for it 's owner's manual instructions...
User Manual
Page 44
... damage the ozone layer in the NUTEK specification 803299/94. Time settings are sometimes used during the manufacture and assembly of certain computer displays. Mercury** Mercury is toxic in higher doses, causes lead poisoning. NUTEK VESA State LED Indicator Power Consumption file:///C|/rita wu/gs3LF/ENGLISH/107T/safety/regs/regulat.htm (3 of display screens and the electrical or electronics components must...
... damage the ozone layer in the NUTEK specification 803299/94. Time settings are sometimes used during the manufacture and assembly of certain computer displays. Mercury** Mercury is toxic in higher doses, causes lead poisoning. NUTEK VESA State LED Indicator Power Consumption file:///C|/rita wu/gs3LF/ENGLISH/107T/safety/regs/regulat.htm (3 of display screens and the electrical or electronics components must...

User Manual
Page 45
... AM] Regulatory Information Normal operation Power Saving Position A1 Power Saving Position A2 ON Suspend OFF Green Yellow Amber < 75 W < 8 W < 2.5 W As an ENERGY STAR® Partner, PHILIPS has determined that this equipment does cause harmful interference to radio or television reception, which can radiate radio frequency energy and, if not installed and used in accordance with the instructions, may result in fire...
... AM] Regulatory Information Normal operation Power Saving Position A1 Power Saving Position A2 ON Suspend OFF Green Yellow Amber < 75 W < 8 W < 2.5 W As an ENERGY STAR® Partner, PHILIPS has determined that this equipment does cause harmful interference to radio or television reception, which can radiate radio frequency energy and, if not installed and used in accordance with the instructions, may result in fire...

User Manual
Page 51
... coloured GREEN or GREEN AND YELLOW. 2. Before replacing the plug cover, make certain that the cord grip is used, the fuse at the distribution board should be inserted into a 13A socket elsewhere. If the fitted plug is not suitable for your socket outlets, it be a BS 1362 5A,A.S.T.A. "EARTH" ("E") 1. How to the terminal which is marked with the following code: BLUE - "NEUTRAL...
... coloured GREEN or GREEN AND YELLOW. 2. Before replacing the plug cover, make certain that the cord grip is used, the fuse at the distribution board should be inserted into a 13A socket elsewhere. If the fitted plug is not suitable for your socket outlets, it be a BS 1362 5A,A.S.T.A. "EARTH" ("E") 1. How to the terminal which is marked with the following code: BLUE - "NEUTRAL...

User Manual
Page 60
... Help After the BRIGHTNESS window has disappeared, to continue to the CONTRAST Smart window, follow the steps bellow. RETURN TO TOP OF THE PAGE CONTRAST To adjust your screen's brightness, follow the steps below. 107E The OSD Controls The OSD Controls Description of the On-Screen Display • The OSD Tree The OSD Controls : Brightness (HotKey) • Contrast (HotKey) • Language • Input Signal Selection • Zoom • Adjust Horizontal • Adjust Vertical • Adjust Shape • Adjust Color • Reset...
... Help After the BRIGHTNESS window has disappeared, to continue to the CONTRAST Smart window, follow the steps bellow. RETURN TO TOP OF THE PAGE CONTRAST To adjust your screen's brightness, follow the steps below. 107E The OSD Controls The OSD Controls Description of the On-Screen Display • The OSD Tree The OSD Controls : Brightness (HotKey) • Contrast (HotKey) • Language • Input Signal Selection • Zoom • Adjust Horizontal • Adjust Vertical • Adjust Shape • Adjust Color • Reset...

User Manual
Page 67
... center. 1) Press the button on your image does not appear centered. Help . . . CLOSE MAIN CONTROLS will be highlighted. The MAIN CONTROLS window appears. 2) Press the button until ADJUST Smart VERTICAL is highlighted. Use this feature if your screen either up or down. After returning to MAIN CONTROLS window. 107E The OSD Controls 6) To adjust the horizontal size, press the or button. 7) When the size is adjusted, press the button to return to...
... center. 1) Press the button on your image does not appear centered. Help . . . CLOSE MAIN CONTROLS will be highlighted. The MAIN CONTROLS window appears. 2) Press the button until ADJUST Smart VERTICAL is highlighted. Use this feature if your screen either up or down. After returning to MAIN CONTROLS window. 107E The OSD Controls 6) To adjust the horizontal size, press the or button. 7) When the size is adjusted, press the button to return to...

User Manual
Page 89
... or third year of the toll-free numbers. Just a phone call being received within the first year of purchase may have any difficulties while installing or using one of purchase, we can contact Philips Monday - q Philips type number q Philips serial number q Purchase date (copy of purchase. q Other cards installed Having the following details so we will also help desks are designed and manufactured...
... or third year of the toll-free numbers. Just a phone call being received within the first year of purchase may have any difficulties while installing or using one of purchase, we can contact Philips Monday - q Philips type number q Philips serial number q Purchase date (copy of purchase. q Other cards installed Having the following details so we will also help desks are designed and manufactured...


