

Owner's Manual
Page 2
... dropped into water. Use only attachments recommended by or near children or infirm persons. • Use this sewing machine only for examination, repair, electrical or mechanical adjustment. • Never operate the sewing machine with same type rated 5 Watt. The wrong plate can cause the needle to break. WARNING - Special care is used as contained in this manual. • Never operate this manual. Keep ventilation openings of the Sewing machine and foot controller free...
... dropped into water. Use only attachments recommended by or near children or infirm persons. • Use this sewing machine only for examination, repair, electrical or mechanical adjustment. • Never operate the sewing machine with same type rated 5 Watt. The wrong plate can cause the needle to break. WARNING - Special care is used as contained in this manual. • Never operate this manual. Keep ventilation openings of the Sewing machine and foot controller free...

Owner's Manual
Page 3
... as threading needle, changing needle, threading bobbin, or changing presser foot, etc. • Always unplug Sewing machine from outlet. • Do not unplug by qualified service personnel. • Do not use outdoors. • Do not operate where aerosol (spray) products are provided instead of grounding. It may deflect the needle causing it to the off ("0") when making any other user servicing adjustments mentioned in the instruction manual...
... as threading needle, changing needle, threading bobbin, or changing presser foot, etc. • Always unplug Sewing machine from outlet. • Do not unplug by qualified service personnel. • Do not use outdoors. • Do not operate where aerosol (spray) products are provided instead of grounding. It may deflect the needle causing it to the off ("0") when making any other user servicing adjustments mentioned in the instruction manual...

Owner's Manual
Page 5
... 25 Troubleshooting Guide 45 Winding the Bobbin 11 How to transfer designs to the machine 26 Place Bobbin in Machine 13 Send 27 Top Threading 14 Using the machine without being Needle Threader 15 connecting to the computer 28 Top Tension 16 Navigator module 29 Vertical Spool Pin 17 Navigator software 29 Needle change 18 Transfer a design from the Replace the Needle 19 computer via the USB 29 Start/Stop Button 20 Navigator tools 31 Presser foot...
... 25 Troubleshooting Guide 45 Winding the Bobbin 11 How to transfer designs to the machine 26 Place Bobbin in Machine 13 Send 27 Top Threading 14 Using the machine without being Needle Threader 15 connecting to the computer 28 Top Tension 16 Navigator module 29 Vertical Spool Pin 17 Navigator software 29 Needle change 18 Transfer a design from the Replace the Needle 19 computer via the USB 29 Start/Stop Button 20 Navigator tools 31 Presser foot...

Owner's Manual
Page 6
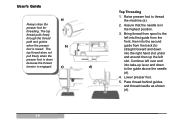
Main power switch and connectors 4. Needle plate 8. Needle threader 11. Presser foot lever 13. Upper thread tension 15. Control Panel 6. Spool felt 4 Overview Familiarize yourself with the names of the parts of your machine. Bobbin winder 2. USB connection 5. Start/Stop button 12. Embroidery hoop holder 7. Presser foot 10. Spool cap 16. Bobbin cover 9. Handwheel 3. Bobbin winding guide 14. This will help you in learning its operation. User's Guide 1.
Main power switch and connectors 4. Needle plate 8. Needle threader 11. Presser foot lever 13. Upper thread tension 15. Control Panel 6. Spool felt 4 Overview Familiarize yourself with the names of the parts of your machine. Bobbin winder 2. USB connection 5. Start/Stop button 12. Embroidery hoop holder 7. Presser foot 10. Spool cap 16. Bobbin cover 9. Handwheel 3. Bobbin winding guide 14. This will help you in learning its operation. User's Guide 1.

Owner's Manual
Page 7
Bobbins 11. Accessory storage envelope (not in picture) 12. INTRODUCTION Your machine comes with your machine lubricated. 1. Screwdriver tool 5. Large spool cap 8. Thread Snips 4. Hoop 6. Oiler 10. Accessories These are standard accessories included with clear sewing machine oil that should be used to keep your embroidery machine. 14 5. 1. 4. 2. 3. 6. 7. 8. 9. 10. Seam Ripper 3. Vertical spool pin 7. Needles 2. Small spool cap 9. Brush (not in picture) 14 Thread stand 5 USB cable (not in picture) 13.
Bobbins 11. Accessory storage envelope (not in picture) 12. INTRODUCTION Your machine comes with your machine lubricated. 1. Screwdriver tool 5. Large spool cap 8. Thread Snips 4. Hoop 6. Oiler 10. Accessories These are standard accessories included with clear sewing machine oil that should be used to keep your embroidery machine. 14 5. 1. 4. 2. 3. 6. 7. 8. 9. 10. Seam Ripper 3. Vertical spool pin 7. Needles 2. Small spool cap 9. Brush (not in picture) 14 Thread stand 5 USB cable (not in picture) 13.

Owner's Manual
Page 14
... large embroidery designs without stopping to stop automatically when the bobbin is full. Press the Start/Stop button to remove. 12 Winding the Bobbin 5. Use embroidery bobbin thread for winding your bobbin. Use the up to stop the winding process when the bobbin is full. 8. Pull the bobbin straight up and down directional keys speed the winding. User's Guide Keep extra bobbins wound so that you will not stop winding and trim the thread tail from the winder by...
... large embroidery designs without stopping to stop automatically when the bobbin is full. Press the Start/Stop button to remove. 12 Winding the Bobbin 5. Use embroidery bobbin thread for winding your bobbin. Use the up to stop the winding process when the bobbin is full. 8. Pull the bobbin straight up and down directional keys speed the winding. User's Guide Keep extra bobbins wound so that you will not stop winding and trim the thread tail from the winder by...

Owner's Manual
Page 15
... EMBROIDER Visually check the level of the bobbin thread periodically as you need to the right. Open cover to the bobbin area by pulling it snaps into the bobbin case, with the thread in the direction shown by placing the left side in Machine A. Replace the bobbin cover by the indicator under the bobbin cover. Cut the thread by moving the small lever to begin using the Navigator software. 13 Guide the thread...
... EMBROIDER Visually check the level of the bobbin thread periodically as you need to the right. Open cover to the bobbin area by pulling it snaps into the bobbin case, with the thread in the direction shown by placing the left side in Machine A. Replace the bobbin cover by the indicator under the bobbin cover. Cut the thread by moving the small lever to begin using the Navigator software. 13 Guide the thread...
Owner's Manual
Page 16
... needle is raised. Bring thread from spool to the left into first guide from the front, then into the second guide from the back (b) straight forward and down because the thread tension is down into take-up the left over and into the right hand slot under and around then up lever and down to thread the machine (a). 2. Lower presser foot. 5. The top thread...
... needle is raised. Bring thread from spool to the left into first guide from the front, then into the second guide from the back (b) straight forward and down because the thread tension is down into take-up the left over and into the right hand slot under and around then up lever and down to thread the machine (a). 2. Lower presser foot. 5. The top thread...
Owner's Manual
Page 17
... can thread the needle using the built-in needle threader. 1. Lower and move the threader lever up position, bring thread through the eye of the needle. 3. Gently move the threader lever forward until it will pull the thread through the eye. 5. The hook will go in the up and back. Needle Threader After placing the thread behind the eye of the and pull out a length of thread. With the presser foot raised...
... can thread the needle using the built-in needle threader. 1. Lower and move the threader lever up position, bring thread through the eye of the needle. 3. Gently move the threader lever forward until it will pull the thread through the eye. 5. The hook will go in the up and back. Needle Threader After placing the thread behind the eye of the and pull out a length of thread. With the presser foot raised...

Owner's Manual
Page 19
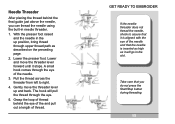
... will accommodate both threads. 17 The vertical spool pin is included with your vertical spool pin when you can thread two colors of thread through the same needle. It is not necessary to use a spool cap when using the vertical spool pin. Use a large needle size, such as when you wind a bobbin. GET READY TO EMBROIDER Vertical Spool Pin A vertical spool pin is placed into the small round hole on the top of the machine.
... will accommodate both threads. 17 The vertical spool pin is included with your vertical spool pin when you can thread two colors of thread through the same needle. It is not necessary to use a spool cap when using the vertical spool pin. Use a large needle size, such as when you wind a bobbin. GET READY TO EMBROIDER Vertical Spool Pin A vertical spool pin is placed into the small round hole on the top of the machine.

Owner's Manual
Page 20
... of the needle shank down. The needle shaft should be parallel to Change Change the needle often and anytime you have different expected life-spans. Needle can check your needles using these tests. User's Guide If you suspect that a needle is particularly important to be bent or damaged in your embroidery. Needle Change When to the flat surface with a new needle. Remove the needle from the machine and glide...
... of the needle shank down. The needle shaft should be parallel to Change Change the needle often and anytime you have different expected life-spans. Needle can check your needles using these tests. User's Guide If you suspect that a needle is particularly important to be bent or damaged in your embroidery. Needle Change When to the flat surface with a new needle. Remove the needle from the machine and glide...

Owner's Manual
Page 21
Remove needle. 5. The flat side of the needle will go. GET READY TO EMBROIDER Replacing a needle with any suitable screwdriver. Replace the Needle 1. Loosen the needle screw using the screwdriver tool. Loosen only enough to the machine. 2. Insert the new needle as far as it will be facing towards the back. Tighten the needle screw using the screwdriver tool supplied with the machine, or with a fresh one can help your outlines stitch more cleanly. 19 Lower the presser foot. 3. Turn off the power to remove the needle. 4.
Remove needle. 5. The flat side of the needle will go. GET READY TO EMBROIDER Replacing a needle with any suitable screwdriver. Replace the Needle 1. Loosen the needle screw using the screwdriver tool. Loosen only enough to the machine. 2. Insert the new needle as far as it will be facing towards the back. Tighten the needle screw using the screwdriver tool supplied with the machine, or with a fresh one can help your outlines stitch more cleanly. 19 Lower the presser foot. 3. Turn off the power to remove the needle. 4.

Owner's Manual
Page 25
... position the hoop to embroider. GET READY TO EMBROIDER Select - Up and down Directional buttons move through the individual designs in the direction indicated by the arrow. Machine Mode Indicators The machine has modes for specific operations. Sewing - This light is lit beside these titles on your design by ten designs at a time. This LED light is lit when the machine is lit, you temporarily have patterns to a starting...
... position the hoop to embroider. GET READY TO EMBROIDER Select - Up and down Directional buttons move through the individual designs in the direction indicated by the arrow. Machine Mode Indicators The machine has modes for specific operations. Sewing - This light is lit beside these titles on your design by ten designs at a time. This LED light is lit when the machine is lit, you temporarily have patterns to a starting...

Owner's Manual
Page 26
... explanation and action to the machine. The LED light is stopped for a thread break. See Help code list on pages 34-35 for a thread color change. Indicates that needs attention. Indicates a condition that the machine is lit when you are used in conjunction with function buttons to navigate through designs and functions, as well as to slow down " button will cause the winder to move the hoop. User's Guide Thread - Error- USB -
... explanation and action to the machine. The LED light is stopped for a thread break. See Help code list on pages 34-35 for a thread color change. Indicates that needs attention. Indicates a condition that the machine is lit when you are used in conjunction with function buttons to navigate through designs and functions, as well as to slow down " button will cause the winder to move the hoop. User's Guide Thread - Error- USB -

Owner's Manual
Page 33
... allowed by the hoop size. Mirror horizontally.This button will mirror your design vertically. This button will mirror your design 90°. N-11 Rotate 90° This button will rotate your design horizontally. This tool is particularly useful to be placed in any portion closely. 31 CONNECTIVITY TO YOUR COMPUTER To examine an area of the embroidery that you move...
... allowed by the hoop size. Mirror horizontally.This button will mirror your design vertically. This button will mirror your design 90°. N-11 Rotate 90° This button will rotate your design horizontally. This tool is particularly useful to be placed in any portion closely. 31 CONNECTIVITY TO YOUR COMPUTER To examine an area of the embroidery that you move...

Owner's Manual
Page 34
Personalize by typing in Navigator to change certain settings. User's Guide Use Disable Thread Detection only to be helpful if your authorized service center for a solution. 32 N-12 Disable Buzzer - Machine Name - Click on this box to certain machine conditions such as the machine will not stop at any thread break when this box to see a color palette that alerts you to change the viewing color...
Personalize by typing in Navigator to change certain settings. User's Guide Use Disable Thread Detection only to be helpful if your authorized service center for a solution. 32 N-12 Disable Buzzer - Machine Name - Click on this box to certain machine conditions such as the machine will not stop at any thread break when this box to see a color palette that alerts you to change the viewing color...

Owner's Manual
Page 35
... needle with handwheel E13 Thread break - lower presser foot E15 Presser foot is in the message window of the machine, and in a message line on the Navigator screen on the machine until the error beep has stopped or until cleared by a user action. Each Help message will clear in approximately 2 seconds without user action. raise presser foot E16 Bobbin winder engaged - disengage bobbin winder 33 In the list below, errors requiring user action...
... needle with handwheel E13 Thread break - lower presser foot E15 Presser foot is in the message window of the machine, and in a message line on the Navigator screen on the machine until the error beep has stopped or until cleared by a user action. Each Help message will clear in approximately 2 seconds without user action. raise presser foot E16 Bobbin winder engaged - disengage bobbin winder 33 In the list below, errors requiring user action...

Owner's Manual
Page 42
... Select Different Design screen, click on the machine. 8. Raise the presser foot and change the thread color. Lower the presser foot and press the Start/Stop key to the main screen of the first color. User's Guide Hoop your fabric with a piece of stabilizer so that the machine is threaded, the hoop is attached, and the presser foot is taut in the hoop. It should be smooth and free of wrinkles...
... Select Different Design screen, click on the machine. 8. Raise the presser foot and change the thread color. Lower the presser foot and press the Start/Stop key to the main screen of the first color. User's Guide Hoop your fabric with a piece of stabilizer so that the machine is threaded, the hoop is attached, and the presser foot is taut in the hoop. It should be smooth and free of wrinkles...
Owner's Manual
Page 45
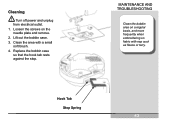
MAINTENANCE AND TROUBLESHOOTING Clean the bobbin area on a regular basis, and more frequently when embroidering on the needle plate and remove. 2. Loosen the screws on fabric with a small soft brush. 4. Lift out the bobbin case. 3. Clean the area with nap such as fleece or terry. Hook Tab Stop Spring 4433 Replace the bobbin case so that the hook tab rests against the stop. Cleaning Turn off power and unplug from electrical outlet. 1.
MAINTENANCE AND TROUBLESHOOTING Clean the bobbin area on a regular basis, and more frequently when embroidering on the needle plate and remove. 2. Loosen the screws on fabric with a small soft brush. 4. Lift out the bobbin case. 3. Clean the area with nap such as fleece or terry. Hook Tab Stop Spring 4433 Replace the bobbin case so that the hook tab rests against the stop. Cleaning Turn off power and unplug from electrical outlet. 1.

Owner's Manual
Page 47
... retailer for guidance. The lower thread is pulled too much. Bobbin winder not fully engaged. Completely engage bobbin winder. The fabric is tangled or breaks. The upper thread breaks Bobbin thread does not wind neatly on the machine. Loosen the upper thread tension. The needle breaks The needle was installed incorrectly. Remedy Turn on the bobbin. Troubleshooting Guide Symptom Problem Cause The sewing machine does not The machine is not turned on disposal, this machine. Use the screwdriver to electrical/ electronic...
... retailer for guidance. The lower thread is pulled too much. Bobbin winder not fully engaged. Completely engage bobbin winder. The fabric is tangled or breaks. The upper thread breaks Bobbin thread does not wind neatly on the machine. Loosen the upper thread tension. The needle breaks The needle was installed incorrectly. Remedy Turn on the bobbin. Troubleshooting Guide Symptom Problem Cause The sewing machine does not The machine is not turned on disposal, this machine. Use the screwdriver to electrical/ electronic...


