

Owner's Manual
Page 2
... parts. WARNING - Close attention is necessary when this sewing machine is required around the Sewing machine needle. • Always use as a toy. Replace bulb with any air openings blocked. Keep ventilation openings of the Sewing machine and foot controller free from the accumulation of burns, ... or infirm persons. • Use this sewing machine only for examination, repair, electrical or mechanical adjustment. • Never operate the sewing machine with same type rated 5 Watt. DANGER - This houshold sewing machine is not working properly, if it is designed to...
... parts. WARNING - Close attention is necessary when this sewing machine is required around the Sewing machine needle. • Always use as a toy. Replace bulb with any air openings blocked. Keep ventilation openings of the Sewing machine and foot controller free from the accumulation of burns, ... or infirm persons. • Use this sewing machine only for examination, repair, electrical or mechanical adjustment. • Never operate the sewing machine with same type rated 5 Watt. DANGER - This houshold sewing machine is not working properly, if it is designed to...

Owner's Manual
Page 3
... double-insulated product, two systems of insulation are being administrated. • To disconnect, turn all controls to break. • Switch the Sewing machine off ("0") position, then remove plug from the electrical outlet when removing covers, lubricating, or when making any object into cord reel. A ... in the needle area, such as threading needle, changing needle, threading bobbin, or changing presser foot, etc. • Always unplug Sewing machine from outlet. • Do not unplug by qualified service personnel. It may deflect the needle causing it to ...
... double-insulated product, two systems of insulation are being administrated. • To disconnect, turn all controls to break. • Switch the Sewing machine off ("0") position, then remove plug from the electrical outlet when removing covers, lubricating, or when making any object into cord reel. A ... in the needle area, such as threading needle, changing needle, threading bobbin, or changing presser foot, etc. • Always unplug Sewing machine from outlet. • Do not unplug by qualified service personnel. It may deflect the needle causing it to ...

Owner's Manual
Page 4
To make sure that you are always provided with the latest sewing capabilities, we reserve the right to change the machine equipment and the assortment of accessories without prior notice, or make modifications to the benefit of the user and the product. Such modifications, however, will always be to the performance or design. INTRODUCTION CONGRATULATIONS ON CHOOSING YOUR NEW MACHINE Your new machine is an advanced computerized household embroidery machine. To fully enjoy all the features, we suggest that you study this user's guide before using the machine.
To make sure that you are always provided with the latest sewing capabilities, we reserve the right to change the machine equipment and the assortment of accessories without prior notice, or make modifications to the benefit of the user and the product. Such modifications, however, will always be to the performance or design. INTRODUCTION CONGRATULATIONS ON CHOOSING YOUR NEW MACHINE Your new machine is an advanced computerized household embroidery machine. To fully enjoy all the features, we suggest that you study this user's guide before using the machine.

Owner's Manual
Page 7
Hoop 6. USB cable (not in picture) 14 Thread stand 5 Accessories These are standard accessories included with clear sewing machine oil that should be used to keep your embroidery machine. 14 5. 1. 4. 2. 3. 6. 7. 8. 9. 10. INTRODUCTION Your machine comes with your machine lubricated. 1. Large spool cap 8. Oiler 10. Thread Snips 4. Screwdriver tool 5. Bobbins 11. Accessory storage envelope (not in picture) 13. Vertical spool pin 7. Small spool cap 9. Brush (not in picture) 12. Seam Ripper 3. Needles 2.
Hoop 6. USB cable (not in picture) 14 Thread stand 5 Accessories These are standard accessories included with clear sewing machine oil that should be used to keep your embroidery machine. 14 5. 1. 4. 2. 3. 6. 7. 8. 9. 10. INTRODUCTION Your machine comes with your machine lubricated. 1. Large spool cap 8. Oiler 10. Thread Snips 4. Screwdriver tool 5. Bobbins 11. Accessory storage envelope (not in picture) 13. Vertical spool pin 7. Small spool cap 9. Brush (not in picture) 12. Seam Ripper 3. Needles 2.

Owner's Manual
Page 8
... the outlet, reverse the plug. On/Off switch 1 - USB Connection Power Switch and Power Connections Main switch When the main switch (A) is turned on 2 - The sewing machine is now ready to install the proper outlet. User's Guide Turn switch to fit in a polarized outlet only one blade is wider than the other...
... the outlet, reverse the plug. On/Off switch 1 - USB Connection Power Switch and Power Connections Main switch When the main switch (A) is turned on 2 - The sewing machine is now ready to install the proper outlet. User's Guide Turn switch to fit in a polarized outlet only one blade is wider than the other...
Owner's Manual
Page 9
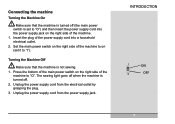
... insert the power supply cord into a household electrical outlet. 2. Connecting the machine Turning the Machine On Make sure that the machine is not sewing. 1. Turning the Machine Off Make sure that the machine is turned off (the main power switch is turned off when the machine is set it to "O". Unplug the power supply cord from the...
... insert the power supply cord into a household electrical outlet. 2. Connecting the machine Turning the Machine On Make sure that the machine is not sewing. 1. Turning the Machine Off Make sure that the machine is turned off (the main power switch is turned off when the machine is set it to "O". Unplug the power supply cord from the...

Owner's Manual
Page 25
Up and down Directional buttons move forward and backward by touching the Start/ Stop button it will also be lit. 23 Sewing - Position - You may use the left and right Directional buttons to a starting point other than center. The Directional buttons move ...through the individual designs in the direction indicated by the arrow. Machine Mode Indicators The machine has modes for specific operations. When this mode is displayed after design selection. GET READY TO EMBROIDER Select - If you...
Up and down Directional buttons move forward and backward by touching the Start/ Stop button it will also be lit. 23 Sewing - Position - You may use the left and right Directional buttons to a starting point other than center. The Directional buttons move ...through the individual designs in the direction indicated by the arrow. Machine Mode Indicators The machine has modes for specific operations. When this mode is displayed after design selection. GET READY TO EMBROIDER Select - If you...

Owner's Manual
Page 46
User's Guide Write down the date of each point indicated on the inside cover of the machine and remove the cover. 2. Place a single drop of clear sewing machine oil at the left side of this manual. 4444 Lubrication Turn off power and unplug from electrical outlet. 1. Oil your machine regularly. Loosen the screw on the cover at each oiling on the drawing.
User's Guide Write down the date of each point indicated on the inside cover of the machine and remove the cover. 2. Place a single drop of clear sewing machine oil at the left side of this manual. 4444 Lubrication Turn off power and unplug from electrical outlet. 1. Oil your machine regularly. Loosen the screw on the cover at each oiling on the drawing.

Owner's Manual
Page 47
An incorrect bobbin is bent or blunt. The upper thread breaks Bobbin thread does not wind neatly on the machine. The needle is used. The upper thread tension is loose. Use the screwdriver to electrical/ electronic products. Loosen the upper thread ...is not turned on disposal, this product must be safely recycled in doubt please contact your retailer for this machine. Troubleshooting Guide Symptom Problem Cause The sewing machine does not The machine is placed wrong. Bobbin winder not fully engaged. Loosen the upper thread tension. If in accordance with relevant...
An incorrect bobbin is bent or blunt. The upper thread breaks Bobbin thread does not wind neatly on the machine. The needle is used. The upper thread tension is loose. Use the screwdriver to electrical/ electronic products. Loosen the upper thread ...is not turned on disposal, this product must be safely recycled in doubt please contact your retailer for this machine. Troubleshooting Guide Symptom Problem Cause The sewing machine does not The machine is placed wrong. Bobbin winder not fully engaged. Loosen the upper thread tension. If in accordance with relevant...


