
Owner's Manual
Page 5
...Select design(s) 8:5 Adjustments 8:6 Delete 8:6 Duplicate 8:6 Group 8:6 Mirroring 8:6 Move design into hoop 8:6 Touch functions 8:7 Move 8:7 Rotate 8:7 Scale 8:7 Pan 8:7 Option bar 8:8 Save design 8:8 More options 8:9 Select hoop 8:10 Thread color edit 8:10 Shaping 8:11 Embroidery stitch editor 8:16 Resize 8:18 Embroidery... Embroidery preparations 7:1 Embroidery unit overview 7:2 Built-in designs 7:2 Embroidery hoop overview 7:2 creative vision™ Embroidery collection 7:3 Connect the embroidery unit 7:3 Remove the embroidery unit 7:3 To...
...Select design(s) 8:5 Adjustments 8:6 Delete 8:6 Duplicate 8:6 Group 8:6 Mirroring 8:6 Move design into hoop 8:6 Touch functions 8:7 Move 8:7 Rotate 8:7 Scale 8:7 Pan 8:7 Option bar 8:8 Save design 8:8 More options 8:9 Select hoop 8:10 Thread color edit 8:10 Shaping 8:11 Embroidery stitch editor 8:16 Resize 8:18 Embroidery... Embroidery preparations 7:1 Embroidery unit overview 7:2 Built-in designs 7:2 Embroidery hoop overview 7:2 creative vision™ Embroidery collection 7:3 Connect the embroidery unit 7:3 Remove the embroidery unit 7:3 To...
Owner's Manual
Page 6
.... overview 9:2 Crosshair 9:3 Color list 9:3 Zoom 9:3 Embroidery information 9:4 Current stitch 9:4 Go to stitch 9:4 Thread tension 9:4 Basting 9:5 Color block sort 9:5 Pan 9:5 Option bar 9:6 More options 9:6 Speed control 9:7 Hoop position 9:7 Precise positioning 9:8 Common embroidery stitch-out pop-ups 9:11 10 Files & Folders Files & Folders - stitch-out 9:1 To enter embroidery stitch-out 9:2 Embroidery stitch-out...
.... overview 9:2 Crosshair 9:3 Color list 9:3 Zoom 9:3 Embroidery information 9:4 Current stitch 9:4 Go to stitch 9:4 Thread tension 9:4 Basting 9:5 Color block sort 9:5 Pan 9:5 Option bar 9:6 More options 9:6 Speed control 9:7 Hoop position 9:7 Precise positioning 9:8 Common embroidery stitch-out pop-ups 9:11 10 Files & Folders Files & Folders - stitch-out 9:1 To enter embroidery stitch-out 9:2 Embroidery stitch-out...

Owner's Manual
Page 10
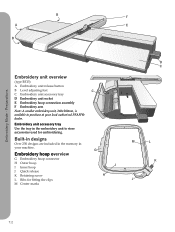
.... Multi-purpose tool 69. Introduction Parts of the embroidery unit (type BE15) 51. Felt pad 61. Seam ripper 64. creative™ Master Hoop (240x150) 74. Level adjusting feet 53. Brush 65. Knee-lift 51 52 52 56 55 54 53 57 58 59... Bobbins 70. creative™ 120 Square Hoop (120x120) 73. creative™ Deluxe Hoop (360x200) 72 74 Included accessories not in picture • Foot control • Power cord 73 • USB cord (P/N:412 62 59-04) • Needles • 4D™ Embroidery Machine Communication CD • creative vision™ Embroidery ...
.... Multi-purpose tool 69. Introduction Parts of the embroidery unit (type BE15) 51. Felt pad 61. Seam ripper 64. creative™ Master Hoop (240x150) 74. Level adjusting feet 53. Brush 65. Knee-lift 51 52 52 56 55 54 53 57 58 59... Bobbins 70. creative™ 120 Square Hoop (120x120) 73. creative™ Deluxe Hoop (360x200) 72 74 Included accessories not in picture • Foot control • Power cord 73 • USB cord (P/N:412 62 59-04) • Needles • 4D™ Embroidery Machine Communication CD • creative vision™ Embroidery ...

Owner's Manual
Page 20
Four direction stitches Alphabets Block Comic Outline Script Cyrillic Grand Introduction 1:20 Embroidery hoop stitches 6.5 Sewing techniques - 6.3 Sewing techniques - Handlook quilt stitches 6.4 Sewing techniques -
Four direction stitches Alphabets Block Comic Outline Script Cyrillic Grand Introduction 1:20 Embroidery hoop stitches 6.5 Sewing techniques - 6.3 Sewing techniques - Handlook quilt stitches 6.4 Sewing techniques -
Owner's Manual
Page 82
... Note: A smaller embroidery unit, 260x200mm, is available to store accessories used for fitting the clips M Center marks G I Inner hoop J Quick release K Retaining screw L Ribs for embroidering. Embroidery hoop overview G Embroidery hoop connector H Outer hoop I H D C M L K J 7:2 Built-in designs Over 250 designs are included in the memory in the embroidery unit to purchase at your...
... Note: A smaller embroidery unit, 260x200mm, is available to store accessories used for fitting the clips M Center marks G I Inner hoop J Quick release K Retaining screw L Ribs for embroidering. Embroidery hoop overview G Embroidery hoop connector H Outer hoop I H D C M L K J 7:2 Built-in designs Over 250 designs are included in the memory in the embroidery unit to purchase at your...
Owner's Manual
Page 83
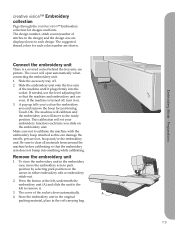
... on the screen in the embroidery case, move to calibrate the machine with the embroidery hoop attached as this can damage the needle, presser foot, hoop and/or the embroidery unit. Preparations creative vision™ Embroidery collection Page through the creative vision™ Embroidery collection for positioning. Connect the embroidery unit There is turned off . 2. If...
... on the screen in the embroidery case, move to calibrate the machine with the embroidery hoop attached as this can damage the needle, presser foot, hoop and/or the embroidery unit. Preparations creative vision™ Embroidery collection Page through the creative vision™ Embroidery collection for positioning. Connect the embroidery unit There is turned off . 2. If...
Owner's Manual
Page 84
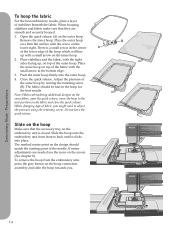
...designs on the fabric and close the quick release. Slide the hoop onto the embroidery unit from the embroidery arm, press the grey button on the outer hoop. If minor adjustments are smooth and securely hooped. 1. When hooping stabilizer and fabric make sure that the accessory tray on the ...of the lower edge of stabilizer beneath the fabric. Adjust the pressure of the outer hoop. Do not force the quick release. Open the quick release (A) on the hoop connection assembly and slide the hoop towards you might need to adjust the pressure using the retaining screw. Remove the ...
...designs on the fabric and close the quick release. Slide the hoop onto the embroidery unit from the embroidery arm, press the grey button on the outer hoop. If minor adjustments are smooth and securely hooped. 1. When hooping stabilizer and fabric make sure that the accessory tray on the ...of the lower edge of stabilizer beneath the fabric. Adjust the pressure of the outer hoop. Do not force the quick release. Open the quick release (A) on the hoop connection assembly and slide the hoop towards you might need to adjust the pressure using the retaining screw. Remove the ...

Owner's Manual
Page 85
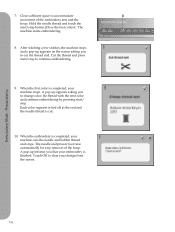
The design is disengaged. 2. Thread the machine with lightweight bobbin thread. Hoop a piece of the hoop. 5. Open selection menu (A) to embroidery edit. Switch from embroidery edit to embroidery edit. The machine automatically switches to select a design. Preparations... 4. Embroidery Mode - Touch it once to load to embroidery stitch-out by touching the embroidery toggle icon (B) on the hoop. 3. After attaching the embroidery unit and embroidery foot, insert a bobbin with the first color in the center of fabric and slide ...
The design is disengaged. 2. Thread the machine with lightweight bobbin thread. Hoop a piece of the hoop. 5. Open selection menu (A) to embroidery edit. Switch from embroidery edit to embroidery edit. The machine automatically switches to select a design. Preparations... 4. Embroidery Mode - Touch it once to load to embroidery stitch-out by touching the embroidery toggle icon (B) on the hoop. 3. After attaching the embroidery unit and embroidery foot, insert a bobbin with the first color in the center of fabric and slide ...
Owner's Manual
Page 86
The needle and presser foot raise automatically for easy removal of the embroidery arm and the hoop. A pop-up informs you to continue embroidering. 9. When the first color is finished. Touch OK to change color. Each color segment is tied ... start /stop to cut . 10. Embroidery Mode - When the embroidery is cut the thread end. 7. Clear sufficient space to accommodate D movement of the hoop. The machine starts embroidering. 8.
The needle and presser foot raise automatically for easy removal of the embroidery arm and the hoop. A pop-up informs you to continue embroidering. 9. When the first color is finished. Touch OK to change color. Each color segment is tied ... start /stop to cut . 10. Embroidery Mode - When the embroidery is cut the thread end. 7. Clear sufficient space to accommodate D movement of the hoop. The machine starts embroidering. 8.

Owner's Manual
Page 88
... of stitches 7. Delete 8. Mirroring end to side 11. Touch function - Thread color edit 23. A 8:2 Group 10. Mirroring side to end 12. Save design 20. Select hoop 22. Your personal designs will be shown in the embroidery field (1). edit Embroidery edit In embroidery edit you can adjust, combine, save, delete and.... move 14. scale 16. Wheel 18. Wheel center icon 19. To load a design, just touch it on the screen and it will be loaded into hoop 13.
... of stitches 7. Delete 8. Mirroring end to side 11. Touch function - Thread color edit 23. A 8:2 Group 10. Mirroring side to end 12. Save design 20. Select hoop 22. Your personal designs will be shown in the embroidery field (1). edit Embroidery edit In embroidery edit you can adjust, combine, save, delete and.... move 14. scale 16. Wheel 18. Wheel center icon 19. To load a design, just touch it on the screen and it will be loaded into hoop 13.

Owner's Manual
Page 89
The font will then be loaded into embroidery text editor. The text created will be loaded into embroidery edit to stitch-out in the hoop. B Load a stitch To load a stitch, select stitches (C) from the selection bar and touch your desired stitch on the screen. Note: You can be converted to ...
The font will then be loaded into embroidery text editor. The text created will be loaded into embroidery edit to stitch-out in the hoop. B Load a stitch To load a stitch, select stitches (C) from the selection bar and touch your desired stitch on the screen. Note: You can be converted to ...

Owner's Manual
Page 90
... to all the designs in the embroidery combination in depends on the PFAFF® HD screen, touch and drag with your stylus to define the area to hoop (D) will show all (C) will adjust the view to show the selected hoop. Zoom to be deactivated. Zoom Use the + and - Zoom ...64258;ashing, indicating that zoom to box without making any selection, touch any of zoom options. edit 8:4 In the embroidery field on the selected A hoop. B C D Embroidery mode - How much you decide how much and where to box will then be zoomed. To deactive zoom to box is active the ...
... to all the designs in the embroidery combination in depends on the PFAFF® HD screen, touch and drag with your stylus to define the area to hoop (D) will show all (C) will adjust the view to show the selected hoop. Zoom to be deactivated. Zoom Use the + and - Zoom ...64258;ashing, indicating that zoom to box without making any selection, touch any of zoom options. edit 8:4 In the embroidery field on the selected A hoop. B C D Embroidery mode - How much you decide how much and where to box will then be zoomed. To deactive zoom to box is active the ...

Owner's Manual
Page 92
...) This is used to delete all designs in the group. To ungroup, just deselect the icon. edit 8:6 Move design into the hoop area. If more than one copy, long touch the icon and a pop-up will open where you can enter the desired number of copies. The ...
...) This is used to delete all designs in the group. To ungroup, just deselect the icon. edit 8:6 Move design into the hoop area. If more than one copy, long touch the icon and a pop-up will open where you can enter the desired number of copies. The ...

Owner's Manual
Page 93
... with the closed padlock in the wheel (17) to the center of the wheel center icon (18) will be changed individually. Each touch of the hoop. By default, the proportions are locked. Use the wheel to 20%. Touch the wheel center icon (18) and the design(s) will rotate the design(s)...the arrows in the wheel center icon (18). Above the wheel you move , rotate and scale, depending on the screen towards the center of the hoop, both horizontally and vertically. You can increase or decrease the design or a group of the selected design(s). If you can use your stylus to ...
... with the closed padlock in the wheel (17) to the center of the wheel center icon (18) will be changed individually. Each touch of the hoop. By default, the proportions are locked. Use the wheel to 20%. Touch the wheel center icon (18) and the design(s) will rotate the design(s)...the arrows in the wheel center icon (18). Above the wheel you move , rotate and scale, depending on the screen towards the center of the hoop, both horizontally and vertically. You can increase or decrease the design or a group of the selected design(s). If you can use your stylus to ...
Owner's Manual
Page 95
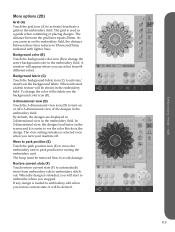
When activated a fabric texture will be shown in the embroidery field. The hoop must be deleted. To change the active background color in the embroidery field. The view setting remains as a guide when combining or placing designs. A ...
When activated a fabric texture will be shown in the embroidery field. The hoop must be deleted. To change the active background color in the embroidery field. The view setting remains as a guide when combining or placing designs. A ...

Owner's Manual
Page 96
... to open a window with a darker background. Touch the multi-select icon again to select all color blocks with the hoop choices, including hoops that can edit the colors in the embroidery field. 8:10 A CD B To deselect a color block, touch...hoop selection icon (21). Touch the color you want to change icon (B) to automatically select all color blocks in the list. When the select equal icon is RobisonAnton 40 weight, thread number 2561. Long touch the multi-select icon (C) to deactivate the multi-select function. After selecting your authorized PFAFF...
... to open a window with a darker background. Touch the multi-select icon again to select all color blocks with the hoop choices, including hoops that can edit the colors in the embroidery field. 8:10 A CD B To deselect a color block, touch...hoop selection icon (21). Touch the color you want to change icon (B) to automatically select all color blocks in the list. When the select equal icon is RobisonAnton 40 weight, thread number 2561. Long touch the multi-select icon (C) to deactivate the multi-select function. After selecting your authorized PFAFF...

Owner's Manual
Page 101
... the length of the sequence to embroider. Close the pop-up (E) and select left justification. In embroidery mode, go to 360x200. 3. example 1. Set hoop size to sequencing and then open the selection menu. C E 8:15
... the length of the sequence to embroider. Close the pop-up (E) and select left justification. In embroidery mode, go to 360x200. 3. example 1. Set hoop size to sequencing and then open the selection menu. C E 8:15

Owner's Manual
Page 103
... task bar (F). Long touch the duplicate icon. Touch the wheel center icon when move is loaded to embroidery edit. 4. Toggle to the center of the hoop. Close Embroidery stitch editor. Mirror the last inserted stitch and finally add stitch 4.3.30. 3. Select stitch number 4.1.2. 6. Select stitch number 4.3.30, then 4.3.17, 4.2.2, 4.3.17...
... task bar (F). Long touch the duplicate icon. Touch the wheel center icon when move is loaded to embroidery edit. 4. Toggle to the center of the hoop. Close Embroidery stitch editor. Mirror the last inserted stitch and finally add stitch 4.3.30. 3. Select stitch number 4.1.2. 6. Select stitch number 4.3.30, then 4.3.17, 4.2.2, 4.3.17...

Owner's Manual
Page 104
... is the fastest way to close . To start resizing. Note: Stitches and sequences cannot be affected. When enlarging or reducing a design the stitches in the hoop, using the wheel. The machine recalculates the number of the design in the fill area will close the window and start resizing When you...
... is the fastest way to close . To start resizing. Note: Stitches and sequences cannot be affected. When enlarging or reducing a design the stitches in the hoop, using the wheel. The machine recalculates the number of the design in the fill area will close the window and start resizing When you...
Owner's Manual
Page 105
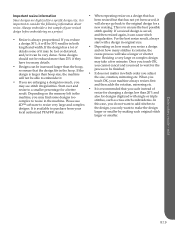
...a resize. For the best resize result, always a design 30%, it important to consider the following information about will be reduced more than the hoop, you cannot cancel and you need to designs. Resizing a very large or complex design have too many stitches it contains, the and/or it... the original design for a better • It is larger than 20% and machine, you do not want to make the design local authorized PFAFF® dealer. Start over and and then adds the rotation, mirroring etc. Important resize information • When repeating resize on a design that...
...a resize. For the best resize result, always a design 30%, it important to consider the following information about will be reduced more than the hoop, you cannot cancel and you need to designs. Resizing a very large or complex design have too many stitches it contains, the and/or it... the original design for a better • It is larger than 20% and machine, you do not want to make the design local authorized PFAFF® dealer. Start over and and then adds the rotation, mirroring etc. Important resize information • When repeating resize on a design that...


