

Owner's Manual
Page 2
...; Never operate the sewing machine with double insulation. A double-insulated product is designed to the product. Special care is provided on cord. This household sewing machine is marked with the sewing machine. • Use this sewing machine only for its intended use as threading needle, changing needle, threading bobbin, or changing presser foot, etc. • Always unplug sewing machine from the electrical outlet when removing covers, lubricating, or when making any other user servicing adjustments mentioned in the instruction manual. • Never drop or insert any...
...; Never operate the sewing machine with double insulation. A double-insulated product is designed to the product. Special care is provided on cord. This household sewing machine is marked with the sewing machine. • Use this sewing machine only for its intended use as threading needle, changing needle, threading bobbin, or changing presser foot, etc. • Always unplug sewing machine from the electrical outlet when removing covers, lubricating, or when making any other user servicing adjustments mentioned in the instruction manual. • Never drop or insert any...
Owner's Manual
Page 4
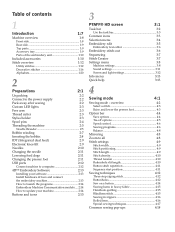
... the needle 2:11 Lowering feed dogs 2:11 Changing the presser foot 2:11 USB ports 2:12 Connect machine to computer 2:12 4D™ Embroidery Software 2:13 Installing your software 2:13 Install hardware drivers and connect the embroidery machine 2:13 How to launch the programs 2:14 Embroidery Machine Communication module.... 2:14 How to all 4:8 Stitch settings 4:9 Stitch width 4:9 Stitch positioning 4:9 Stitch length 4:9 Stitch density 4:10 Thread tension 4:10 Buttonhole slit length 4:10 Button stitch repetition 4:11 Sequence start position 4:11 Sewing...
... the needle 2:11 Lowering feed dogs 2:11 Changing the presser foot 2:11 USB ports 2:12 Connect machine to computer 2:12 4D™ Embroidery Software 2:13 Installing your software 2:13 Install hardware drivers and connect the embroidery machine 2:13 How to launch the programs 2:14 Embroidery Machine Communication module.... 2:14 How to all 4:8 Stitch settings 4:9 Stitch width 4:9 Stitch positioning 4:9 Stitch length 4:9 Stitch density 4:10 Thread tension 4:10 Buttonhole slit length 4:10 Button stitch repetition 4:11 Sequence start position 4:11 Sewing...
Owner's Manual
Page 8
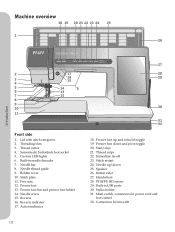
Threading slots 3. Needle bar 8. Free arm 12. Needle screw 15. Button ruler 27. Built-in needle threader 7. Custom LED-lights 6. Presser foot 13. Speaker 26. Connection for power cord and foot control 32. Sensormatic buttonhole foot socket 5. Needle thread guide 9. Bobbin cover 10. Stitch plate 11. Immediate tie-off 23. PFAFF® HD screen 29. Built-in USB ports 30. Presser foot bar and presser foot holder 14. Thread snips 22. Needle up and extra lift toggle 19. Handwheel 28. Action indicator 27 28 29 30 31...
Threading slots 3. Needle bar 8. Free arm 12. Needle screw 15. Button ruler 27. Built-in needle threader 7. Custom LED-lights 6. Presser foot 13. Speaker 26. Connection for power cord and foot control 32. Sensormatic buttonhole foot socket 5. Needle thread guide 9. Bobbin cover 10. Stitch plate 11. Immediate tie-off 23. PFAFF® HD screen 29. Built-in USB ports 30. Presser foot bar and presser foot holder 14. Thread snips 22. Needle up and extra lift toggle 19. Handwheel 28. Action indicator 27 28 29 30 31...

Owner's Manual
Page 11
...button size that the IDT is used to sew narrow hems in a suitable length to zipper teeth. Embroidery/Sensormatic free-motion foot This foot is used for sewing manual buttonholes. This foot can be used for straight stitching and zigzag stitching with a stitch length longer than 1.0mm stitch length, use this foot. Fancy stitch foot When sewing decorative stitches or short zigzag stitches and other utility stitches with less than 1.0mm. Presser feet Presser foot 0A Presser foot 1A Presser foot 2A Presser foot 3 Presser foot 4 Standard presser foot with IDT (attached on the machine...
...button size that the IDT is used to sew narrow hems in a suitable length to zipper teeth. Embroidery/Sensormatic free-motion foot This foot is used for sewing manual buttonholes. This foot can be used for straight stitching and zigzag stitching with a stitch length longer than 1.0mm stitch length, use this foot. Fancy stitch foot When sewing decorative stitches or short zigzag stitches and other utility stitches with less than 1.0mm. Presser feet Presser foot 0A Presser foot 1A Presser foot 2A Presser foot 3 Presser foot 4 Standard presser foot with IDT (attached on the machine...
Owner's Manual
Page 12
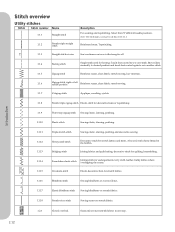
.... Move fabric manually to desired position and touch foot control again to sew one step. 1:12 Note: This stitch makes a stronger tie-off . 1.1.4 Basting stitch Single stitch used with strong tie-off than stitch 2.1.1. Touch foot control to sew another stitch. 1.1.5 Zigzag stitch Reinforce seams, clean finish, stretch sewing, lace insertion. 1.1.6 Zigzag stitch, right or left needle position Reinforce seams, clean finish, stretch sewing. 1.1.7 Z-zigzag stitch Applique, couching, eyelets. 1.1.8 Stretch triple zigzag stitch Elastic stitch for basting.
.... Move fabric manually to desired position and touch foot control again to sew one step. 1:12 Note: This stitch makes a stronger tie-off . 1.1.4 Basting stitch Single stitch used with strong tie-off than stitch 2.1.1. Touch foot control to sew another stitch. 1.1.5 Zigzag stitch Reinforce seams, clean finish, stretch sewing, lace insertion. 1.1.6 Zigzag stitch, right or left needle position Reinforce seams, clean finish, stretch sewing. 1.1.7 Z-zigzag stitch Applique, couching, eyelets. 1.1.8 Stretch triple zigzag stitch Elastic stitch for basting.
Owner's Manual
Page 27
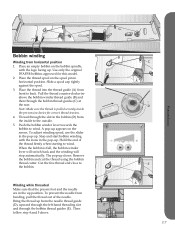
... wind. Note: Make sure the thread is full, the bobbin winder lever will switch back and the winding will stop automatically. To adjust winding speed, use the slider in the pop-up position. Remove the bobbin and cut the thread using the bobbin thread cutter. Winding while threaded Make sure that the presser foot and the needle are in the bobbin (D) from the inside the pre-tension device for this model. 2. B C A D E A D 2:7 Preparations Slide a spool cap tightly against the spool. 3. Push the bobbin winder lever...
... wind. Note: Make sure the thread is full, the bobbin winder lever will switch back and the winding will stop automatically. To adjust winding speed, use the slider in the pop-up position. Remove the bobbin and cut the thread using the bobbin thread cutter. Winding while threaded Make sure that the presser foot and the needle are in the bobbin (D) from the inside the pre-tension device for this model. 2. B C A D E A D 2:7 Preparations Slide a spool cap tightly against the spool. 3. Push the bobbin winder lever...
Owner's Manual
Page 31
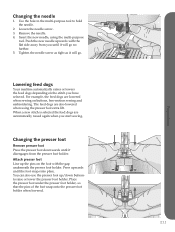
... feed dogs are lowered when sewing on buttons, free-motion sewing and embroidering. Lowering feed dogs Your machine automatically raises or lowers the feed dogs depending on the foot with the flat side away from the presser foot holder. Place the presser foot under the presser foot holder, so that the pins of the foot snap onto the presser foot holder when lowered. 2:11 Insert the new needle, using the presser foot extra lift. Press upwards until it disengages from you until it will go . Loosen the needle screw. 3. Remove...
... feed dogs are lowered when sewing on buttons, free-motion sewing and embroidering. Lowering feed dogs Your machine automatically raises or lowers the feed dogs depending on the foot with the flat side away from the presser foot holder. Place the presser foot under the presser foot holder, so that the pins of the foot snap onto the presser foot holder when lowered. 2:11 Insert the new needle, using the presser foot extra lift. Press upwards until it disengages from you until it will go . Loosen the needle screw. 3. Remove...
Owner's Manual
Page 35
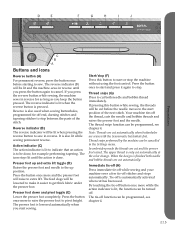
... the reverse button is also lit while sewing permanent reverse. Immediate tie-off (H) Press immediate tie-off while sewing and your machine sews a few tie-off the thread, cuts the needle and bobbin threads and raises the presser foot and the needle. In embroidery mode the threads are cut has been used when sewing buttonholes, programmed tie-off is lowered automatically when you start or stop . Presser foot down and pivot toggle (E) Lower the presser foot completely...
... the reverse button is also lit while sewing permanent reverse. Immediate tie-off (H) Press immediate tie-off while sewing and your machine sews a few tie-off the thread, cuts the needle and bobbin threads and raises the presser foot and the needle. In embroidery mode the threads are cut has been used when sewing buttonholes, programmed tie-off is lowered automatically when you start or stop . Presser foot down and pivot toggle (E) Lower the presser foot completely...
Owner's Manual
Page 44
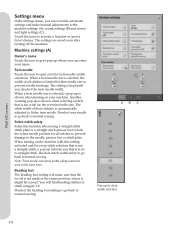
... the set to lock the center needle position for twin needle selection. 3:8 The setting is too wide for that the tie-off the machine. When a twin needle size is selected, a pop-up is shown when turning on the machine with this function when using a straight stitch stitch plate or a straight stitch presser foot to straight stitch. The stitch width of choices. Twin needle Touch the icon to prevent needle breakage. Deselect twin needle to go back to normal sewing. Deselect stitch...
... the set to lock the center needle position for twin needle selection. 3:8 The setting is too wide for that the tie-off the machine. When a twin needle size is selected, a pop-up is shown when turning on the machine with this function when using a straight stitch stitch plate or a straight stitch presser foot to straight stitch. The stitch width of choices. Twin needle Touch the icon to prevent needle breakage. Deselect twin needle to go back to normal sewing. Deselect stitch...
Owner's Manual
Page 46
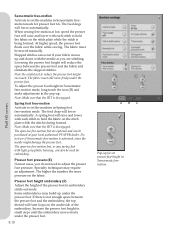
.... The feed dogs will lower automatically. At higher speed, the presser foot floats over the fabric while sewing. The open -toe free-motion feet, or any spring foot with each stitch to hold the fabric on the fabric. Increase the presser foot height in small steps until the embroidery moves freely under the presser foot. Pfaff HD screen Sensormatic free-motion Activate to set the machine in Spring foot free-motion mode. Spring foot free-motion Activate to set the machine in Sensormatic freemotion mode for set presser foot height...
.... The feed dogs will lower automatically. At higher speed, the presser foot floats over the fabric while sewing. The open -toe free-motion feet, or any spring foot with each stitch to hold the fabric on the fabric. Increase the presser foot height in small steps until the embroidery moves freely under the presser foot. Pfaff HD screen Sensormatic free-motion Activate to set the machine in Spring foot free-motion mode. Spring foot free-motion Activate to set the machine in Sensormatic freemotion mode for set presser foot height...
Owner's Manual
Page 56
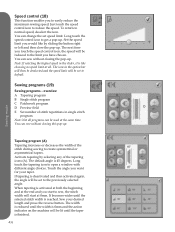
... maximum sewing speed. A B C E D Sewing mode Tapering program (A) Tapering increases or decreases the width of stitch repetitions in the option bar will then be deselected and the speed limit will be reduced to sew, the stitch width will be set speed limit. The default angle is finished. 4:6 Speed control (18) 18 This function enables you want for your desired length and press the reverse button...
... maximum sewing speed. A B C E D Sewing mode Tapering program (A) Tapering increases or decreases the width of stitch repetitions in the option bar will then be deselected and the speed limit will be reduced to sew, the stitch width will be set speed limit. The default angle is finished. 4:6 Speed control (18) 18 This function enables you want for your desired length and press the reverse button...
Owner's Manual
Page 60
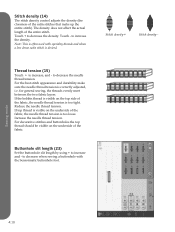
... buttonhole foot. Stitch density + Stitch density - Buttonhole slit length (23) Set the buttonhole slit length by using + to decrease the density. Sewing mode 23 4:10 Touch - Note: This is too tight. Touch + to increase and - If the bobbin thread is visible on the underside of the fabric, the needle thread tension is correctly adjusted, i.e. The density does not affect the actual length of the satin stitches that make sure the needle thread tension is too loose...
... buttonhole foot. Stitch density + Stitch density - Buttonhole slit length (23) Set the buttonhole slit length by using + to decrease the density. Sewing mode 23 4:10 Touch - Note: This is too tight. Touch + to increase and - If the bobbin thread is visible on the underside of the fabric, the needle thread tension is correctly adjusted, i.e. The density does not affect the actual length of the satin stitches that make sure the needle thread tension is too loose...
Owner's Manual
Page 63
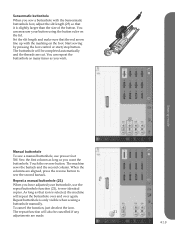
... lid. Repeat buttonhole is selected, the machine will also be completed automatically and the threads are aligned, press the reverse button to sew identical copies. The machine sews the bartack and the second column. Set the slit length and make sure that icon is only visible when sewing a buttonhole manually. You can repeat the buttonhole as many times as you wish. You can measure your buttonhole, use presser foot 5M. The...
... lid. Repeat buttonhole is selected, the machine will also be completed automatically and the threads are aligned, press the reverse button to sew identical copies. The machine sews the bartack and the second column. Set the slit length and make sure that icon is only visible when sewing a buttonhole manually. You can repeat the buttonhole as many times as you wish. You can measure your buttonhole, use presser foot 5M. The...
Owner's Manual
Page 66
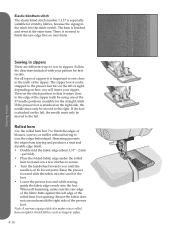
... while sewing, guide the fabric edge evenly into the foot. Then set the stitch position so that it is important to sew close to iron the edges beforehand. The zipper foot 4 can be snapped to secure. • Turn the handwheel towards you will insert your pattern for best results. Raise the presser foot and slide the fabric into the scroll of the presser foot. Sewing mode Elastic blindhem stitch The elastic blind stitch number...
... while sewing, guide the fabric edge evenly into the foot. Then set the stitch position so that it is important to sew close to iron the edges beforehand. The zipper foot 4 can be snapped to secure. • Turn the handwheel towards you will insert your pattern for best results. Raise the presser foot and slide the fabric into the scroll of the presser foot. Sewing mode Elastic blindhem stitch The elastic blind stitch number...
Owner's Manual
Page 83
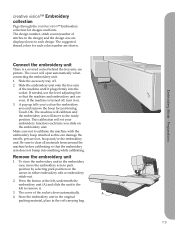
... embroidery unit. Embroidery Mode - Preparations creative vision™ Embroidery collection Page through the creative vision™ Embroidery collection for each color number are shown. The design number, stitch count (number of the socket closes automatically. The cover will move the embroidery arm to the ready position. To store the embroidery unit in the design) and the design size are even. The suggested thread colors for designs and fonts. If needed, use the level adjusting feet so that the embroidery arm...
... embroidery unit. Embroidery Mode - Preparations creative vision™ Embroidery collection Page through the creative vision™ Embroidery collection for each color number are shown. The design number, stitch count (number of the socket closes automatically. The cover will move the embroidery arm to the ready position. To store the embroidery unit in the design) and the design size are even. The suggested thread colors for designs and fonts. If needed, use the level adjusting feet so that the embroidery arm...
Owner's Manual
Page 133
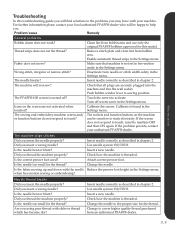
... Push bobbin winder lever to touch? The sewing and embroidery machine screen and/ or function buttons do not respond to sewing position. Is the correct presser foot used? Use needle system 130/705 H. Insert needle correctly as described in chapter 2. Use needle system 130/705 H. Insert a new needle. Maintenance Troubleshooting In this model. Did you insert a wrong needle? Wrong stitch, irregular or narrow stitch? Change to static electricity. The machine will be sensitive to a new higher quality thread purchased from bobbin area. Insert needle...
... Push bobbin winder lever to touch? The sewing and embroidery machine screen and/ or function buttons do not respond to sewing position. Is the correct presser foot used? Use needle system 130/705 H. Insert needle correctly as described in chapter 2. Use needle system 130/705 H. Insert a new needle. Maintenance Troubleshooting In this model. Did you insert a wrong needle? Wrong stitch, irregular or narrow stitch? Change to static electricity. The machine will be sensitive to a new higher quality thread purchased from bobbin area. Insert needle...
Owner's Manual
Page 134
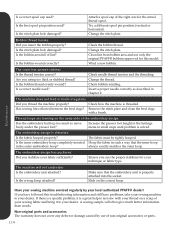
... the outer hoop. Is the stitch plate hole damaged? Attach a spool cap of the right size for this troubleshooting information and still have followed this model. Is the bobbin area full of your sewing fabric and bring it to your fabric sufficiently? Wind a new bobbin. Is a correct needle used ? Check needle thread tension and the threading. The machine does not feed or feeds irregularly Did you insert the bobbin properly? The embroidery design is solved. The embroidery design has...
... the outer hoop. Is the stitch plate hole damaged? Attach a spool cap of the right size for this troubleshooting information and still have followed this model. Is the bobbin area full of your sewing fabric and bring it to your fabric sufficiently? Wind a new bobbin. Is a correct needle used ? Check needle thread tension and the threading. The machine does not feed or feeds irregularly Did you insert the bobbin properly? The embroidery design is solved. The embroidery design has...
Owner's Manual
Page 135
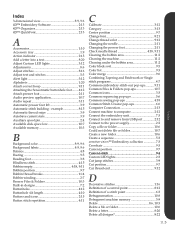
... foot 3:8 Blindhem stitch 4:15 Bobbin empty 4:18, 9:11 Bobbin position 9:7 Bobbin thread breaks 11:4 Bobbin winding 2:7 Browse Files & Folders 10:3 Built-in designs 7:2 Buttonholes 4:12 Buttonhole slit length 4:10 Buttons and icons 2:15 Button stitch repetition 4:11 C Calibrate 3:12 Category 3:13 Center position 9:7 Change font 8:21 Change thread color 9:12 Changing the needle 2:11 Changing the presser foot 2:11 Check needle thread 4:18, 9:11 Cleaning the bobbin area 11:2 Cleaning the machine 11:2 Cleaning under the bobbin area 11:2 Color block sort 9:5 Color list...
... foot 3:8 Blindhem stitch 4:15 Bobbin empty 4:18, 9:11 Bobbin position 9:7 Bobbin thread breaks 11:4 Bobbin winding 2:7 Browse Files & Folders 10:3 Built-in designs 7:2 Buttonholes 4:12 Buttonhole slit length 4:10 Buttons and icons 2:15 Button stitch repetition 4:11 C Calibrate 3:12 Category 3:13 Center position 9:7 Change font 8:21 Change thread color 9:12 Changing the needle 2:11 Changing the presser foot 2:11 Check needle thread 4:18, 9:11 Cleaning the bobbin area 11:2 Cleaning the machine 11:2 Cleaning under the bobbin area 11:2 Color block sort 9:5 Color list...

Owner's Manual
Page 136
... maximum number of stitches 8:23 External Device 10:4 G Getting started embroidering 7:5 Go to stitch 9:4 Grid 8:9 Group 8:6 H Handlook quilting 4:15 Hoop position 9:7 Horizontal position 2:4 Horizontal preview 5:5 How to launch the programs 2:14 How to embroidery edit 8:21 Lock screen 3:12 Long touch 3:3 Lowering feed dogs 2:11 Index 11:6 example 8:17 Embroidery stitch-out 3:6 Embroidery stitch-out - clear screen 9:12 Embroidery Machine Communication module. 2:14 Embroidery needle 2:10 Embroidery stitch editor 8:16 Embroidery stitch editor - Delete a stitch or...
... maximum number of stitches 8:23 External Device 10:4 G Getting started embroidering 7:5 Go to stitch 9:4 Grid 8:9 Group 8:6 H Handlook quilting 4:15 Hoop position 9:7 Horizontal position 2:4 Horizontal preview 5:5 How to launch the programs 2:14 How to embroidery edit 8:21 Lock screen 3:12 Long touch 3:3 Lowering feed dogs 2:11 Index 11:6 example 8:17 Embroidery stitch-out 3:6 Embroidery stitch-out - clear screen 9:12 Embroidery Machine Communication module. 2:14 Embroidery needle 2:10 Embroidery stitch editor 8:16 Embroidery stitch editor - Delete a stitch or...
Owner's Manual
Page 137
... equal 8:10 N Needles 2:10 Needle thread breaks 11:3 Needle threader 2:5 Needle up and extra lift toggle 2:15 Q Quick help 3:13 R Raise and lower the presser foot 4:3 Rear side 1:9 Register immediately for these benefits 2:14 Remove hoop 8:22 Remove presser foot 2:11 Remove Sensormatic buttonhole foot 4:18 Remove the embroidery unit 7:3 Rename a file or folder 10:6 Repeat a manual buttonhole 4:13 Replace a stitch or letter 5:3 Replace file 8:22 Replacing the stitch plate 11:2 Resize 8:18 Resize adjustments 8:18 Restore...
... equal 8:10 N Needles 2:10 Needle thread breaks 11:3 Needle threader 2:5 Needle up and extra lift toggle 2:15 Q Quick help 3:13 R Raise and lower the presser foot 4:3 Rear side 1:9 Register immediately for these benefits 2:14 Remove hoop 8:22 Remove presser foot 2:11 Remove Sensormatic buttonhole foot 4:18 Remove the embroidery unit 7:3 Rename a file or folder 10:6 Repeat a manual buttonhole 4:13 Replace a stitch or letter 5:3 Replace file 8:22 Replacing the stitch plate 11:2 Resize 8:18 Resize adjustments 8:18 Restore...


