
Owner's Manual
Page 3
... stitching. Always unplug this sewing machine only for examination, repair, electrical or mechanical adjustment. 8. Do not allow plug to as threading needle, changing needle, threading bobbin, or changing presser foot, etc. 20. Use this appliance from the electric outlet when removing covers, lubricating, or when making any air opening . 10. Never...
... stitching. Always unplug this sewing machine only for examination, repair, electrical or mechanical adjustment. 8. Do not allow plug to as threading needle, changing needle, threading bobbin, or changing presser foot, etc. 20. Use this appliance from the electric outlet when removing covers, lubricating, or when making any air opening . 10. Never...
Owner's Manual
Page 5
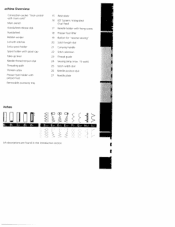
achine Overview Connection socket foot control with main cord' Main switch Handwheel release disk Handwheel Bobbin winder Lid with stitches Extra spool holder Spool holder with spool cap Take-up lever Needle thread tension dial Threading path Thread cutter Presser foot ...
achine Overview Connection socket foot control with main cord' Main switch Handwheel release disk Handwheel Bobbin winder Lid with stitches Extra spool holder Spool holder with spool cap Take-up lever Needle thread tension dial Threading path Thread cutter Presser foot ...

Owner's Manual
Page 6
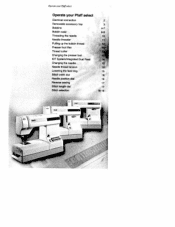
Contents Accessories and needles Accessory tray Appliqué Appliqué foot Bias-tape binder Blind stitch Bobbin case Buttonholes Changing the needle plate Changing the needle Cleaning and oiling Closed overlock stitch Cording foot Covering stitch Darning with... the elastic stitch Darning with the straight stitch Darning Decorative sewing Drawing up the bobbin thread Dropping the feed dog Elastic stitch Elastic stitches Electrical connection Embroidering with a dense zigzag stitch Eyelet embroidery Feather stitch Felling foot ...
Contents Accessories and needles Accessory tray Appliqué Appliqué foot Bias-tape binder Blind stitch Bobbin case Buttonholes Changing the needle plate Changing the needle Cleaning and oiling Closed overlock stitch Cording foot Covering stitch Darning with... the elastic stitch Darning with the straight stitch Darning Decorative sewing Drawing up the bobbin thread Dropping the feed dog Elastic stitch Elastic stitches Electrical connection Embroidering with a dense zigzag stitch Eyelet embroidery Feather stitch Felling foot ...

Owner's Manual
Page 7
... Selecting needle position 16 Selecting stitch width 16 Winding from the second spool holder 6 Serging with blindstitch and overlock stitch 25, 28-29 Winding the bobbin 4-7 Serging with zigzag stitch 24 Winding through the needle 7 Setting stretch stitches 17-19 Setting utility stitches 17-19 Zigzag stitch 24 Sewing light 69...
... Selecting needle position 16 Selecting stitch width 16 Winding from the second spool holder 6 Serging with blindstitch and overlock stitch 25, 28-29 Winding the bobbin 4-7 Serging with zigzag stitch 24 Winding through the needle 7 Setting stretch stitches 17-19 Setting utility stitches 17-19 Zigzag stitch 24 Sewing light 69...
Owner's Manual
Page 11
Operate your Pfaffselect Operate your Pfaff select Electrical connection Removable accessory tray Bobbins Bobbin case Threading the needle Needle threader Pulling up the bobbin thread Presser foot lifter Thread cutter Changing the presser foot lOT System/Integrated Dual Feed Changing the needle Needle thread tension Lowering the feed dog Stitch width dial Needle position dIal Reverse sewing Stitch length dial Stitch selection 2 3 4-7 18 16 17 17 18-19 p$Rfl
Operate your Pfaffselect Operate your Pfaff select Electrical connection Removable accessory tray Bobbins Bobbin case Threading the needle Needle threader Pulling up the bobbin thread Presser foot lifter Thread cutter Changing the presser foot lOT System/Integrated Dual Feed Changing the needle Needle thread tension Lowering the feed dog Stitch width dial Needle position dIal Reverse sewing Stitch length dial Stitch selection 2 3 4-7 18 16 17 17 18-19 p$Rfl

Owner's Manual
Page 14
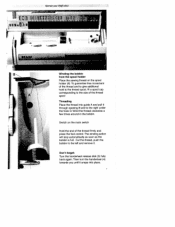
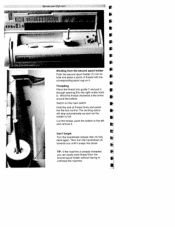
Operate your Pfaffselect Preparing the machine for bobbin winding Hold the handwheel (4) firmly and turn the handwheel release disc (3) until it is winding the bobbin. E F F I Push the bobbin to the right. Placing the bobbin Switch off the main switch (2) Place the empty bobbin so that the black pin of the bobbin winder (5) snaps into the slot of the arrow. This stops the needle from moving while the machine is moved fully to the right Note: The bobbin can only be wound when it stops in the direction of the bobbin.
Operate your Pfaffselect Preparing the machine for bobbin winding Hold the handwheel (4) firmly and turn the handwheel release disc (3) until it is winding the bobbin. E F F I Push the bobbin to the right. Placing the bobbin Switch off the main switch (2) Place the empty bobbin so that the black pin of the bobbin winder (5) snaps into the slot of the arrow. This stops the needle from moving while the machine is moved fully to the right Note: The bobbin can only be wound when it stops in the direction of the bobbin.
Owner's Manual
Page 15
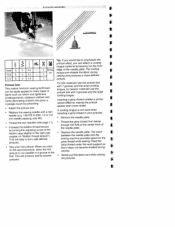
The winding action will stop automatically as soon as the bobbin is full. Switch on the spool holder (8). it Operate your Pfaffselect Winding the bobbin from the spool holder Place the sewing thread on the main switch Hold the end of the thread spool Threading Place the thread ...into place. Wind the thread clockwise a r few times around in the bobbin. Don't forget: Turn the handwheel release disk (3) fully back again. Then turn the handwheel (4) towards you until it snaps into guide A and pull ...
The winding action will stop automatically as soon as the bobbin is full. Switch on the spool holder (8). it Operate your Pfaffselect Winding the bobbin from the spool holder Place the sewing thread on the main switch Hold the end of the thread spool Threading Place the thread ...into place. Wind the thread clockwise a r few times around in the bobbin. Don't forget: Turn the handwheel release disk (3) fully back again. Then turn the handwheel (4) towards you until it snaps into guide A and pull ...
Owner's Manual
Page 16
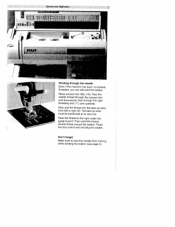
... corresponding spooi cap on it . t Operate your Pfaff select nat F h i11 $ I Winding from the second spool holder without having to F unthread the machine. Don't forget: Turn the handwheel release disk (3) fully back again. Cut the thread, push the bobbin to the right under hook D. Then turn the... thread from the second spool holder F Push the second spool holder (7) into place. The winding action will stop automatically as soon as the bobbin is already threaded, F you until it through opening B to the left and remove it . TIP: If the machine is full. Wind ...
... corresponding spooi cap on it . t Operate your Pfaff select nat F h i11 $ I Winding from the second spool holder without having to F unthread the machine. Don't forget: Turn the handwheel release disk (3) fully back again. Cut the thread, push the bobbin to the right under hook D. Then turn the... thread from the second spool holder F Push the second spool holder (7) into place. The winding action will stop automatically as soon as the bobbin is already threaded, F you until it through opening B to the left and remove it . TIP: If the machine is full. Wind ...
Owner's Manual
Page 17
Operate your Pfaffsekct I F AV t
Operate your Pfaffsekct I F AV t
Owner's Manual
Page 18
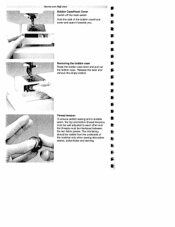
...buttonholes and darning. The interlacing should be interlaced between the two fabric pieces. Release the lever and remove the empty bobbin. I Raise the bobbin case lever and pull out the bobbin case. a, a Thread tension To ensure perfect sewing and a durable seam, the top and bottom thread-tensions must ...be well adjusted to each other and the threads must be visible from the underside of the bobbin case/hook cover and open it towards you...
...buttonholes and darning. The interlacing should be interlaced between the two fabric pieces. Release the lever and remove the empty bobbin. I Raise the bobbin case lever and pull out the bobbin case. a, a Thread tension To ensure perfect sewing and a durable seam, the top and bottom thread-tensions must ...be well adjusted to each other and the threads must be visible from the underside of the bobbin case/hook cover and open it towards you...

Owner's Manual
Page 19
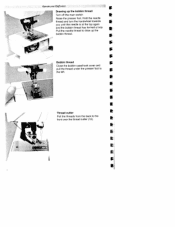
Operate your Pfaffsekct Inserting the bobbin Insert the full bobbin into the bobbin case. \ In doing so, pull the thread sideways through slot A, then under the tension plate B until it will go. Check: Pull the bobbin thread sharply. Opening E of the hook. -F The bobbin case must not fall out of the bobbin case must turn clockwise. Inserting the bobbin case D Lift lever F and slide the bobbin case onto the hook pin D as far as it rests in the opening (see arrow). A Check: When you lookat the bobbin and pull the thread, the bobbin must face upwards.
Operate your Pfaffsekct Inserting the bobbin Insert the full bobbin into the bobbin case. \ In doing so, pull the thread sideways through slot A, then under the tension plate B until it will go. Check: Pull the bobbin thread sharply. Opening E of the hook. -F The bobbin case must not fall out of the bobbin case must turn clockwise. Inserting the bobbin case D Lift lever F and slide the bobbin case onto the hook pin D as far as it rests in the opening (see arrow). A Check: When you lookat the bobbin and pull the thread, the bobbin must face upwards.
Owner's Manual
Page 22
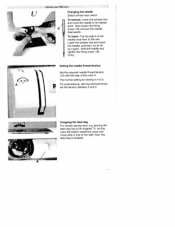
Thread cutter Pull the threads from the back to the left. Hold the needle thread and turn the handwheel towards you until the needle is at the top again and the bobbin thread has formed a loop. a Bobbin thread $ Close the bobbin case/hook cover and pull the thread under the presser foot to the front over the thread cutter (12). Pull the needle thread to draw up the I Drawing up the bobbin thread Turn off the main switch Raise the presser foot. A Operate your Pfaff select S I bobbin thread. F
Thread cutter Pull the threads from the back to the left. Hold the needle thread and turn the handwheel towards you until the needle is at the top again and the bobbin thread has formed a loop. a Bobbin thread $ Close the bobbin case/hook cover and pull the thread under the presser foot to the front over the thread cutter (12). Pull the needle thread to draw up the I Drawing up the bobbin thread Turn off the main switch Raise the presser foot. A Operate your Pfaff select S I bobbin thread. F
Owner's Manual
Page 25
... tension (10) with the help of the needle must face to be dropped. The normal setting for sewing is dropped. To do this, open the bobbin case/hook cover and move the needle to its highest point. Ii Operate your Pfffselect Changing the needle Switch off the main switch Aj To...
... tension (10) with the help of the needle must face to be dropped. The normal setting for sewing is dropped. To do this, open the bobbin case/hook cover and move the needle to its highest point. Ii Operate your Pfffselect Changing the needle Switch off the main switch Aj To...
Owner's Manual
Page 33
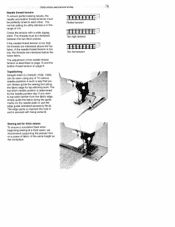
... interlaced between the two fabric pieces. Utility stitches and practical sewing Needle thread tension To ensure perfect sewing results, the needle and bobbin thread tensions must be perfectly tuned to top-stitch farther from the fabric edge, simply guide the fabric along the fabric edge for...standard accessory No.8). The adjustment of the same height as the workpiece Perfect tension Too high tension Too low tension Topstitching Straight stitch G (1540)IE (1530, 1520) can always guide the sewing foot along the guide marks on page 8. Sewing aid for utility stitches is too ...
... interlaced between the two fabric pieces. Utility stitches and practical sewing Needle thread tension To ensure perfect sewing results, the needle and bobbin thread tensions must be perfectly tuned to top-stitch farther from the fabric edge, simply guide the fabric along the fabric edge for...standard accessory No.8). The adjustment of the same height as the workpiece Perfect tension Too high tension Too low tension Topstitching Straight stitch G (1540)IE (1530, 1520) can always guide the sewing foot along the guide marks on page 8. Sewing aid for utility stitches is too ...

Owner's Manual
Page 45
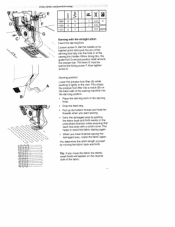
...the hem from the first row. • When sewing several seams next to one another, you should use an additional bobbin case and wind the bobbin by hand with the elastic thread. For smocking work . As the elastic thread is much stronger than the normal...; Finally, cut the protruding hem edge back to thread the twin needle. 1540 G 1 530 E 1520 E 0 3-4 • 3-5 0/1 0 3-4 • 3-5 0/1 0 3-4 3-5 0/1 Smocking effect with the elastic thread, you must be sewn at very low. Doncforget, the higher the bobbin thread tension, the more intense the gathering effect. • Sew a test...
...the hem from the first row. • When sewing several seams next to one another, you should use an additional bobbin case and wind the bobbin by hand with the elastic thread. For smocking work . As the elastic thread is much stronger than the normal...; Finally, cut the protruding hem edge back to thread the twin needle. 1540 G 1 530 E 1520 E 0 3-4 • 3-5 0/1 0 3-4 • 3-5 0/1 0 3-4 3-5 0/1 Smocking effect with the elastic thread, you must be sewn at very low. Doncforget, the higher the bobbin thread tension, the more intense the gathering effect. • Sew a test...

Owner's Manual
Page 46
...rows of gathering. • Mark the first line on the reverse side of the presser foot. I ;! 1530 E 0 6 • 3-5 0/1 1520 E 0 6 3-5 0/1 1540 M 1530 F 1 520 F 5-'. the thread. • Determine the amount of the fabric and sew along it. Due to extend approx. 10-20cm. • Each subsequent ...of gather by sewing over an elastic thread. • Mark the first gathering seam on the right side of gather by pulling the bobbin thread. Gathering with a stitch length of the elastic threads. secure the gather. • The gather can also be gathered by how...
...rows of gathering. • Mark the first line on the reverse side of the presser foot. I ;! 1530 E 0 6 • 3-5 0/1 1520 E 0 6 3-5 0/1 1540 M 1530 F 1 520 F 5-'. the thread. • Determine the amount of the fabric and sew along it. Due to extend approx. 10-20cm. • Each subsequent ...of gather by sewing over an elastic thread. • Mark the first gathering seam on the right side of gather by pulling the bobbin thread. Gathering with a stitch length of the elastic threads. secure the gather. • The gather can also be gathered by how...
Owner's Manual
Page 47
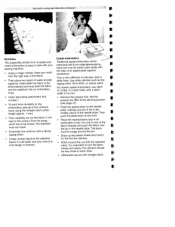
... hole C of the darning foot fully into the darning position. • Place the darning work in the darning hoop. • Dropthefeeddog. • Pull up the bobbin thread and hold the threads when you start sewing. • Darn the damaged area by moving the fabric back and forth. -J Tip: If you have...
... hole C of the darning foot fully into the darning position. • Place the darning work in the darning hoop. • Dropthefeeddog. • Pull up the bobbin thread and hold the threads when you start sewing. • Darn the damaged area by moving the fabric back and forth. -J Tip: If you have...
Owner's Manual
Page 62
Decorative sewing and embmidery techniques w w/ Richelieu Eyelet embroidery This especially artistic form of the fabric. G (1540), E (1530/1520), with a dense must not move. I • Embroider the contours with a stitch width 3-5 mm. Then push the plate down at the ...(stitch length approx. 1 mm). • Then carefully cut with the help of water-soluble table linen. zigzag stitch. • Draw up the bobbin thread and hold it • Finally, simply dissolve the stabilizer for the first few stitches. onto the right side of eyelet and insert embroidery is...
Decorative sewing and embmidery techniques w w/ Richelieu Eyelet embroidery This especially artistic form of the fabric. G (1540), E (1530/1520), with a dense must not move. I • Embroider the contours with a stitch width 3-5 mm. Then push the plate down at the ...(stitch length approx. 1 mm). • Then carefully cut with the help of water-soluble table linen. zigzag stitch. • Draw up the bobbin thread and hold it • Finally, simply dissolve the stabilizer for the first few stitches. onto the right side of eyelet and insert embroidery is...
Owner's Manual
Page 70
... does not become knotted during sewing and produces a more raised. I • Thread the two needles (see page 11). • Increase the bobbin thread tension by turning the adjusting screw of the needle plate. • Replace the needle plate. Accessories and needles F I I I I I... Tip: If you would like to emphasize the I pintuck effect, you start on the front 1540 G 1530 E 1520 E 0 2,5 D 0 2,5 0 0 2,5 5 Shining edge of the needle plate. The cording 5 foot tongue pre-shapes the fabric during sewing....
... does not become knotted during sewing and produces a more raised. I • Thread the two needles (see page 11). • Increase the bobbin thread tension by turning the adjusting screw of the needle plate. • Replace the needle plate. Accessories and needles F I I I I I... Tip: If you would like to emphasize the I pintuck effect, you start on the front 1540 G 1530 E 1520 E 0 2,5 D 0 2,5 0 0 2,5 5 Shining edge of the needle plate. The cording 5 foot tongue pre-shapes the fabric during sewing....
Owner's Manual
Page 80
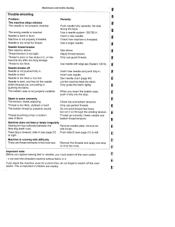
... must switch off the main switch. Thread is bent, and has hit the needle Let the machine feed the fabric. Check needle and bobbin thread tensions Machine does not feed or feeds irregularly Sewing lint has collected between the feed dog teeth rows Remove needle plate, remove lint ... not wind thread free-hand, but run it on through the winding tension. Important note: Before you replace sewing feet or needles, you insert the bobbin case, F push it . This is too small for a short time, do not forget to switch off the main switch. See above . Insert a ...
... must switch off the main switch. Thread is bent, and has hit the needle Let the machine feed the fabric. Check needle and bobbin thread tensions Machine does not feed or feeds irregularly Sewing lint has collected between the feed dog teeth rows Remove needle plate, remove lint ... not wind thread free-hand, but run it on through the winding tension. Important note: Before you replace sewing feet or needles, you insert the bobbin case, F push it . This is too small for a short time, do not forget to switch off the main switch. See above . Insert a ...

