
Owner's Manual
Page 5
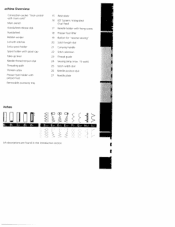
... Feed 17 Needle holder with fixing screw 18 Presser foot lifter 19 Button for "reverse sewing" 20 Stitch length dial 21 Carrying handle 22 Stitch selection 23 Thread guide 24 Sewing lamp (max. 15 watt) 25 Stitch width dial 26 Needle position dial 27 Needle plate itches U[Ia B5 C5 B5...
... Feed 17 Needle holder with fixing screw 18 Presser foot lifter 19 Button for "reverse sewing" 20 Stitch length dial 21 Carrying handle 22 Stitch selection 23 Thread guide 24 Sewing lamp (max. 15 watt) 25 Stitch width dial 26 Needle position dial 27 Needle plate itches U[Ia B5 C5 B5...
Owner's Manual
Page 7
... (Integrated Dual Feed) Top-stitching Trouble-shooting Twin needle 49-51 15 12 10 14 23 70 11, 35 Utility stitch table Introduction Selecting needle position 16 Selecting stitch width 16 Winding from the second spool holder 6 Serging with blindstitch and overlock stitch 25, 28-29 Winding the bobbin 4-7 Serging ... table 58 Stabilizing edges 42 Standard buttonhole 33 Standard buttonhole with gimp thread 33 Stitch density 17 Stitch length adjustment dial 17 Stitch selection dial 19 Straight stitch 24 Stretch triple straight stitch 26 Stretch triple zigzag stitch 26
... (Integrated Dual Feed) Top-stitching Trouble-shooting Twin needle 49-51 15 12 10 14 23 70 11, 35 Utility stitch table Introduction Selecting needle position 16 Selecting stitch width 16 Winding from the second spool holder 6 Serging with blindstitch and overlock stitch 25, 28-29 Winding the bobbin 4-7 Serging ... table 58 Stabilizing edges 42 Standard buttonhole 33 Standard buttonhole with gimp thread 33 Stitch density 17 Stitch length adjustment dial 17 Stitch selection dial 19 Straight stitch 24 Stretch triple straight stitch 26 Stretch triple zigzag stitch 26
Owner's Manual
Page 8
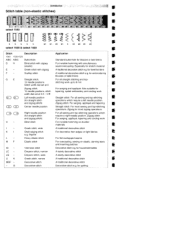
...) Zigzag stitch: For serging, appliqué and tapering. LG - In,áctio,i S Stitch table (non-elastic stitches) fl select 1540 I lEt' ( < >< S>, I 1% I I Wi WI WI WI 0 011 013 WI WI select 1530 & select 1520 I Stitch Description 1540 1530/1520 NB/C NB/C Buttonhole D H Blind stitch with simultaneous seam/overcasting. Greek stitch with zigzag F Scallop stitch GE Straight...
...) Zigzag stitch: For serging, appliqué and tapering. LG - In,áctio,i S Stitch table (non-elastic stitches) fl select 1540 I lEt' ( < >< S>, I 1% I I Wi WI WI WI 0 011 013 WI WI select 1530 & select 1520 I Stitch Description 1540 1530/1520 NB/C NB/C Buttonhole D H Blind stitch with simultaneous seam/overcasting. Greek stitch with zigzag F Scallop stitch GE Straight...
Owner's Manual
Page 9
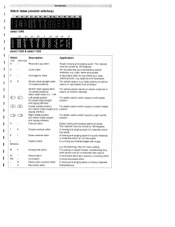
..., MF IG - The material must be turned by 180 degrees A closing and serging seam for jersey. Peacock's eye stitch E - In:reduction Stitch table (stretch stitches) select 1540 0/1 WI 0/1 0/1 0 0/i 0/3 0/1 0/1 select 1530 & select 1520 Stitch Description 1540 1530/1 520 D -
..., MF IG - The material must be turned by 180 degrees A closing and serging seam for jersey. Peacock's eye stitch E - In:reduction Stitch table (stretch stitches) select 1540 0/1 WI 0/1 0/1 0 0/i 0/3 0/1 0/1 select 1530 & select 1520 Stitch Description 1540 1530/1 520 D -

Owner's Manual
Page 10
... material must be turned by 180 degrees LK - LD - for sportswear For whip-stitching hems, e.g. cuffs, hems and panels FG - for household textiles A decorative stitch, e.g. N\ select 1540 Stitch 1540 1530/1520 LC - on pajamas and sweatsuits. Florentine stitch A stretch, decorative stitch p I .-. - .' /11 -. 'f -7 . ,,Ip '.1 i-7 s-7 - / -.,i .. .A '-1' r 4-1 / .--- -Z -- Introduction I Stitch table (stretch stitches) MM MM r MM M , - ' • 'I k-' ' \ 7/i X ". Description...
... material must be turned by 180 degrees LK - LD - for sportswear For whip-stitching hems, e.g. cuffs, hems and panels FG - for household textiles A decorative stitch, e.g. N\ select 1540 Stitch 1540 1530/1520 LC - on pajamas and sweatsuits. Florentine stitch A stretch, decorative stitch p I .-. - .' /11 -. 'f -7 . ,,Ip '.1 i-7 s-7 - / -.,i .. .A '-1' r 4-1 / .--- -Z -- Introduction I Stitch table (stretch stitches) MM MM r MM M , - ' • 'I k-' ' \ 7/i X ". Description...
Owner's Manual
Page 11
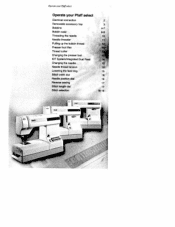
Operate your Pfaffselect Operate your Pfaff select Electrical connection Removable accessory tray Bobbins Bobbin case Threading the needle Needle threader Pulling up the bobbin thread Presser foot lifter Thread cutter Changing the presser foot lOT System/Integrated Dual Feed Changing the needle Needle thread tension Lowering the feed dog Stitch width dial Needle position dIal Reverse sewing Stitch length dial Stitch selection 2 3 4-7 18 16 17 17 18-19 p$Rfl
Operate your Pfaffselect Operate your Pfaff select Electrical connection Removable accessory tray Bobbins Bobbin case Threading the needle Needle threader Pulling up the bobbin thread Presser foot lifter Thread cutter Changing the presser foot lOT System/Integrated Dual Feed Changing the needle Needle thread tension Lowering the feed dog Stitch width dial Needle position dIal Reverse sewing Stitch length dial Stitch selection 2 3 4-7 18 16 17 17 18-19 p$Rfl
Owner's Manual
Page 13
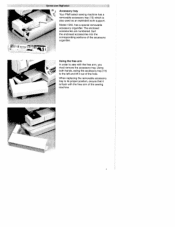
... to its proper position, ensure that it out of the accessory organi5er. - Model 1540, has a special removable accessory organi5er. Sort the enclosed accessories into the corresponding sections of the hole. lHt- * _____ Qperate your Pfr1ffselect Accessory tray ç Your Pfaff select sewing machine has a removable accessory tray (15) which is flush with the...
... to its proper position, ensure that it out of the accessory organi5er. - Model 1540, has a special removable accessory organi5er. Sort the enclosed accessories into the corresponding sections of the hole. lHt- * _____ Qperate your Pfr1ffselect Accessory tray ç Your Pfaff select sewing machine has a removable accessory tray (15) which is flush with the...
Owner's Manual
Page 16
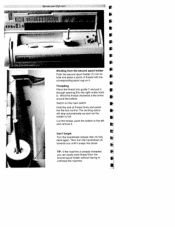
... of thread with the corresponding spooi cap on the main switch Hold the end of thread firmly and press the the foot control. Operate your Pfaff select nat F h i11 $ I Winding from the second spool holder without having to the right under hook D. TIP: If the machine is full. Threading Place the thread...
... of thread with the corresponding spooi cap on the main switch Hold the end of thread firmly and press the the foot control. Operate your Pfaff select nat F h i11 $ I Winding from the second spool holder without having to the right under hook D. TIP: If the machine is full. Threading Place the thread...
Owner's Manual
Page 22
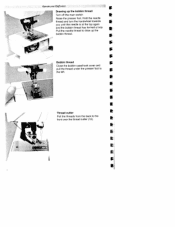
A Operate your Pfaff select S I bobbin thread. a Bobbin thread $ Close the bobbin case/hook cover and pull the thread under the presser foot to the front over the thread cutter (12). Hold the needle thread and turn the handwheel towards you until the needle is at the top again and the bobbin thread has formed a loop. Pull the needle thread to draw up the I Drawing up the bobbin thread Turn off the main switch Raise the presser foot. F Thread cutter Pull the threads from the back to the left.
A Operate your Pfaff select S I bobbin thread. a Bobbin thread $ Close the bobbin case/hook cover and pull the thread under the presser foot to the front over the thread cutter (12). Hold the needle thread and turn the handwheel towards you until the needle is at the top again and the bobbin thread has formed a loop. Pull the needle thread to draw up the I Drawing up the bobbin thread Turn off the main switch Raise the presser foot. F Thread cutter Pull the threads from the back to the left.
Owner's Manual
Page 24
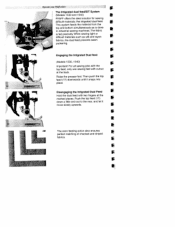
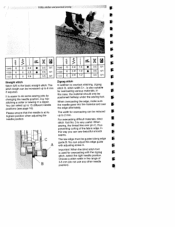
...the top and bottom simultaneously as silk and rayon S fabrics, the dual feed prevents seam puckering. $ S Engaging the Intigrated Dual feed $ (Models 1530, 1540) S Important! Push the top feed (17) T down a little and out to the rear, and let it snaps into place. The fabric I ...When sewing light or difficult materials such as is fed precisely. Operate your Pfaff select The Intigrated dual teedIIDT System (Models 1530 and 1540) PFAFF offers the ideal solution for sewing difficult materials: the intigrated dual feed.
...the top and bottom simultaneously as silk and rayon S fabrics, the dual feed prevents seam puckering. $ S Engaging the Intigrated Dual feed $ (Models 1530, 1540) S Important! Push the top feed (17) T down a little and out to the rear, and let it snaps into place. The fabric I ...When sewing light or difficult materials such as is fed precisely. Operate your Pfaff select The Intigrated dual teedIIDT System (Models 1530 and 1540) PFAFF offers the ideal solution for sewing difficult materials: the intigrated dual feed.

Owner's Manual
Page 26
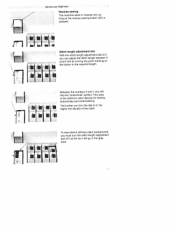
...right. During sewing you will find recommendations in increments to the left can be in the material. When the position of the stitch. When selecting the width, the needle must not be in the material. In chapter "Utility stitches and practical sewing" (pages 21-44), you can ... R k Basic setting: Turn the stitch width knob (27) to the left (see page 49). The reverse applies also for the stitch width selection of individual stitches. The furthest needle position to the symbol (maximum stitch width) Exception: Straight stitch is being changed, the needle must not be achieved...
...right. During sewing you will find recommendations in increments to the left can be in the material. When the position of the stitch. When selecting the width, the needle must not be in the material. In chapter "Utility stitches and practical sewing" (pages 21-44), you can ... R k Basic setting: Turn the stitch width knob (27) to the left (see page 49). The reverse applies also for the stitch width selection of individual stitches. The furthest needle position to the symbol (maximum stitch width) Exception: Straight stitch is being changed, the needle must not be achieved...
Owner's Manual
Page 27
... far as the reverse sewing button (20) is the optimum stitch density for sewing buttonholes and embroidering. This area is pressed. _______ ___ Operate your Pfaff select Reverse sewing The machine sews in reverse only as long as it will find the "buttonhole" symbol.
... far as the reverse sewing button (20) is the optimum stitch density for sewing buttonholes and embroidering. This area is pressed. _______ ___ Operate your Pfaff select Reverse sewing The machine sews in reverse only as long as it will find the "buttonhole" symbol.

Owner's Manual
Page 28
... are suitable for stretch material. I The stitch length dial can find the stitch A table with button B. _____ Operate your Pfaffselect Stitch selection, push button controls - Button B releases the button that have been activated. Utility stitches Each stitch has been given a letter that you...combinations By pushing two or several buttons you can either be in the normal sewing range or in the utility stitch range. select 1540 LI . Button B releases the buttons that are illustrated on the push button controls. All the stitch combinations are already ...
... are suitable for stretch material. I The stitch length dial can find the stitch A table with button B. _____ Operate your Pfaffselect Stitch selection, push button controls - Button B releases the button that have been activated. Utility stitches Each stitch has been given a letter that you...combinations By pushing two or several buttons you can either be in the normal sewing range or in the utility stitch range. select 1540 LI . Button B releases the buttons that are illustrated on the push button controls. All the stitch combinations are already ...
Owner's Manual
Page 29
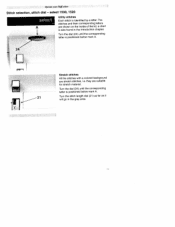
Operate your Pfcffselect Stitch selection, stitch dial - Turn the dial (24) until the corresponding letter is also found in the grey area. they are shown on the inside of the ... mark A. Turn the dial (24) until the corresponding letter is identified by a letter. The stitches and their corresponding letters are suitable for stretch material. select 1530, 1520 select Utility stitches Each stitch is positioned below mark A. 21 Turn the stitch length dial (21) as far as it will go in the Introduction...
Operate your Pfcffselect Stitch selection, stitch dial - Turn the dial (24) until the corresponding letter is also found in the grey area. they are shown on the inside of the ... mark A. Turn the dial (24) until the corresponding letter is identified by a letter. The stitches and their corresponding letters are suitable for stretch material. select 1530, 1520 select Utility stitches Each stitch is positioned below mark A. 21 Turn the stitch length dial (21) as far as it will go in the Introduction...
Owner's Manual
Page 32
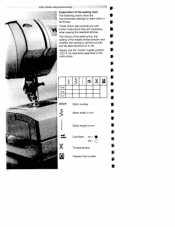
... charts also provide you with S the top feed switched on = off . Utility stitches and practical sewing I Stitch width in mm Stitch length in the instructions. H-x 1540 1530 I 1520 I stitch Stitch number I Explanation of the needle thread tension and whether the sewing is carried out with further instructions that are necessary when...
... charts also provide you with S the top feed switched on = off . Utility stitches and practical sewing I Stitch width in mm Stitch length in the instructions. H-x 1540 1530 I 1520 I stitch Stitch number I Explanation of the needle thread tension and whether the sewing is carried out with further instructions that are necessary when...
Owner's Manual
Page 34
...page 16). Choose a stitch width in a zipper. the edge alternately. You can adjust this way you can select up to do not use any other needle position). for overcasting with adjusting screw A. topstitching a collar or ... materials. F Important: When the blind stitch foot is the basic straight stitch. In this edge guide with the zigzag F stitch, select the right needle position. Utility stitches and practical sewing S I I I I ; $ • 1540 G 2- 1-2 3-5 0/1 1530E02,5•350/i • 1530 E 2-i' 1-2 3-5 0/1 I 1520 E 0 2,5 3-5 0/1 1520 E ...
...page 16). Choose a stitch width in a zipper. the edge alternately. You can adjust this way you can select up to do not use any other needle position). for overcasting with adjusting screw A. topstitching a collar or ... materials. F Important: When the blind stitch foot is the basic straight stitch. In this edge guide with the zigzag F stitch, select the right needle position. Utility stitches and practical sewing S I I I I ; $ • 1540 G 2- 1-2 3-5 0/1 1530E02,5•350/i • 1530 E 2-i' 1-2 3-5 0/1 I 1520 E 0 2,5 3-5 0/1 1520 E ...
Owner's Manual
Page 35
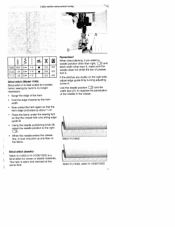
When blind stitching, if you select a needle position other than right, and stitch width other than 5, make sure the needle does not strike the bar of the fabric. Stitch H (1540) Blind stitch (elastic) Stitch D (1540) or H (1530/1 520) is no longer necessary. •...; Serge the edge of the needle in the crease. Remember! Utility stirche.c and practical sewing A S -r ; 1540 H/D 5-4 1-2 • 3-5 0/3 1530 -/H 5-b. 1-2 • 3-5 0/3 ' - select the needle position to regulate the penetration of the hem • Fold the edge inwards by the hem width. • Now...
When blind stitching, if you select a needle position other than right, and stitch width other than 5, make sure the needle does not strike the bar of the fabric. Stitch H (1540) Blind stitch (elastic) Stitch D (1540) or H (1530/1 520) is no longer necessary. •...; Serge the edge of the needle in the crease. Remember! Utility stirche.c and practical sewing A S -r ; 1540 H/D 5-4 1-2 • 3-5 0/3 1530 -/H 5-b. 1-2 • 3-5 0/3 ' - select the needle position to regulate the penetration of the hem • Fold the edge inwards by the hem width. • Now...
Owner's Manual
Page 38
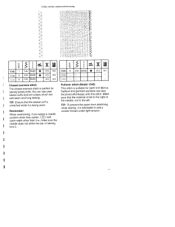
I 5- For elastic materials and knits, the select models offer overlock stitches which do not fray too much can be sewn together perfectly. Tip: We recommend using blind stitch foot No. 3 when sewing overlock seams. It guides particularly well and prevents the seam from puckering even on wide seams. 1540 K 53O I I itretch • 5- itretch...
I 5- For elastic materials and knits, the select models offer overlock stitches which do not fray too much can be sewn together perfectly. Tip: We recommend using blind stitch foot No. 3 when sewing overlock seams. It guides particularly well and prevents the seam from puckering even on wide seams. 1540 K 53O I I itretch • 5- itretch...
Owner's Manual
Page 39
...with this stitch. Make sure that the sleeve cuff is stretched while it is advisable to the left. Remember! When overlocking, if you select a needle position other than center, and stitch width other than 5 , make sure the needle does not strike the bar of the ...open-knit fabrics. Stretch 3-5 0/3 Closed overlock stitch The closed overlock stitch is being sewn. I 1530 K 1 fl K L jX 54- Pullover stitch (Model 1540) This stitch is fed to the right of sewing foot 3. Stretch • 3-5 0/3 5-'- TIP: Ensure that the material is suitable for sewing jersey knits. ...
...with this stitch. Make sure that the sleeve cuff is stretched while it is advisable to the left. Remember! When overlocking, if you select a needle position other than center, and stitch width other than 5 , make sure the needle does not strike the bar of the ...open-knit fabrics. Stretch 3-5 0/3 Closed overlock stitch The closed overlock stitch is being sewn. I 1530 K 1 fl K L jX 54- Pullover stitch (Model 1540) This stitch is fed to the right of sewing foot 3. Stretch • 3-5 0/3 5-'- TIP: Ensure that the material is suitable for sewing jersey knits. ...
Owner's Manual
Page 40
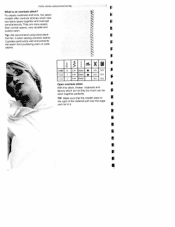
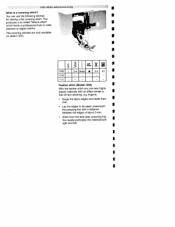
... Utiliiy sutches and practical sewing S What is a covering stitch? I • Stitch from the face side, ensuring that of about 3 mm. Feather stitch (Model 1540) S With the feather stitch you can use the following stitches for sewing a flat covering seam. You can sew highly elastic materials with a distance between the...be sewn underneath I the pressing foot with an effect similar to collar plackets or raglan seams. a The covering stitches are only available on select 1540. S L\j\j $ S S S • 1540 L 5-bi Stretch 3-5 0/1 S 1530 - - - 1520 - - - - -
... Utiliiy sutches and practical sewing S What is a covering stitch? I • Stitch from the face side, ensuring that of about 3 mm. Feather stitch (Model 1540) S With the feather stitch you can use the following stitches for sewing a flat covering seam. You can sew highly elastic materials with a distance between the...be sewn underneath I the pressing foot with an effect similar to collar plackets or raglan seams. a The covering stitches are only available on select 1540. S L\j\j $ S S S • 1540 L 5-bi Stretch 3-5 0/1 S 1530 - - - 1520 - - - - -


