
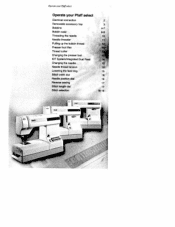
Owner's Manual
Page 3
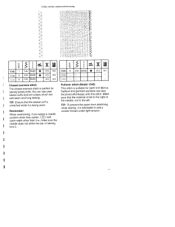
... is not working properly, if it . 2. Do not place in the needle area, such as threading needle, changing needle, threading bobbin, or changing presser foot, etc. 20. Close attention is necessary when this sewing machine only for a sewing machine that has fallen into a tub or sink. Please also observe the general safety notes on cord. Never operate this manual. 7. Use needles recommended by pulling on opposite page. IMPORTANT SAFETY INSTRUCTIONS For...
... is not working properly, if it . 2. Do not place in the needle area, such as threading needle, changing needle, threading bobbin, or changing presser foot, etc. 20. Close attention is necessary when this sewing machine only for a sewing machine that has fallen into a tub or sink. Please also observe the general safety notes on cord. Never operate this manual. 7. Use needles recommended by pulling on opposite page. IMPORTANT SAFETY INSTRUCTIONS For...

Owner's Manual
Page 6
... and needles Accessory tray Appliqué Appliqué foot Bias-tape binder Blind stitch Bobbin case Buttonholes Changing the needle plate Changing the needle Cleaning and oiling Closed overlock stitch Cording foot Covering stitch Darning with the elastic stitch Darning with the straight stitch Darning Decorative sewing Drawing up the bobbin thread Dropping the feed dog Elastic stitch Elastic stitches Electrical connection Embroidering with a dense zigzag stitch Eyelet embroidery Feather stitch Felling foot Free arm Fringe foot Introduction Gathering foot I 59 55-56 Gathering with elastic...
... and needles Accessory tray Appliqué Appliqué foot Bias-tape binder Blind stitch Bobbin case Buttonholes Changing the needle plate Changing the needle Cleaning and oiling Closed overlock stitch Cording foot Covering stitch Darning with the elastic stitch Darning with the straight stitch Darning Decorative sewing Drawing up the bobbin thread Dropping the feed dog Elastic stitch Elastic stitches Electrical connection Embroidering with a dense zigzag stitch Eyelet embroidery Feather stitch Felling foot Free arm Fringe foot Introduction Gathering foot I 59 55-56 Gathering with elastic...
Owner's Manual
Page 7
... spool holder 6 Serging with blindstitch and overlock stitch 25, 28-29 Winding the bobbin 4-7 Serging with zigzag stitch 24 Winding through the needle 7 Setting stretch stitches 17-19 Setting utility stitches 17-19 Zigzag stitch 24 Sewing light 69 Sewing on buttons 34 Sewing on patches 38 Sewing on zippers 40-41 Sewing table Introduction Shirring foot 79 Shell-edging 44 Smocking 35 Special accessories table 58 Stabilizing edges 42 Standard buttonhole 33 Standard buttonhole with gimp thread 33 Stitch density 17 Stitch length adjustment dial 17 Stitch...
... spool holder 6 Serging with blindstitch and overlock stitch 25, 28-29 Winding the bobbin 4-7 Serging with zigzag stitch 24 Winding through the needle 7 Setting stretch stitches 17-19 Setting utility stitches 17-19 Zigzag stitch 24 Sewing light 69 Sewing on buttons 34 Sewing on patches 38 Sewing on zippers 40-41 Sewing table Introduction Shirring foot 79 Shell-edging 44 Smocking 35 Special accessories table 58 Stabilizing edges 42 Standard buttonhole 33 Standard buttonhole with gimp thread 33 Stitch density 17 Stitch length adjustment dial 17 Stitch...
Owner's Manual
Page 8
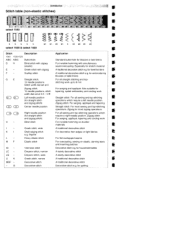
... all sewing and top-stitching I (for stretch material A traditional decorative stitch e.g. stitching work I H - In,áctio,i S Stitch table (non-elastic stitches) fl select 1540 I lEt' ( < >< S>, I 1% I I Wi WI WI WI 0 011 013 WI WI select 1530 & select 1520 I Stitch Description 1540 1530/1520 NB/C NB/C Buttonhole D H Blind stitch with zigzag F Scallop stitch GE Straight stitch, 15 needle positions Stitch width dial set at 0 Application I Standard buttonnole for quilting I Zigzag for most sewing and top-stitching operations...
... all sewing and top-stitching I (for stretch material A traditional decorative stitch e.g. stitching work I H - In,áctio,i S Stitch table (non-elastic stitches) fl select 1540 I lEt' ( < >< S>, I 1% I I Wi WI WI WI 0 011 013 WI WI select 1530 & select 1520 I Stitch Description 1540 1530/1520 NB/C NB/C Buttonhole D H Blind stitch with zigzag F Scallop stitch GE Straight stitch, 15 needle positions Stitch width dial set at 0 Application I Standard buttonnole for quilting I Zigzag for most sewing and top-stitching operations...
Owner's Manual
Page 9
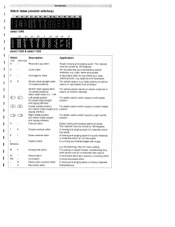
H Stretch triple zigzag stitch, 15 needle positions Stitch width knob 0.5 - 5 Left needle position (for stretch triple straight and zigzag stitches> Center needle position (for stretch triple straight and zigzag stitches> Right needle position (for stretch triple straight and zigzag stitches> Pullover stitch Closed overlock stitch Open overlock stitch Feather stitch For sewing elastic bands on elastic materials or seams on heavy materials Embellishment hemstitching. Cover stitch F - cuffs, hems and panels A decorative stitch tor top-stitching or whipstitching hems, eg. I K K I...
H Stretch triple zigzag stitch, 15 needle positions Stitch width knob 0.5 - 5 Left needle position (for stretch triple straight and zigzag stitches> Center needle position (for stretch triple straight and zigzag stitches> Right needle position (for stretch triple straight and zigzag stitches> Pullover stitch Closed overlock stitch Open overlock stitch Feather stitch For sewing elastic bands on elastic materials or seams on heavy materials Embellishment hemstitching. Cover stitch F - cuffs, hems and panels A decorative stitch tor top-stitching or whipstitching hems, eg. I K K I...
Owner's Manual
Page 11
Operate your Pfaffselect Operate your Pfaff select Electrical connection Removable accessory tray Bobbins Bobbin case Threading the needle Needle threader Pulling up the bobbin thread Presser foot lifter Thread cutter Changing the presser foot lOT System/Integrated Dual Feed Changing the needle Needle thread tension Lowering the feed dog Stitch width dial Needle position dIal Reverse sewing Stitch length dial Stitch selection 2 3 4-7 18 16 17 17 18-19 p$Rfl
Operate your Pfaffselect Operate your Pfaff select Electrical connection Removable accessory tray Bobbins Bobbin case Threading the needle Needle threader Pulling up the bobbin thread Presser foot lifter Thread cutter Changing the presser foot lOT System/Integrated Dual Feed Changing the needle Needle thread tension Lowering the feed dog Stitch width dial Needle position dIal Reverse sewing Stitch length dial Stitch selection 2 3 4-7 18 16 17 17 18-19 p$Rfl
Owner's Manual
Page 13
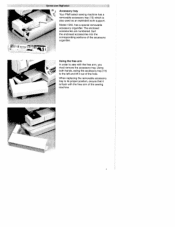
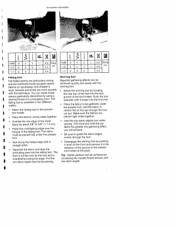
... work support. The enclosed accessories are numbered. Sort the enclosed accessories into the corresponding sections of the hole. Model 1540, has a special removable accessory organi5er. Using the free arm In order to its proper position, ensure that it out of the accessory organi5er. lHt- * _____ Qperate your Pfr1ffselect Accessory tray ç Your Pfaff select sewing machine has a removable accessory tray (15) which is flush with the free arm, you must remove the accessory tray. - When replacing...
... work support. The enclosed accessories are numbered. Sort the enclosed accessories into the corresponding sections of the hole. Model 1540, has a special removable accessory organi5er. Using the free arm In order to its proper position, ensure that it out of the accessory organi5er. lHt- * _____ Qperate your Pfr1ffselect Accessory tray ç Your Pfaff select sewing machine has a removable accessory tray (15) which is flush with the free arm, you must remove the accessory tray. - When replacing...
Owner's Manual
Page 25
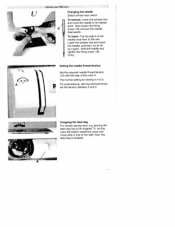
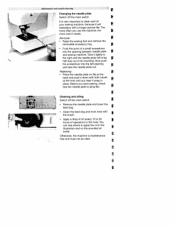
... feed dog For certain sewing work, e.g. To do this, open the bobbin case/hook cover and move the needle to the right. Hold the needle and tighten the fixing screw (18) firmly. Now the feed dog is 4 to be dropped. Ii Operate your Pfffselect Changing the needle Switch off the main switch Aj To remove: Lower the presser foot and move slide A fully to its highest point. The normal setting for sewing is dropped. P For embroidering, darning and buttonhole set...
... feed dog For certain sewing work, e.g. To do this, open the bobbin case/hook cover and move the needle to the right. Hold the needle and tighten the fixing screw (18) firmly. Now the feed dog is 4 to be dropped. Ii Operate your Pfffselect Changing the needle Switch off the main switch Aj To remove: Lower the presser foot and move slide A fully to its highest point. The normal setting for sewing is dropped. P For embroidering, darning and buttonhole set...
Owner's Manual
Page 27
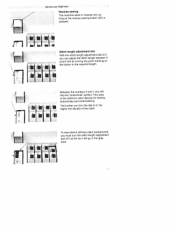
... optimum stitch density for sewing buttonholes and embroidering. This area is pressed. The further you can adjust the stitch length between 0 and 6 mm by turning the point marking on ii E U the button to 0, the higher the density of the stitch. _______ ___ Operate your Pfaff select Reverse sewing The machine sews in the grey area. 3 i cli iLl Di 42 I Stitch length adjustment dial With the stitch length adjustment dial (21) you turn the stitch length adjustment dial...
... optimum stitch density for sewing buttonholes and embroidering. This area is pressed. The further you can adjust the stitch length between 0 and 6 mm by turning the point marking on ii E U the button to 0, the higher the density of the stitch. _______ ___ Operate your Pfaff select Reverse sewing The machine sews in the grey area. 3 i cli iLl Di 42 I Stitch length adjustment dial With the stitch length adjustment dial (21) you turn the stitch length adjustment dial...
Owner's Manual
Page 32
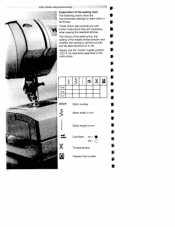
.... These charts also provide you with S the top feed switched on = off . H-x 1540 1530 I 1520 I stitch Stitch number I Explanation of the needle thread tension and whether the sewing is carried out with further instructions that are necessary when sewing the selected stitches. Always use the "center" needle position if not otherwise specificed in mm Dual feed on or off = Q Thread tension F F Presser foot number S 5 ; ; Utility stitches and practical sewing I Stitch width in mm Stitch length in the instructions.
.... These charts also provide you with S the top feed switched on = off . H-x 1540 1530 I 1520 I stitch Stitch number I Explanation of the needle thread tension and whether the sewing is carried out with further instructions that are necessary when sewing the selected stitches. Always use the "center" needle position if not otherwise specificed in mm Dual feed on or off = Q Thread tension F F Presser foot number S 5 ; ; Utility stitches and practical sewing I Stitch width in mm Stitch length in the instructions.
Owner's Manual
Page 33
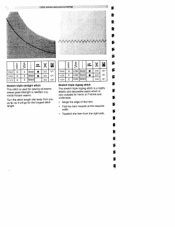
...-stitch needle position is too high the threads are interlaced below the lower fabric. The edge guide is inserted into hole A and is described on page 15 and the bobbin thread tension on page 8. Sewing aid for thick seams I To ensure a consistent feed when beginning sewing at a thick seam, we recommend supporting the presser foot on the needle plate or use the edge guide (standard accessory No.8). The adjustment of 4-5. Perfect tension Too high tension Too low tension Topstitching Straight stitch G (1540...
...-stitch needle position is too high the threads are interlaced below the lower fabric. The edge guide is inserted into hole A and is described on page 15 and the bobbin thread tension on page 8. Sewing aid for thick seams I To ensure a consistent feed when beginning sewing at a thick seam, we recommend supporting the presser foot on the needle plate or use the edge guide (standard accessory No.8). The adjustment of 4-5. Perfect tension Too high tension Too low tension Topstitching Straight stitch G (1540...
Owner's Manual
Page 34
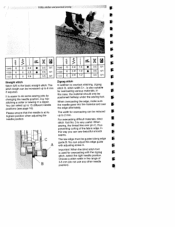
... fabric edge. the edge alternately. In this case, the material should only be reduced I the needle goes into the material and over pin C, thus I stitch length can be positioned halfway under the sewing foot. Utility stitches and practical sewing S I I I I ; $ • 1540 G 2- 1-2 3-5 0/1 1530E02,5•350/i • 1530 E 2-i' 1-2 3-5 0/1 I 1520 E 0 2,5 3-5 0/1 1520 E 2- 1-2 35 Oil I Straight stitch Stitch GIE is easier to overlock stitching, zigzag I preventing curling of 3-5 mm (do some sewing jobs by changing the needle position...
... fabric edge. the edge alternately. In this case, the material should only be reduced I the needle goes into the material and over pin C, thus I stitch length can be positioned halfway under the sewing foot. Utility stitches and practical sewing S I I I I ; $ • 1540 G 2- 1-2 3-5 0/1 1530E02,5•350/i • 1530 E 2-i' 1-2 3-5 0/1 I 1520 E 0 2,5 3-5 0/1 1520 E 2- 1-2 35 Oil I Straight stitch Stitch GIE is easier to overlock stitching, zigzag I preventing curling of 3-5 mm (do some sewing jobs by changing the needle position...
Owner's Manual
Page 36
The stretch triple zigzag stitch is a highly elastic and decorative seam which is needed, e.g. F F F F F F F S I ( - 1540 G 0 Stretch • 3-5 oil 1540 G 3-51.4 Stretch • 3-5 0/1 1 530 E 0 Stretch • 3-5 0/1 1530 E 3-51. F as far as it will go for the longest stitch length. • Serge the edge of the hem. • Fold the hem inwards at the required F width. • Topstitch the hem from you very suitable for sewing all seams where great strength is...
The stretch triple zigzag stitch is a highly elastic and decorative seam which is needed, e.g. F F F F F F F S I ( - 1540 G 0 Stretch • 3-5 oil 1540 G 3-51.4 Stretch • 3-5 0/1 1 530 E 0 Stretch • 3-5 0/1 1530 E 3-51. F as far as it will go for the longest stitch length. • Serge the edge of the hem. • Fold the hem inwards at the required F width. • Topstitch the hem from you very suitable for sewing all seams where great strength is...
Owner's Manual
Page 39
... is fed to the right of sewing foot 3. Remember! Utility stitches and practical sewing • 4 -- - ......' ,__ ) %• I 1540 I 1540 H 1530 - 12O - 5-' Stretch • - - - - 3-5 0/1 - - - - Pullover stitch (Model 1540) This stitch is being sewn. When overlocking, if you select a needle position other than center, and stitch width other than 5 , make sure the needle does not strike the bar of the needle, not to add a woolen thread under light tension. You can also be joined...
... is fed to the right of sewing foot 3. Remember! Utility stitches and practical sewing • 4 -- - ......' ,__ ) %• I 1540 I 1540 H 1530 - 12O - 5-' Stretch • - - - - 3-5 0/1 - - - - Pullover stitch (Model 1540) This stitch is being sewn. When overlocking, if you select a needle position other than center, and stitch width other than 5 , make sure the needle does not strike the bar of the needle, not to add a woolen thread under light tension. You can also be joined...
Owner's Manual
Page 59
... dense zigzag stitch you can create Interesting embroidery. By adjusting the width of the stitch using the width dial (27). Uneven embroidering • Place stabilizer under the fabric. • Set needle thread tension to "buttonhole", select zigzag stitch G (1540), E (1530/1520), set stitch length to 0 while sewing at a constant speed through the procedure. Note: If you selected the right or left needle position, the stitch width will only change in one direction. Decorative sewing and embroide,y techniques Embroidering with a dense zigzag...
... dense zigzag stitch you can create Interesting embroidery. By adjusting the width of the stitch using the width dial (27). Uneven embroidering • Place stabilizer under the fabric. • Set needle thread tension to "buttonhole", select zigzag stitch G (1540), E (1530/1520), set stitch length to 0 while sewing at a constant speed through the procedure. Note: If you selected the right or left needle position, the stitch width will only change in one direction. Decorative sewing and embroide,y techniques Embroidering with a dense zigzag...
Owner's Manual
Page 62
... sewing machine. plate, making sure pin A fits in the middle cutout of the fabric threads and push the fabric over the pin in the eyelet plate. G (1540), E (1530/1520), with a dense must not move. Then push the plate down at the darning position I twice using the straight stitch (stitch length approx. 1 mm). • Then carefully cut with the selected kind design is important to sew with straight stitch. Cut one -of an eyelet plate (special accessory). stitch. E F Set...
... sewing machine. plate, making sure pin A fits in the middle cutout of the fabric threads and push the fabric over the pin in the eyelet plate. G (1540), E (1530/1520), with a dense must not move. Then push the plate down at the darning position I twice using the straight stitch (stitch length approx. 1 mm). • Then carefully cut with the selected kind design is important to sew with straight stitch. Cut one -of an eyelet plate (special accessory). stitch. E F Set...
Owner's Manual
Page 68
... stitch foot Compass guide 93-036 962-9 1 For embroidering leather a. Accessories and needle: Presser feet (special accessory) for top feed) 98-694 818-00 Knit-edge foot 93-042 957-91 For sewing knitted fabrics I Braiding foot 93-036 936-9 1 For overstitching cords 7/9 hole foot 93-036 946-9 1 For sewing yarn and ribben Free-form embroidery foot 93-936 963-9 1 For embroidery work F (twin needle with (needle size 80) needle spacing 1.6 to 2.0) F Cording foot, 7 grooves 93-042 953-9 1 (twin needle with needle spacing...
... stitch foot Compass guide 93-036 962-9 1 For embroidering leather a. Accessories and needle: Presser feet (special accessory) for top feed) 98-694 818-00 Knit-edge foot 93-042 957-91 For sewing knitted fabrics I Braiding foot 93-036 936-9 1 For overstitching cords 7/9 hole foot 93-036 946-9 1 For sewing yarn and ribben Free-form embroidery foot 93-936 963-9 1 For embroidery work F (twin needle with (needle size 80) needle spacing 1.6 to 2.0) F Cording foot, 7 grooves 93-042 953-9 1 (twin needle with needle spacing...
Owner's Manual
Page 69
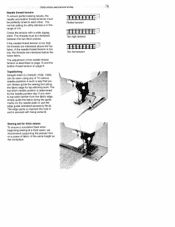
... stitch length. You can be placed fully under the presser foot, and the fabric to guide the fabric edges evenly through the foot cut out. The hem is direction of the groove of a contrasting color. Shirring foot Beautiful gathering effects can make these seams particularly decorative by using a sewing thread of the presser foot holder at the front and remove it snaps into the front bar. • Place the fabric to the presser foot holder. The fabric...
... stitch length. You can be placed fully under the presser foot, and the fabric to guide the fabric edges evenly through the foot cut out. The hem is direction of the groove of a contrasting color. Shirring foot Beautiful gathering effects can make these seams particularly decorative by using a sewing thread of the presser foot holder at the front and remove it snaps into the front bar. • Place the fabric to the presser foot holder. The fabric...
Owner's Manual
Page 78
... oil your sewing machine, because it lightly to F the right and the needle plate will rewardyou with the brush. • Apply a drop of oil (every 15 to 20 I hours of operation) to apply the oil in place. Mairaenance and troubkslwoting F Changing the needle plate Switch off the main switch F I • Clean the feed dog and hook area with a longer service life. I • Remove the needle plate and lower the feed dog. Before you use the machine...
... oil your sewing machine, because it lightly to F the right and the needle plate will rewardyou with the brush. • Apply a drop of oil (every 15 to 20 I hours of operation) to apply the oil in place. Mairaenance and troubkslwoting F Changing the needle plate Switch off the main switch F I • Clean the feed dog and hook area with a longer service life. I • Remove the needle plate and lower the feed dog. Before you use the machine...
Owner's Manual
Page 80
... pulling or Only guide the fabric lightly pushing the fabric. Seam is sewn unevenly The tension needs adjusting Thread is too thick, slubbed or hard The bobbin thread is lowered, slide A (see page 27) Push slide B (see page 27) to the hook. Thread bunching at right. Check needle and bobbin thread tensions Machine does not feed or feeds irregularly Sewing lint has collected between the feed dog teeth rows Remove needle plate, remove lint with brush. Feed dog is unevenly...
... pulling or Only guide the fabric lightly pushing the fabric. Seam is sewn unevenly The tension needs adjusting Thread is too thick, slubbed or hard The bobbin thread is lowered, slide A (see page 27) Push slide B (see page 27) to the hook. Thread bunching at right. Check needle and bobbin thread tensions Machine does not feed or feeds irregularly Sewing lint has collected between the feed dog teeth rows Remove needle plate, remove lint with brush. Feed dog is unevenly...


