RS1000 Optio RS1000
Page 10
... Powering the Camera 31 Charging the Battery 31 Installing the Battery 32 Using the AC Adapter 35 Installing the SD Memory Card 37 Number of Images Recordable on an SD Memory Card 40 Turning the Camera On and Off 41 Starting-up in the Playback Mode 42 Initial Settings 43 Setting the Display Language 43 Setting the Date and Time 47 Common Operations 49 Understanding the Button Functions 50 A Mode 50 Q Mode 52 Switching Between A Mode and Q Mode 54 Setting the Camera Functions 55 Operating the Menus 55 Menu List 59 Taking Pictures...
... Powering the Camera 31 Charging the Battery 31 Installing the Battery 32 Using the AC Adapter 35 Installing the SD Memory Card 37 Number of Images Recordable on an SD Memory Card 40 Turning the Camera On and Off 41 Starting-up in the Playback Mode 42 Initial Settings 43 Setting the Display Language 43 Setting the Date and Time 47 Common Operations 49 Understanding the Button Functions 50 A Mode 50 Q Mode 52 Switching Between A Mode and Q Mode 54 Setting the Camera Functions 55 Operating the Menus 55 Menu List 59 Taking Pictures...
RS1000 Optio RS1000
Page 11
... Mode 83 Using the Self-timer 85 Taking a Series of Pictures (Continuous Shooting/Burst Shooting/ 16-frame Shooting Mode 86 Taking Panoramic Pictures (Digital Panorama Mode 89 Setting the Shooting Functions 92 Selecting the Flash Mode 92 Selecting the Focus Mode 94 Selecting the Recorded Pixels 96 Adjusting the White Balance 98 Setting the Exposure (EV Compensation 99 Correcting the Shadows 100 Setting the Sensitivity 101 Setting the Digital Blur Removal Function 102 Setting the Date Imprint Function 103 Calling Up a Specific Function 104 Recording Movies 106 Recording a Movie...
... Mode 83 Using the Self-timer 85 Taking a Series of Pictures (Continuous Shooting/Burst Shooting/ 16-frame Shooting Mode 86 Taking Panoramic Pictures (Digital Panorama Mode 89 Setting the Shooting Functions 92 Selecting the Flash Mode 92 Selecting the Focus Mode 94 Selecting the Recorded Pixels 96 Adjusting the White Balance 98 Setting the Exposure (EV Compensation 99 Correcting the Shadows 100 Setting the Sensitivity 101 Setting the Digital Blur Removal Function 102 Setting the Date Imprint Function 103 Calling Up a Specific Function 104 Recording Movies 106 Recording a Movie...
RS1000 Optio RS1000
Page 12
... 150 Copying Images 153 Setting the Printing Service (DPOF 155 Printing Single Images 155 Printing All Images 157 Settings 159 Camera Settings 160 Formatting an SD Memory Card 160 Changing the Sound Settings 161 Changing the Date and Time 162 Setting the World Time 165 Changing the Display Language 167 Changing the Naming System of the Folder 168 Changing the Video Output Format 169 Adjusting the Brightness of the Display 170 Using the Power Saving Function 171 Setting the Auto Power Off Function 172 Changing the Start-up Screen 173 Resetting to Default Settings (Reset 174...
... 150 Copying Images 153 Setting the Printing Service (DPOF 155 Printing Single Images 155 Printing All Images 157 Settings 159 Camera Settings 160 Formatting an SD Memory Card 160 Changing the Sound Settings 161 Changing the Date and Time 162 Setting the World Time 165 Changing the Display Language 167 Changing the Naming System of the Folder 168 Changing the Video Output Format 169 Adjusting the Brightness of the Display 170 Using the Power Saving Function 171 Setting the Auto Power Off Function 172 Changing the Start-up Screen 173 Resetting to Default Settings (Reset 174...
RS1000 Optio RS1000
Page 23
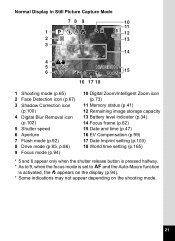
... mode (p.85, p.86) 9 Focus mode (p.94) 10 Digital Zoom/Intelligent Zoom icon (p.73) 11 Memory status (p.41) 12 Remaining image storage capacity 13 Battery level indicator (p.34) 14 Focus frame (p.62) 15 Date and time (p.47) 16 EV Compensation (p.99) 17 Date Imprint setting (p.103) 18 World time setting (p.165) * 5 and 6 appear only when the shutter release button is pressed halfway. * As to 9, when the focus mode is set to = and the Auto-Macro function is...
... mode (p.85, p.86) 9 Focus mode (p.94) 10 Digital Zoom/Intelligent Zoom icon (p.73) 11 Memory status (p.41) 12 Remaining image storage capacity 13 Battery level indicator (p.34) 14 Focus frame (p.62) 15 Date and time (p.47) 16 EV Compensation (p.99) 17 Date Imprint setting (p.103) 18 World time setting (p.165) * 5 and 6 appear only when the shutter release button is pressed halfway. * As to 9, when the focus mode is set to = and the Auto-Macro function is...
RS1000 Optio RS1000
Page 34
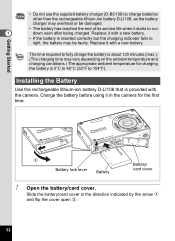
... time. 3 Battery lock lever Battery Battery/ card cover 1 Open the battery/card cover. Charge the battery before using it starts to run 1 down soon after being charged. The time required to fully charge the battery is inserted correctly but the charging indicator fails to light, the battery may be damaged. • The battery has reached the end of its service life when it in the direction indicated by the arrow 1 and flip the cover open 2. 32 Installing...
... time. 3 Battery lock lever Battery Battery/ card cover 1 Open the battery/card cover. Charge the battery before using it starts to run 1 down soon after being charged. The time required to fully charge the battery is inserted correctly but the charging indicator fails to light, the battery may be damaged. • The battery has reached the end of its service life when it in the direction indicated by the arrow 1 and flip the cover open 2. 32 Installing...
RS1000 Optio RS1000
Page 39
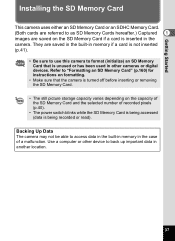
...; The power switch blinks while the SD Memory Card is being accessed (data is being recorded or read). Refer to access data in the built-in memory in another location. 37 Backing Up Data The camera may not be able to "Formatting an SD Memory Card" (p.160) for instructions on formatting. • Make sure that is unused or has been used in the camera. Use a computer or other cameras or digital devices.
...; The power switch blinks while the SD Memory Card is being accessed (data is being recorded or read). Refer to access data in the built-in memory in another location. 37 Backing Up Data The camera may not be able to "Formatting an SD Memory Card" (p.160) for instructions on formatting. • Make sure that is unused or has been used in the camera. Use a computer or other cameras or digital devices.
RS1000 Optio RS1000
Page 40
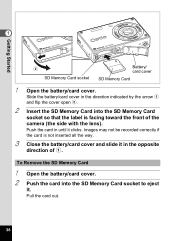
... Started SD Memory Card socket Battery/ card cover SD Memory Card 1 Open the battery/card cover. Push the card in the opposite direction of the camera (the side with the lens). Slide the battery/card cover in the direction indicated by the arrow 1 and flip the cover open 2. 2 Insert the SD Memory Card into the SD Memory Card socket to eject it clicks. Pull the card out. 38 Images may not be recorded correctly if the card...
... Started SD Memory Card socket Battery/ card cover SD Memory Card 1 Open the battery/card cover. Push the card in the opposite direction of the camera (the side with the lens). Slide the battery/card cover in the direction indicated by the arrow 1 and flip the cover open 2. 2 Insert the SD Memory Card into the SD Memory Card socket to eject it clicks. Pull the card out. 38 Images may not be recorded correctly if the card...
RS1000 Optio RS1000
Page 41
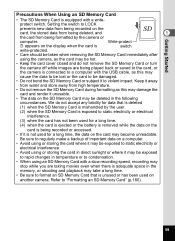
... time, the data on another camera. protect switch. Getting Started Precautions When Using an SD Memory Card • The SD Memory Card is being recorded or accessed. • If it to violent impact. Setting the switch to LOCK prevents new data from high temperature. • Do not remove the SD Memory Card during formatting as this may damage the card and render it may stop while you are being played back or saved...
... time, the data on another camera. protect switch. Getting Started Precautions When Using an SD Memory Card • The SD Memory Card is being recorded or accessed. • If it to violent impact. Setting the switch to LOCK prevents new data from high temperature. • Do not remove the SD Memory Card during formatting as this may damage the card and render it may stop while you are being played back or saved...
RS1000 Optio RS1000
Page 56
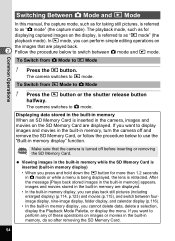
... memory display" function. After the message [Plays back stored images in the built-in memory] appears, images and movies stored in the built-in memory are played back. 2 Follow the procedure below to use the "Built-in memory display, you want to display images and movies in the built-in memory, turn the camera off before inserting or removing the SD Memory Card. To Switch from Q Mode to Q mode. If you cannot delete data, delete a selection, display the Playback Mode Palette, or display...
... memory display" function. After the message [Plays back stored images in the built-in memory] appears, images and movies stored in the built-in memory are played back. 2 Follow the procedure below to use the "Built-in memory display, you want to display images and movies in the built-in memory, turn the camera off before inserting or removing the SD Memory Card. To Switch from Q Mode to Q mode. If you cannot delete data, delete a selection, display the Playback Mode Palette, or display...

RS1000 Optio RS1000
Page 59
... on the [A Rec.Mode] menu 1 Press the 3 button in A mode. White Balance AWB Focusing Area Sensitivity Auto EV Compensation 0.0 Movie MENU Cancel OK OK 6 Press the 4 button or the four-way controller (4). The setting is saved and then the camera is pressed. To use another operation, refer to change the setting. Recorded Pixels 14M The focusing area changes each time the four-way controller (23) is ready for setting the other functions. Mode 1/2 The frame moves to...
... on the [A Rec.Mode] menu 1 Press the 3 button in A mode. White Balance AWB Focusing Area Sensitivity Auto EV Compensation 0.0 Movie MENU Cancel OK OK 6 Press the 4 button or the four-way controller (4). The setting is saved and then the camera is pressed. To use another operation, refer to change the setting. Recorded Pixels 14M The focusing area changes each time the four-way controller (23) is ready for setting the other functions. Mode 1/2 The frame moves to...
RS1000 Optio RS1000
Page 60
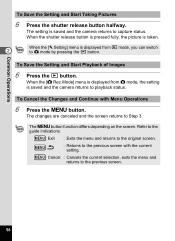
... A mode by pressing the Q button. Refer to the original screen. MENU Exit : Exits the menu and returns to the guide indications. To Cancel the Changes and Continue with the current setting. The 3 button function differs depending on the screen. To Save the Setting and Start Playback of Images 6 Press the Q button. The changes are canceled and the screen returns to the previous screen. 58 Common Operations To Save the Setting and Start Taking Pictures 6 Press the shutter release button halfway. MENU...
... A mode by pressing the Q button. Refer to the original screen. MENU Exit : Exits the menu and returns to the guide indications. To Cancel the Changes and Continue with the current setting. The 3 button function differs depending on the screen. To Save the Setting and Start Playback of Images 6 Press the Q button. The changes are canceled and the screen returns to the previous screen. 58 Common Operations To Save the Setting and Start Taking Pictures 6 Press the shutter release button halfway. MENU...

RS1000 Optio RS1000
Page 61
... enjoy easy picture-taking still pictures and recording movies. Common Operations Menu List This displays the items that you to go straight to it in the Appendix "Default Settings" (p.200) to check whether the settings are saved when the camera is too dark. Digital Blur Removal For correcting camera shake during shooting. Item Description Recorded Pixels For choosing the number of recorded pixels of still pictures White Balance For adjusting the color balance according to the light conditions Focusing...
... enjoy easy picture-taking still pictures and recording movies. Common Operations Menu List This displays the items that you to go straight to it in the Appendix "Default Settings" (p.200) to check whether the settings are saved when the camera is too dark. Digital Blur Removal For correcting camera shake during shooting. Item Description Recorded Pixels For choosing the number of recorded pixels of still pictures White Balance For adjusting the color balance according to the light conditions Focusing...
RS1000 Optio RS1000
Page 62
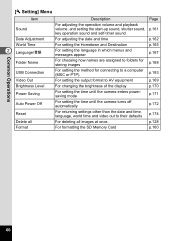
... Operations [W Setting] Menu Item Sound Date Adjustment World Time 2 Language/ Folder Name USB Connection Video Out Brightness Level Power Saving Auto Power Off Reset Delete all Format Description Page For adjusting the operation volume and playback volume, and setting the start-up sound, shutter sound, p.161 key operation sound and self-timer sound For adjusting the date and time p.162 For setting the Hometown and Destination p.165 For setting the language in which menus and messages appear p.167 For choosing how names are assigned to folders for storing images p.168 For setting...
... Operations [W Setting] Menu Item Sound Date Adjustment World Time 2 Language/ Folder Name USB Connection Video Out Brightness Level Power Saving Auto Power Off Reset Delete all Format Description Page For adjusting the operation volume and playback volume, and setting the start-up sound, shutter sound, p.161 key operation sound and self-timer sound For adjusting the date and time p.162 For setting the Hometown and Destination p.165 For setting the language in which menus and messages appear p.167 For choosing how names are assigned to folders for storing images p.168 For setting...
RS1000 Optio RS1000
Page 65
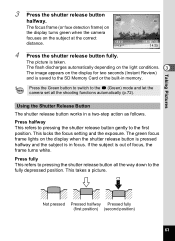
... pressing the shutter release button gently to the SD Memory Card or the built-in memory. Taking Pictures 3 Press the shutter release button halfway. Using the Shutter Release Button The shutter release button works in focus. Press fully This refers to the fully depressed position. The green focus frame lights on the display when the shutter release button is pressed halfway and the subject is saved to the first position. This takes a picture. If the...
... pressing the shutter release button gently to the SD Memory Card or the built-in memory. Taking Pictures 3 Press the shutter release button halfway. Using the Shutter Release Button The shutter release button works in focus. Press fully This refers to the fully depressed position. The green focus frame lights on the display when the shutter release button is pressed halfway and the subject is saved to the first position. This takes a picture. If the...
RS1000 Optio RS1000
Page 72
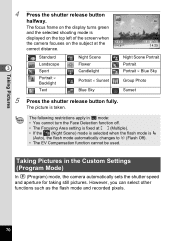
... Settings (Program Mode) In R (Program) mode, the camera automatically sets the shutter speed and aperture for taking still pictures. However, you can select other functions such as the flash mode and recorded pixels. 70 Taking Pictures 4 3 5 Press the shutter release button halfway. The picture is , (Auto), the flash mode automatically changes to a (Flash Off). • The EV Compensation function cannot be used. The focus frame on the display turns green and the selected shooting mode is displayed on the top left of the screen...
... Settings (Program Mode) In R (Program) mode, the camera automatically sets the shutter speed and aperture for taking still pictures. However, you can select other functions such as the flash mode and recorded pixels. 70 Taking Pictures 4 3 5 Press the shutter release button halfway. The picture is , (Auto), the flash mode automatically changes to a (Flash Off). • The EV Compensation function cannot be used. The focus frame on the display turns green and the selected shooting mode is displayed on the top left of the screen...

RS1000 Optio RS1000
Page 143
... not appear. 5 Use the four-way controller (23) to select [Overwrite] or [Save as Cancel OK OK 6 Press the 4 button. An error message appears in Step 4. • The natural skin tone function can only be detected on images where people's faces cannot be used with still pictures taken with I (16-frame shooting) mode, movies or on the camera. Overwrite original image? Editing and Printing Images 141 4 Press...
... not appear. 5 Use the four-way controller (23) to select [Overwrite] or [Save as Cancel OK OK 6 Press the 4 button. An error message appears in Step 4. • The natural skin tone function can only be detected on images where people's faces cannot be used with still pictures taken with I (16-frame shooting) mode, movies or on the camera. Overwrite original image? Editing and Printing Images 141 4 Press...
RS1000 Optio RS1000
Page 149
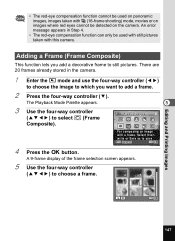
... a decorative frame to still pictures. The Playback Mode Palette appears. 5 3 Use the four-way controller (2345) to choose a frame. A 9-frame display of the frame selection screen appears. 5 Use the four-way controller (2345) to select N (Frame Composite). y OK OK Editing and Printing Images 147 • The red-eye compensation function cannot be used on panoramic images, images taken with I (16-frame shooting) mode, movies or on the camera. There are 20 frames...
... a decorative frame to still pictures. The Playback Mode Palette appears. 5 3 Use the four-way controller (2345) to choose a frame. A 9-frame display of the frame selection screen appears. 5 Use the four-way controller (2345) to select N (Frame Composite). y OK OK Editing and Printing Images 147 • The red-eye compensation function cannot be used on panoramic images, images taken with I (16-frame shooting) mode, movies or on the camera. There are 20 frames...

RS1000 Optio RS1000
Page 151
... may slow down processing speed. 149 To reload the optional frames into the CD-ROM drive. 5 When the installer window opens, click [EXIT]. 6 If there is formatted or if the built-in the Optio RS1000. To Copy Frames 1 Remove the SD Memory Card from the computer and camera. See "Connecting with files on the camera (removable disk). See "Connecting with the camera. These optional frames are deleted from a computer.
... may slow down processing speed. 149 To reload the optional frames into the CD-ROM drive. 5 When the installer window opens, click [EXIT]. 6 If there is formatted or if the built-in the Optio RS1000. To Copy Frames 1 Remove the SD Memory Card from the computer and camera. See "Connecting with files on the camera (removable disk). See "Connecting with the camera. These optional frames are deleted from a computer.
RS1000 Optio RS1000
Page 173
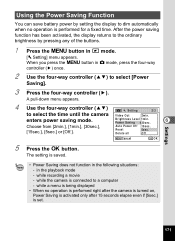
... press the 3 button in A mode, press the four-way controller (5) once. 2 Use the four-way controller (23) to select the time until the camera Video Out 2min. Reset Delete all 5sec. Settings 171 Power Saving 30sec. 6 Choose from [2min.], [1min.], [30sec.], Auto Power Off 15sec. [15sec.], [5sec.] or [Off.]. while a menu is being displayed • When no operation is saved. • Power Saving does not function in the playback mode - After the power saving function has been...
... press the 3 button in A mode, press the four-way controller (5) once. 2 Use the four-way controller (23) to select the time until the camera Video Out 2min. Reset Delete all 5sec. Settings 171 Power Saving 30sec. 6 Choose from [2min.], [1min.], [30sec.], Auto Power Off 15sec. [15sec.], [5sec.] or [Off.]. while a menu is being displayed • When no operation is saved. • Power Saving does not function in the playback mode - After the power saving function has been...
RS1000 Optio RS1000
Page 219
... G Green Button .......51, 53, 104 Green Mode 72 Guide indications 25 H Half-length Portrait Mode 77 Hometown 46, 165 I Image Storage Capacity 207 Infinity s 94 8 Info Display 22 Initial Settings 43 Installing a battery 32 Installing the software ......180 Intelligent Zoom 73 K Kids Mode 78 L Landscape Mode 66 Language setting .......43, 167 217 Appendix Checking the memory card 41 City name 204 Color filter 142 Connecting to a TV .......... 132 Continuous Shooting j .... 86 Copy 153 Cropping 137 D Date and time setting...
... G Green Button .......51, 53, 104 Green Mode 72 Guide indications 25 H Half-length Portrait Mode 77 Hometown 46, 165 I Image Storage Capacity 207 Infinity s 94 8 Info Display 22 Initial Settings 43 Installing a battery 32 Installing the software ......180 Intelligent Zoom 73 K Kids Mode 78 L Landscape Mode 66 Language setting .......43, 167 217 Appendix Checking the memory card 41 City name 204 Color filter 142 Connecting to a TV .......... 132 Continuous Shooting j .... 86 Copy 153 Cropping 137 D Date and time setting...


