User Manual
Page 1
SLR Digital Camera Operating Manual For optimum camera performance, please read the Operating Manual before using the camera.
SLR Digital Camera Operating Manual For optimum camera performance, please read the Operating Manual before using the camera.

User Manual
Page 2
.... To users of this manual safe, as there are even cases where limitations are not PRINT Image Matching III compliant. You can use In general, lenses that have an Aperture s (Auto) position. Keep this camera • There is a possibility that are placed on taking pictures even for purchasing the PENTAX q Digital Camera. The PRINT Image...
.... To users of this manual safe, as there are even cases where limitations are not PRINT Image Matching III compliant. You can use In general, lenses that have an Aperture s (Auto) position. Keep this camera • There is a possibility that are placed on taking pictures even for purchasing the PENTAX q Digital Camera. The PRINT Image...
User Manual
Page 5
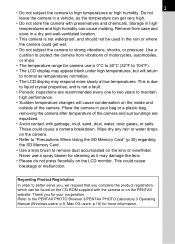
... temperatures. These could cause breakage or malfunction. 3 • Do not subject the camera to remove dust accumulated on the inside and outside of the camera and surroundings are recommended every one to two years to the PENTAX PHOTO Browser 3/PENTAX PHOTO Laboratory 3 Operating Manual (Windows users: p.9, Mac OS users: p.10) for your bag or a plastic...
... temperatures. These could cause breakage or malfunction. 3 • Do not subject the camera to remove dust accumulated on the inside and outside of the camera and surroundings are recommended every one to two years to the PENTAX PHOTO Browser 3/PENTAX PHOTO Laboratory 3 Operating Manual (Windows users: p.9, Mac OS users: p.10) for your bag or a plastic...
User Manual
Page 6
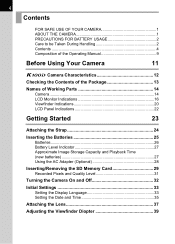
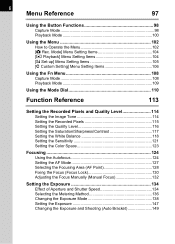
...USAGE 2 Care to be Taken During Handling 2 Contents 4 Composition of the Operating Manual 9 Before Using Your Camera 11 q Camera Characteristics 12 Checking the Contents of the Package 13 Names of Working Parts 14 Camera 14 LCD Monitor Indications 16 Viewfinder Indications 20 LCD Panel Indications 22 Getting Started ...27 Using the AC Adapter (Optional 28 Inserting/Removing the SD Memory Card 29 Recorded Pixels and Quality Level 31 Turning the Camera On and Off 32 Initial Settings 33 Setting the Display Language 33 Setting the Date and Time 35 Attaching the Lens 37 ...
...USAGE 2 Care to be Taken During Handling 2 Contents 4 Composition of the Operating Manual 9 Before Using Your Camera 11 q Camera Characteristics 12 Checking the Contents of the Package 13 Names of Working Parts 14 Camera 14 LCD Monitor Indications 16 Viewfinder Indications 20 LCD Panel Indications 22 Getting Started ...27 Using the AC Adapter (Optional 28 Inserting/Removing the SD Memory Card 29 Recorded Pixels and Quality Level 31 Turning the Camera On and Off 32 Initial Settings 33 Setting the Display Language 33 Setting the Date and Time 35 Attaching the Lens 37 ...
User Manual
Page 8
... Using the Autofocus 124 Setting the AF Mode 127 Selecting the Focusing Area (AF Point 128 Fixing the Focus (Focus Lock 130 Adjusting the Focus Manually (Manual Focus 132 Setting the Exposure 134 Effect of Aperture and Shutter Speed 134 Selecting the Metering Method 136 Changing the Exposure Mode 138 Setting the...
... Using the Autofocus 124 Setting the AF Mode 127 Selecting the Focusing Area (AF Point 128 Fixing the Focus (Focus Lock 130 Adjusting the Focus Manually (Manual Focus 132 Setting the Exposure 134 Effect of Aperture and Shutter Speed 134 Selecting the Metering Method 136 Changing the Exposure Mode 138 Setting the...
User Manual
Page 11
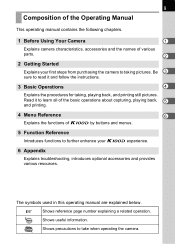
... your q experience. 6 Appendix Explains troubleshooting, introduces optional accessories and provides various resources. The symbols used in this operating manual are explained below. 1 Shows reference page number explaining a related operation. Read it and follow the instructions. 3 Basic ... the procedures for taking pictures. Shows useful information. 9 Composition of the Operating Manual This operating manual contains the following chapters. 1 Before Using Your Camera 1 Explains camera characteristics, accessories and the names of q by buttons and menus. 5 Function Reference...
... your q experience. 6 Appendix Explains troubleshooting, introduces optional accessories and provides various resources. The symbols used in this operating manual are explained below. 1 Shows reference page number explaining a related operation. Read it and follow the instructions. 3 Basic ... the procedures for taking pictures. Shows useful information. 9 Composition of the Operating Manual This operating manual contains the following chapters. 1 Before Using Your Camera 1 Explains camera characteristics, accessories and the names of q by buttons and menus. 5 Function Reference...
User Manual
Page 14
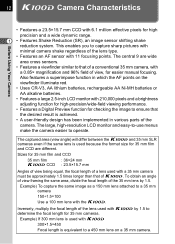
...; Features a 23.5×15.7 mm CCD with 6.1 million effective pixels for easier manual focusing. The central 9 are different. The captured area (view angle) will differ between the q and 35 mm SLR cameras even if the same lens is used with q 300×1.5=450 Focal length is achieved. •...length of a lens used with a 35 mm camera must be approximately 1.5 times longer than that of a conventional 35 mm camera, with 210,000 pixels and a brightness adjusting function for high-precision/wide-field viewing performance. • Features a Digital Preview function for 35 mm film and CCD are ...
...; Features a 23.5×15.7 mm CCD with 6.1 million effective pixels for easier manual focusing. The central 9 are different. The captured area (view angle) will differ between the q and 35 mm SLR cameras even if the same lens is used with q 300×1.5=450 Focal length is achieved. •...length of a lens used with a 35 mm camera must be approximately 1.5 times longer than that of a conventional 35 mm camera, with 210,000 pixels and a brightness adjusting function for high-precision/wide-field viewing performance. • Features a Digital Preview function for 35 mm film and CCD are ...
User Manual
Page 15
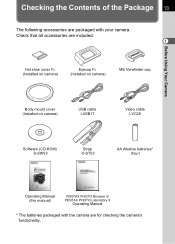
... cover FK (Installed on camera) Eyecup FO (Installed on camera) ME Viewfinder cap Before Using Your Camera Body mount cover (Installed on camera) USB cable I-USB17 Video cable I-VC28 Software (CD-ROM) S-SW53 Strap O-ST53 AA Alkaline batteries* (four) Operating Manual (this manual) PENTAX PHOTO Browser 3/ PENTAX PHOTO Laboratory 3 Operating Manual * The batteries packaged with your camera. Check that all...
... cover FK (Installed on camera) Eyecup FO (Installed on camera) ME Viewfinder cap Before Using Your Camera Body mount cover (Installed on camera) USB cable I-USB17 Video cable I-VC28 Software (CD-ROM) S-SW53 Strap O-ST53 AA Alkaline batteries* (four) Operating Manual (this manual) PENTAX PHOTO Browser 3/ PENTAX PHOTO Laboratory 3 Operating Manual * The batteries packaged with your camera. Check that all...

User Manual
Page 23
Before Using Your Camera 12 Number of recordable images/EV compensation Show the number of recordable images with the appropriate exposure value appears if exposure mode is a. (p.144) 13 Shake Reduction display (p.47) Appears during Shake Reduction. 14 Manual focus (p.132) Appears when focus mode is \. 15 ISO sensitivity warning (p.122) Appears when...
Before Using Your Camera 12 Number of recordable images/EV compensation Show the number of recordable images with the appropriate exposure value appears if exposure mode is a. (p.144) 13 Shake Reduction display (p.47) Appears during Shake Reduction. 14 Manual focus (p.132) Appears when focus mode is \. 15 ISO sensitivity warning (p.122) Appears when...
User Manual
Page 30
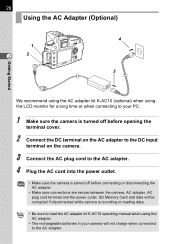
...SD Memory Card and data will be corrupted if disconnected while camera is recording or reading data. • Be sure to read the AC adapter kit K-AC10 operating manual when using the LCD monitor for a long time or when connecting to your camera will not charge when connected to the AC adapter. 4 ...Plug the AC cord into the power outlet. • Make sure the camera is turned off before opening the terminal cover...
...SD Memory Card and data will be corrupted if disconnected while camera is recording or reading data. • Be sure to read the AC adapter kit K-AC10 operating manual when using the LCD monitor for a long time or when connecting to your camera will not charge when connected to the AC adapter. 4 ...Plug the AC cord into the power outlet. • Make sure the camera is turned off before opening the terminal cover...
User Manual
Page 46
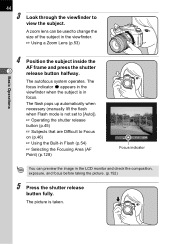
... and check the composition, exposure, and focus before taking the picture. (p.152) 5 Press the shutter release button fully. The flash pops up automatically when necessary (manually lift the flash when Flash mode is not set to [Auto]). 1 Operating the shutter release button (p.45) 1 Subjects that are Difficult to change the size...
... and check the composition, exposure, and focus before taking the picture. (p.152) 5 Press the shutter release button fully. The flash pops up automatically when necessary (manually lift the flash when Flash mode is not set to [Auto]). 1 Operating the shutter release button (p.45) 1 Subjects that are Difficult to change the size...
User Manual
Page 48
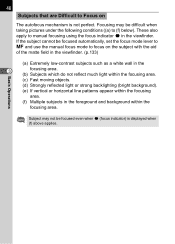
Subject may be focused automatically, set the focus mode lever to \ and use the manual focus mode to manual focusing using the focus indicator ] in the foreground and background within the focusing area. If the subject cannot be difficult when taking pictures under the ...
Subject may be focused automatically, set the focus mode lever to \ and use the manual focus mode to manual focusing using the focus indicator ] in the foreground and background within the focusing area. If the subject cannot be difficult when taking pictures under the ...
User Manual
Page 49
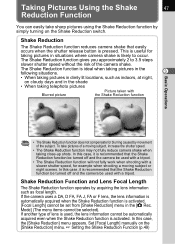
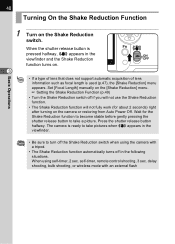
...subject. The Shake Reduction function is ideal when taking pictures in the following situations. 3 • When taking pictures in situations where camera shake is used, the lens information cannot be selected). In this case, it is recommended that the Shake Reduction function be turned ...not fully work when shooting with a tripod. Set [Focal Length] manually on the Shake Reduction switch. Shake Reduction The Shake Reduction function reduces camera shake that the Shake Reduction function be turned off and the camera be set from [Shake Reduction] menu in the shade • ...
...subject. The Shake Reduction function is ideal when taking pictures in the following situations. 3 • When taking pictures in situations where camera shake is used, the lens information cannot be selected). In this case, it is recommended that the Shake Reduction function be turned ...not fully work when shooting with a tripod. Set [Focal Length] manually on the Shake Reduction switch. Shake Reduction The Shake Reduction function reduces camera shake that the Shake Reduction function be turned off and the camera be set from [Shake Reduction] menu in the shade • ...
User Manual
Page 50
...shutter release button halfway. Set [Focal Length] manually on . • If a type of lens that does not support automatic acquisition of lens information such as focal length is used (p.47), the [Shake Reduction] menu appears. When using the camera with an external flash delay shooting, bulb ... in the following situations. When the shutter release button is ready to turn off the Shake Reduction switch when using self-timer, 2 sec. The camera is pressed halfway, k appears in the viewfinder. • Be sure to take a picture. self-timer, remote control shooting, 3 sec. Wait...
...shutter release button halfway. Set [Focal Length] manually on . • If a type of lens that does not support automatic acquisition of lens information such as focal length is used (p.47), the [Shake Reduction] menu appears. When using the camera with an external flash delay shooting, bulb ... in the following situations. When the shutter release button is ready to turn off the Shake Reduction switch when using self-timer, 2 sec. The camera is pressed halfway, k appears in the viewfinder. • Be sure to take a picture. self-timer, remote control shooting, 3 sec. Wait...
User Manual
Page 51
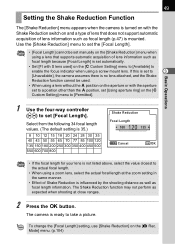
.... Basic Operations 1 Use the four-way controller (op) to set to 3 [Unavailable], the camera assumes there is no lens attached, and the Shake Reduction function cannot be set manually on the [Shake Reduction] menu when using a lens that supports automatic acquisition of lens information such... menu. (p.104) The Shake Reduction function may not perform as focal length information. The camera is set [Focal Length]. 49 Setting the Shake Reduction Function The [Shake Reduction] menu appears when the camera is turned on with S lens used . • When using a lens without the ...
.... Basic Operations 1 Use the four-way controller (op) to set to 3 [Unavailable], the camera assumes there is no lens attached, and the Shake Reduction function cannot be set manually on the [Shake Reduction] menu when using a lens that supports automatic acquisition of lens information such... menu. (p.104) The Shake Reduction function may not perform as focal length information. The camera is set [Focal Length]. 49 Setting the Shake Reduction Function The [Shake Reduction] menu appears when the camera is turned on with S lens used . • When using a lens without the ...
User Manual
Page 56
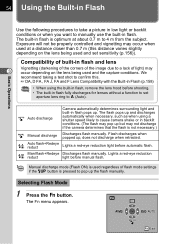
... distance varies slightly depending on the lens being used regardless of light) may not discharge if the camera determines that the flash is not necessary.) h Manual discharge Discharges flash manually. We recommend taking a test shot to s (Auto). Lights a red-eye reduction light before... lens hood before shooting. • The built-in flash fully discharges for lenses without a function to manually use the built-in flash. g Auto discharge Camera automatically determines surrounding light and built-in flash pops up , does not discharge when retracted. Selecting Flash Mode...
... distance varies slightly depending on the lens being used regardless of light) may not discharge if the camera determines that the flash is not necessary.) h Manual discharge Discharges flash manually. We recommend taking a test shot to s (Auto). Lights a red-eye reduction light before... lens hood before shooting. • The built-in flash fully discharges for lenses without a function to manually use the built-in flash. g Auto discharge Camera automatically determines surrounding light and built-in flash pops up , does not discharge when retracted. Selecting Flash Mode...

User Manual
Page 57
... the LCD panel and viewfinder. (p.17, p.20, p.22) Switch between Auto discharge mode and Manual discharge mode (Flash ON) by pressing the K button while the built-in flash is set to H, I, =, q, or .. The camera is ready to the Fn menu screen. 5 Press the { button. OK OK 3 Use the... four-way controller (op) to choose a flash mode. 4 Press the 4 button. 3 The camera returns to take a picture. Basic Operations Using Auto Discharge g, i (Automatic Flash Popup) 1 Set the mode dial to e, b, c, a or p, g and i appear gray...
... the LCD panel and viewfinder. (p.17, p.20, p.22) Switch between Auto discharge mode and Manual discharge mode (Flash ON) by pressing the K button while the built-in flash is set to H, I, =, q, or .. The camera is ready to the Fn menu screen. 5 Press the { button. OK OK 3 Use the... four-way controller (op) to choose a flash mode. 4 Press the 4 button. 3 The camera returns to take a picture. Basic Operations Using Auto Discharge g, i (Automatic Flash Popup) 1 Set the mode dial to e, b, c, a or p, g and i appear gray...
User Manual
Page 58
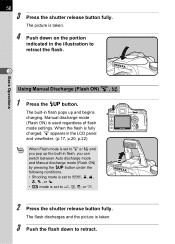
...to I, =, s, q, \, or .. • H mode is taken. 3 Push the flash down on the portion indicated in flash, you can switch between Auto discharge mode and Manual discharge mode (Flash ON) by pressing the K button under the following conditions. • Shooting mode is set to retract. Basic Operations 3 Using... (Flash ON) h, j 1 Press the K button. The built-in flash pops up the built-in the illustration to retract the flash. Manual discharge mode (Flash ON) is taken. 4 Push down to i, B, C, or E. 2 Press the shutter release button fully. The picture is used regardless of flash mode...
...to I, =, s, q, \, or .. • H mode is taken. 3 Push the flash down on the portion indicated in flash, you can switch between Auto discharge mode and Manual discharge mode (Flash ON) by pressing the K button under the following conditions. • Shooting mode is set to retract. Basic Operations 3 Using... (Flash ON) h, j 1 Press the K button. The built-in flash pops up the built-in the illustration to retract the flash. Manual discharge mode (Flash ON) is taken. 4 Push down to i, B, C, or E. 2 Press the shutter release button fully. The picture is used regardless of flash mode...
User Manual
Page 59
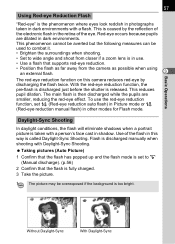
... flash as far away from closer if a zoom lens is in use the red-eye reduction function, set to wide angle and shoot from the camera as possible when using an external flash. 3 The red-eye reduction function on this way is set i (Red-eye reduction auto flash) in Picture mode... that the flash has popped up and the flash mode is called Daylight-Sync Shooting. 57 Using Red-eye Reduction Flash "Red-eye" is discharged manually when shooting with Daylight-Sync Shooting. This phenomenon cannot be averted but the following measures can be overexposed if the background is caused by the...
... flash as far away from closer if a zoom lens is in use the red-eye reduction function, set to wide angle and shoot from the camera as possible when using an external flash. 3 The red-eye reduction function on this way is set i (Red-eye reduction auto flash) in Picture mode... that the flash has popped up and the flash mode is called Daylight-Sync Shooting. 57 Using Red-eye Reduction Flash "Red-eye" is discharged manually when shooting with Daylight-Sync Shooting. This phenomenon cannot be averted but the following measures can be overexposed if the background is caused by the...
User Manual
Page 65
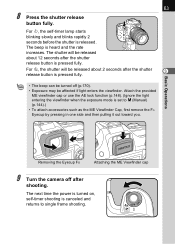
...viewfinder cap or use the AE lock function (p.148). (Ignore the light entering the viewfinder when the exposure mode is canceled and returns to a (Manual) (p.144).) • To attach accessories such as the ME Viewfinder Cap, first remove the FO Eyecup by pressing in one side and then ...button fully. For Z, the shutter will be affected if light enters the viewfinder. Removing the Eyecup FO Attaching the ME Viewfinder cap 9 Turn the camera off (p.170). • Exposure may be released about 2 seconds after the shutter release button is pressed fully. The next time the power is ...
...viewfinder cap or use the AE lock function (p.148). (Ignore the light entering the viewfinder when the exposure mode is canceled and returns to a (Manual) (p.144).) • To attach accessories such as the ME Viewfinder Cap, first remove the FO Eyecup by pressing in one side and then ...button fully. For Z, the shutter will be affected if light enters the viewfinder. Removing the Eyecup FO Attaching the ME Viewfinder cap 9 Turn the camera off (p.170). • Exposure may be released about 2 seconds after the shutter release button is pressed fully. The next time the power is ...


