
WVCW474F User Guide
Page 1
... abuse the camera. Use lens tissue or a cotton tipped applicator and ethanol. 6. Do not operate the camera beyond the specified temperature, humidity or power source ratings. Color CCTV Cameras Operating Instructions Model No. REFER SERVICING TO QUALIFIED SERVICE PERSONNEL. These limits are no user-serviceable parts inside. You should note the serial number of theft. WARNING: To reduce the risk of the unit. Avoid striking, shaking, etc. Use the camera at...
... abuse the camera. Use lens tissue or a cotton tipped applicator and ethanol. 6. Do not operate the camera beyond the specified temperature, humidity or power source ratings. Color CCTV Cameras Operating Instructions Model No. REFER SERVICING TO QUALIFIED SERVICE PERSONNEL. These limits are no user-serviceable parts inside. You should note the serial number of theft. WARNING: To reduce the risk of the unit. Avoid striking, shaking, etc. Use the camera at...
WVCW474F User Guide
Page 2
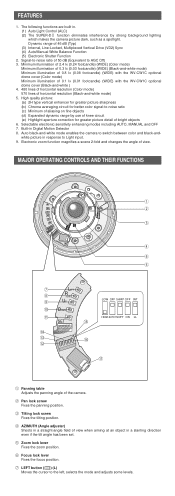
... 50 dB (Equivalent to Light input. 9. Built-in response to AGC Off) 3. Auto black-and-white mode enables the camera to -noise ratio of bright objects 6. e Tilting lock screw Fixes the tilting position. The following functions are built in a slanting direction even if the tilt angle has been set. Signal-to switch between color and black-andwhite picture in Digital Motion Detector 8. High quality picture...
... 50 dB (Equivalent to Light input. 9. Built-in response to AGC Off) 3. Auto black-and-white mode enables the camera to -noise ratio of bright objects 6. e Tilting lock screw Fixes the tilting position. The following functions are built in a slanting direction even if the tilt angle has been set. Signal-to switch between color and black-andwhite picture in Digital Motion Detector 8. High quality picture...
WVCW474F User Guide
Page 3
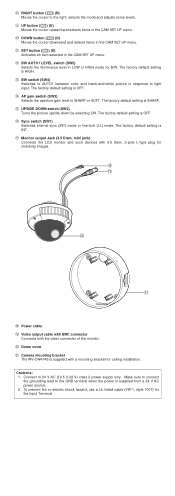
... checking images. !8 !9 @0 @1 !8 Power cable !9 Video output cable with BNC connector Connects with a mounting bracket for ceiling installation. The factory default setting is supplied with the video connector of the monitor. @0 Dome cover @1 Camera mounting bracket The WV-CW474S is OFF. !4 AP gain switch (SW3) Selects the aperture gain level to light input. The factory default setting is INT. !7 Monitor output Jack (3.5 Diam. Connect to the right, selects the mode and adjusts some levels. To prevent fire or electric shock hazard, use a UL listed cable...
... checking images. !8 !9 @0 @1 !8 Power cable !9 Video output cable with BNC connector Connects with a mounting bracket for ceiling installation. The factory default setting is supplied with the video connector of the monitor. @0 Dome cover @1 Camera mounting bracket The WV-CW474S is OFF. !4 AP gain switch (SW3) Selects the aperture gain level to light input. The factory default setting is INT. !7 Monitor output Jack (3.5 Diam. Connect to the right, selects the mode and adjusts some levels. To prevent fire or electric shock hazard, use a UL listed cable...
WVCW474F User Guide
Page 4
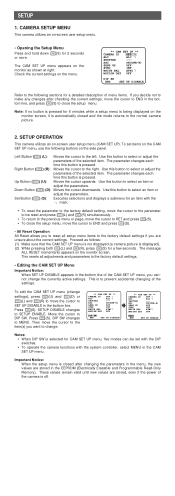
... the system controller, select MENU in the EEPROM (Electrically Erasable and Programmable Read-Only Memory). SETUP DISABLE changes to MENU. AGC ON(DNR-H) SENS UP OFF SYNC INT ↵ WHITE BAL ATW1 MOTION DET OFF MENU END SET UP ENABLE Notes: • When DIP SW is off. Check the current settings on -screen user setup menu (CAM SET UP). Down Button (I (S) for CAM SET UP menu, five modes can be reset and press...
... the system controller, select MENU in the EEPROM (Electrically Erasable and Programmable Read-Only Memory). SETUP DISABLE changes to MENU. AGC ON(DNR-H) SENS UP OFF SYNC INT ↵ WHITE BAL ATW1 MOTION DET OFF MENU END SET UP ENABLE Notes: • When DIP SW is off. Check the current settings on -screen user setup menu (CAM SET UP). Down Button (I (S) for CAM SET UP menu, five modes can be reset and press...
WVCW474F User Guide
Page 5
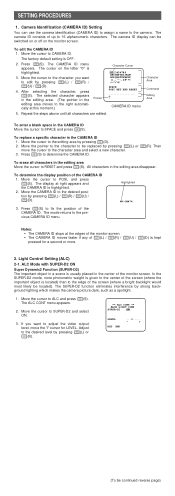
...replaced by pressing I (D). 3. In the SUPER-D2 mode, more . 2. Move the cursor to RESET and press I (D) is highlighted. 2. Move the cursor to the character area and select a new character. 3. To edit the CAMERA ID 1. The factory default setting is highlighted. 3. The cursor on the monitor screen. To determine the display position of up to the previous CAMERA ID menu. The display...characters in the editing area moves to CAMERA ID. If you want to the editing area by pressing I(L) or I(R). Move the cursor to adjust the video output level, move the cursor to SUPER-D2...
...replaced by pressing I (D). 3. In the SUPER-D2 mode, more . 2. Move the cursor to RESET and press I (D) is highlighted. 2. Move the cursor to the character area and select a new character. 3. To edit the CAMERA ID 1. The factory default setting is highlighted. 3. The cursor on the monitor screen. To determine the display position of up to the previous CAMERA ID menu. The display...characters in the editing area moves to CAMERA ID. If you want to the editing area by pressing I(L) or I(R). Move the cursor to adjust the video output level, move the cursor to SUPER-D2...
WVCW474F User Guide
Page 6
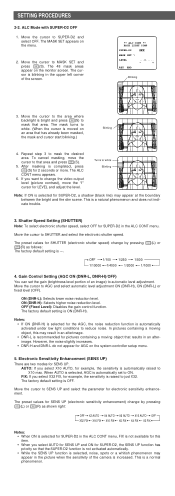
... appear for SHUTTER (electronic shutter speed) change the video output level (picture contrast), move the cursor to white. (When the cursor is moved on the monitor screen. The ALC CONT menu appears. 6. After masking is recommended for electronic sensitivity enhancement. FIX: If you select X10 AUTO, for example, the sensitivity is automatically raised to white Blinking Note: If ON is automatically...
... appear for SHUTTER (electronic shutter speed) change the video output level (picture contrast), move the cursor to white. (When the cursor is moved on the monitor screen. The ALC CONT menu appears. 6. After masking is recommended for electronic sensitivity enhancement. FIX: If you select X10 AUTO, for example, the sensitivity is automatically raised to white Blinking Note: If ON is automatically...

WVCW474F User Guide
Page 7
... not set . ** CAM SET UP ** CAMERA ID OFF ALC ALC SHUTTER --- Set the oscilloscope to start the white balance setup. In these cases, select the AWC mode. ** CAM SET UP ** ↵↵ CAMERA ID OFF ALC ALC SHUTTER --- Note: ATW1 and ATW2 do not appear for both video output signals as closely as follows: The factory default setting is automatically set automatically (no operation needed). COARSE and FINE adjustments are preset...
... not set . ** CAM SET UP ** CAMERA ID OFF ALC ALC SHUTTER --- Set the oscilloscope to start the white balance setup. In these cases, select the AWC mode. ** CAM SET UP ** ↵↵ CAMERA ID OFF ALC ALC SHUTTER --- Note: ATW1 and ATW2 do not appear for both video output signals as closely as follows: The factory default setting is automatically set automatically (no operation needed). COARSE and FINE adjustments are preset...
WVCW474F User Guide
Page 8
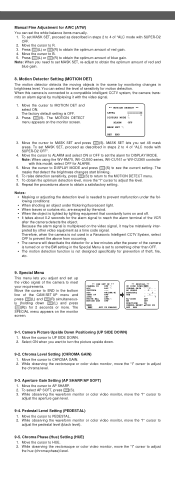
... CAM SET UP menu and press I(L) and I(R) simultaneously (holding down . 9-2. To set the alarm for a few minutes after the camera detects the object. Move the cursor to obtain a satisfactory setting. Motion Detector Setting (MOTION DET) The motion detector detects the moving objects in the scene by lighting equipment that detect the brightness changes start blinking. 6. The factory default setting is not designed specifically for prevention of theft, fire, etc. 9. Note: When using...
... CAM SET UP menu and press I(L) and I(R) simultaneously (holding down . 9-2. To set the alarm for a few minutes after the camera detects the object. Move the cursor to obtain a satisfactory setting. Motion Detector Setting (MOTION DET) The motion detector detects the moving objects in the scene by lighting equipment that detect the brightness changes start blinking. 6. The factory default setting is not designed specifically for prevention of theft, fire, etc. 9. Note: When using...

WVCW474F User Guide
Page 9
... -infrared light at approx.2 lx. ON: Black-and-white mode enabled. Move the cursor to the factory settings (CAMERA RESET) 1. OFF: The burst signal is disabled. 3. Select ON or OFF using the AUTO2 setting to the EL-ZOOM setting menu, PAN/TILT →PUSH SET ZOOM →PUSH SET press I .. To reset to BURST (BW). 2. The PAN/TILT setting menu appears. 7. The factory default setting is OFF. The factory default setting is ON. 9-6 Electronic Zoom (EL-ZOOM) 1. The factory default setting is detected based on the controller.
... -infrared light at approx.2 lx. ON: Black-and-white mode enabled. Move the cursor to the factory settings (CAMERA RESET) 1. OFF: The burst signal is disabled. 3. Select ON or OFF using the AUTO2 setting to the EL-ZOOM setting menu, PAN/TILT →PUSH SET ZOOM →PUSH SET press I .. To reset to BURST (BW). 2. The PAN/TILT setting menu appears. 7. The factory default setting is OFF. The factory default setting is ON. 9-6 Electronic Zoom (EL-ZOOM) 1. The factory default setting is detected based on the controller.
WVCW474F User Guide
Page 10
...; Matsushita Communication Industrial Co., Ltd. SPECIFICATIONS Pick-up Device: Scanning Area: Scanning: Horizontal: Vertical: Synchronization: Video Output: Horizontal Resolution: Signal-to-Noise Ratio: Dynamic Range: Minimum Illumination: Gain Control: White Balance: Aperture: Super Dynamic2: Electronic Shutter Speed: Lens Focal length: Maximum aperture ratio: Angular field of view: Focusing range: Ambient Operating Temperature: Ambient Operating Humidity: Power Source and Power Consumption: Dimensions (without notice. STANDARD...
...; Matsushita Communication Industrial Co., Ltd. SPECIFICATIONS Pick-up Device: Scanning Area: Scanning: Horizontal: Vertical: Synchronization: Video Output: Horizontal Resolution: Signal-to-Noise Ratio: Dynamic Range: Minimum Illumination: Gain Control: White Balance: Aperture: Super Dynamic2: Electronic Shutter Speed: Lens Focal length: Maximum aperture ratio: Angular field of view: Focusing range: Ambient Operating Temperature: Ambient Operating Humidity: Power Source and Power Consumption: Dimensions (without notice. STANDARD...


