
WJRT416V User Guide
Page 4
... CLAIM OR ACTION FOR DAMAGES, BROUGHT BY ANY PERSON OR ORGANIZATION BEING A PHOTOGENIC SUBJECT, DUE TO VIOLATION OF PRIVACY WITH THE RESULT OF THAT SURVEILLANCE-CAMERA'S PICTURE, INCLUDING SAVED DATA, FOR SOME REASON, BECOMES PUBLIC OR IS USED FOR THE PURPOSE OTHER THAN SURVEILLANCE. 4 CHANGES ARE ADDED TO THE INFORMATION HEREIN...
... CLAIM OR ACTION FOR DAMAGES, BROUGHT BY ANY PERSON OR ORGANIZATION BEING A PHOTOGENIC SUBJECT, DUE TO VIOLATION OF PRIVACY WITH THE RESULT OF THAT SURVEILLANCE-CAMERA'S PICTURE, INCLUDING SAVED DATA, FOR SOME REASON, BECOMES PUBLIC OR IS USED FOR THE PURPOSE OTHER THAN SURVEILLANCE. 4 CHANGES ARE ADDED TO THE INFORMATION HEREIN...
WJRT416V User Guide
Page 6
... of the recorder 17 Shutdown of the recorder 18 Monitor live images from the cameras 19 Display images on a single screen 19 Display images from cameras on a multi-screen 19 Display images from the cameras sequentially (sequential display 20 Recording 21 Manual recording 21 Timer recording 21 Alarm recording 21 Playback ...28 Copying (Duplicate 29 Log in as a different user 31 Log out 31 Log in 32 Disk management 33 Check HDD information 33 Format the HDD 35 Operate the recorder using a PC 38 Functions and their descriptions 38 System requirements for a PC 38 Installation 39...
... of the recorder 17 Shutdown of the recorder 18 Monitor live images from the cameras 19 Display images on a single screen 19 Display images from cameras on a multi-screen 19 Display images from the cameras sequentially (sequential display 20 Recording 21 Manual recording 21 Timer recording 21 Alarm recording 21 Playback ...28 Copying (Duplicate 29 Log in as a different user 31 Log out 31 Log in 32 Disk management 33 Check HDD information 33 Format the HDD 35 Operate the recorder using a PC 38 Functions and their descriptions 38 System requirements for a PC 38 Installation 39...
WJRT416V User Guide
Page 9
... settings or operate the unit using a PC via a network such as a LAN (local area network). The digital disk recorder is possible to record pictures of surveillance cameras instead of using the recorder. It is input from the cameras connected to perform recording automatically at 30 ips. Internal CD/DVD drive (Only for use within a surveillance system. Up to...
... settings or operate the unit using a PC via a network such as a LAN (local area network). The digital disk recorder is possible to record pictures of surveillance cameras instead of using the recorder. It is input from the cameras connected to perform recording automatically at 30 ips. Internal CD/DVD drive (Only for use within a surveillance system. Up to...
WJRT416V User Guide
Page 11
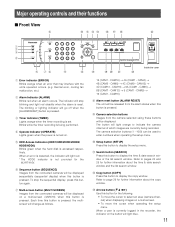
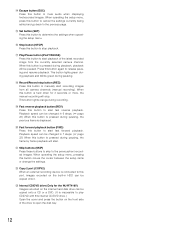
... REC STOP REV FWD SKIP - + COPY2 Digital Disk Recorder WJ-RT416 !9 @0 @1 Inside the cover @3 q Error indicator (ERROR) Blinks orange when an error that may interfere with the unit's operation occurs. (e.g. r Operate Indicator (OPERATE) Lights green when the power is reset. y Sequence button (SEQUENCE) Images from the connected cameras will light blue. 11 To stop...
... REC STOP REV FWD SKIP - + COPY2 Digital Disk Recorder WJ-RT416 !9 @0 @1 Inside the cover @3 q Error indicator (ERROR) Blinks orange when an error that may interfere with the unit's operation occurs. (e.g. r Operate Indicator (OPERATE) Lights green when the power is reset. y Sequence button (SEQUENCE) Images from the connected cameras will light blue. 11 To stop...
WJRT416V User Guide
Page 12
...during pausing, the previous frame is pressed during pausing. !8 Record/Record stop button (REC) Press this button to mute audio when displaying live/recorded images. Press this button to manually start recording images from the currently selected camera channel. Playback speed can be changed in HDD can be copied... Play/Pause button (PLAY/PAUSE) Press this button to start . @1 Skip buttons (SKIP) Press these buttons to skip to open the disk tray. 12 When operating the setup menu, press this button to cancel the settings currently being edited and go back to the previous page...
...during pausing, the previous frame is pressed during pausing. !8 Record/Record stop button (REC) Press this button to mute audio when displaying live/recorded images. Press this button to manually start recording images from the currently selected camera channel. Playback speed can be changed in HDD can be copied... Play/Pause button (PLAY/PAUSE) Press this button to start . @1 Skip buttons (SKIP) Press these buttons to skip to open the disk tray. 12 When operating the setup menu, press this button to cancel the settings currently being edited and go back to the previous page...
WJRT416V User Guide
Page 13
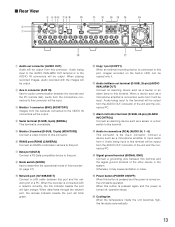
... onto it . Audio being input to the AUDIO IN/ALARM OUT terminal or to the VIDEO IN connectors will be output. When playing recorded images, audio recorded with a network correctly, the link indicator beside the port will be output. t Monitor 2 terminal (D-SUB, 15-pin) (MONITOR2) ... !5 Power button (POWER ON/OFF) When this fan starts automatically. 13 Rear View e r ty u i o !0 !1 !2 !3 !4 !5 w q AUX IN SERIAL RS485(CAMERA) AUDIO IN/ALARM OUT 5 3 1 POWER ON OFF AUDIO OUT MONITOR1 MONITOR2 DATA 12 MODE 10/100BASE-T COPY1 ALARM IN/CONTOROL 6 4 AUDIO IN 2 SIGNAL GND IN...
... onto it . Audio being input to the AUDIO IN/ALARM OUT terminal or to the VIDEO IN connectors will be output. When playing recorded images, audio recorded with a network correctly, the link indicator beside the port will be output. t Monitor 2 terminal (D-SUB, 15-pin) (MONITOR2) ... !5 Power button (POWER ON/OFF) When this fan starts automatically. 13 Rear View e r ty u i o !0 !1 !2 !3 !4 !5 w q AUX IN SERIAL RS485(CAMERA) AUDIO IN/ALARM OUT 5 3 1 POWER ON OFF AUDIO OUT MONITOR1 MONITOR2 DATA 12 MODE 10/100BASE-T COPY1 ALARM IN/CONTOROL 6 4 AUDIO IN 2 SIGNAL GND IN...
WJRT416V User Guide
Page 14
Connect system cameras or combination cameras to the VIDEO IN 1 - 4 connectors. 14 The VIDEO IN 1 - 4 connectors are compatible with coaxial cable. When connecting a combination camera, connect it either to the VIDEO IN connectors. !7 Power cord inlet (AC IN) Connect the provided power cord to this inlet. !8 Video in connectors (BNC) (VIDEO IN 1 - 16)/ Video out connectors (BNC) (VIDEO OUT 1 - 16) Images (video signals) from the cameras connected to the VIDEO IN connectors will be looped through to the VIDEO OUT connectors.
Connect system cameras or combination cameras to the VIDEO IN 1 - 4 connectors. 14 The VIDEO IN 1 - 4 connectors are compatible with coaxial cable. When connecting a combination camera, connect it either to the VIDEO IN connectors. !7 Power cord inlet (AC IN) Connect the provided power cord to this inlet. !8 Video in connectors (BNC) (VIDEO IN 1 - 16)/ Video out connectors (BNC) (VIDEO OUT 1 - 16) Images (video signals) from the cameras connected to the VIDEO IN connectors will be looped through to the VIDEO OUT connectors.
WJRT416V User Guide
Page 15
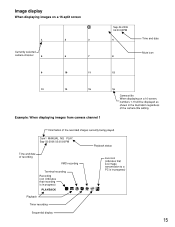
... 11 12 13 14 15 Example: When displaying images from camera channel 1 16 Camera title When displaying on a 16-screen, numbers 1-16 will be displayed as shown in the illustration regardless of recording VMD recording Terminal recording Recording icon (indicates that recording is in progress) PLAYBACK Playback Timer recording Live icon (indicates that live image transmission to a PC...
... 11 12 13 14 15 Example: When displaying images from camera channel 1 16 Camera title When displaying on a 16-screen, numbers 1-16 will be displayed as shown in the illustration regardless of recording VMD recording Terminal recording Recording icon (indicates that recording is in progress) PLAYBACK Playback Timer recording Live icon (indicates that live image transmission to a PC...

WJRT416V User Guide
Page 16
Startup Start up the recorder as follows. z Connect the power cord to a 120 V AC 60 Hz outlet when the model in use is completed, live images from the connected cameras will be displayed on the power of the system check, the startup window will start. x Press the power button to a 220 - 240 V AC 50 Hz outlet. In the process of the recorder. • The OPERATE indicator will light and the system check will be displayed. 16 When the model in use is the PAL model, connect the power cord to turn on a monitor. • When the system check is the NTSC model.
Startup Start up the recorder as follows. z Connect the power cord to a 120 V AC 60 Hz outlet when the model in use is completed, live images from the connected cameras will be displayed on the power of the system check, the startup window will start. x Press the power button to a 220 - 240 V AC 50 Hz outlet. In the process of the recorder. • The OPERATE indicator will light and the system check will be displayed. 16 When the model in use is the PAL model, connect the power cord to turn on a monitor. • When the system check is the NTSC model.
WJRT416V User Guide
Page 17
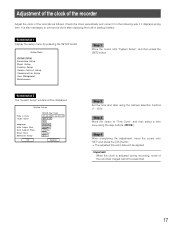
Setup Menu System Setup Recording Setup Event Setup Display Setup Camera Control Setup Communication Setup User Management Maintenance Step 1 Move the cursor onto "System Setup", and then press the [SET] button. Adjustment of the clock of the recorder Adjust the clock of the recorded images cannot be searched. 17 Step 4 When completing the adjustment, move...
Setup Menu System Setup Recording Setup Event Setup Display Setup Camera Control Setup Communication Setup User Management Maintenance Step 1 Move the cursor onto "System Setup", and then press the [SET] button. Adjustment of the clock of the recorder Adjust the clock of the recorded images cannot be searched. 17 Step 4 When completing the adjustment, move...
WJRT416V User Guide
Page 18
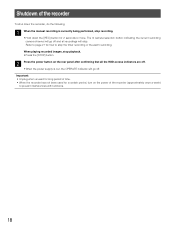
... button indicating the current recording camera channel will go off and all the HDD access indicators are off. • When the power supply is currently being performed, stop recording. • Hold down the recorder, do the following. Refer to page 21 for 2 seconds or more. Important: • Unplug ...when unused for long period of time. • When the recorder has not been used for a certain period, turn on the rear panel after confirming that all recordings will go off. Shutdown of the recorder To shut down the [REC] button for how to stop playback. •...
... button indicating the current recording camera channel will go off and all the HDD access indicators are off. • When the power supply is currently being performed, stop recording. • Hold down the recorder, do the following. Refer to page 21 for 2 seconds or more. Important: • Unplug ...when unused for long period of time. • When the recorder has not been used for a certain period, turn on the rear panel after confirming that all recordings will go off. Shutdown of the recorder To shut down the [REC] button for how to stop playback. •...
WJRT416V User Guide
Page 19
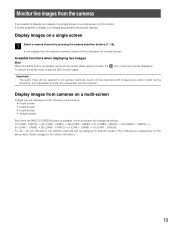
...- Display images on a single screen z Select a camera channel by pressing the camera selection buttons (1 - 16). • Live images from cameras on a multi-screen Images can be displayed on a single screen. Audio will be recorded with images even when muted during recording. CAM8) → 4C (CAM9 - CAM9) &#...8594; 16 (CAM1 - CAM16) For 4A - 4D, 6A, 6B and 9, the camera channels can be assigned to display live images sequentially...
...- Display images on a single screen z Select a camera channel by pressing the camera selection buttons (1 - 16). • Live images from cameras on a multi-screen Images can be displayed on a single screen. Audio will be recorded with images even when muted during recording. CAM8) → 4C (CAM9 - CAM9) &#...8594; 16 (CAM1 - CAM16) For 4A - 4D, 6A, 6B and 9, the camera channels can be assigned to display live images sequentially...
WJRT416V User Guide
Page 20
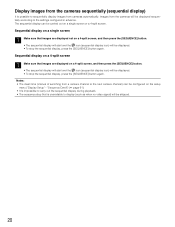
.... • The sequence step that images are displayed on the setup menu ("Display Setup" - Notes: • The dwell time (interval of switching from a camera channel to the next camera channel) can be carried out on a 4-split screen, and then press the [SEQUENCE] button. • The sequential display will start and the icon... the icon (sequential display icon) will be skipped. 20 Sequential display on a single screen z Make sure that is possible to sequentially display images from the cameras will be displayed sequentially according to the settings configured in advance.
.... • The sequence step that images are displayed on the setup menu ("Display Setup" - Notes: • The dwell time (interval of switching from a camera channel to the next camera channel) can be carried out on a 4-split screen, and then press the [SEQUENCE] button. • The sequential display will start and the icon... the icon (sequential display icon) will be skipped. 20 Sequential display on a single screen z Make sure that is possible to sequentially display images from the cameras will be displayed sequentially according to the settings configured in advance.
WJRT416V User Guide
Page 21
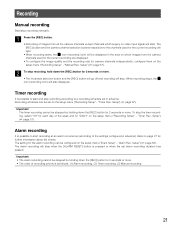
... setting for further information about the events. To stop . "Timer Rec. The alarm recording will start and stop recording according to page 27 for the alarm recording can be configured on the setup menu ("Recording Setup" - The [REC] button and the camera channel selection buttons respective to the settings configured in the area on which...
... setting for further information about the events. To stop . "Timer Rec. The alarm recording will start and stop recording according to page 27 for the alarm recording can be configured on the setup menu ("Recording Setup" - The [REC] button and the camera channel selection buttons respective to the settings configured in the area on which...
WJRT416V User Guide
Page 22
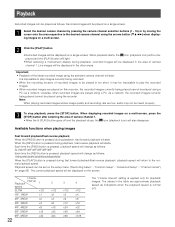
...played on a single screen. Likewise, when recorded images are played on this recorder, the recorded images currently being played cannot be played using a PC via a network, the recorded images currently being recorded. • When the recording duration of camera channel 1. • When the lit [... a network. Important: • Playback of camera channel 1. The current playback speed will be impossible to be played is pressed during playback, recorded images will starts. z Select the desired camera channel by pressing the camera channel selection buttons (1 - 16) or by...
...played on a single screen. Likewise, when recorded images are played on this recorder, the recorded images currently being played cannot be played using a PC via a network, the recorded images currently being recorded. • When the recording duration of camera channel 1. • When the lit [... a network. Important: • Playback of camera channel 1. The current playback speed will be impossible to be played is pressed during playback, recorded images will starts. z Select the desired camera channel by pressing the camera channel selection buttons (1 - 16) or by...
WJRT416V User Guide
Page 24
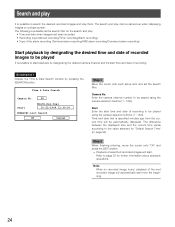
... and date when images had been recorded • Recording type (Manual recording/Timer recording/Alarm recording) • Type of the alarm recording (Terminal alarm recording/VMD alarm recording/Command alarm recording) Start playback by designating the desired time and date of recorded images to be played using the camera selection buttons (1 - 10/0). Time & Date Search Camera No. 05 Start Month-Day-Year...
... and date when images had been recorded • Recording type (Manual recording/Timer recording/Alarm recording) • Type of the alarm recording (Terminal alarm recording/VMD alarm recording/Command alarm recording) Start playback by designating the desired time and date of recorded images to be played using the camera selection buttons (1 - 10/0). Time & Date Search Camera No. 05 Start Month-Day-Year...
WJRT416V User Guide
Page 25
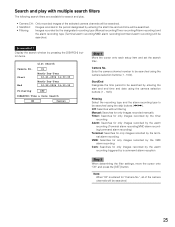
... start time and end time will be searched. • Filtering: Images recorded by the designated recording type (Manual recording/Timer recording/Alarm recording) and the alarm recording type (Terminal alarm recording/VMD alarm recording/command alarm recording) will be searched. 25 Camera No. Filtering Select the recording type and the alarm recording type to be searched using the skip buttons (s d). Screenshot 1 Display...
... start time and end time will be searched. • Filtering: Images recorded by the designated recording type (Manual recording/Timer recording/Alarm recording) and the alarm recording type (Terminal alarm recording/VMD alarm recording/command alarm recording) will be searched. 25 Camera No. Filtering Select the recording type and the alarm recording type to be searched using the skip buttons (s d). Screenshot 1 Display...
WJRT416V User Guide
Page 27
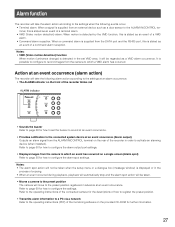
...will automatically stop and the alarm spot action will be taken. • Moves a camera to the preset position The camera will move to the preset position registered in advance at an event occurrence. Alarm function The recorder will take the following events occur. • Terminal alarm: When a signal is...; The alarm spot action will be taken when the setup menu or a dialogue box (message window) is possible to configure to record images from the camera to configure the settings. Refer to page 60 for how to activate an alarming device (when installed). It is displayed or in ...
...will automatically stop and the alarm spot action will be taken. • Moves a camera to the preset position The camera will move to the preset position registered in advance at an event occurrence. Alarm function The recorder will take the following events occur. • Terminal alarm: When a signal is...; The alarm spot action will be taken when the setup menu or a dialogue box (message window) is possible to configure to record images from the camera to configure the settings. Refer to page 60 for how to activate an alarming device (when installed). It is displayed or in ...
WJRT416V User Guide
Page 28
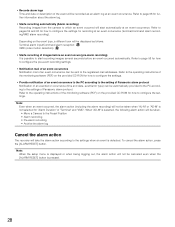
...the alarm log. • Starts recording automatically (Alarm recording) Recording images from the camera to which an event occurred will be sent to configure the settings. Terminal alarm input/Command alarm reception: VMD (video motion detection): • Starts recording of the monitoring software (PDF)...a Camera to the Preset Position • Alarm recording • Pre-alarm recording • Archive the alarm log Cancel the alarm action The recorder will not be displayed as an alarm log at an event occurrence. • Records alarm logs Time and date or description of Panasonic alarm...
...the alarm log. • Starts recording automatically (Alarm recording) Recording images from the camera to which an event occurred will be sent to configure the settings. Terminal alarm input/Command alarm reception: VMD (video motion detection): • Starts recording of the monitoring software (PDF)...a Camera to the Preset Position • Alarm recording • Pre-alarm recording • Archive the alarm log Cancel the alarm action The recorder will not be displayed as an alarm log at an event occurrence. • Records alarm logs Time and date or description of Panasonic alarm...

WJRT416V User Guide
Page 29
...) 3. Enter the camera channel number to be searched using the WJ-RT416V with the internal CD/DVD drive, the disk drive to be used for copy- Note: When "00" is entered for unexpected situations such as malfunction of the HDD. It is possible to copy recorded images onto an external recording device (HDD, DVD...
...) 3. Enter the camera channel number to be searched using the WJ-RT416V with the internal CD/DVD drive, the disk drive to be used for copy- Note: When "00" is entered for unexpected situations such as malfunction of the HDD. It is possible to copy recorded images onto an external recording device (HDD, DVD...


