
TH42PX500U User Guide
Page 10
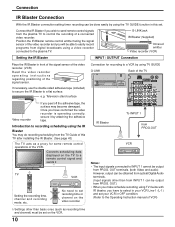
... adhesive tape (included) to secure the IR Blaster to a remote control signal and sends it by using the TV GUIDE function in your VCR in OFF condition. (Refer to the Operating Instruction manual of VCR) › Settings other than basic ones (such as a proxy for recording to a VCR by...positioning of the signal sensor. Connect the IR Blaster if you peel off the adhesive tape, the surface may do recording scheduling from the plasma TV to set on the video recorder Connection for some remote control operations of a connected video recorder. VCR No need to control the recording ...
... adhesive tape (included) to secure the IR Blaster to a remote control signal and sends it by using the TV GUIDE function in your VCR in OFF condition. (Refer to the Operating Instruction manual of VCR) › Settings other than basic ones (such as a proxy for recording to a VCR by...positioning of the signal sensor. Connect the IR Blaster if you peel off the adhesive tape, the surface may do recording scheduling from the plasma TV to set on the video recorder Connection for some remote control operations of a connected video recorder. VCR No need to control the recording ...
TH42PX500U User Guide
Page 11
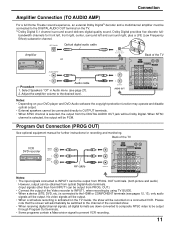
... L AUDIO OUT G - D I G I TA L AUDIO OUT G-LINK R Audio cable Procedure 1. Program Out Connection (PROG OUT) See optional equipment manual for further instructions for front left, front right, center, surround left and surround right, plus a LFE (Low Frequency Effect) subwoofer channel. OUT.) •... Connect the output of the TV C a b l e C A R D TM ANTENNA Cable In L R OUTPUT AUDIO OUT AV IN Y Y R L AUDIO IN VIDEO PB PB S VIDEO...
... L AUDIO OUT G - D I G I TA L AUDIO OUT G-LINK R Audio cable Procedure 1. Program Out Connection (PROG OUT) See optional equipment manual for further instructions for front left, front right, center, surround left and surround right, plus a LFE (Low Frequency Effect) subwoofer channel. OUT.) •... Connect the output of the TV C a b l e C A R D TM ANTENNA Cable In L R OUTPUT AUDIO OUT AV IN Y Y R L AUDIO IN VIDEO PB PB S VIDEO...
TH42PX500U User Guide
Page 12
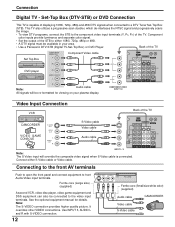
... in your plasma display. Connecting to the front AV terminals Push to open the front panel and connect equipment to the component video input terminals (Y, PB, PR) of the STB to the video input terminals. See the optional equipment manual for viewing on your area. • Use a Panasonic DTV-STB (Digital TV-Set-Top...
... in your plasma display. Connecting to the front AV terminals Push to open the front panel and connect equipment to the component video input terminals (Y, PB, PR) of the STB to the video input terminals. See the optional equipment manual for viewing on your area. • Use a Panasonic DTV-STB (Digital TV-Set-Top...
TH42PX500U User Guide
Page 18
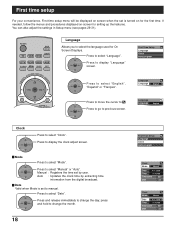
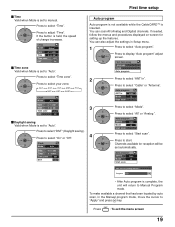
... and procedures displayed on-screen for On Screen Displays. POWER SAP LIGHT TV VCR DVD DTV RCVR DBS/CBL AUX TV/VIDEO SLEEP EXIT MUT CALL ASPECT FAVORITE E RE CH -VOL OK VOL+ Language Allows you to select "Manual" or "Auto". CH -VOL OK VOL+ CH Press to display ... set by extracting time information from the digital broadcast. Press to previous screen. Press to go to select "Language". Manual : Registers the time set to manual. Press to change the month. 18 First Time Setup Language Clock Auto program Language Language English Language Language English First ...
... and procedures displayed on-screen for On Screen Displays. POWER SAP LIGHT TV VCR DVD DTV RCVR DBS/CBL AUX TV/VIDEO SLEEP EXIT MUT CALL ASPECT FAVORITE E RE CH -VOL OK VOL+ Language Allows you to select "Manual" or "Auto". CH -VOL OK VOL+ CH Press to display ... set by extracting time information from the digital broadcast. Press to previous screen. Press to go to select "Language". Manual : Registers the time set to manual. Press to change the month. 18 First Time Setup Language Clock Auto program Language Language English Language Language English First ...
TH42PX500U User Guide
Page 19
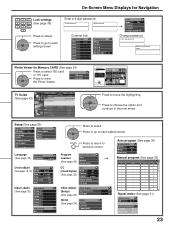
... available while the CableCARDTM is held, the speed of change increases. Progress • After Auto program is complete, the unit will be set to manual. To make available a channel that has been located by auto scan, in Setup menu. 1 CH -VOL OK VOL+ CH Press to select ... program". Channels available for setting up the features. You can scan All (Analog and Digital) channels. Press to select "All" or "Analog ". Clock Mode Manual Date 4 / 1 / 2005 Time 9 : 43 AM Time zone EST DST Off Time zone Valid when Mode is set to select "Start scan". Press ...
... available while the CableCARDTM is held, the speed of change increases. Progress • After Auto program is complete, the unit will be set to manual. To make available a channel that has been located by auto scan, in Setup menu. 1 CH -VOL OK VOL+ CH Press to select ... program". Channels available for setting up the features. You can scan All (Analog and Digital) channels. Press to select "All" or "Analog ". Clock Mode Manual Date 4 / 1 / 2005 Time 9 : 43 AM Time zone EST DST Off Time zone Valid when Mode is set to select "Start scan". Press ...
TH42PX500U User Guide
Page 23
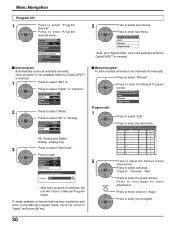
...2000 Pixel 2048x1536 Select OK Select MENU RETURN 102-0001 102-0004 102-0007 102-0002 102-0005 102-0008 102-0003 102-0006 TV Guide (See page 43) SETUP SCHEDULE LISTINGS SEARCH SETUP CH -VOL OK VOL+ CH Press to previous screen. CH -VOL OK ...) Side Bar Off About (See page 34) About Version License CableCARD Auto program (See page 30) Auto program ANT In Cable Mode All Start scan Manual program (See page 30) Edit Apply CH Caption Favorite Add 1 - - - - - - No 4 - - - - - - No 8 - - - - - - No 9 - - - - - - Monitor out On Lock Mode Off ...
...2000 Pixel 2048x1536 Select OK Select MENU RETURN 102-0001 102-0004 102-0007 102-0002 102-0005 102-0008 102-0003 102-0006 TV Guide (See page 43) SETUP SCHEDULE LISTINGS SEARCH SETUP CH -VOL OK VOL+ CH Press to previous screen. CH -VOL OK ...) Side Bar Off About (See page 34) About Version License CableCARD Auto program (See page 30) Auto program ANT In Cable Mode All Start scan Manual program (See page 30) Edit Apply CH Caption Favorite Add 1 - - - - - - No 4 - - - - - - No 8 - - - - - - No 9 - - - - - - Monitor out On Lock Mode Off ...
TH42PX500U User Guide
Page 30
... After Auto program is complete, the unit will return to enter your program. Manual program To add or delete channels from channels list manually. No 5 - - - - - - No 10 - - - - - - CH -VOL OK VOL+ Press to Manual Program mode. "Auto program" is not available while the CableCARDTM is inserted. ... Press to next page for each adjustment. Press to select sub-menus. To make available a channel that has been located by auto scan, in the Manual program mode, move cursor to select edit area. -VOL OK VOL+ "Caption", "Favorite", "Add". No 9 - - - - - - No 2 Press to...
... After Auto program is complete, the unit will return to enter your program. Manual program To add or delete channels from channels list manually. No 5 - - - - - - No 10 - - - - - - CH -VOL OK VOL+ Press to Manual Program mode. "Auto program" is not available while the CableCARDTM is inserted. ... Press to next page for each adjustment. Press to select sub-menus. To make available a channel that has been located by auto scan, in the Manual program mode, move cursor to select edit area. -VOL OK VOL+ "Caption", "Favorite", "Add". No 9 - - - - - - No 2 Press to...

TH42PX500U User Guide
Page 31
... "Apply". Caption detail Menu Navigation Edit (Add) Setting to register/delete in CH Antenna. 3 Press to move cursor to display "Signal meter". Program channel Auto Manual 4 Press to select the character to select "Signal meter". CH You may enter up to 7 characters. 2 CH Press to select Favorite number. CH -VOL OK...
... "Apply". Caption detail Menu Navigation Edit (Add) Setting to register/delete in CH Antenna. 3 Press to move cursor to display "Signal meter". Program channel Auto Manual 4 Press to select the character to select "Signal meter". CH You may enter up to 7 characters. 2 CH Press to select Favorite number. CH -VOL OK...

TH42PX500U User Guide
Page 47
...and use to change the information. When finished, press OK key. 2) Using Manual Recording • Highlight Schedule, and press the Menu button to display the Schedule Options menu. • Highlight New Manual Recording and press OK key to display the Remind Options menu. • ...to display the Schedule Options menu. • Highlight New Manual Reminder and press the OK key to display the Record Options menu. • Current information is displayed. When finished, press OK key. TV Guide SETUP SCHEDULE LISTINGS SEARCH SETUP SEARCH SETUP SCHEDULE LISTINGS ...
...and use to change the information. When finished, press OK key. 2) Using Manual Recording • Highlight Schedule, and press the Menu button to display the Schedule Options menu. • Highlight New Manual Recording and press OK key to display the Remind Options menu. • ...to display the Schedule Options menu. • Highlight New Manual Reminder and press the OK key to display the Record Options menu. • Current information is displayed. When finished, press OK key. TV Guide SETUP SCHEDULE LISTINGS SEARCH SETUP SEARCH SETUP SCHEDULE LISTINGS ...


