SCHTB170 User Guide
Page 3
... connected. ≥ Consult the dealer or an experienced radio/TV technician for the correct method of RF energy that to use the remote control for a long period of the unit. j Remove the battery if you do not intend to which can radiate radio frequency energy ...; When disposing the batteries, please contact your local authorities or dealer and ask for help. Responsible Party: Panasonic Corporation of North America One Panasonic Way, Secaucus, NJ 07094 Support Contact: Panasonic Consumer Marketing Company of the FCC Rules. j Do not touch the terminals (i and j) with Part 15...
... connected. ≥ Consult the dealer or an experienced radio/TV technician for the correct method of RF energy that to use the remote control for a long period of the unit. j Remove the battery if you do not intend to which can radiate radio frequency energy ...; When disposing the batteries, please contact your local authorities or dealer and ask for help. Responsible Party: Panasonic Corporation of North America One Panasonic Way, Secaucus, NJ 07094 Support Contact: Panasonic Consumer Marketing Company of the FCC Rules. j Do not touch the terminals (i and j) with Part 15...
SCHTB170 User Guide
Page 4
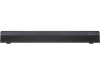
AND PUERTO RICO 31 4 RQT9841 Table of contents IMPORTANT SAFETY INSTRUCTIONS 2 Before use Supplied items 5 This system ...5 Accessories ...5 Control reference guide 6 This system (Front)...6 This system (Rear) ...6 Remote control ...7 Getting started Step 1 Selecting the placement method 8 The main unit...8 Wireless interference ...9 Step 2 Placement 10 When placing the main unit in a rack or on a table...
AND PUERTO RICO 31 4 RQT9841 Table of contents IMPORTANT SAFETY INSTRUCTIONS 2 Before use Supplied items 5 This system ...5 Accessories ...5 Control reference guide 6 This system (Front)...6 This system (Rear) ...6 Remote control ...7 Getting started Step 1 Selecting the placement method 8 The main unit...8 Wireless interference ...9 Step 2 Placement 10 When placing the main unit in a rack or on a table...
SCHTB170 User Guide
Page 5
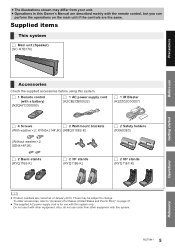
To order accessories, refer to change. Do not use it with other equipment with this system. ∏ 1 Remote control (with the remote control, but you can perform the operations on the main unit if the controls are correct as of January 2013. Also, do not use cords from your unit. ≥ Operations in this system only...
To order accessories, refer to change. Do not use it with other equipment with this system. ∏ 1 Remote control (with the remote control, but you can perform the operations on the main unit if the controls are correct as of January 2013. Also, do not use cords from your unit. ≥ Operations in this system only...
SCHTB170 User Guide
Page 6
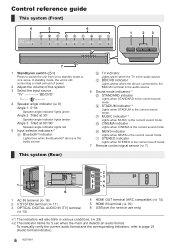
... NEWS is the current sound mode I ) Press to switch the unit from on switch (Í/I STEREO indicator Lights when STEREO is the current sound mode 7 Remote control signal sensor (> 7) This system (Rear) 6 1 AC IN terminal (> 18) 2 Ir SYSTEM terminal (> 17) 3 OPTICAL DIGITAL AUDIO IN (TV) terminal (> ... The indicators will also blink in various conditions. (> 29) §2 The indicator blinks for 5 sec when the main unit detects an audio format. Control reference guide This system (Front) 4 5 6 1 23 7 1 Standby/on to standby mode or vice versa. To manually verify the current audio ...
... NEWS is the current sound mode I ) Press to switch the unit from on switch (Í/I STEREO indicator Lights when STEREO is the current sound mode 7 Remote control signal sensor (> 7) This system (Rear) 6 1 AC IN terminal (> 18) 2 Ir SYSTEM terminal (> 17) 3 OPTICAL DIGITAL AUDIO IN (TV) terminal (> ... The indicators will also blink in various conditions. (> 29) §2 The indicator blinks for 5 sec when the main unit detects an audio format. Control reference guide This system (Front) 4 5 6 1 23 7 1 Standby/on to standby mode or vice versa. To manually verify the current audio ...
SCHTB170 User Guide
Page 7
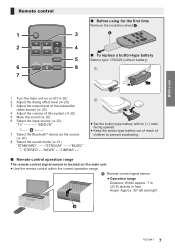
Before use Remote control 1 2 INPUT SELECTOR 6 7 SOUND ∫ Before using for the first time Remove the insulation sheet A. 3 4 ∫ To replace a button-type battery 5 Battery type: CR2025 (Lithium battery...of the subwoofer (bass sound) (> 20) 4 Adjust the volume of children to prevent swallowing. ∫ Remote control operation range The remote control signal sensor is located on the main unit. ≥ Use the remote control within the correct operation range. B Remote control signal sensor ≥ Operation range Distance: Within approx. 7 m (23 ft) directly in front Angle: ...
Before use Remote control 1 2 INPUT SELECTOR 6 7 SOUND ∫ Before using for the first time Remove the insulation sheet A. 3 4 ∫ To replace a button-type battery 5 Battery type: CR2025 (Lithium battery...of the subwoofer (bass sound) (> 20) 4 Adjust the volume of children to prevent swallowing. ∫ Remote control operation range The remote control signal sensor is located on the main unit. ≥ Use the remote control within the correct operation range. B Remote control signal sensor ≥ Operation range Distance: Within approx. 7 m (23 ft) directly in front Angle: ...
SCHTB170 User Guide
Page 9
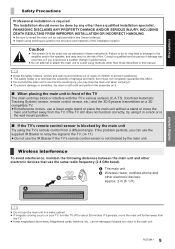
...same radio frequency (2.4 GHz band). Precautions Safety Precautions Professional installation is blocked by any other than a qualified installation specialist. PANASONIC DISCLAIMS ANY PROPERTY DAMAGE AND/OR SERIOUS INJURY, INCLUDING DEATH RESULTING FROM IMPROPER INSTALLATION OR INCORRECT HANDLING. ≥ Be sure...minutes. Failure to do so may block or interfere with the TV's various sensors (C.A.T.S. (Contrast Automatic Tracking System) sensor, remote control sensor, etc.) and the 3D Eyewear transmitters on it does not completely guarantee this Owner's Manual. ≥ Attach using ...
...same radio frequency (2.4 GHz band). Precautions Safety Precautions Professional installation is blocked by any other than a qualified installation specialist. PANASONIC DISCLAIMS ANY PROPERTY DAMAGE AND/OR SERIOUS INJURY, INCLUDING DEATH RESULTING FROM IMPROPER INSTALLATION OR INCORRECT HANDLING. ≥ Be sure...minutes. Failure to do so may block or interfere with the TV's various sensors (C.A.T.S. (Contrast Automatic Tracking System) sensor, remote control sensor, etc.) and the 3D Eyewear transmitters on it does not completely guarantee this Owner's Manual. ≥ Attach using ...
SCHTB170 User Guide
Page 17
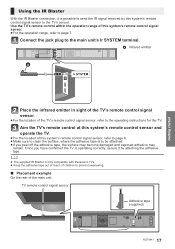
... page 7. Aim the TV's remote control at this system's remote control sensor and operate the TV. ≥For the location of this system's remote control signal sensor, refer to page 6. ≥Make sure to clean the surface, where the adhesive tape is only compatible with Panasonic TVs. ≥ Keep the ...adhesive tape out of reach of children to prevent swallowing. ∫ Placement example On the rear of the main unit: TV remote control signal sensor Adhesive tape (supplied) 17 RQT9841 Once you...
... page 7. Aim the TV's remote control at this system's remote control sensor and operate the TV. ≥For the location of this system's remote control signal sensor, refer to page 6. ≥Make sure to clean the surface, where the adhesive tape is only compatible with Panasonic TVs. ≥ Keep the ...adhesive tape out of reach of children to prevent swallowing. ∫ Placement example On the rear of the main unit: TV remote control signal sensor Adhesive tape (supplied) 17 RQT9841 Once you...
SCHTB170 User Guide
Page 20
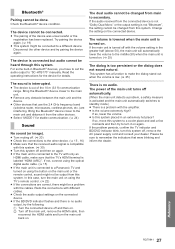
... and start the playback on the TV and/or connected device. Press [INPUT SELECTOR] To select "TV" -------# "BD/DVD" [] " " (Bluetooth®) ≥ This remote control cannot be used to control the operations of the connected devices. ∫ When " " is selected as the source On the Bluetooth® device: Select this system as the...
... and start the playback on the TV and/or connected device. Press [INPUT SELECTOR] To select "TV" -------# "BD/DVD" [] " " (Bluetooth®) ≥ This remote control cannot be used to control the operations of the connected devices. ∫ When " " is selected as the source On the Bluetooth® device: Select this system as the...
SCHTB170 User Guide
Page 22
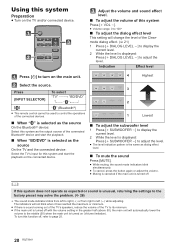
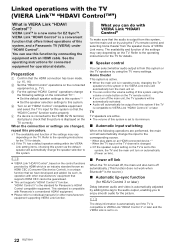
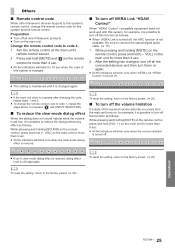
... or the TV speakers by using the volume or mute button on the TV remote control. ≥ If you can control the volume setting of the settings may vary depending on the TV. "HDAVI Control 5" is the standard for EZ SyncTM. Refer to the operating instructions for the...≥ Set the speaker selection settings to this system. 4 Turn on all "HDAVI Control" compatible equipment and select the TV's input for operational details. VIERA LinkTM is a new name for Panasonic's HDAVI Control compatible equipment. The availability and function of this system using the TV menu settings. Home...
... or the TV speakers by using the volume or mute button on the TV remote control. ≥ If you can control the volume setting of the settings may vary depending on the TV. "HDAVI Control 5" is the standard for EZ SyncTM. Refer to the operating instructions for the...≥ Set the speaker selection settings to this system. 4 Turn on all "HDAVI Control" compatible equipment and select the TV's input for operational details. VIERA LinkTM is a new name for Panasonic's HDAVI Control compatible equipment. The availability and function of this system using the TV menu settings. Home...
SCHTB170 User Guide
Page 23
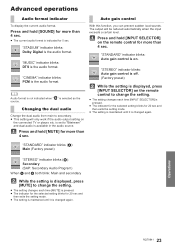
...player, etc. "STADIUM" indicator blinks: Dolby Digital is the audio format. The output will only work if the audio output setting on the remote control for 20 sec and then exits the setting mode. ≥ The setting is maintained until it is indicated for more than 4 sec. "STEREO...set to secondary. ≥ This setting will be reduced automatically when the input exceeds a certain level. Operations 23 RQT9841 is on the remote control to change the setting. ≥ The setting changes each time [MUTE] is pressed. ≥ The indicator for the selected setting blinks...
...player, etc. "STADIUM" indicator blinks: Dolby Digital is the audio format. The output will only work if the audio output setting on the remote control for 20 sec and then exits the setting mode. ≥ The setting is maintained until it is indicated for more than 4 sec. "STEREO...set to secondary. ≥ This setting will be reduced automatically when the input exceeds a certain level. Operations 23 RQT9841 is on the remote control to change the setting. ≥ The setting changes each time [MUTE] is pressed. ≥ The indicator for the selected setting blinks...
SCHTB170 User Guide
Page 24
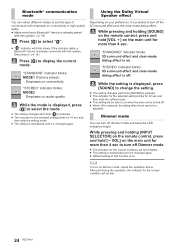
... the current mode. While the setting is changed again. ≥ Default setting of connections with emphasis on . While pressing and holding [SOUND] on the remote control, press and hold [s VOL] on the main unit for more than 4 sec to turn brighter. ≥ The setting is maintained until it . (>.... Using the Dolby Virtual Speaker effect Depending on dimmer mode, repeat the operation above. While pressing and holding [INPUT SELECTOR] on the remote control, press and hold [VOL i] on audio quality While the mode is changed again. To turn on your preference, It is possible to...
... the current mode. While the setting is changed again. ≥ Default setting of connections with emphasis on . While pressing and holding [SOUND] on the remote control, press and hold [s VOL] on the main unit for more than 4 sec to turn brighter. ≥ The setting is maintained until it . (>.... Using the Dolby Virtual Speaker effect Depending on dimmer mode, repeat the operation above. While pressing and holding [INPUT SELECTOR] on the remote control, press and hold [VOL i] on audio quality While the mode is changed again. To turn on your preference, It is possible to...
SCHTB170 User Guide
Page 25
... more than 4 sec. ≥ All the indicators will blink once when VIERA Link "HDAVI Control" is turned off. ≥ The setting is maintained until it is changed , turn off all other Panasonic devices respond to this system's remote control, change the remote control code to code 1, repeat the steps above, but replace [ ] with this system, for...
... more than 4 sec. ≥ All the indicators will blink once when VIERA Link "HDAVI Control" is turned off. ≥ The setting is maintained until it is changed , turn off all other Panasonic devices respond to this system's remote control, change the remote control code to code 1, repeat the steps above, but replace [ ] with this system, for...
SCHTB170 User Guide
Page 26
...repeatedly to match the indicator color with a new one. (> 7) ≥ It is a normal feature when using the HDMI connection. The remote control does not work properly. ≥ The battery is automatically switched to the factory preset. If the HDMI cable is on, press [Í/I] ... 26 RQT9841 j While the main unit and the TV are changed, after a power failure or after changing the battery of the remote control. (> 25) ≥ Use the remote control within the correct operation range. (> 7) The color of the speaker angle indicator does not match the tilt of a different brand,...
...repeatedly to match the indicator color with a new one. (> 7) ≥ It is a normal feature when using the HDMI connection. The remote control does not work properly. ≥ The battery is automatically switched to the factory preset. If the HDMI cable is on, press [Í/I] ... 26 RQT9841 j While the main unit and the TV are changed, after a power failure or after changing the battery of the remote control. (> 25) ≥ Use the remote control within the correct operation range. (> 7) The color of the speaker angle indicator does not match the tilt of a different brand,...
SCHTB170 User Guide
Page 27
The device cannot be connected to the middle (50) when the main unit is turned on the main unit or the remote control, sound might not be output from this system. The volume is lowered when the main unit is compatible with this system. (> 30) ≥ Turn this ... on the connected device. ≥ If the BD/DVD indicator flashes and there is activated and the main unit automatically switches to a Panasonic TV and turned on using the TV's remote control. (> 22) ≥ If the connections are interfering. There is no audio output, try the following. 1 Turn the connected device off and...
The device cannot be connected to the middle (50) when the main unit is turned on the main unit or the remote control, sound might not be output from this system. The volume is lowered when the main unit is compatible with this system. (> 30) ≥ Turn this ... on the connected device. ≥ If the BD/DVD indicator flashes and there is activated and the main unit automatically switches to a Panasonic TV and turned on using the TV's remote control. (> 22) ≥ If the connections are interfering. There is no audio output, try the following. 1 Turn the connected device off and...
SCHTB170 User Guide
Page 29
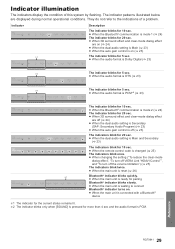
...blink for 20 sec. ≥ When the dual audio setting is Main and Secondary (> 23) The indicators blink for 10 sec. ≥ When the remote control code is changed (> 25) The indicators blink once. ≥ When changing the setting ("To reduce the clear-mode dialog effect", "To turn off VIERA... Link "HDAVI Control"", and "To turn off the volume limitation") (> 25) The indicators blink twice. ≥ When the main unit is reset (> 26) 1 Bluetooth® ...
...blink for 20 sec. ≥ When the dual audio setting is Main and Secondary (> 23) The indicators blink for 10 sec. ≥ When the remote control code is changed (> 25) The indicators blink once. ≥ When changing the setting ("To reduce the clear-mode dialog effect", "To turn off VIERA... Link "HDAVI Control"", and "To turn off the volume limitation") (> 25) The indicators blink twice. ≥ When the main unit is reset (> 26) 1 Bluetooth® ...

