

Home Theater
Page 2
... sources such as power-supply cord or plug is damaged, liquid has been spilled or objects have fallen into your safety. If this equipment does cause harmful interference to correct the interference by the manufacturer. 5) Do not use this device must accept any ventilation openings. REFER SERVICING TO QUALIFIED SERVICE PERSONNEL. Install in accordance with the manufacturer's instructions. 8) Do not install...
... sources such as power-supply cord or plug is damaged, liquid has been spilled or objects have fallen into your safety. If this equipment does cause harmful interference to correct the interference by the manufacturer. 5) Do not use this device must accept any ventilation openings. REFER SERVICING TO QUALIFIED SERVICE PERSONNEL. Install in accordance with the manufacturer's instructions. 8) Do not install...

Home Theater
Page 3
... prolonged exposure to stereo sources 15 Using Dolby Pro Logic 15 Using the Sound Field Control (SFC 15 MENU operation 16 The radio 17 Direct tuning/Automatic presetting/Manual presetting/Selecting channels 17 Sound field 18 Adjusting the tone/Dimension Control "DIMEN"/ Center Width Control "C-WDTH"/Balance/ Center focus/Adjusting SFC 18 Other functions 19 Sleep timer/Muting/Dimmer 19 The RESET function 19 Remote control operation guide 20 Watching DVDs/TV 20 Operating the DVD recorder/DVD player 20 Operating the TV 20 Changing the remote control code 21 Reference...
... prolonged exposure to stereo sources 15 Using Dolby Pro Logic 15 Using the Sound Field Control (SFC 15 MENU operation 16 The radio 17 Direct tuning/Automatic presetting/Manual presetting/Selecting channels 17 Sound field 18 Adjusting the tone/Dimension Control "DIMEN"/ Center Width Control "C-WDTH"/Balance/ Center focus/Adjusting SFC 18 Other functions 19 Sleep timer/Muting/Dimmer 19 The RESET function 19 Remote control operation guide 20 Watching DVDs/TV 20 Operating the DVD recorder/DVD player 20 Operating the TV 20 Changing the remote control code 21 Reference...
Home Theater
Page 4
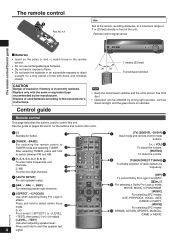
... digit channels. 5 4 [-AUTO SETUP] For auto speaker setup. 5 [u, 2, i, 1, SKIP] For selecting preset radio channels. 6 [-EFFECT, ―C.FOCUS] Use when adjusting Dolby Pro Logic ΙΙ effects. Replace only with doors and windows closed. Press and hold to select center focus mode. 6 [-, +] First select [-EFFECT] or [-LEVEL, RQTX0175 -TEST], then press [-] or [+] to start the speaker test 4 signal. 7 [TV] [BD/DVR, ―DVD-P] 7 Input mode and remote control mode buttons. [+, -, VOL] 8 To adjust the volume. [MUTING] To mute the volume. 8 [TUNER DIRECT TUNING...
... digit channels. 5 4 [-AUTO SETUP] For auto speaker setup. 5 [u, 2, i, 1, SKIP] For selecting preset radio channels. 6 [-EFFECT, ―C.FOCUS] Use when adjusting Dolby Pro Logic ΙΙ effects. Replace only with doors and windows closed. Press and hold to select center focus mode. 6 [-, +] First select [-EFFECT] or [-LEVEL, RQTX0175 -TEST], then press [-] or [+] to start the speaker test 4 signal. 7 [TV] [BD/DVR, ―DVD-P] 7 Input mode and remote control mode buttons. [+, -, VOL] 8 To adjust the volume. [MUTING] To mute the volume. 8 [TUNER DIRECT TUNING...

Home Theater
Page 5
... to the operating instructions for prolonged periods of power. 2 [-MENU, ―SETUP, RETURN] • For entering menus and setup to make various settings. • For returning to a multi-channel source with headphones 8 [M] Flashes or lights during Auto Speaker Setup. In standby mode, the unit is still consuming a small amount of time to prevent hearing damage. 9 [SETUP MIC] jack For calibration microphone. 10 Remote control signal sensor Display TUNED ST MONO SLEEP 1 [TUNED, ST, MONO] Radio indicators TUNED: A station is tuned ST: A stereo FM broadcast...
... to the operating instructions for prolonged periods of power. 2 [-MENU, ―SETUP, RETURN] • For entering menus and setup to make various settings. • For returning to a multi-channel source with headphones 8 [M] Flashes or lights during Auto Speaker Setup. In standby mode, the unit is still consuming a small amount of time to prevent hearing damage. 9 [SETUP MIC] jack For calibration microphone. 10 Remote control signal sensor Display TUNED ST MONO SLEEP 1 [TUNED, ST, MONO] Radio indicators TUNED: A station is tuned ST: A stereo FM broadcast...
Home Theater
Page 6
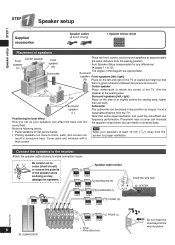
Center speaker Place underneath or above the center of the speaker wires as it is good coherency between the picture and sound. Connect the speakers to the receiver Attach the speaker-cable stickers to cross (short-circuit) or reverse the polarity of the TV. Surround Subwoofer speaker The subwoofer can affect the bass and the sound field. Positioning for best effect How you set up your speakers at secure bases. •...
Center speaker Place underneath or above the center of the speaker wires as it is good coherency between the picture and sound. Connect the speakers to the receiver Attach the speaker-cable stickers to cross (short-circuit) or reverse the polarity of the TV. Surround Subwoofer speaker The subwoofer can affect the bass and the sound field. Positioning for best effect How you set up your speakers at secure bases. •...
Home Theater
Page 7
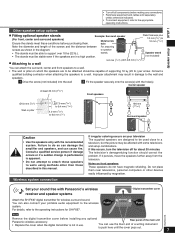
... making any optional Rear panel of the main unit Panasonic wireless accessory. • Replace the cover when the digital transmitter is apparent. • Do not attempt to attach these speakers to walls using methods other devices easily in use the blunt end of a writing instrument to a wall. Notes on front speakers These speakers do so can damage the amplifier and speakers, and can cause fire. Set your sound free...
... making any optional Rear panel of the main unit Panasonic wireless accessory. • Replace the cover when the digital transmitter is apparent. • Do not attempt to attach these speakers to walls using methods other devices easily in use the blunt end of a writing instrument to a wall. Notes on front speakers These speakers do so can damage the amplifier and speakers, and can cause fire. Set your sound free...
Home Theater
Page 8
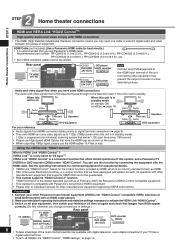
...; page 14) Video TV Audio MENU TUNE SETUP RETURN SETUP MIC ENTER Video INPUT SELECTOR VOLUME This unit Audio Speakers MENU TUNE SETUP RETURN SETUP MIC ENTER Video INPUT SELECTOR VOLUME This unit Audio Speakers DVD equipment DVD equipment For your reference • Audio signals from HDMI connection takes priority to standby. Connect your TV has a digital output terminal. • To turn off then on again and check that have the HDMI logo (as shown on Video Audio TV Audio When this unit is in standby mode (in standby mode). 1125p...
...; page 14) Video TV Audio MENU TUNE SETUP RETURN SETUP MIC ENTER Video INPUT SELECTOR VOLUME This unit Audio Speakers MENU TUNE SETUP RETURN SETUP MIC ENTER Video INPUT SELECTOR VOLUME This unit Audio Speakers DVD equipment DVD equipment For your reference • Audio signals from HDMI connection takes priority to standby. Connect your TV has a digital output terminal. • To turn off then on again and check that have the HDMI logo (as shown on Video Audio TV Audio When this unit is in standby mode (in standby mode). 1125p...
Home Theater
Page 9
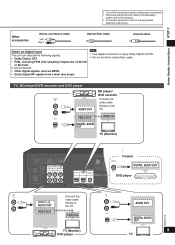
... signals: • Dolby Digital, DTS • PCM, including PCM with sampling frequencies of 96 kHz or 88.2 kHz It cannot decode: • Other digital signals, such as MPEG • Dolby Digital RF signals from a laser disc player •Note • Use digital connection to R AUDIO OUT the TV. TV, BD player/DVD recorder and DVD player BD/DVR IN L R AUDIO OUT BD player/ DVD recorder Connect the video cable directly to the appropriate operating instructions. STEP 2 Home theater connections • Turn off all components before making...
... signals: • Dolby Digital, DTS • PCM, including PCM with sampling frequencies of 96 kHz or 88.2 kHz It cannot decode: • Other digital signals, such as MPEG • Dolby Digital RF signals from a laser disc player •Note • Use digital connection to R AUDIO OUT the TV. TV, BD player/DVD recorder and DVD player BD/DVR IN L R AUDIO OUT BD player/ DVD recorder Connect the video cable directly to the appropriate operating instructions. STEP 2 Home theater connections • Turn off all components before making...
Home Theater
Page 10
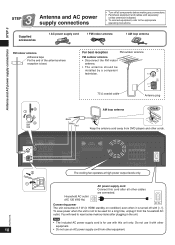
... connect equipment, refer to be installed by a competent technician. Antenna and AC power supply connections RQTX0175 2 1 3 2 1 10 75 Ω coaxial cable Antenna plug Black White Red AM loop antenna Click! PUSH DIGITAL TRA NSMITTER PUSH The cooling fan operates at high power output levels only. For best reception FM outdoor antenna FM outdoor antenna • Disconnect the FM indoor antenna. • The antenna should be used for use an AC power supply cord from DVD players...
... connect equipment, refer to be installed by a competent technician. Antenna and AC power supply connections RQTX0175 2 1 3 2 1 10 75 Ω coaxial cable Antenna plug Black White Red AM loop antenna Click! PUSH DIGITAL TRA NSMITTER PUSH The cooling fan operates at high power output levels only. For best reception FM outdoor antenna FM outdoor antenna • Disconnect the FM indoor antenna. • The antenna should be used for use an AC power supply cord from DVD players...
Home Theater
Page 12
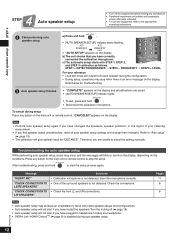
...; The calibration will blink or scroll on the display, depending on the conditions. LEVEL For your listening environment. • If you find speaker output unsatisfactory, reset all auto speaker setup settings and change them manually. "CANCELED" appears on the display. Press any button on the display and all components before making any connections. • Peripheral equipment and cables sold separately unless otherwise indicated. • To connect equipment, refer to adjust the setting manually...
...; The calibration will blink or scroll on the display, depending on the conditions. LEVEL For your listening environment. • If you find speaker output unsatisfactory, reset all auto speaker setup settings and change them manually. "CANCELED" appears on the display. Press any button on the display and all components before making any connections. • Peripheral equipment and cables sold separately unless otherwise indicated. • To connect equipment, refer to adjust the setting manually...
Home Theater
Page 13
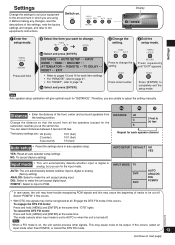
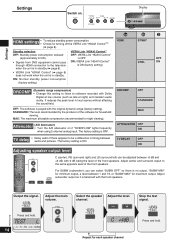
... [-MENU] and [ENTER] at the same time. Press repeatedly until "EXIT" appears. Press [ENTER] to PCM. Note Auto speaker setup calibration will give optimal result for each speaker channel AUTO SETUP DEFAULT NO YES Input mode • This unit automatically detects whether input is digital or analog. (factory setting) ANALOG: Select to make the unit accept digital input. INPUT MODE TV DVR DVD AUTO ANALOG DIG PCMFIX 1 In rare cases, the unit may have trouble recognizing PCM signals...
... [-MENU] and [ENTER] at the same time. Press repeatedly until "EXIT" appears. Press [ENTER] to PCM. Note Auto speaker setup calibration will give optimal result for each speaker channel AUTO SETUP DEFAULT NO YES Input mode • This unit automatically detects whether input is digital or analog. (factory setting) ANALOG: Select to make the unit accept digital input. INPUT MODE TV DVR DVD AUTO ANALOG DIG PCMFIX 1 In rare cases, the unit may have trouble recognizing PCM signals...
Home Theater
Page 14
..." lights frequently when using 2-channel analog input. C +4dB Repeat for household viewing. Display Settings HDMI settings • • To reduce standby power consumption. TEST L L C R RS LS SUBW 14 Select the speaker Adjust the level. Standby selection OFF: Standby power consumption reduced (approximately 0.3 W). • Signals from DVD equipment cannot pass through HDMI connection to be adjusted between -6 dB and VOL +6 dB, with Dolby Digital at low volume (such as late at night) and maintain audio clarity. Adjust center and surround output to software...
..." lights frequently when using 2-channel analog input. C +4dB Repeat for household viewing. Display Settings HDMI settings • • To reduce standby power consumption. TEST L L C R RS LS SUBW 14 Select the speaker Adjust the level. Standby selection OFF: Standby power consumption reduced (approximately 0.3 W). • Signals from DVD equipment cannot pass through HDMI connection to be adjusted between -6 dB and VOL +6 dB, with Dolby Digital at low volume (such as late at night) and maintain audio clarity. Adjust center and surround output to software...
Home Theater
Page 15
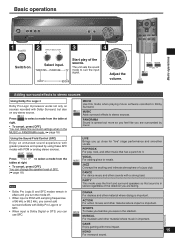
DVD-P BD/DVR Adjust the volume. You can make you feel like you can change the speaker level of SFC. (➡ page 18) Note • Dolby Pro Logic ΙΙ and SFC modes remain in effect until you turn the mode off. • When input is PCM with sampling frequencies of the direction you up close for "live" stage performance and smoother vocals. MUSIC VOCAL For adding...
DVD-P BD/DVR Adjust the volume. You can make you feel like you can change the speaker level of SFC. (➡ page 18) Note • Dolby Pro Logic ΙΙ and SFC modes remain in effect until you turn the mode off. • When input is PCM with sampling frequencies of the direction you up close for "live" stage performance and smoother vocals. MUSIC VOCAL For adding...
Home Theater
Page 16
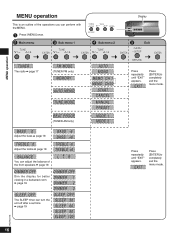
... with the MENU. 1 Press [-MENU] once. 2 Main menu 3 Sub menu 1 4 Sub menu 2 Display 5 Exit MENU operation TUNER The radio ➡ page 17 FM MODE (TUNER FM only) MEMORY AUTO MEMO TUNE MODE BEAT PROOF (TUNER AM only) BASS 0 Adjust the bass ➡ page 18 BASS -6 BASS +6 TREBLE 0 Adjust the treble ➡ page 18 TREBLE -6 TREBLE +6 BALANCE LR You can adjust the balance of the front speakers ➡ page 18 DIMMER OFF Dim the display for better viewing in...
... with the MENU. 1 Press [-MENU] once. 2 Main menu 3 Sub menu 1 4 Sub menu 2 Display 5 Exit MENU operation TUNER The radio ➡ page 17 FM MODE (TUNER FM only) MEMORY AUTO MEMO TUNE MODE BEAT PROOF (TUNER AM only) BASS 0 Adjust the bass ➡ page 18 BASS -6 BASS +6 TREBLE 0 Adjust the treble ➡ page 18 TREBLE -6 TREBLE +6 BALANCE LR You can adjust the balance of the front speakers ➡ page 18 DIMMER OFF Dim the display for better viewing in...

Home Theater
Page 17
... indicator and channel numbers are preset in these channels). For channels 1 to cancel. 3. e.g. Select "MANUAL" to 9, press the corresponding number. RQTX0175 Main unit 1. or 1 / +] to be preset is a lot of the station. Press [TUNER DIRECT TUNING]. 4. The last station to select "MODE 1" or "MODE 2" ➡ [ENTER]. Press [-MENU] to select the channel ➡ [ENTER]. ("STORED" lights.) For your reference FM stations can also be displayed. or 1 / +] to select "TUNER" ➡ "FM MODE". 2. Press [-MENU] to select "TUNER" ➡ "AUTO MEMO...
... indicator and channel numbers are preset in these channels). For channels 1 to cancel. 3. e.g. Select "MANUAL" to 9, press the corresponding number. RQTX0175 Main unit 1. or 1 / +] to be preset is a lot of the station. Press [TUNER DIRECT TUNING]. 4. The last station to select "MODE 1" or "MODE 2" ➡ [ENTER]. Press [-MENU] to select the channel ➡ [ENTER]. ("STORED" lights.) For your reference FM stations can also be displayed. or 1 / +] to select "TUNER" ➡ "FM MODE". 2. Press [-MENU] to select "TUNER" ➡ "AUTO MEMO...
Home Theater
Page 18
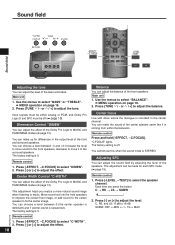
... select "DIMEN". 2. You cannot use this when the sound mode is 3. This adjustment can be off . Use the menus to the surround speakers. Press [-EFFECT, ―C.FOCUS] to adjust the balance. You can make the sound of the center speaker seem like it to select "BASS" or "TREBLE". ➡ MENU operation on page 16. 2. Remote control 1. You can make up for each SFC mode (➡ page 15). Remote control 1. The factory setting is STEREO. Center focus Use with discs...
... select "DIMEN". 2. You cannot use this when the sound mode is 3. This adjustment can be off . Use the menus to the surround speakers. Press [-EFFECT, ―C.FOCUS] to adjust the balance. You can make the sound of the center speaker seem like it to select "BASS" or "TREBLE". ➡ MENU operation on page 16. 2. Remote control 1. You can make up for each SFC mode (➡ page 15). Remote control 1. The factory setting is STEREO. Center focus Use with discs...

Home Theater
Page 19
... menus to select "DIMMER". ➡ MENU operation on page 16. 2. The RESET function RQTX0175 The operation settings for better viewing in minutes). Press [TUNE 2 / - Other functions Other functions/The RESET function Sleep timer The SLEEP timer can turn the unit off after a set time. or 1 / +] to select the level (1, 2, or 3) or OFF. Press [-MENU] to standby. The time remaining appears. Muting also cancels when you adjust the volume or switch the unit...
... menus to select "DIMMER". ➡ MENU operation on page 16. 2. The RESET function RQTX0175 The operation settings for better viewing in minutes). Press [TUNE 2 / - Other functions Other functions/The RESET function Sleep timer The SLEEP timer can turn the unit off after a set time. or 1 / +] to select the level (1, 2, or 3) or OFF. Press [-MENU] to standby. The time remaining appears. Muting also cancels when you adjust the volume or switch the unit...
Home Theater
Page 20
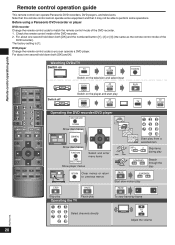
... the remote control mode of the DVD recorder. 1. Before using a Panasonic DVD recorder or player DVD recorder Change the remote control code to previous menus Start play from a selected item SKIP Skip items during play PAUSE SLOW/SEARCH Search through the disc SLOW/SEARCH Start slow-motion play STOP PAUSE PAUSE Stop play Pause play Operating the TV To view frame-by-frame RQTX0175 Select channels directly Adjust the volume 20 The factory setting is [1]. Note that this remote control cannot operate...
... the remote control mode of the DVD recorder. 1. Before using a Panasonic DVD recorder or player DVD recorder Change the remote control code to previous menus Start play from a selected item SKIP Skip items during play PAUSE SLOW/SEARCH Search through the disc SLOW/SEARCH Start slow-motion play STOP PAUSE PAUSE Stop play Pause play Operating the TV To view frame-by-frame RQTX0175 Select channels directly Adjust the volume 20 The factory setting is [1]. Note that this remote control cannot operate...
Home Theater
Page 21
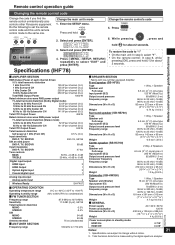
... S/N at rated power DVD-P, TV, BD/DVR 80 dB Input impedance DVD-P, TV, BD/DVR Tone controls BASS 47 kΩ 50 Hz, +6 dB to -6 dB TREBLE 20 kHz, +6 dB to -6 dB Digital input/output: HDMI Input 2 HDMI Output 1 Optical digital input 2 Coaxial digital input 1 Analog input/output Analog audio input Wireless Ready 3 SH-FX67 g OPERATING CONDITION Operating temperature range Operating humidity range g FM TUNER SECTION Frequency range Sensitivity Total harmonic distortion MONO STEREO S/N MONO STEREO Antenna terminal g AM TUNER SECTION Frequency range 0°C to...
... S/N at rated power DVD-P, TV, BD/DVR 80 dB Input impedance DVD-P, TV, BD/DVR Tone controls BASS 47 kΩ 50 Hz, +6 dB to -6 dB TREBLE 20 kHz, +6 dB to -6 dB Digital input/output: HDMI Input 2 HDMI Output 1 Optical digital input 2 Coaxial digital input 1 Analog input/output Analog audio input Wireless Ready 3 SH-FX67 g OPERATING CONDITION Operating temperature range Operating humidity range g FM TUNER SECTION Frequency range Sensitivity Total harmonic distortion MONO STEREO S/N MONO STEREO Antenna terminal g AM TUNER SECTION Frequency range 0°C to...
Home Theater
Page 22
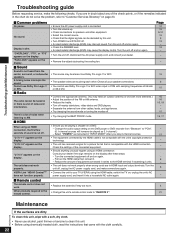
... use alcohol, paint thinner or benzine to clean this unit's remote control code to "REMOTE 2". Turn the connected equipment off , unplug the AC power supply cord, and make the following checks. Turn the unit off and on the display. No sound. "U 70-3" appears on again. - Check the settings of the check points, or if the remedies indicated in HDMI input and output terminals. Troubleshooting guide/Maintenance Troubleshooting guide Before requesting service, make connections again...
... use alcohol, paint thinner or benzine to clean this unit's remote control code to "REMOTE 2". Turn the connected equipment off , unplug the AC power supply cord, and make the following checks. Turn the unit off and on the display. No sound. "U 70-3" appears on again. - Check the settings of the check points, or if the remedies indicated in HDMI input and output terminals. Troubleshooting guide/Maintenance Troubleshooting guide Before requesting service, make connections again...


