Operating Instructions
Page 5
... ...40 Adjusting the time lag by delaying audio output when pictures on TV arrives after sounds ...40 Changing the volume display ...40 Reset (factory settings) ...40 Step 2 Connecting speakers ...10 Step 3 Connecting a TV and a Blu-ray Disc/DVD player ...12 Step 4 Watching TV or DVD ...14 Preparations Connections ...16 Basic connections ...16 Connecting equipment with HDMI terminal ...16 Connecting cables to video and audio terminals (Connecting equipment without HDMI terminal) ...17 Connecting cables to S video and audio terminals ...18 Connecting cables to component and audio terminals...
... ...40 Adjusting the time lag by delaying audio output when pictures on TV arrives after sounds ...40 Changing the volume display ...40 Reset (factory settings) ...40 Step 2 Connecting speakers ...10 Step 3 Connecting a TV and a Blu-ray Disc/DVD player ...12 Step 4 Watching TV or DVD ...14 Preparations Connections ...16 Basic connections ...16 Connecting equipment with HDMI terminal ...16 Connecting cables to video and audio terminals (Connecting equipment without HDMI terminal) ...17 Connecting cables to S video and audio terminals ...18 Connecting cables to component and audio terminals...

Operating Instructions
Page 6
... playback settings are used • When playing multi-channel sources • When using the digital transmitter (SH-FX67) is possible For selecting input sources (➔ pages 15, 26 and 41) For adjusting volumes (➔ pages 15, 26 and 41) For tuning the radio (➔ page 49) For SETUP operations (➔ page 36) Lights on to standby mode or vice versa. Use numbers indicated in use (➔ pages 15, 24, 26 and 27) General display Frequency...
... playback settings are used • When playing multi-channel sources • When using the digital transmitter (SH-FX67) is possible For selecting input sources (➔ pages 15, 26 and 41) For adjusting volumes (➔ pages 15, 26 and 41) For tuning the radio (➔ page 49) For SETUP operations (➔ page 36) Lights on to standby mode or vice versa. Use numbers indicated in use (➔ pages 15, 24, 26 and 27) General display Frequency...
Operating Instructions
Page 7
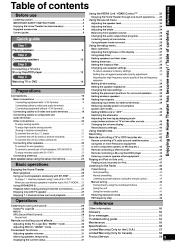
... RECORDER DVD PLAYER BD/DVD ANALOG 8CH For playing 8 channels sources (➔ page 27) For selecting a channel TV, cable box and satellite receiver (➔ page 42) DVD recorder (➔ page 43) Radio (➔ page 48) For adjusting volumes (➔ pages 14, 15, 26 and 41) For silencing speakers temporarily (➔ page 31) (R6/LR6, AA) CH Place this side in the remote control. • Do not use CTIONS FUN Rear Panel Speaker...
... RECORDER DVD PLAYER BD/DVD ANALOG 8CH For playing 8 channels sources (➔ page 27) For selecting a channel TV, cable box and satellite receiver (➔ page 42) DVD recorder (➔ page 43) Radio (➔ page 48) For adjusting volumes (➔ pages 14, 15, 26 and 41) For silencing speakers temporarily (➔ page 31) (R6/LR6, AA) CH Place this side in the remote control. • Do not use CTIONS FUN Rear Panel Speaker...

Operating Instructions
Page 9
..., about 1 meter (3 feet) higher than ear level. This page introduces speaker settings for setting. 9 RQT9223 Placing speakers Quick guide H in "Auto speaker setup using the setup microphone" (➔ pages 24 and 25) when you do not install surround speakers, sound assigned to them . Step 1 Placing speakers 5.1, 6.1, 7.1 etc. When you cannot install speakers the same distance away. Surround speakers ( D right, E left ) Place behind the listening-viewing position. Surround back speakers ( F right, G left ) Place on this...
..., about 1 meter (3 feet) higher than ear level. This page introduces speaker settings for setting. 9 RQT9223 Placing speakers Quick guide H in "Auto speaker setup using the setup microphone" (➔ pages 24 and 25) when you do not install surround speakers, sound assigned to them . Step 1 Placing speakers 5.1, 6.1, 7.1 etc. When you cannot install speakers the same distance away. Surround speakers ( D right, E left ) Place behind the listening-viewing position. Surround back speakers ( F right, G left ) Place on this...
Operating Instructions
Page 13
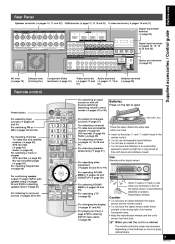
... with surround playback. R • The "SURROUND" indicator lights on after the setting. • You can enjoy 2-channel sources with a digital sound output. This convenient function enables you turn the unit on. Press POWER SURROUND SPEAKERS A SPEAKERS B AUTO SPEAKER SETUP RETURN -SETUP OK TUNE SETUP MIC AUX S VIDEO VIDEO L - A lower color gradation (256 steps), without using the unit late at night. HDMI input Digital audio out (optical) Connecting the optical fiber cable You need an optical fiber cable for connection (➔ pages 16 to turn off...
... with surround playback. R • The "SURROUND" indicator lights on after the setting. • You can enjoy 2-channel sources with a digital sound output. This convenient function enables you turn the unit on. Press POWER SURROUND SPEAKERS A SPEAKERS B AUTO SPEAKER SETUP RETURN -SETUP OK TUNE SETUP MIC AUX S VIDEO VIDEO L - A lower color gradation (256 steps), without using the unit late at night. HDMI input Digital audio out (optical) Connecting the optical fiber cable You need an optical fiber cable for connection (➔ pages 16 to turn off...
Operating Instructions
Page 14
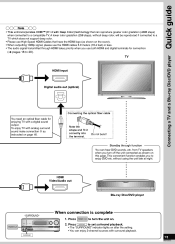
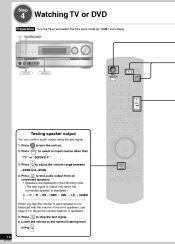
R SURROUND SPEAKERS A ENTER Testing speaker output You can confirm audio output using AUTO TEST AUTO TV/VIDEO to the normal listening level . 14 RQT9223 Press to turn the unit on and switch the TV's input mode (to adjust the volume balance of speakers. 5. Press to select an input source other than SUB MENU S "TV " or "BD/DVD P. to adjust the volume range between -30dB and -35dB. 4. Press using the test signal. 1. Step 4 Watching TV or DVD Turn the TV on . ". 3. Lower the volume to stop...
R SURROUND SPEAKERS A ENTER Testing speaker output You can confirm audio output using AUTO TEST AUTO TV/VIDEO to the normal listening level . 14 RQT9223 Press to turn the unit on and switch the TV's input mode (to adjust the volume balance of speakers. 5. Press to select an input source other than SUB MENU S "TV " or "BD/DVD P. to adjust the volume range between -30dB and -35dB. 4. Press using the test signal. 1. Step 4 Watching TV or DVD Turn the TV on . ". 3. Lower the volume to stop...

Operating Instructions
Page 23
... (DVD RECORDER) HDMI 1 (BD/DVD PLAYER) HDMI 2 (CABLE/SAT) HDMI 3 COMPONENT VIDEO Y IN OUT BD/ TV MONITOR DVD PLAYER S VIDEO FM indoor antenna (included) Fix the other cords. Rear panel OUND BACK ND BACK L OUT IN IN How to select "MULTI ROOM " in another room (➔ page 27) (MULTI ROOM). To use these options, insert the digital transmitter into the unit's digital transmitter terminal and connect surround speakers to the appropriate operating instructions. See SH-FX67's operating instructions for details. To use multi...
... (DVD RECORDER) HDMI 1 (BD/DVD PLAYER) HDMI 2 (CABLE/SAT) HDMI 3 COMPONENT VIDEO Y IN OUT BD/ TV MONITOR DVD PLAYER S VIDEO FM indoor antenna (included) Fix the other cords. Rear panel OUND BACK ND BACK L OUT IN IN How to select "MULTI ROOM " in another room (➔ page 27) (MULTI ROOM). To use these options, insert the digital transmitter into the unit's digital transmitter terminal and connect surround speakers to the appropriate operating instructions. See SH-FX67's operating instructions for details. To use multi...
Operating Instructions
Page 24
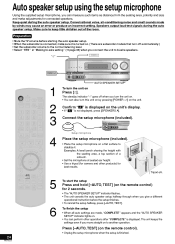
..." " SPEAKERS A VOLUME INPUT SELECTOR WIRELESS READY MULTI CH PROCESSING TrueHD D+ DTS-HD MULTI CH LPCM BI-AMP SURROUND M.ROOM _ + POWER POWER SURROUND SPEAKERS A SPEAKERS B AUTO SPEAKER SETUP RETURN -SETUP OK TUNE SETUP MIC AUX S VIDEO VIDEO L - The standby indicator "^" goes off automatically.) • Set the subwoofer volume to the normal listening level. • Select "YES " in "Making bi-wire setting" (➔ page 38) when you connect the unit to another operation. AUDIO - Auto speaker setup using the setup microphone Using the supplied setup microphone, you...
..." " SPEAKERS A VOLUME INPUT SELECTOR WIRELESS READY MULTI CH PROCESSING TrueHD D+ DTS-HD MULTI CH LPCM BI-AMP SURROUND M.ROOM _ + POWER POWER SURROUND SPEAKERS A SPEAKERS B AUTO SPEAKER SETUP RETURN -SETUP OK TUNE SETUP MIC AUX S VIDEO VIDEO L - The standby indicator "^" goes off automatically.) • Set the subwoofer volume to the normal listening level. • Select "YES " in "Making bi-wire setting" (➔ page 38) when you connect the unit to another operation. AUDIO - Auto speaker setup using the setup microphone Using the supplied setup microphone, you...
Operating Instructions
Page 25
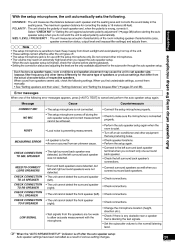
... sensitive to the left surround back speaker terminal when you find undesirable settings, correct them . Note • The setup microphone is too far. • An error occurred from the actual characteristics of speakers or produce settings that are the only available adjustment for use with the microphone. When you connect only one of various setting changes. 25 RQT9223 Auto speaker setup using the setup microphone Preparations Select "CHECK NO " in...
... sensitive to the left surround back speaker terminal when you find undesirable settings, correct them . Note • The setup microphone is too far. • An error occurred from the actual characteristics of speakers or produce settings that are the only available adjustment for use with the microphone. When you connect only one of various setting changes. 25 RQT9223 Auto speaker setup using the setup microphone Preparations Select "CHECK NO " in...

Operating Instructions
Page 26
...22). 26 RQT9223 R _ + TUNE TUNE "WIRELESS READY SURROUND, M. SUB MENU S Play the selected input source. Enjoying the Home Theater INPUT SELECTOR VOLUME SURROUND SPEAKERS A SPEAKERS B "MULTI CH PROCESSING" INPUT SELECTOR _ VOLUME + "SURROUND" MULTI CH PROCESSING TrueHD D+ DTS-HD MULTI CH LPCM BI-AMP WIRELESS READY SURROUND M.ROOM " " POWER POWER SURROUND SPEAKERS A SPEAKERS B AUTO SPEAKER SETUP RETURN -SETUP OK SETUP MIC AUX S VIDEO VIDEO L - FM AM CD TV CABLE/SAT BD/DVD P. (Blu-ray Disc/DVD player) GAME ...
...22). 26 RQT9223 R _ + TUNE TUNE "WIRELESS READY SURROUND, M. SUB MENU S Play the selected input source. Enjoying the Home Theater INPUT SELECTOR VOLUME SURROUND SPEAKERS A SPEAKERS B "MULTI CH PROCESSING" INPUT SELECTOR _ VOLUME + "SURROUND" MULTI CH PROCESSING TrueHD D+ DTS-HD MULTI CH LPCM BI-AMP WIRELESS READY SURROUND M.ROOM " " POWER POWER SURROUND SPEAKERS A SPEAKERS B AUTO SPEAKER SETUP RETURN -SETUP OK SETUP MIC AUX S VIDEO VIDEO L - FM AM CD TV CABLE/SAT BD/DVD P. (Blu-ray Disc/DVD player) GAME ...

Operating Instructions
Page 27
... RQT9223 Enjoying the Home Theater Basic operations Note • When you place the surround speakers at the back of SH-FX67, you can enjoy 7.1 channel playback, making analog 8-channel connections • Make analog 8-channel connections (➔ page 20). • Select "SPEAKERS A" (➔ page 26). • Switch the input source to the FRONT A terminals Switch " A " on while the digital transmitter is output from the recorder go through function). By using "MULTI ROOM " (➔ below...
... RQT9223 Enjoying the Home Theater Basic operations Note • When you place the surround speakers at the back of SH-FX67, you can enjoy 7.1 channel playback, making analog 8-channel connections • Make analog 8-channel connections (➔ page 20). • Select "SPEAKERS A" (➔ page 26). • Switch the input source to the FRONT A terminals Switch " A " on while the digital transmitter is output from the recorder go through function). By using "MULTI ROOM " (➔ below...
Operating Instructions
Page 29
... concert hall. R SURROUND "MUSIC " "EX " (Dolby Digital EX) • The "SURROUND" indicator lights on after the setting. • Surround playback switches on (➔ page 26). Best suited to emphasize the human voice. Sounds assigned to surround back channels become monaural in playback when you connect two surround back speakers to the input signals. • The subwoofer goes silent when you use NEO:6 on sources containing surround channels only. Sounds assigned to surround back channels become stereo in "Setting speakers and their...
... concert hall. R SURROUND "MUSIC " "EX " (Dolby Digital EX) • The "SURROUND" indicator lights on after the setting. • Surround playback switches on (➔ page 26). Best suited to emphasize the human voice. Sounds assigned to surround back channels become monaural in playback when you connect two surround back speakers to the input signals. • The subwoofer goes silent when you use NEO:6 on sources containing surround channels only. Sounds assigned to surround back channels become stereo in "Setting speakers and their...

Operating Instructions
Page 31
... adjust. • To shift the test signal output to the normal listening level using +, -]. [VOL Note • The front speakers cannot be output.) ENTER 1. Press [-AUTO, TEST] to 29, MAX (maximum) Factory setting: 20 5. Press [DISPLAY]. • The sound volume, SFC setting and Digital input (terminal name/format) scroll in turn across the display. • When the unit is receiving a dual audio signal, the reception status is displayed (➔ page 35). • Preset channel number is also displayed...
... adjust. • To shift the test signal output to the normal listening level using +, -]. [VOL Note • The front speakers cannot be output.) ENTER 1. Press [-AUTO, TEST] to 29, MAX (maximum) Factory setting: 20 5. Press [DISPLAY]. • The sound volume, SFC setting and Digital input (terminal name/format) scroll in turn across the display. • When the unit is receiving a dual audio signal, the reception status is displayed (➔ page 35). • Preset channel number is also displayed...
Operating Instructions
Page 32
... manuals for other manufacturers' equipment supporting VIERA Link function. You can use this unit's remote control. You can also adjust the volume level by using the remote control of TV (VIERA) 1 You can enjoy the followings by using the volume control buttons. Digital audio out (optical) Rear panel FRONT A A FRONT FRONT FRONT B B CENTER CENTER SURROUND SURROUND BACK SURROUND BACK SURROUND R LF L BI-WIRE R HF L R L R L OUT IN IN IN (DVD RECORDER) HDMI 1 (BD/DVD PLAYER) HDMI 2 (CABLE/SAT) HDMI 3 COMPONENT VIDEO Y A OR B/BI-WIRE : 4-8 Ω / EACH SPEAKER...
... manuals for other manufacturers' equipment supporting VIERA Link function. You can use this unit's remote control. You can also adjust the volume level by using the remote control of TV (VIERA) 1 You can enjoy the followings by using the volume control buttons. Digital audio out (optical) Rear panel FRONT A A FRONT FRONT FRONT B B CENTER CENTER SURROUND SURROUND BACK SURROUND BACK SURROUND R LF L BI-WIRE R HF L R L R L OUT IN IN IN (DVD RECORDER) HDMI 1 (BD/DVD PLAYER) HDMI 2 (CABLE/SAT) HDMI 3 COMPONENT VIDEO Y A OR B/BI-WIRE : 4-8 Ω / EACH SPEAKER...
Operating Instructions
Page 36
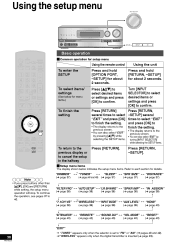
... Using the setup menu VOLUME INPUT SELECTOR WIRELESS READY MULTI CH PROCESSING TrueHD D+ DTS-HD MULTI CH LPCM BI-AMP SURROUND M.ROOM INPUT SELECTOR _ + POWER SURROUND SPEAKERS A SPEAKERS B AUTO SPEAKER SETUP RETURN -SETUP OK TUNE SETUP MIC AUX S VIDEO VIDEO L - AUDIO - Press [RETURN] several times to select "EXIT " and press [OK] to finish the setting. • The display returns to the previous screen. • You can also select "EXIT " by turning [INPUT SELECTOR] while selecting the SETUP items. ENTER To select items/ settings (See below indicates the setup menu...
... Using the setup menu VOLUME INPUT SELECTOR WIRELESS READY MULTI CH PROCESSING TrueHD D+ DTS-HD MULTI CH LPCM BI-AMP SURROUND M.ROOM INPUT SELECTOR _ + POWER SURROUND SPEAKERS A SPEAKERS B AUTO SPEAKER SETUP RETURN -SETUP OK TUNE SETUP MIC AUX S VIDEO VIDEO L - AUDIO - Press [RETURN] several times to select "EXIT " and press [OK] to finish the setting. • The display returns to the previous screen. • You can also select "EXIT " by turning [INPUT SELECTOR] while selecting the SETUP items. ENTER To select items/ settings (See below indicates the setup menu...
Operating Instructions
Page 37
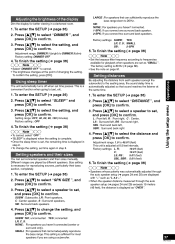
..., the sound delay time is 80 Hz (➔ page 38). • See the note on page 51. 4. Press [e][r] to select "SPK SIZE ", and press [OK] to confirm. For speakers that cannot adequately reproduce the bass range. Adjustment range: DIMMER 1 (bright) to confirm. 3. Factory settings: SUBW ; SMALL ; Using the setup menu To enter the SETUP (➔ page 36) 2. For speakers you connect one surround back speaker...
..., the sound delay time is 80 Hz (➔ page 38). • See the note on page 51. 4. Press [e][r] to select "SPK SIZE ", and press [OK] to confirm. For speakers that cannot adequately reproduce the bass range. Adjustment range: DIMMER 1 (bright) to confirm. 3. Factory settings: SUBW ; SMALL ; Using the setup menu To enter the SETUP (➔ page 36) 2. For speakers you connect one surround back speaker...
Operating Instructions
Page 50
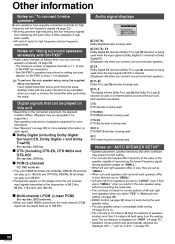
... (Dolby Pro Logic decoder) is being used when the input signal is DTS 5.1-channel. (Displayed only when you make HDMI connections, the multi-channel LPCM signal can be impossible if not supported.) See operating instructions of reproducing the lowest frequency signal among speakers judged as "SMALL ". • Left and right front speakers are necessary.) - See SH-FX67's operating instructions for setting surround selector on SH-FX67 to 192 kHz. 50 RQT9223 Settings made with the setup microphone...
... (Dolby Pro Logic decoder) is being used when the input signal is DTS 5.1-channel. (Displayed only when you make HDMI connections, the multi-channel LPCM signal can be impossible if not supported.) See operating instructions of reproducing the lowest frequency signal among speakers judged as "SMALL ". • Left and right front speakers are necessary.) - See SH-FX67's operating instructions for setting surround selector on SH-FX67 to 192 kHz. 50 RQT9223 Settings made with the setup microphone...

Operating Instructions
Page 51
...-wire speakers Note for more information, refer to output the missing bass range from the front speakers.) • Settings made with analog 8-channel connections. • The "BI-AMP" indicator stays on Speaker size" (➔ left (L) * Compatible iPod correct as "LARGE " • The subwoofer also makes audio output in the bass range when you perform stereo playback of analog and PCM sources. • The subwoofer sends out only the LFE (low frequency effect channel) signal contained in 2-channel Dolby Digital or DTS sources when...
...-wire speakers Note for more information, refer to output the missing bass range from the front speakers.) • Settings made with analog 8-channel connections. • The "BI-AMP" indicator stays on Speaker size" (➔ left (L) * Compatible iPod correct as "LARGE " • The subwoofer also makes audio output in the bass range when you perform stereo playback of analog and PCM sources. • The subwoofer sends out only the LFE (low frequency effect channel) signal contained in 2-channel Dolby Digital or DTS sources when...
Operating Instructions
Page 53
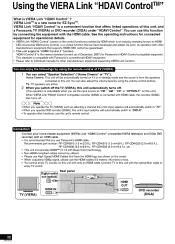
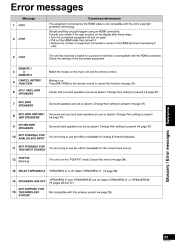
... the HDMI cable then reinsert it. • Reduce the number of the connected equipment. 2 U703 3 U704 4 5 6 REMOTE 1 or REMOTE 2 CANCEL MUTING FUNCTION NO C AND LS/RS SPEAKERS NO LS/RS SPEAKERS NO LS/RS AND SBL/ SBR SPEAKERS NO SBL/SBR SPEAKERS NOT POSSIBLE FOR ANALOG 8CH INPUT NOT POSSIBLE FOR THIS INPUT SOURCE PCM FIX (flashing) Match the modes on . Select "SPEAKERS A" (➔ page 26). Change their setting to the HDMI...
... the HDMI cable then reinsert it. • Reduce the number of the connected equipment. 2 U703 3 U704 4 5 6 REMOTE 1 or REMOTE 2 CANCEL MUTING FUNCTION NO C AND LS/RS SPEAKERS NO LS/RS SPEAKERS NO LS/RS AND SBL/ SBR SPEAKERS NO SBL/SBR SPEAKERS NOT POSSIBLE FOR ANALOG 8CH INPUT NOT POSSIBLE FOR THIS INPUT SOURCE PCM FIX (flashing) Match the modes on . Select "SPEAKERS A" (➔ page 26). Change their setting to the HDMI...
Operating Instructions
Page 54
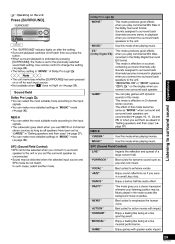
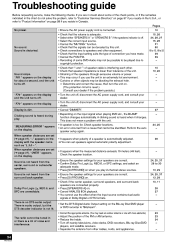
... problem persists.) • Turn the unit off, disconnect the AC power supply cord, and consult your dealer. • Turn the unit off . Clicking sound is heard during play 2-channel stereo sources. • Ensure the speaker settings for about some DVD-Audio may not be possible to 23 39 39 - 10 10, 22 - - - When speaker distances are unavailable. "MEASURING ERROR " appears on the input signal when playing DVD etc., the BI-AMP function changes...
... problem persists.) • Turn the unit off, disconnect the AC power supply cord, and consult your dealer. • Turn the unit off . Clicking sound is heard during play 2-channel stereo sources. • Ensure the speaker settings for about some DVD-Audio may not be possible to 23 39 39 - 10 10, 22 - - - When speaker distances are unavailable. "MEASURING ERROR " appears on the input signal when playing DVD etc., the BI-AMP function changes...


