Digital Video Camcorder
Page 1
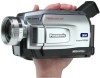
Spanish Quick Use Guide is included. PV-DV202 PV-DV402 [ PV-DV402 shown ] Mini Before attempting to : consumerproducts@panasonic.com LSQT0563A Guía para rápida consulta en español está incluida. For assistance, please call : 1-800-211-PANA(7262) or send e-mail to connect, operate or adjust this product, please read these instructions thoroughly. R Digital Video Camcorder Operating Instructions Models No.
Spanish Quick Use Guide is included. PV-DV202 PV-DV402 [ PV-DV402 shown ] Mini Before attempting to : consumerproducts@panasonic.com LSQT0563A Guía para rápida consulta en español está incluida. For assistance, please call : 1-800-211-PANA(7262) or send e-mail to connect, operate or adjust this product, please read these instructions thoroughly. R Digital Video Camcorder Operating Instructions Models No.
Digital Video Camcorder
Page 2
... Rules. Model No. FCC Warning: To assure continued FCC compliance, use only the provided shielded interface cable when connecting digital video camcorder to provide reasonable protection against harmful interference when operated in accordance with Part 15 of the FCC Rules. CAUTION: TO REDUCE THE RISK OF ELECTRIC SHOCK, DO NOT REMOVE COVER (OR BACK) NO USER-SERVICEABLE PARTS INSIDE REFER SERVICING TO QUALIFIED SERVICE PERSONNEL...
... Rules. Model No. FCC Warning: To assure continued FCC compliance, use only the provided shielded interface cable when connecting digital video camcorder to provide reasonable protection against harmful interference when operated in accordance with Part 15 of the FCC Rules. CAUTION: TO REDUCE THE RISK OF ELECTRIC SHOCK, DO NOT REMOVE COVER (OR BACK) NO USER-SERVICEABLE PARTS INSIDE REFER SERVICING TO QUALIFIED SERVICE PERSONNEL...
Digital Video Camcorder
Page 3
... the operating instructions should be adhered to the unit. An appliance and cart combination should be placed in a built-in USA Section 810 of antenna discharge unit, connection to . 10. The 3-wire grounding type plug will prevent damage to the video unit due to replace your appliance dealer or local power company. Part 1 of the Canadian Electrical Code, in installation such...
... the operating instructions should be adhered to the unit. An appliance and cart combination should be placed in a built-in USA Section 810 of antenna discharge unit, connection to . 10. The 3-wire grounding type plug will prevent damage to the video unit due to replace your appliance dealer or local power company. Part 1 of the Canadian Electrical Code, in installation such...
Digital Video Camcorder
Page 4
..., or direct splashing from any service or repairs to this video unit yourself as the original part. Unplug your hand. Your Palmcorder contains a sensitive pick-up device which could permanently damage the internal parts of the lens with them might be damaged by following conditions: a. Improper cleaning can fall into , or objects have the same characteristics as opening or removing covers may...
..., or direct splashing from any service or repairs to this video unit yourself as the original part. Unplug your hand. Your Palmcorder contains a sensitive pick-up device which could permanently damage the internal parts of the lens with them might be damaged by following conditions: a. Improper cleaning can fall into , or objects have the same characteristics as opening or removing covers may...
Digital Video Camcorder
Page 5
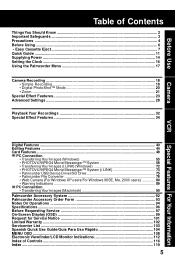
... Should Know 2 Important Safeguards ...3 Precautions ...4 Before Using ...6 • Easy Cassette Eject ...7 Quick Guide ...11 Supplying Power ...14 Setting the Clock ...16 Using the Palmcorder Menu 17 Camera Recording ...18 • Simple Recording 18 • Digital PhotoShot™ Mode 20 • Zoom ...21 Special Effect Features 23 Advanced Settings ...28 Playback Your Recordings 32 Special Effect Features 34 Digital Features ...40 Editing Features ...44 Card Features ...48 PC Connection • Transferring Your Images (Windows 55 •...
... Should Know 2 Important Safeguards ...3 Precautions ...4 Before Using ...6 • Easy Cassette Eject ...7 Quick Guide ...11 Supplying Power ...14 Setting the Clock ...16 Using the Palmcorder Menu 17 Camera Recording ...18 • Simple Recording 18 • Digital PhotoShot™ Mode 20 • Zoom ...21 Special Effect Features 23 Advanced Settings ...28 Playback Your Recordings 32 Special Effect Features 34 Digital Features ...40 Editing Features ...44 Card Features ...48 PC Connection • Transferring Your Images (Windows 55 •...
Digital Video Camcorder
Page 7
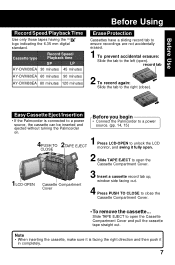
... TO TAPE EJECT CLOSE Press LCD-OPEN to close ). Note • When inserting the cassette, make sure it is connected to the right (close the Cassette Compartment Cover. • To remove the cassette... Slide TAPE EJECT to the left (open the Cassette Compartment Cover and pull the cassette tape straight out. Before Use Before Using Record Speed/Playback Time Use only those tapes having the Mini logo indicating the 6.35 mm digital standard. Cassette type Record Speed/ Playback time SP LP...
... TO TAPE EJECT CLOSE Press LCD-OPEN to close ). Note • When inserting the cassette, make sure it is connected to the right (close the Cassette Compartment Cover. • To remove the cassette... Slide TAPE EJECT to the left (open the Cassette Compartment Cover and pull the cassette tape straight out. Before Use Before Using Record Speed/Playback Time Use only those tapes having the Mini logo indicating the 6.35 mm digital standard. Cassette type Record Speed/ Playback time SP LP...

Digital Video Camcorder
Page 17
... cannot record on or play a tape. • While recording, the Menu screen cannot be displayed. • During playback, the Menu screen can be displayed. To select PROG. To select REC-SPEED, AUDIO-REC, INDEX, SHUTTER, SELF-REC, WIND-CUT, or ZOOM-MIC. 4 : SET-UP CAMERA SET-UP menu is displayed. To select REMOTE, BEEP, or MAGICVU (PV-DV402 only). 5 : DISPLAY SETTING DISPLAY SETTING menu is displayed. To select D. FUNCTION, D.EFFECT, or D.ZOOM. 2 : REC MODE VCR REC MODE menu is displayed. To select DISPLAY, C.RESET, DATE/ TIME, or CLOCK-SET. 6 : LCD/EVF SETTING LCD/EVF SETTING menu is...
... cannot record on or play a tape. • While recording, the Menu screen cannot be displayed. • During playback, the Menu screen can be displayed. To select PROG. To select REC-SPEED, AUDIO-REC, INDEX, SHUTTER, SELF-REC, WIND-CUT, or ZOOM-MIC. 4 : SET-UP CAMERA SET-UP menu is displayed. To select REMOTE, BEEP, or MAGICVU (PV-DV402 only). 5 : DISPLAY SETTING DISPLAY SETTING menu is displayed. To select D. FUNCTION, D.EFFECT, or D.ZOOM. 2 : REC MODE VCR REC MODE menu is displayed. To select DISPLAY, C.RESET, DATE/ TIME, or CLOCK-SET. 6 : LCD/EVF SETTING LCD/EVF SETTING menu is...
Digital Video Camcorder
Page 24
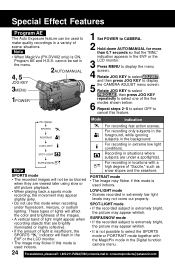
... 1 Set POWER to select one of scene situations. Press MENU to display 5 the CAMERA ADJUST menu screen. Repeat steps 2~5 to select OFF to select the SPORTS mode or PORTRAIT mode together with a high degree of light is used indoors. Note • When MagicVu (PV-DV402 only) is used indoors. cannot be so blurred when they are viewed later using slow or still picture playback. • When playing back a sports mode recording, the...
... 1 Set POWER to select one of scene situations. Press MENU to display 5 the CAMERA ADJUST menu screen. Repeat steps 2~5 to select OFF to select the SPORTS mode or PORTRAIT mode together with a high degree of light is used indoors. Note • When MagicVu (PV-DV402 only) is used indoors. cannot be so blurred when they are viewed later using slow or still picture playback. • When playing back a sports mode recording, the...

Digital Video Camcorder
Page 29
... the "W" side of the lens. 29 Note • DISPLAY must be required • when your Palmcorder is aimed at a new scene. 4 Press and hold POWER ZOOM, "T" side (Telephoto), until the lens is at 4, 6POWER ZOOM maximum zoom in. 5 Turn M.FOCUS DIAL until the picture is far from the subject to on the LCD or EVF. Manual Focus 1 Use Manual Focus (MF) when recording ... • a subject through glass...
... the "W" side of the lens. 29 Note • DISPLAY must be required • when your Palmcorder is aimed at a new scene. 4 Press and hold POWER ZOOM, "T" side (Telephoto), until the lens is at 4, 6POWER ZOOM maximum zoom in. 5 Turn M.FOCUS DIAL until the picture is far from the subject to on the LCD or EVF. Manual Focus 1 Use Manual Focus (MF) when recording ... • a subject through glass...
Digital Video Camcorder
Page 31
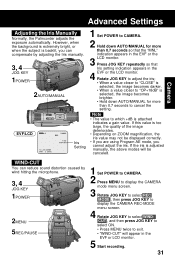
... are using Program AE mode, you can reduce sound distortion caused by adjusting the Iris manually. 3, 4 JOG KEY 1POWER 2AUTO/MANUAL EVF/LCD Iris Setting 1 Set POWER to which +dB is backlit, you cannot adjust the iris. WIND-CUT You can compensate by wind hitting the microphone. 3, 4 JOG KEY 1POWER 2MENU 5REC/PAUSE 1 Set POWER to CAMERA. 2 Press MENU to display the CAMERA mode menu screen. 3 Rotate JOG KEY to select REC MODE , then...
... are using Program AE mode, you can reduce sound distortion caused by adjusting the Iris manually. 3, 4 JOG KEY 1POWER 2AUTO/MANUAL EVF/LCD Iris Setting 1 Set POWER to which +dB is backlit, you cannot adjust the iris. WIND-CUT You can compensate by wind hitting the microphone. 3, 4 JOG KEY 1POWER 2MENU 5REC/PAUSE 1 Set POWER to CAMERA. 2 Press MENU to display the CAMERA mode menu screen. 3 Rotate JOG KEY to select REC MODE , then...
Digital Video Camcorder
Page 32
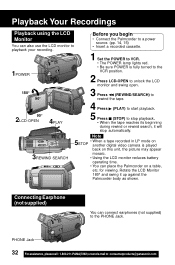
... a recorded cassette. 1POWER 1 Set the POWER to VCR. • The POWER lamp lights red. • Be sure POWER is fully turned to the VCR position. 2 Press LCD-OPEN to unlock the LCD monitor and swing open. 180° 90° 3 Press (REWIND/SEARCH) to rewind the tape. 4 Press (PLAY) to start playback. 90° 2LCD-OPEN 4PLAY 5 Press (STOP) to stop automatically. 3REWIND SEARCH Note 5 • When a tape recorded in LP mode on STOP another digital video camera...
... a recorded cassette. 1POWER 1 Set the POWER to VCR. • The POWER lamp lights red. • Be sure POWER is fully turned to the VCR position. 2 Press LCD-OPEN to unlock the LCD monitor and swing open. 180° 90° 3 Press (REWIND/SEARCH) to rewind the tape. 4 Press (PLAY) to start playback. 90° 2LCD-OPEN 4PLAY 5 Press (STOP) to stop automatically. 3REWIND SEARCH Note 5 • When a tape recorded in LP mode on STOP another digital video camera...

Digital Video Camcorder
Page 33
... Repeat Playback mode when the tape reaches its end. • The letter "R " will appear on the screen. 33 Adjusting the Volume 1, 2 VOLUME Built-in Speaker 1 Rotate VOLUME to adjust the volume of tape and start recording exactly where you left off. 3, 4, 5 JOG KEY 2MENU 1POWER EVF/LCD 1Set POWER to VCR. 2 Press MENU to display the VCR mode menu screen. 3 Rotate JOG KEY to select PLAY MODE , then press JOG KEY to display the VCR PLAY MODE menu screen...
... Repeat Playback mode when the tape reaches its end. • The letter "R " will appear on the screen. 33 Adjusting the Volume 1, 2 VOLUME Built-in Speaker 1 Rotate VOLUME to adjust the volume of tape and start recording exactly where you left off. 3, 4, 5 JOG KEY 2MENU 1POWER EVF/LCD 1Set POWER to VCR. 2 Press MENU to display the VCR mode menu screen. 3 Rotate JOG KEY to select PLAY MODE , then press JOG KEY to display the VCR PLAY MODE menu screen...
Digital Video Camcorder
Page 41
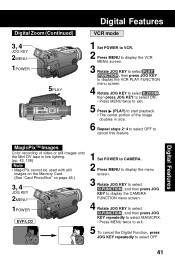
... 1POWER 5PLAY Digital Features VCR mode 1 Set POWER to VCR. 2 Press MENU to display the VCR MENU screen. 3 Rotate JOG KEY to select PLAY FUNCTION , then press JOG KEY to display the VCR PLAY FUNCTION menu screen. 4 Rotate JOG KEY to select D.ZOOM , then press JOG KEY to select ON. • Press MENU twice to exit. 5 Press (PLAY) to start playback. • The center portion of video or still images onto the Mini DV tape in size. 6 Repeat...
... 1POWER 5PLAY Digital Features VCR mode 1 Set POWER to VCR. 2 Press MENU to display the VCR MENU screen. 3 Rotate JOG KEY to select PLAY FUNCTION , then press JOG KEY to display the VCR PLAY FUNCTION menu screen. 4 Rotate JOG KEY to select D.ZOOM , then press JOG KEY to select ON. • Press MENU twice to exit. 5 Press (PLAY) to start playback. • The center portion of video or still images onto the Mini DV tape in size. 6 Repeat...

Digital Video Camcorder
Page 42
... Digital Functions are turned off when not needed . Digital Features Dual Digital Electronic Image Stabilization System (D.E.I .S. may be used in VCR mode, the image size is inadequate. • Turn D.E.I .S in both the Recording and Playback (VCR) modes. It can be observed when taping under a great amount of fluorescent light. • Recording a scene with very fast motions. 3REC/PAUSE BPLAY 2, 4, C, DEIS VCR mode A Set POWER to VCR. is turned off when not needed . is turned off automatically when the EIS and Digital Zoom...
... Digital Functions are turned off when not needed . Digital Features Dual Digital Electronic Image Stabilization System (D.E.I .S. may be used in VCR mode, the image size is inadequate. • Turn D.E.I .S in both the Recording and Playback (VCR) modes. It can be observed when taping under a great amount of fluorescent light. • Recording a scene with very fast motions. 3REC/PAUSE BPLAY 2, 4, C, DEIS VCR mode A Set POWER to VCR. is turned off when not needed . is turned off automatically when the EIS and Digital Zoom...

Digital Video Camcorder
Page 43
... main menu screen to the other. When Photo Title is displayed on the left is played back in black-andwhite. 1 Set POWER to CAMERA or VCR. 2 Press MENU to display the menu screen. 3 Rotate JOG KEY to select D.FUNCTION in the CAMERA mode menu screen or PLAY FUNCTION in the main menu screen to "WIPE". (Menu OSD: p. 108) b.Press REC/PAUSE to start recording. Digital Features Other Digital Functions Use the following scene during playback) The picture is played back in sepia, a brownish color, giving...
... main menu screen to the other. When Photo Title is displayed on the left is played back in black-andwhite. 1 Set POWER to CAMERA or VCR. 2 Press MENU to display the menu screen. 3 Rotate JOG KEY to select D.FUNCTION in the CAMERA mode menu screen or PLAY FUNCTION in the main menu screen to "WIPE". (Menu OSD: p. 108) b.Press REC/PAUSE to start recording. Digital Features Other Digital Functions Use the following scene during playback) The picture is played back in sepia, a brownish color, giving...

Digital Video Camcorder
Page 60
... unstable. • Change the screen area or color pallet in the Display Properties window. • Turn the Palmcorder power switch ON or OFF while connecting the Palmcorder to your PC using the USB Cable (supplied) or C DV interface Cable (i.LINK). Before you begin • Insert a recorded tape. (p. 11) 1 Set Palmcorder POWER to VCR. 2 Connect the Palmcorder to your PC using the USB Cable or DV Interface Cable (i.LINK). • Change the Palmcorder power switch (VCR/CAMERA). *You must...
... unstable. • Change the screen area or color pallet in the Display Properties window. • Turn the Palmcorder power switch ON or OFF while connecting the Palmcorder to your PC using the USB Cable (supplied) or C DV interface Cable (i.LINK). Before you begin • Insert a recorded tape. (p. 11) 1 Set Palmcorder POWER to VCR. 2 Connect the Palmcorder to your PC using the USB Cable or DV Interface Cable (i.LINK). • Change the Palmcorder power switch (VCR/CAMERA). *You must...
Digital Video Camcorder
Page 63
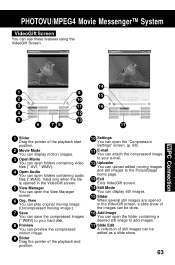
... compressed image to your e-mail. 12 Uploader You can upload edited moving images and still images to add images. 17 Slide Edit A collection of still images can be edited as a slide show of the playback start position. 2 Movie Mode You can display motion images. 3 Open Movie You can open folders containing video files (*.AVI, *.WMV). 4 Open Audio You can display still images. 15 Slider When several still images are opened in the VideoGift screen. 5 View Manager...
... compressed image to your e-mail. 12 Uploader You can upload edited moving images and still images to add images. 17 Slide Edit A collection of still images can be edited as a slide show of the playback start position. 2 Movie Mode You can display motion images. 3 Open Movie You can open folders containing video files (*.AVI, *.WMV). 4 Open Audio You can display still images. 15 Slider When several still images are opened in the VideoGift screen. 5 View Manager...
Digital Video Camcorder
Page 102
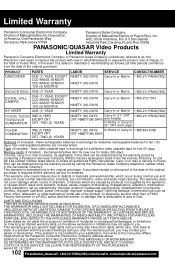
... batteries in materials and workmanship, which vary, from the date of the original purchase is requires before warranty service is extended only to , video and audio head cleaning. A purchase receipt or other rights, which occur during normal use such as "the Warrantor") will repair or replace this product with this product develops during the warranty period by contacting a Panasonic Services Company (PASC) Factory...
... batteries in materials and workmanship, which vary, from the date of the original purchase is requires before warranty service is extended only to , video and audio head cleaning. A purchase receipt or other rights, which occur during normal use such as "the Warrantor") will repair or replace this product with this product develops during the warranty period by contacting a Panasonic Services Company (PASC) Factory...

Digital Video Camcorder
Page 108
...: Normal recording speed mode. Setting to OFF cancels the previously selected digital zoom. 3 PROGRESSIVE (p. 20) When set to ON, you can record a picture compatible with a wide-screen TV equipped with a visual shutter effect and click sound. 10 SELF-REC (p. 22) NORMAL: During self-recording, the picture on a 80 minute tape. 7 AUDIO-REC (p. 44) 12 bit: The sound is recorded in the 12 bit/32 kHz mode. 16 bit: The sound is 1.5 times as long...
...: Normal recording speed mode. Setting to OFF cancels the previously selected digital zoom. 3 PROGRESSIVE (p. 20) When set to ON, you can record a picture compatible with a wide-screen TV equipped with a visual shutter effect and click sound. 10 SELF-REC (p. 22) NORMAL: During self-recording, the picture on a 80 minute tape. 7 AUDIO-REC (p. 44) 12 bit: The sound is recorded in the 12 bit/32 kHz mode. 16 bit: The sound is 1.5 times as long...

Digital Video Camcorder
Page 119
... Memory Card 94 Connecting Earphone ... 32 Copying from Digital Equipment 47 Copying your Tapes ...... 46 D Date and Time Indication 112 DC Power Cable . 6, 15, 92 Delete All Image Pages ... 52 Delete Specific Images .... 51 DEW Indication 99 Digital E.I.S 42 Digital Functions 43 Digital PhotoShot™ Mode 20 Digital Video Cassette Tape 7 Digital Zoom 40, 41 DV Interface Cable (i.LINK 47, 72, 92 DPOF Setting 54 E Easy Cassette Eject ....... 7 Erase Protection Tab ....... 7 EVF/LCD Monitor Indications 112~115 F Fast Forward/Rewind Check .. 34 Focus 29 Format the Memory Card...
... Memory Card 94 Connecting Earphone ... 32 Copying from Digital Equipment 47 Copying your Tapes ...... 46 D Date and Time Indication 112 DC Power Cable . 6, 15, 92 Delete All Image Pages ... 52 Delete Specific Images .... 51 DEW Indication 99 Digital E.I.S 42 Digital Functions 43 Digital PhotoShot™ Mode 20 Digital Video Cassette Tape 7 Digital Zoom 40, 41 DV Interface Cable (i.LINK 47, 72, 92 DPOF Setting 54 E Easy Cassette Eject ....... 7 Erase Protection Tab ....... 7 EVF/LCD Monitor Indications 112~115 F Fast Forward/Rewind Check .. 34 Focus 29 Format the Memory Card...


