
PTD5500U User Guide
Page 4
... and signal names 38 Communication conditions (Factory setting 38 Basic format 38 Control commands 39 Cable specifications 39 Using the Remote 2 terminal 40 Indication of lamp monitor 41 Cleaning and replacement of air filter 42 Procedure of cleaning 42 Replacing of lamp unit 43 Timing of connecting with PCs 20 How to install and remove the projection lens (optional 21 How to install the projection lens 21 How to remove the projection lens 21 Projection 22 Powering up the projector 22 Making adjustment and...
... and signal names 38 Communication conditions (Factory setting 38 Basic format 38 Control commands 39 Cable specifications 39 Using the Remote 2 terminal 40 Indication of lamp monitor 41 Cleaning and replacement of air filter 42 Procedure of cleaning 42 Replacing of lamp unit 43 Timing of connecting with PCs 20 How to install and remove the projection lens (optional 21 How to install the projection lens 21 How to remove the projection lens 21 Projection 22 Powering up the projector 22 Making adjustment and...
PTD5500U User Guide
Page 8
...". If the projector is installed in a place exposed to used for high ceiling: Model No. If a chemical wipe is used beyond the replacement time. Do not install the projector near the screen or take care to remove the power cord plug from the ceiling, purchase an optional hanging attachment (for the light source of the projection lens with the supplied lens cap when the projector is used hours. • The life cycle of a mercury lamp varies according...
...". If the projector is installed in a place exposed to used for high ceiling: Model No. If a chemical wipe is used beyond the replacement time. Do not install the projector near the screen or take care to remove the power cord plug from the ceiling, purchase an optional hanging attachment (for the light source of the projection lens with the supplied lens cap when the projector is used hours. • The life cycle of a mercury lamp varies according...

PTD5500U User Guide
Page 9
... the mode to select an item on -screen indication function. POWER ON button (page 22) Turns on the screen. Arrow buttons (page 28) Use these buttons to control them to Projector > Remote control operation indicator lamp The lamp flashes when any remote control button is active, a message "PROGRESS..." Also use numeric buttons. 9 ENTER button (page 28) Press this button while projecting an image automatically corrects the picture positioning on the screen. D.ZOOM +) buttons (page 26) Any portion of the picture can be zoomed in. ID SET button...
... the mode to select an item on -screen indication function. POWER ON button (page 22) Turns on the screen. Arrow buttons (page 28) Use these buttons to control them to Projector > Remote control operation indicator lamp The lamp flashes when any remote control button is active, a message "PROGRESS..." Also use numeric buttons. 9 ENTER button (page 28) Press this button while projecting an image automatically corrects the picture positioning on the screen. D.ZOOM +) buttons (page 26) Any portion of the picture can be zoomed in. ID SET button...
PTD5500U User Guide
Page 11
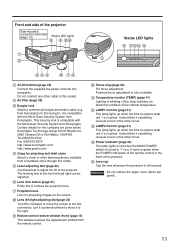
...) Lighting or blinking of this lock port. It turns to this lamp indicates an abnormal condition of the internal temperature. Lens cap Cap the lens whenever the projector is reached. Air filter (page 42) Burglar lock Attach a commercial burglar prevention cable (e.g., from Kensington) to green when the POWER ON button of the projector. Contact details for this receptacle. Focus ring (page 24) For focus adjustment. Front and side of the projector Side-mounted connection terminals...
...) Lighting or blinking of this lock port. It turns to this lamp indicates an abnormal condition of the internal temperature. Lens cap Cap the lens whenever the projector is reached. Air filter (page 42) Burglar lock Attach a commercial burglar prevention cable (e.g., from Kensington) to green when the POWER ON button of the projector. Contact details for this receptacle. Focus ring (page 24) For focus adjustment. Front and side of the projector Side-mounted connection terminals...

PTD5500U User Guide
Page 12
... adjustment mode for at least three seconds. LENS button (page 24) Switches to DVI-D input. Arrow ( ) buttons (page 28) Use to enter the "SECURITY" password. 12 MENU button (page 28) Displays and clears the Main Menu. Name and function of parts Rear view of the main unit Controls on rear panel Controls on the menu screen, change setting and adjust the level. Also use them to select an item on rear panel Ventilation holes Lamp unit cover...
... adjustment mode for at least three seconds. LENS button (page 24) Switches to DVI-D input. Arrow ( ) buttons (page 28) Use to enter the "SECURITY" password. 12 MENU button (page 28) Displays and clears the Main Menu. Name and function of parts Rear view of the main unit Controls on rear panel Controls on the menu screen, change setting and adjust the level. Also use them to select an item on rear panel Ventilation holes Lamp unit cover...

PTD5500U User Guide
Page 17
... to calculate the projection distance for the wide lens position (LW) and the projection distance for the telephoto lens position (LT). Side view With optional ceiling mount bracket (ET-PKD55) ; ;H L 180 261 L H Screen L : Projection distance SH : Image height SW : Image width H : Distance from the MAIN MENU) to page 57 for the projection distances of the projection lenses available as optional accessories. When an SXGA signal is input and projected, the right and...
... to calculate the projection distance for the wide lens position (LW) and the projection distance for the telephoto lens position (LT). Side view With optional ceiling mount bracket (ET-PKD55) ; ;H L 180 261 L H Screen L : Projection distance SH : Image height SW : Image width H : Distance from the MAIN MENU) to page 57 for the projection distances of the projection lenses available as optional accessories. When an SXGA signal is input and projected, the right and...
PTD5500U User Guide
Page 22
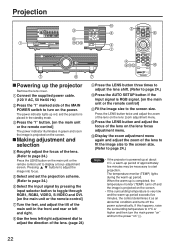
...-up red, and the projector is RGB signal. [on the main unit or the remote control] Turn the feet, and adjust the tilt of the lens to fit the image size to the screen size. (Refer to turn the power "on the lens zoom adjustment menu. Display the zoom adjustment menu again and adjust the zoom of the main unit in the standby mode. The power indicator lights up period of the lens on the power. Press the LENS button and adjust the focus of...
...-up red, and the projector is RGB signal. [on the main unit or the remote control] Turn the feet, and adjust the tilt of the lens to fit the image size to the screen size. (Refer to turn the power "on the lens zoom adjustment menu. Display the zoom adjustment menu again and adjust the zoom of the main unit in the standby mode. The power indicator lights up period of the lens on the power. Press the LENS button and adjust the focus of...
PTD5500U User Guide
Page 23
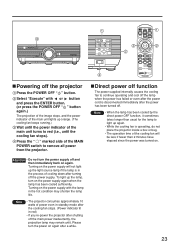
... have elapsed since the power was turned on the power supply with or button and press the ENTER button. (or press the POWER OFF " " button again.) The projection of the image stops, and the power indicator of the main unit lights up orange. (The cooling fan keeps running.) Wait until the power indicator of the MAIN POWER switch to red (i.e., until the cooling fan stops). TEMP LAMP1 LAMP2 POWER D LP Powering off and then immediately...
... have elapsed since the power was turned on the power supply with or button and press the ENTER button. (or press the POWER OFF " " button again.) The projection of the image stops, and the power indicator of the main unit lights up orange. (The cooling fan keeps running.) Wait until the power indicator of the MAIN POWER switch to red (i.e., until the cooling fan stops). TEMP LAMP1 LAMP2 POWER D LP Powering off and then immediately...

PTD5500U User Guide
Page 25
... pressing the FREEZE button on the screen can be disturbed for example, a shutter mode is not an abnormal error. The image is in white and black contrast when the system is turned off. Avoid supplying images that are input. Using the FREEZE function The image on the remote control. The image comes back. 25 Press the "SHUTTER" button again. Automatic adjustment (AUTO SETUP) Automatic adjustment function adjust the resolution, clock phase and...
... pressing the FREEZE button on the screen can be disturbed for example, a shutter mode is not an abnormal error. The image is in white and black contrast when the system is turned off. Avoid supplying images that are input. Using the FREEZE function The image on the remote control. The image comes back. 25 Press the "SHUTTER" button again. Automatic adjustment (AUTO SETUP) Automatic adjustment function adjust the resolution, clock phase and...

PTD5500U User Guide
Page 31
... input video signal is used for profitable purpose or in the presence of an audience (for digital RGB signals. FRAME LOCK This mode is left intact when projected onto the screen. Attention • If you choose an aspect ratio that does not match the source video's aspect ratio, you are disrupted while playing some moving images with the or button. Adjusting the position POSITION ASPECT ZOOM...
... input video signal is used for profitable purpose or in the presence of an audience (for digital RGB signals. FRAME LOCK This mode is left intact when projected onto the screen. Attention • If you choose an aspect ratio that does not match the source video's aspect ratio, you are disrupted while playing some moving images with the or button. Adjusting the position POSITION ASPECT ZOOM...
PTD5500U User Guide
Page 33
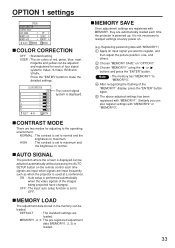
... OFF DEFAULT MEMORY1 RETRN COLOR CORRECTION OFF : Standard setting USER : The six colors of red, green, blue, cyan, magenta and yellow can be adjusted and registered for adjusting to the operating environment. COLOR CORRECTION RGB R 0 G 0 B 0 Cy 0 Mg 0 Ye 0 SELECT ADJ RETRN The current signal system is loaded. AUTO SIGNAL The position where the screen is used at every power on. (e.g. Choose "MEMORY SAVE" on the remote control each time signals are input when signals are input...
... OFF DEFAULT MEMORY1 RETRN COLOR CORRECTION OFF : Standard setting USER : The six colors of red, green, blue, cyan, magenta and yellow can be adjusted and registered for adjusting to the operating environment. COLOR CORRECTION RGB R 0 G 0 B 0 Cy 0 Mg 0 Ye 0 SELECT ADJ RETRN The current signal system is loaded. AUTO SIGNAL The position where the screen is used at every power on. (e.g. Choose "MEMORY SAVE" on the remote control each time signals are input when signals are input...
PTD5500U User Guide
Page 34
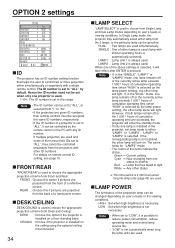
... hours of them have their remote controls must be set in the projector, set to "ALL", it is possible to reduce power consumption, reduce operating noise and extend lamp service life. • "LOW" is selected as the lamp power setting), the other lamp will light. Note • When set to "ALL" by the remote control or the PC with a single remote control. FUNC1 LAMP POW AUTO POW. SINGLE : One of cumulative operating time (when "HIGH" is set...
... hours of them have their remote controls must be set in the projector, set to "ALL", it is possible to reduce power consumption, reduce operating noise and extend lamp service life. • "LOW" is selected as the lamp power setting), the other lamp will light. Note • When set to "ALL" by the remote control or the PC with a single remote control. FUNC1 LAMP POW AUTO POW. SINGLE : One of cumulative operating time (when "HIGH" is set...

PTD5500U User Guide
Page 35
... be projected. OUT BAUDRATE : 9 600, 19 200 or 38 400 is selected. V: VERTICAL Attention • Select the correct FAN CONTROL2 setting in which the images are input for the remote control's FUNC1 button. AUTO POW.OFF The projector can set the function for the set to confirm the entry. 35 This function is used . PASSWORD This function is set duration. For details on the serial terminals...
... be projected. OUT BAUDRATE : 9 600, 19 200 or 38 400 is selected. V: VERTICAL Attention • Select the correct FAN CONTROL2 setting in which the images are input for the remote control's FUNC1 button. AUTO POW.OFF The projector can set the function for the set to confirm the entry. 35 This function is used . PASSWORD This function is set duration. For details on the serial terminals...
PTD5500U User Guide
Page 36
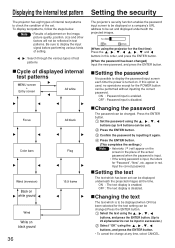
... display the password input screen each time the power is input, the letters for the first time) Press the , , , , , and buttons in test patterns. Press the ENTER button. Select the text using the projector for "Password", "New", etc. Be sure to display the input signal before performing various kinds of setting. : Search through the various types of test patterns Cycle of displayed internal test patterns MENU screen + Entry screen All white Focus All black Color...
... display the password input screen each time the power is input, the letters for the first time) Press the , , , , , and buttons in test patterns. Press the ENTER button. Select the text using the projector for "Password", "New", etc. Be sure to display the input signal before performing various kinds of setting. : Search through the various types of test patterns Cycle of displayed internal test patterns MENU screen + Entry screen All white Focus All black Color...
PTD5500U User Guide
Page 41
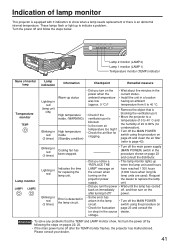
.... Blinking in red (3 times) Lighting in red Blinking in a location having an ambient temperature from 0 to page 42). Attention • To solve any problems that is • Check if the ventilation port is detected in the lamp circuit. • Turn off , and then turn on the after the TEMP monitor flashes, the projector has malfunctioned. Error is blocked. • Is the room air temperature too high? • Check the air filter for replacing the lamp unit...
.... Blinking in red (3 times) Lighting in red Blinking in a location having an ambient temperature from 0 to page 42). Attention • To solve any problems that is • Check if the ventilation port is detected in the lamp circuit. • Turn off , and then turn on the after the TEMP monitor flashes, the projector has malfunctioned. Error is blocked. • Is the room air temperature too high? • Check the air filter for replacing the lamp unit...

PTD5500U User Guide
Page 42
... a sign to step . Clean the air filter. Air filter Attention • Be careful not to turn "OFF" the power supply) on the location of projector operation. Set the air filter. In addition, when the lamp unit is deposited in the air filter, temperature inside , dirt and dust are two air filters, one at the right. Set the air filter in place when using the projector. Dismantle the air filter. Procedure of cleaning Turn off the power supply observing the procedure (How...
... a sign to step . Clean the air filter. Air filter Attention • Be careful not to turn "OFF" the power supply) on the location of projector operation. Set the air filter. In addition, when the lamp unit is deposited in the air filter, temperature inside , dirt and dust are two air filters, one at the right. Set the air filter in place when using the projector. Dismantle the air filter. Procedure of cleaning Turn off the power supply observing the procedure (How...

PTD5500U User Guide
Page 43
... HIGH and lamp selection is operated.) After the time of 1 500 hours 1, entering a standby state. Indication after 1 300 hours 2 (with the lamp output set at "HIGH"), power supply will not disappear unless the menu (MENU) button is operated. 1 This time period is 4 000 hours when long life lamp units are used in the diagram on the left, recommending replacement of lamp unit. (The indication on the rear of main unit or remote control button is DUAL). When replacing the lamp...
... HIGH and lamp selection is operated.) After the time of 1 500 hours 1, entering a standby state. Indication after 1 300 hours 2 (with the lamp output set at "HIGH"), power supply will not disappear unless the menu (MENU) button is operated. 1 This time period is 4 000 hours when long life lamp units are used in the diagram on the left, recommending replacement of lamp unit. (The indication on the rear of main unit or remote control button is DUAL). When replacing the lamp...

PTD5500U User Guide
Page 44
.... Have a Phillips screwdriver ready ahead of the lamp unit have cooled off. Remove the two screws securing the fan unit. Install the new lamp unit. Replacing the lamp unit Lamp unit replacement steps Attention • After 1 500 hours (4 000 hours when long life lamp units are constructed in the figure. Lamp unit cover Lamp unit 2 Lamp unit Fixing screws Handle Lamp unit 1 Caution The lamp unit will not be completed within 10 minutes...
.... Have a Phillips screwdriver ready ahead of the lamp unit have cooled off. Remove the two screws securing the fan unit. Install the new lamp unit. Replacing the lamp unit Lamp unit replacement steps Attention • After 1 500 hours (4 000 hours when long life lamp units are constructed in the figure. Lamp unit cover Lamp unit 2 Lamp unit Fixing screws Handle Lamp unit 1 Caution The lamp unit will not be completed within 10 minutes...

PTD5500U User Guide
Page 51
... the projector to have the battery changed . POP server name field Available input characters: Alphanumeric characters (A-Z, a-z, 0-9), hyphen (-), period (.) POP server user name field POP server password field Button to update settings Adjust clock page Click [Network Setting], then [Adjust clock] to display the POP server setup page. Note • If the time becomes incorrect immediately after setting the correct time, then the battery needs to update time and date settings...
... the projector to have the battery changed . POP server name field Available input characters: Alphanumeric characters (A-Z, a-z, 0-9), hyphen (-), period (.) POP server user name field POP server password field Button to update settings Adjust clock page Click [Network Setting], then [Adjust clock] to display the POP server setup page. Note • If the time becomes incorrect immediately after setting the correct time, then the battery needs to update time and date settings...
PTD5500U User Guide
Page 53
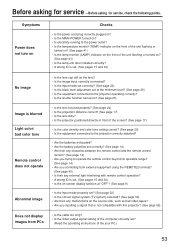
... No image Image is blurred Light color/ bad color tone Remote control does not operate Abnormal image Does not display images from PCs Checks • Is the power cord plug correctly plugged in? • Is the MAIN POWER turned on? • Is electricity running to the power outlet? • Is the temperature monitor (TEMP) indicator on the front of the unit flashing or turned on? (See page 41) • Is the lamp monitor (LAMP) indicator...
... No image Image is blurred Light color/ bad color tone Remote control does not operate Abnormal image Does not display images from PCs Checks • Is the power cord plug correctly plugged in? • Is the MAIN POWER turned on? • Is electricity running to the power outlet? • Is the temperature monitor (TEMP) indicator on the front of the unit flashing or turned on? (See page 41) • Is the lamp monitor (LAMP) indicator...


