
Dlp Projector - Multi Language
Page 3
.... 4-9) IMPORTANT SAFETY NOTICE 4 Precautions with regard to safety 6 Before Using ...10 Location and function of each part 12 Using the remote control unit 17 Installation...19 Connection...24 Installation of input module (optional 27 How to install and remove the projection lens (optional 33 ... Registration of input signal data 40 Basic operations using the remote control 43 On-screen menus ...46 Adjusting the picture...49 Adjusting the position...56 How to use ADVANCED MENU 60 Setting the DISPLAY LANGUAGE 66 Option1 settings ...67 Option2 settings ...75 Displaying the internal...
.... 4-9) IMPORTANT SAFETY NOTICE 4 Precautions with regard to safety 6 Before Using ...10 Location and function of each part 12 Using the remote control unit 17 Installation...19 Connection...24 Installation of input module (optional 27 How to install and remove the projection lens (optional 33 ... Registration of input signal data 40 Basic operations using the remote control 43 On-screen menus ...46 Adjusting the picture...49 Adjusting the position...56 How to use ADVANCED MENU 60 Setting the DISPLAY LANGUAGE 66 Option1 settings ...67 Option2 settings ...75 Displaying the internal...

Dlp Projector - Multi Language
Page 7
...battery to come into contact with metallic objects such as doing so can result in fire or electric shocks. ■ After removing the battery from remote control unit, keep it away from metallic objects. ■ Insulate the battery using tape or similar before disposal. • If the battery ... flammable objects into contact with metallic objects or other . • If this is not observed, accidents may result. ■ Do not use the projector while the projection lens cover is still attached to the projection lens (sold separately). • If this may cause the battery to leak, overheat,...
...battery to come into contact with metallic objects such as doing so can result in fire or electric shocks. ■ After removing the battery from remote control unit, keep it away from metallic objects. ■ Insulate the battery using tape or similar before disposal. • If the battery ... flammable objects into contact with metallic objects or other . • If this is not observed, accidents may result. ■ Do not use the projector while the projection lens cover is still attached to the projection lens (sold separately). • If this may cause the battery to leak, overheat,...
Dlp Projector - Multi Language
Page 10
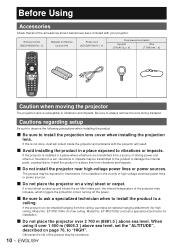
...transmitted from the ceiling, purchase an optional hanging attachment (for Remote Control (AA) Power cord [K2CG3YY00015 × 1] Drop-prevention bracket Eye bolt [THEA172J × 4] Wire [TTRA0144 × 4] Caution when moving the projector The projection lens is to be installed hanging from a ...filter intake port, the internal temperature of the accessories shown below have been included with the projector will collect inside the projector and problems with your projector. If the product is susceptible to damage the internal parts, causing failure. Cautions regarding ...
...transmitted from the ceiling, purchase an optional hanging attachment (for Remote Control (AA) Power cord [K2CG3YY00015 × 1] Drop-prevention bracket Eye bolt [THEA172J × 4] Wire [TTRA0144 × 4] Caution when moving the projector The projection lens is to be installed hanging from a ...filter intake port, the internal temperature of the accessories shown below have been included with the projector will collect inside the projector and problems with your projector. If the product is susceptible to damage the internal parts, causing failure. Cautions regarding ...

Dlp Projector - Multi Language
Page 12
.... ENGLISH * ON SCREEN button p. 43) This button turns on and off about the projector's status via E-mail. / LIGHT button p. 44) When this button is pressed, the remote control button light is turned on the screen. STATUS button p. 43) Press this button .... - Location and function of each part Remote control unit ■ Front # $ % 0 & ( 1 ) * 2 3 + 4 - . 5 / 6 7 # Remote control operation indicator lamp The lamp flashes when any remote control button is pressed. $ POWER STANDBY button pp. 34, 36) When the projector is in projection mode with the MAIN POWER...
.... ENGLISH * ON SCREEN button p. 43) This button turns on and off about the projector's status via E-mail. / LIGHT button p. 44) When this button is pressed, the remote control button light is turned on the screen. STATUS button p. 43) Press this button .... - Location and function of each part Remote control unit ■ Front # $ % 0 & ( 1 ) * 2 3 + 4 - . 5 / 6 7 # Remote control operation indicator lamp The lamp flashes when any remote control button is pressed. $ POWER STANDBY button pp. 34, 36) When the projector is in projection mode with the MAIN POWER...

Dlp Projector - Multi Language
Page 13
... AUX button to switch the input is disabled when an optional input module is used in the system, this button specifies the ID of the remote control. 7 ID ALL button pp. 18, 75) When two or more main units are used in the system, this button to restore the default ... setting. 6 ID SET button pp. 18, 75) When two or more main units are used to prevent unintentional operation of the projector by accidentally pressing a button, and to prevent the remote control batteries from MAIN MENU. 5 DEFAULT button p. 48) Press this button switches to the mode to adjust the projection lens. 4 ...
... AUX button to switch the input is disabled when an optional input module is used in the system, this button specifies the ID of the remote control. 7 ID ALL button pp. 18, 75) When two or more main units are used in the system, this button to restore the default ... setting. 6 ID SET button pp. 18, 75) When two or more main units are used to prevent unintentional operation of the projector by accidentally pressing a button, and to prevent the remote control batteries from MAIN MENU. 5 DEFAULT button p. 48) Press this button switches to the mode to adjust the projection lens. 4 ...

Dlp Projector - Multi Language
Page 14
.... ) Power indicator lamp p. 34) The lamp lights in red when the MAIN POWER switch is turned to adjust the tilt of the projector. (Adjustable feet are provided at the front and rear, right and left.) . Adjustable feet p. 20) Use these feet to " l " (on ...remote control. & LAMP (LAMP1, LAMP2, LAMP3, LAMP4) monitor p. 107) These light when it is time to replace the lamp unit. ENGLISH Projection lens cover lock button p. 33) This button toggles between lock and unlock of the detachable cover for projecting images on ). Location and function of each part (continued) Projector...
.... ) Power indicator lamp p. 34) The lamp lights in red when the MAIN POWER switch is turned to adjust the tilt of the projector. (Adjustable feet are provided at the front and rear, right and left.) . Adjustable feet p. 20) Use these feet to " l " (on ...remote control. & LAMP (LAMP1, LAMP2, LAMP3, LAMP4) monitor p. 107) These light when it is time to replace the lamp unit. ENGLISH Projection lens cover lock button p. 33) This button toggles between lock and unlock of the detachable cover for projecting images on ). Location and function of each part (continued) Projector...

Dlp Projector - Multi Language
Page 16
... of input signals. . S-VIDEO IN terminal p. 25) An input terminal for DVI-D signals. 16 - This terminal complies with a wired remote control cable (M3 jack). $ REMOTE2 IN terminal p. 106) The user can remotely control the main unit by using an external control circuit to this terminal (D-SUB 9-pin female). % SERIAL IN terminal....... (pp...
... of input signals. . S-VIDEO IN terminal p. 25) An input terminal for DVI-D signals. 16 - This terminal complies with a wired remote control cable (M3 jack). $ REMOTE2 IN terminal p. 106) The user can remotely control the main unit by using an external control circuit to this terminal (D-SUB 9-pin female). % SERIAL IN terminal....... (pp...

Dlp Projector - Multi Language
Page 17
...; Top View (Front) 30° (Rear) 30° Remote 30° Control 30° Remote Control • Side View Remote Control 30° 30° 15° Remote 15° Control 15° 15° Remote 30° 30° Control Remote Control Figure 2 Screen Projector Remote Control Remote Control Remote Control receiver window receiver window (front) (rear) ENGLISH - 17...
...; Top View (Front) 30° (Rear) 30° Remote 30° Control 30° Remote Control • Side View Remote Control 30° 30° 15° Remote 15° Control 15° 15° Remote 30° 30° Control Remote Control Figure 2 Screen Projector Remote Control Remote Control Remote Control receiver window receiver window (front) (rear) ENGLISH - 17...

Dlp Projector - Multi Language
Page 18
...set before the ID SET button was set the same ID number again. Carefully site the projector so its ID number and the ID number of the remote control when using only a single projector. 1. However, the stored ID will not be erased if the batteries of 15 m or... less. ENGLISH Using a wired remote control When multiple main units are left exhausted. Setting projector ID number to remote control Every projector has its Remote Control receiver windows will be directly exposed to simultaneously control multiple main units with a length...
...set before the ID SET button was set the same ID number again. Carefully site the projector so its ID number and the ID number of the remote control when using only a single projector. 1. However, the stored ID will not be erased if the batteries of 15 m or... less. ENGLISH Using a wired remote control When multiple main units are left exhausted. Setting projector ID number to remote control Every projector has its Remote Control receiver windows will be directly exposed to simultaneously control multiple main units with a length...
Dlp Projector - Multi Language
Page 25
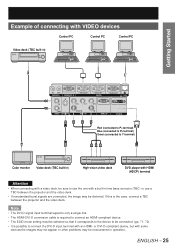
... the video deck. • If nonstandard burst signals are connected, the image may be encountered in time base corrector (TBC) or use a TBC between the projector and the video deck. Getting Started Example of connecting with VIDEO devices Control PC Control PC Control PC Video deck (TBC built-in) IN OUT... REMOTE 1 REMOTE 2 IN RS-232C IN RS-422 IN SERIAL RS-422 OUT LAN IN OUT VIDEO S-VIDEO IN R/PR G/Y SYNC/HD RGB 1 IN B/PB VD RGB 2 ...
... the video deck. • If nonstandard burst signals are connected, the image may be encountered in time base corrector (TBC) or use a TBC between the projector and the video deck. Getting Started Example of connecting with VIDEO devices Control PC Control PC Control PC Video deck (TBC built-in) IN OUT... REMOTE 1 REMOTE 2 IN RS-232C IN RS-422 IN SERIAL RS-422 OUT LAN IN OUT VIDEO S-VIDEO IN R/PR G/Y SYNC/HD RGB 1 IN B/PB VD RGB 2 ...

Dlp Projector - Multi Language
Page 26
Connection (continued) Example of connecting with personal computers Control PC Control PC To 2nd projector (SERIAL IN terminal) IN OUT REMOTE 1 REMOTE 2 IN RS-232C IN RS-422 IN SERIAL RS-422 OUT LAN IN OUT VIDEO S-VIDEO IN R/PR G/Y SYNC/HD RGB 1 IN B/PB VD RGB 2 ...
Connection (continued) Example of connecting with personal computers Control PC Control PC To 2nd projector (SERIAL IN terminal) IN OUT REMOTE 1 REMOTE 2 IN RS-232C IN RS-422 IN SERIAL RS-422 OUT LAN IN OUT VIDEO S-VIDEO IN R/PR G/Y SYNC/HD RGB 1 IN B/PB VD RGB 2 ...

Dlp Projector - Multi Language
Page 28
.... Fix the input module. 4. ENGLISH Slot Input module Tighten the two screws. Remove 2 screws. 3. Register the input signal. • This projector needs to register the type of input signal after the installation of the input module. • For details on the registration of installation Disconnect the ...power before installing the input module. Remove the slot cover. 2. IN OUT REMOTE 1 REMOTE 2 IN RS-232C IN RS-422 IN SERIAL RS-422 OUT LAN IN OUT VIDEO S-VIDEO IN R/PR G/Y SYNC/HD RGB 1 IN B/...
.... Fix the input module. 4. ENGLISH Slot Input module Tighten the two screws. Remove 2 screws. 3. Register the input signal. • This projector needs to register the type of input signal after the installation of the input module. • For details on the registration of installation Disconnect the ...power before installing the input module. Remove the slot cover. 2. IN OUT REMOTE 1 REMOTE 2 IN RS-232C IN RS-422 IN SERIAL RS-422 OUT LAN IN OUT VIDEO S-VIDEO IN R/PR G/Y SYNC/HD RGB 1 IN B/...

Dlp Projector - Multi Language
Page 29
... module ET-MD77SD1 HD/SD-SDI input module ET-MD77SD3 DVD player High-vision video deck DVI-D signal DVI-D input module ET-MD77DV PC Projector IN OUT REMOTE 1 REMOTE 2 IN RS-232C IN RS-422 IN SERIAL RS-422 OUT LAN IN OUT VIDEO S-VIDEO IN R/PR G/Y SYNC/HD RGB 1 IN B/PB VD... LENS ENTER SHUTTER LIGHT ON OFF AC IN OFF ON MAIN POWER ENGLISH - 29 Getting Started Connecting signals to the input module When installing the projector, it is necessary to connect signals to establish proper signal connection.
... module ET-MD77SD1 HD/SD-SDI input module ET-MD77SD3 DVD player High-vision video deck DVI-D signal DVI-D input module ET-MD77DV PC Projector IN OUT REMOTE 1 REMOTE 2 IN RS-232C IN RS-422 IN SERIAL RS-422 OUT LAN IN OUT VIDEO S-VIDEO IN R/PR G/Y SYNC/HD RGB 1 IN B/PB VD... LENS ENTER SHUTTER LIGHT ON OFF AC IN OFF ON MAIN POWER ENGLISH - 29 Getting Started Connecting signals to the input module When installing the projector, it is necessary to connect signals to establish proper signal connection.

Dlp Projector - Multi Language
Page 37
... on the control panel on the screen is not successful, even though the projector is properly positioned against the screen, you can be identified by color from the..."FOCUS", "ZOOM" and "SHIFT". 2. Press to select an item and adjust it . ENGLISH - 37 Press LENS on the remote control. • When the FOCUS button is pressed: The focus is adjusted. • When the ZOOM button is pressed: The ... LENS ZOOM ɹɹADJUST LENS SHIFT ɹɹADJUST ■ Using the remote control 1. LENS FOCUS ɹɹADJUST LENS ZOOM ɹɹADJUST LENS SHIFT ɹɹADJUST ■ At...
... on the control panel on the screen is not successful, even though the projector is properly positioned against the screen, you can be identified by color from the..."FOCUS", "ZOOM" and "SHIFT". 2. Press to select an item and adjust it . ENGLISH - 37 Press LENS on the remote control. • When the FOCUS button is pressed: The focus is adjusted. • When the ZOOM button is pressed: The ... LENS ZOOM ɹɹADJUST LENS SHIFT ɹɹADJUST ■ Using the remote control 1. LENS FOCUS ɹɹADJUST LENS ZOOM ɹɹADJUST LENS SHIFT ɹɹADJUST ■ At...

Dlp Projector - Multi Language
Page 38
... will appear in the menu, and the projection lens will be carried out. Press and hold LENS on the projector's controls or SHIFT on the remote control for about 5 seconds.) • "PROGRESS..." Using the standard projection position as the reference, the optical ...E ɹMEɹNUɹC A N C E L 2. Press ENTER while the menu shown above is to the home position 1. Model number of the projector. ENGLISH Moving the projection lens position to protect the parts of projection lens PT-D10000U PT-DW10000U 0.15V 0.50V Projected screen 0.15V height, V 0.15V 0.12V...
... will appear in the menu, and the projection lens will be carried out. Press and hold LENS on the projector's controls or SHIFT on the remote control for about 5 seconds.) • "PROGRESS..." Using the standard projection position as the reference, the optical ...E ɹMEɹNUɹC A N C E L 2. Press ENTER while the menu shown above is to the home position 1. Model number of the projector. ENGLISH Moving the projection lens position to protect the parts of projection lens PT-D10000U PT-DW10000U 0.15V 0.50V Projected screen 0.15V height, V 0.15V 0.12V...

Dlp Projector - Multi Language
Page 40
...is being displayed, the new signals will be registered because it is not registered on the remote control or operating section of the main unit. A2:SVGA72-A2 RGB1 --- A5:SVGA72-A5 ...RGB1 --- A8:SVGA72-A8 RGB1 --- MAIN MENU PICTURE POSITION ADVANCED MENU DISPLAY LANGUAGE OPTION1 OPTION2 TEST PATTERN SIGNAL LIST NETWORK SECURITY Press to display the "REGISTERED SIGNAL LIST" menu. ...used, the data of the old signals is supplied, press MENU on shipment of the projector. A3:SVGA72-A3 RGB1 --- SELECT ENTER DETAILS DEFAULT DELETE 2. If all the memories ...
...is being displayed, the new signals will be registered because it is not registered on the remote control or operating section of the main unit. A2:SVGA72-A2 RGB1 --- A5:SVGA72-A5 ...RGB1 --- A8:SVGA72-A8 RGB1 --- MAIN MENU PICTURE POSITION ADVANCED MENU DISPLAY LANGUAGE OPTION1 OPTION2 TEST PATTERN SIGNAL LIST NETWORK SECURITY Press to display the "REGISTERED SIGNAL LIST" menu. ...used, the data of the old signals is supplied, press MENU on shipment of the projector. A3:SVGA72-A3 RGB1 --- SELECT ENTER DETAILS DEFAULT DELETE 2. If all the memories ...

Dlp Projector - Multi Language
Page 43
... being input and projected. 1. Press STATUS on the remote control. Press SHUTTER again. • The image comes back. Basic Operation Basic operations using the remote control INPUT SELECT ON SCREEN TEST PATTERN STATUS LIGHT AUTO SETUP SHUTTER ASPECT FUNC1 Using the SHUTTER function If the projector is not used to hide images temporarily. 1.
... being input and projected. 1. Press STATUS on the remote control. Press SHUTTER again. • The image comes back. Basic Operation Basic operations using the remote control INPUT SELECT ON SCREEN TEST PATTERN STATUS LIGHT AUTO SETUP SHUTTER ASPECT FUNC1 Using the SHUTTER function If the projector is not used to hide images temporarily. 1.
Dlp Projector - Multi Language
Page 44
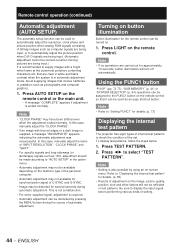
...gradation such as 16:9, adjustment should be made according to supply images with a bright white frame at the outermost periphery containing characters etc. Remote control operation (continued) Automatic adjustment (AUTO SETUP) The automatic setup function can be used as an easy shortcut button. Using the FUNC1 ... type of the personal computer. • Automatic adjustment may not available for details. (p. 73) Displaying the internal test pattern The projector has eight types of internal test patterns to check the condition of bitmap images such as computer signals are being input, or to...
...gradation such as 16:9, adjustment should be made according to supply images with a bright white frame at the outermost periphery containing characters etc. Remote control operation (continued) Automatic adjustment (AUTO SETUP) The automatic setup function can be used as an easy shortcut button. Using the FUNC1 ... type of the personal computer. • Automatic adjustment may not available for details. (p. 73) Displaying the internal test pattern The projector has eight types of internal test patterns to check the condition of bitmap images such as computer signals are being input, or to...

Dlp Projector - Multi Language
Page 45
Basic Operation Changing the picture aspect ratio You can change the aspect ratio for projected pictures to "Adjusting the aspect ratio" for selection depending on the remote control. • The setting will change as follows each time ASPECT is pressed. VID AUTO (PRIORITY) S1 AUTO DEFAULT THROUGH VID AUTO 16:9*1 HV FIT 4:3*2 H FIT*2 S4:3*1 *1: PT-D10000U Only *2: PT-DW10000U Only Note • Some aspect ratios may not be available for details. (p. 57) ENGLISH - 45 Press ASPECT on the input signal. Refer to match the input signal. 1.
Basic Operation Changing the picture aspect ratio You can change the aspect ratio for projected pictures to "Adjusting the aspect ratio" for selection depending on the remote control. • The setting will change as follows each time ASPECT is pressed. VID AUTO (PRIORITY) S1 AUTO DEFAULT THROUGH VID AUTO 16:9*1 HV FIT 4:3*2 H FIT*2 S4:3*1 *1: PT-D10000U Only *2: PT-DW10000U Only Note • Some aspect ratios may not be available for details. (p. 57) ENGLISH - 45 Press ASPECT on the input signal. Refer to match the input signal. 1.

Dlp Projector - Multi Language
Page 55
...7. GAMMA SHARPNESS NOISE REDUCTION DYNAMIC IRIS SYSTEM SELECTOR NATURAL 0 0 10 1 DEFAULT DEFAULT 0 OFF OFF AUTO 1 MENU SELECT ADJUST 6. Press DEFAULT on the remote control to select "NATURAL". 5. ENGLISH - 55 Display the "PICTURE" screen. (p. 49) 3. Press ▲▼ to "OFF". (p. 67) 2. Set... (International Electrotechnical Commission). PICTURE PICTURE MODE CONTRAST BRIGHTNESS COLOR TINT COLOR TEMP. Basic Operation * When DEFAULT is pressed, the projector automatically returns to AUTO1 or AUTO. ■ RGB1/RGB2/DVI-D terminal input signals RGB YPBPR Note • Refer to ...
...7. GAMMA SHARPNESS NOISE REDUCTION DYNAMIC IRIS SYSTEM SELECTOR NATURAL 0 0 10 1 DEFAULT DEFAULT 0 OFF OFF AUTO 1 MENU SELECT ADJUST 6. Press DEFAULT on the remote control to select "NATURAL". 5. ENGLISH - 55 Display the "PICTURE" screen. (p. 49) 3. Press ▲▼ to "OFF". (p. 67) 2. Set... (International Electrotechnical Commission). PICTURE PICTURE MODE CONTRAST BRIGHTNESS COLOR TINT COLOR TEMP. Basic Operation * When DEFAULT is pressed, the projector automatically returns to AUTO1 or AUTO. ■ RGB1/RGB2/DVI-D terminal input signals RGB YPBPR Note • Refer to ...
