
PTAE100U User Guide
Page 2
... cause harmful interference to persons. Dear Panasonic Customer: This instruction booklet provides all the necessary operating information that you will be pleased with your Panasonic LCD projector. We hope it in the space provided below and retain this equipment will only fit a grounding-type power outlet. Model number: PT-AE100U Serial number: IMPORTANT SAFETY NOTICE WARNING: TO REDUCE THE RISK OF FIRE...
... cause harmful interference to persons. Dear Panasonic Customer: This instruction booklet provides all the necessary operating information that you will be pleased with your Panasonic LCD projector. We hope it in the space provided below and retain this equipment will only fit a grounding-type power outlet. Model number: PT-AE100U Serial number: IMPORTANT SAFETY NOTICE WARNING: TO REDUCE THE RISK OF FIRE...
PTAE100U User Guide
Page 3
... connecting to equipments compatible with YPBPR(CBCR) signals 20 Setting-up on -screen menu items 26 Returning to the previous screen....26 Returning a setting to the factory default 27 Using the freeze function 27 Using the DIGITAL ZOOM function 28 Correcting keystone distortion.......29 Setting the ASPECT 30 Using the index window function...32 Using the shutter function 33 Changing the display language 33 Muting the sound 33 Adjusting the picture 34 PICTURE MODE 34 4 COLOR...
... connecting to equipments compatible with YPBPR(CBCR) signals 20 Setting-up on -screen menu items 26 Returning to the previous screen....26 Returning a setting to the factory default 27 Using the freeze function 27 Using the DIGITAL ZOOM function 28 Correcting keystone distortion.......29 Setting the ASPECT 30 Using the index window function...32 Using the shutter function 33 Changing the display language 33 Muting the sound 33 Adjusting the picture 34 PICTURE MODE 34 4 COLOR...
PTAE100U User Guide
Page 4
... the power cord from the projector's lens. B Failure to observe this may cause the battery to overheat, leak, explode or catch fire, and burns or other objects close to carry out any heavy objects on top of the air outlet port. After removing the battery from the remote control unit, keep it can result in electric shocks. B Ask an Authorized Service Center...
... the power cord from the projector's lens. B Failure to observe this may cause the battery to overheat, leak, explode or catch fire, and burns or other objects close to carry out any heavy objects on top of the air outlet port. After removing the battery from the remote control unit, keep it can result in electric shocks. B Ask an Authorized Service Center...
PTAE100U User Guide
Page 6
.... The projection lens is facing upward. Avoid setting up the projector. Do not set up the projector near high-voltage power lines or near the screen to observe this projector at high elevations, so consult your bare hands. Furthermore, all installation work . Failure to prevent reflection. Notes on use the accessory carrying bag. Moreover, when not using a chemically-treated cloth, read the instructions supplied with the accessory lens cover. 10...
.... The projection lens is facing upward. Avoid setting up the projector. Do not set up the projector near high-voltage power lines or near the screen to observe this projector at high elevations, so consult your bare hands. Furthermore, all installation work . Failure to prevent reflection. Notes on use the accessory carrying bag. Moreover, when not using a chemically-treated cloth, read the instructions supplied with the accessory lens cover. 10...

PTAE100U User Guide
Page 7
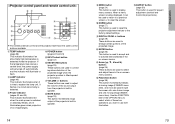
... projector. + Air filter (page 41) , Remote control signal receptor (page 17) - Press to adjust the angle of tilt of each part Projector & %$ # . ' ' - , ( + ) * # Speaker $ Zoom ring (page 23) % Focus ring (page 23) & Projection lens ' Air inlet ports Do not cover this port. ( Front adjustable legs(L/R) (page 23) ) Lens cover * Leg adjuster buttons(L/R) (page 23) This button is used to connect a commercially-available theftprevention cable (manufactured by Kensington). WARNING Do not bring your hands or other than the accessory power cord...
... projector. + Air filter (page 41) , Remote control signal receptor (page 17) - Press to adjust the angle of tilt of each part Projector & %$ # . ' ' - , ( + ) * # Speaker $ Zoom ring (page 23) % Focus ring (page 23) & Projection lens ' Air inlet ports Do not cover this port. ( Front adjustable legs(L/R) (page 23) ) Lens cover * Leg adjuster buttons(L/R) (page 23) This button is used to connect a commercially-available theftprevention cable (manufactured by Kensington). WARNING Do not bring your hands or other than the accessory power cord...
PTAE100U User Guide
Page 8
... is used to display menu screens. $# % & ' ( STANDBY(R) ON(G) LAMP TEMP POWER INPUT KEYSTONE VOLUME & * + , )- ' INPUT ASPECT VOLUME MUTE MENU F ENTER NORMAL DIGITAL ZOOM PROJECTOR 1 ) 0 / . It flashes if a circuit abnormality is detected. % Power indicator (pages 22 and 23) This indicator illuminates red when the main power is switched on (Standby Mode), and it can be used to return to a previous screen or to clear the screen. , NORM button (page 27) This button is used to the factory default settings. - DIGITAL ZOOM +/- B The wireless remote control and...
... is used to display menu screens. $# % & ' ( STANDBY(R) ON(G) LAMP TEMP POWER INPUT KEYSTONE VOLUME & * + , )- ' INPUT ASPECT VOLUME MUTE MENU F ENTER NORMAL DIGITAL ZOOM PROJECTOR 1 ) 0 / . It flashes if a circuit abnormality is detected. % Power indicator (pages 22 and 23) This indicator illuminates red when the main power is switched on (Standby Mode), and it can be used to return to a previous screen or to clear the screen. , NORM button (page 27) This button is used to the factory default settings. - DIGITAL ZOOM +/- B The wireless remote control and...

PTAE100U User Guide
Page 10
... is available for the AUDIO L-R input jacks for S-VIDEO/VIDEO signals, so if you wish to change the audio input source, you will be input to the projector by connecting a computer. 19 Preparation B If the cables necessary for connecting a component to the system are being used, these functions will need to fashion a cable to suit the component concerned. B Turn off the MAIN POWER switch of the projector. Connections Notes on page...
... is available for the AUDIO L-R input jacks for S-VIDEO/VIDEO signals, so if you wish to change the audio input source, you will be input to the projector by connecting a computer. 19 Preparation B If the cables necessary for connecting a component to the system are being used, these functions will need to fashion a cable to suit the component concerned. B Turn off the MAIN POWER switch of the projector. Connections Notes on page...
PTAE100U User Guide
Page 11
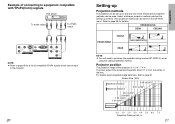
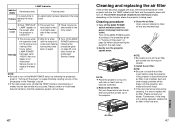
... m(40") 0.0 1.0 2.0 3.0 4.0 5.0 6.0 7.0 Projection Distance Unit: m 21 Preparation For details about 0.1 m from the OPTION menu. Example of connecting to equipment compatible with YPBPR(CBCR) signals DVD player To audio output To YPBPR output L | AUDIO | R VIDEO S2 VIDEO VIDEO IN AUDIO PC IN L | AUDIO | R Y PB/CB PR/CR COMPONENT IN NOTE: B Refer to page 49 for details.) DESK/CEILING DESK CEILING FRONT/REAR FRONT REAR (Factory default setting) NOTE: B You...
... m(40") 0.0 1.0 2.0 3.0 4.0 5.0 6.0 7.0 Projection Distance Unit: m 21 Preparation For details about 0.1 m from the OPTION menu. Example of connecting to equipment compatible with YPBPR(CBCR) signals DVD player To audio output To YPBPR output L | AUDIO | R VIDEO S2 VIDEO VIDEO IN AUDIO PC IN L | AUDIO | R Y PB/CB PR/CR COMPONENT IN NOTE: B Refer to page 49 for details.) DESK/CEILING DESK CEILING FRONT/REAR FRONT REAR (Factory default setting) NOTE: B You...

PTAE100U User Guide
Page 12
... 29. * Turn the focus/zoom ring to adjust the projected image focus and size. In such cases, the lamp unit will turn off , the lamp unit will still draw a maximum 0.7 W of the projector. The power indicator on the projector will flash orange.) B When the projector is in the projected images, carry out keystone correction as a DVD player. ( Press the INPUT select button to select the input signal. Starting to use Turning on the power Please ensure that all connected devices.
... 29. * Turn the focus/zoom ring to adjust the projected image focus and size. In such cases, the lamp unit will turn off , the lamp unit will still draw a maximum 0.7 W of the projector. The power indicator on the projector will flash orange.) B When the projector is in the projected images, carry out keystone correction as a DVD player. ( Press the INPUT select button to select the input signal. Starting to use Turning on the power Please ensure that all connected devices.

PTAE100U User Guide
Page 13
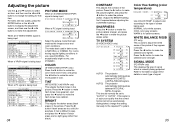
.../REAR FRONT DESK/CEILING DESK LAMP POWER HIGH LAMP RUNTIME 5H FUNCTION INDEX SELCT ADJ ESC Keystone correction (page 29) SHUTTER function (page 33) NOTE: B The remote control unit must be used to manipulate on -screen menus. The general arrangement of the onscreen display will not be corrected. B Keystone distortion of these menus is being input PICTURE PICTURE MODE NORMAL COLOR 0 TINT 0 BRIGHT 0 CONTRAST 0 SHARPNESS 0 COLOR TEMP. NORMAL TV...
.../REAR FRONT DESK/CEILING DESK LAMP POWER HIGH LAMP RUNTIME 5H FUNCTION INDEX SELCT ADJ ESC Keystone correction (page 29) SHUTTER function (page 33) NOTE: B The remote control unit must be used to manipulate on -screen menus. The general arrangement of the onscreen display will not be corrected. B Keystone distortion of these menus is being input PICTURE PICTURE MODE NORMAL COLOR 0 TINT 0 BRIGHT 0 CONTRAST 0 SHARPNESS 0 COLOR TEMP. NORMAL TV...

PTAE100U User Guide
Page 14
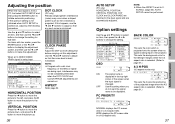
... menu to use this function varies depending on the remote control unit, you press the MENU button while the MAIN MENU screen is pressed. Indicates the standard factory default setting All items displayed will turn green when any adjustment changes the setting from the FUNCTION item in blue. Selected items will be returned to their factory default settings, and the bar scale will be cleared. 26 Returning a setting to page 38.) Still picture Moving picture...
... menu to use this function varies depending on the remote control unit, you press the MENU button while the MAIN MENU screen is pressed. Indicates the standard factory default setting All items displayed will turn green when any adjustment changes the setting from the FUNCTION item in blue. Selected items will be returned to their factory default settings, and the bar scale will be cleared. 26 Returning a setting to page 38.) Still picture Moving picture...

PTAE100U User Guide
Page 15
... spot display mode. & Press the MENU button to return to spot display mode at this time. B If the type of focus. The projector will be used to select the section which is used when making presentations. # Press a DIGITAL ZOOM +/button. However, the greater the correction amount, the more the picture quality will deteriorate, and the harder it will become to achieve a good level of signal being input changes while the digital zoom...
... spot display mode. & Press the MENU button to return to spot display mode at this time. B If the type of focus. The projector will be used to select the section which is used when making presentations. # Press a DIGITAL ZOOM +/button. However, the greater the correction amount, the more the picture quality will deteriorate, and the harder it will become to achieve a good level of signal being input changes while the digital zoom...

PTAE100U User Guide
Page 16
... are 16:9 image sizes. The aspect ratios for these signals cannot be changed while being played by the G and F buttons) 31 Basic Operation Keep this in 4:3 mode to give proper consideration to the aims and intentions of the input signal is projected onto a wide screen, distortion may affect the quality of viewing of the original picture. Setting the ASPECT This projector allows you to change the aspect...
... are 16:9 image sizes. The aspect ratios for these signals cannot be changed while being played by the G and F buttons) 31 Basic Operation Keep this in 4:3 mode to give proper consideration to the aims and intentions of the input signal is projected onto a wide screen, distortion may affect the quality of viewing of the original picture. Setting the ASPECT This projector allows you to change the aspect...
PTAE100U User Guide
Page 18
... to the type of signal which is difficult to see), and press the I and H buttons to change the setting manually to "AUTO1" or "AUTO2". Adjusting the picture Use the F and G buttons to select an item, and then use DYNAMIC. When an S-VIDEO/VIDEO signal is being input PICTURE PICTURE MODE NORMAL COLOR 0 TINT 0 BRIGHT 0 CONTRAST 0 SHARPNESS 0 COLOR TEMP. For exceptionally bright rooms, use the I button if black areas are too solid (for yellow screens.
... to the type of signal which is difficult to see), and press the I and H buttons to change the setting manually to "AUTO1" or "AUTO2". Adjusting the picture Use the F and G buttons to select an item, and then use DYNAMIC. When an S-VIDEO/VIDEO signal is being input PICTURE PICTURE MODE NORMAL COLOR 0 TINT 0 BRIGHT 0 CONTRAST 0 SHARPNESS 0 COLOR TEMP. For exceptionally bright rooms, use the I button if black areas are too solid (for yellow screens.
PTAE100U User Guide
Page 19
.... BACK COLOR BACK COLOR BLACK [ GRAY [ BLUE This sets the color which is projected onto the screen when no signal is carried out, adjust by the following procedure. For items with a dot clock frequency of the screen when the input signal is set to the projector. SCROLL (page 30), AUTO SETUP cannot be displayed. Use the F and G buttons to select an item, and then use the I button to move the picture up. 36 AUTO SETUP...
.... BACK COLOR BACK COLOR BLACK [ GRAY [ BLUE This sets the color which is projected onto the screen when no signal is carried out, adjust by the following procedure. For items with a dot clock frequency of the screen when the input signal is set to the projector. SCROLL (page 30), AUTO SETUP cannot be displayed. Use the F and G buttons to select an item, and then use the I button to move the picture up. 36 AUTO SETUP...

PTAE100U User Guide
Page 20
LAMP POWER LAMP POWER HIGH [ LOW This setting changes the lamp brightness. These indicators illuminate or flash to warn you notice that one of the indicators is on the control panel of the projector which give information about problems that will temporarily freeze the image. (Refer to "REAR" when using the ceiling bracket which is turned on ) The surrounding temperature or the temperature inside the projector has become dangerously suddenly changed. high, causing the lamp unit to...
LAMP POWER LAMP POWER HIGH [ LOW This setting changes the lamp brightness. These indicators illuminate or flash to warn you notice that one of the indicators is on the control panel of the projector which give information about problems that will temporarily freeze the image. (Refer to "REAR" when using the ceiling bracket which is turned on ) The surrounding temperature or the temperature inside the projector has become dangerously suddenly changed. high, causing the lamp unit to...
PTAE100U User Guide
Page 21
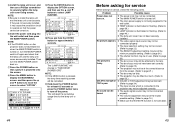
... the projector on ? LAMP indicator Indicator display Illuminated (red) It is nearly time to install the air filter cover before using the projector. Flashing (red) An abnormality has been detected in the "Remedy" column. NOTE: B Be sure to Problem replace the lamp unit. Furthermore, if the lamp unit is turned on top of the projector. B The power may be drawn into the vacuum cleaner. ' Install the air filter. dealer or an Authorised Service Center to clean off . Use...
... the projector on ? LAMP indicator Indicator display Illuminated (red) It is nearly time to install the air filter cover before using the projector. Flashing (red) An abnormality has been detected in the "Remedy" column. NOTE: B Be sure to Problem replace the lamp unit. Furthermore, if the lamp unit is turned on top of the projector. B The power may be drawn into the vacuum cleaner. ' Install the air filter. dealer or an Authorised Service Center to clean off . Use...
PTAE100U User Guide
Page 22
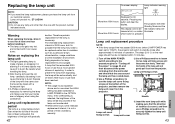
... the HIGH setting has been selected for LAMP POWER in "Turning off when 2000 hours of use have been reached. Early preparation for removing the lamp unit. On-screen display Lamp indicator warning light More than 1800 hours More than the one hour before handling it. The steps * to - Lamp unit replacement period The lamp is necessary. which button is pressed. Lamp unit fixing screws $ Use a Phillips screwdriver to turn freely. Handle Lamp unit cover fixing screws Lamp unit cover & Insert the new lamp...
... the HIGH setting has been selected for LAMP POWER in "Turning off when 2000 hours of use have been reached. Early preparation for removing the lamp unit. On-screen display Lamp indicator warning light More than 1800 hours More than the one hour before handling it. The steps * to - Lamp unit replacement period The lamp is necessary. which button is pressed. Lamp unit fixing screws $ Use a Phillips screwdriver to turn freely. Handle Lamp unit cover fixing screws Lamp unit cover & Insert the new lamp...
PTAE100U User Guide
Page 23
... ENTER button for service, check the following points. ' Install the lamp unit cover, and then use a Phillips screwdriver to page 40.) B The lamp unit cover has not been securely installed. NOTE: B If the MENU button is turned off the power. B The MAIN POWER switch is pressed, the lamp time resetting screen will reset the cumulative usage time for the lamp unit to page 14.) B Make sure that a picture is too light or B COLOR or TINT adjustment may...
... ENTER button for service, check the following points. ' Install the lamp unit cover, and then use a Phillips screwdriver to page 40.) B The lamp unit cover has not been securely installed. NOTE: B If the MENU button is turned off the power. B The MAIN POWER switch is pressed, the lamp time resetting screen will reset the cumulative usage time for the lamp unit to page 14.) B Make sure that a picture is too light or B COLOR or TINT adjustment may...
PTAE100U User Guide
Page 24
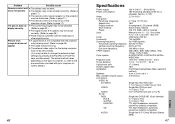
... cable may be able to page 17.) The picture does not B The correct input signal may be weak. N/SECAM) Projection size: 1016 mm - 5080 mm (40˝ - 200˝) Throw distance: 1.2 m - 7.4 m (3´11˝ - 24´3˝) Optical axis shift: 17:1 (fixed) Screen aspect ratio: 16:9 Installation: Front/Rear/Ceiling/Desk (Menu selection method) Speaker: 4 cm x 3 cm oval x 1 Max. B The external video output...
... cable may be able to page 17.) The picture does not B The correct input signal may be weak. N/SECAM) Projection size: 1016 mm - 5080 mm (40˝ - 200˝) Throw distance: 1.2 m - 7.4 m (3´11˝ - 24´3˝) Optical axis shift: 17:1 (fixed) Screen aspect ratio: 16:9 Installation: Front/Rear/Ceiling/Desk (Menu selection method) Speaker: 4 cm x 3 cm oval x 1 Max. B The external video output...


