
PTD6000U User Guide
Page 1
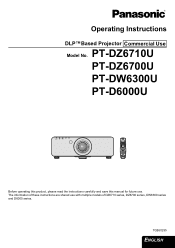
Operating Instructions DLP™Based Projector Commercial Use Model No. The information of these instructions are shared use . PT-DZ6710U PT-DZ6700U PT-DW6300U PT-D6000U STANDBY(RED)/ ON(GREEN) LAMP TEMP FILTER Before operating this product, please read the instructions carefully and save this manual for future use with multiple models of DZ6710 series, DZ6700 series, DW6300 series and D6000 series. TQBJ0295 ENGLISH
Operating Instructions DLP™Based Projector Commercial Use Model No. The information of these instructions are shared use . PT-DZ6710U PT-DZ6700U PT-DW6300U PT-D6000U STANDBY(RED)/ ON(GREEN) LAMP TEMP FILTER Before operating this product, please read the instructions carefully and save this manual for future use with multiple models of DZ6710 series, DZ6700 series, DW6300 series and D6000 series. TQBJ0295 ENGLISH
PTD6000U User Guide
Page 2
...intended to alert the user to the presence of electric shock to operate the projector in a manner which is supplied with a three-pin grounding-type power plug. Model number: PT-DZ6710U/PT-DZ6700U/PT-DW6300U/PT-D6000U Serial number: WARNING: TO REDUCE THE RISK OF FIRE OR ELECTRIC SHOCK...conforms to at the directive 2004/108/EC, article 9(2) Panasonic Testing Center Panasonic Service Europe, a division of the grounding plug. If you will be found on the power plug. The lightning flash with your Panasonic DLP™Based Projector. We hope it will only fit a grounding-type power...
...intended to alert the user to the presence of electric shock to operate the projector in a manner which is supplied with a three-pin grounding-type power plug. Model number: PT-DZ6710U/PT-DZ6700U/PT-DW6300U/PT-D6000U Serial number: WARNING: TO REDUCE THE RISK OF FIRE OR ELECTRIC SHOCK...conforms to at the directive 2004/108/EC, article 9(2) Panasonic Testing Center Panasonic Service Europe, a division of the grounding plug. If you will be found on the power plug. The lightning flash with your Panasonic DLP™Based Projector. We hope it will only fit a grounding-type power...
PTD6000U User Guide
Page 5
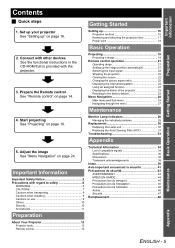
...lors de l'installation 46 Précautions lors de l'utilisation 46 Autres 46 Sécurit 47 Remplacement 48 About Your Projector 12 Projector body 12 Remote control 14 Maintenance Appendix ENGLISH - 5 Connect with other devices See the functional instructions in the CD-ROM...See "Projecting" on page 14. Important Information Preparation Basic Operation Getting Started Contents J Quick steps Getting Started 1. Set up your projector See "Setting up 16 Projection method 16 Removing and attaching the projection lens 17 Power cord 18 Basic Operation 2. Adjust the image ...
...lors de l'installation 46 Précautions lors de l'utilisation 46 Autres 46 Sécurit 47 Remplacement 48 About Your Projector 12 Projector body 12 Remote control 14 Maintenance Appendix ENGLISH - 5 Connect with other devices See the functional instructions in the CD-ROM...See "Projecting" on page 14. Important Information Preparation Basic Operation Getting Started Contents J Quick steps Getting Started 1. Set up your projector See "Setting up 16 Projection method 16 Removing and attaching the projection lens 17 Power cord 18 Basic Operation 2. Adjust the image ...
PTD6000U User Guide
Page 6
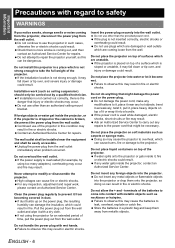
... Center. Clean the power plug regularly to prevent it , fire or electric shocks could result. Failure to observe this may cause the projector to overheat, which is used while damaged, electric shocks, short-circuits or fire may cause the batteries to leak, overheat, explode or... or the power plug. If the plug is placed on soft materials such as necklaces or hairpins. Continued use the projector in fire. If the projector is not inserted correctly, electric shocks or overheating could result. Important Information Precautions with regard to safety WARNINGS If you ...
... Center. Clean the power plug regularly to prevent it , fire or electric shocks could result. Failure to observe this may cause the projector to overheat, which is used while damaged, electric shocks, short-circuits or fire may cause the batteries to leak, overheat, explode or... or the power plug. If the plug is placed on soft materials such as necklaces or hairpins. Continued use the projector in fire. If the projector is not inserted correctly, electric shocks or overheating could result. Important Information Precautions with regard to safety WARNINGS If you ...
PTD6000U User Guide
Page 7
... wire (install in narrow, badly ventilated places such as closets or bookshelves. If this is being used . During a thunderstorm, do not touch the projector or the cable. Do not place your eye, it . Keep the remote control unit out of the reach of children. Strong light is swallowed, ... from the reach of infants and pets after using tape or similar before handling it may result. Do not place your skin. Using the projector under such conditions may cause injury. If the lamp section breaks, it may result in your skin into contact with metallic objects or other ...
... wire (install in narrow, badly ventilated places such as closets or bookshelves. If this is being used . During a thunderstorm, do not touch the projector or the cable. Do not place your eye, it . Keep the remote control unit out of the reach of children. Strong light is swallowed, ... from the reach of infants and pets after using tape or similar before handling it may result. Do not place your skin. Using the projector under such conditions may cause injury. If the lamp section breaks, it may result in your skin into contact with metallic objects or other ...
PTD6000U User Guide
Page 8
...used batteries from the remote control promptly. If the lamp has broken, ventilate the room immediately. Ask your weight on the projector. Using chemical treated wipes may cause insulation deterioration, electrical leakage or explosion which could result in fire, malfunction or plastic ...deterioration. Do not set up the projector in fire or problems with operation. Do not use chemical treated wipes when cleaning. Electric shocks can damage the cables, ...
...used batteries from the remote control promptly. If the lamp has broken, ventilate the room immediately. Ask your weight on the projector. Using chemical treated wipes may cause insulation deterioration, electrical leakage or explosion which could result in fire, malfunction or plastic ...deterioration. Do not set up the projector in fire or problems with operation. Do not use chemical treated wipes when cleaning. Electric shocks can damage the cables, ...
PTD6000U User Guide
Page 9
...The internal parts can occur on the screen affected by a qualified technician. Moreover, when not using this may damage the projector. Failure to move the projector, as near the screen to safety Do not reach for the openings beside the optical lens, during transport. Cover the ...always remove the lens during horizontal or vertical movements of the lens or the front glass with the lens cover when transporting the projector. The projection lens is should only be turned off any lights near an air conditioner or lighting equipment. Furthermore, all installation...
...The internal parts can occur on the screen affected by a qualified technician. Moreover, when not using this may damage the projector. Failure to move the projector, as near the screen to safety Do not reach for the openings beside the optical lens, during transport. Cover the ...always remove the lens during horizontal or vertical movements of the lens or the front glass with the lens cover when transporting the projector. The projection lens is should only be turned off any lights near an air conditioner or lighting equipment. Furthermore, all installation...
PTD6000U User Guide
Page 10
...and a commercially available shielded interface cable. Provide a lamp for the password. DLP chips The DLP chips are made using the projector by firewall or others. Connection to external device When connecting the projector to confirm the correct procedure for more than 1 year. The leakage of the... projector for disposal. Do not use . Do not share your personal registered ...
...and a commercially available shielded interface cable. Provide a lamp for the password. DLP chips The DLP chips are made using the projector by firewall or others. Connection to external device When connecting the projector to confirm the correct procedure for more than 1 year. The leakage of the... projector for disposal. Do not use . Do not share your personal registered ...

PTD6000U User Guide
Page 11
Important Information Precautions with regard to an Authorized Service Center for enclosed products, such as a plug cover or foam cartons, must be treated properly. * Contact to safety Accessories Make sure the following accessories are provided with your projector. Remote control (x1) N2QAYB000371 AA batteries for remote control (x2) Safety cable TTRA0214 Attachment screw (x1) Safety cable (x1) Power cord (x1) K2CG3FZ00008 Projector lens cover (x1) TKKL5244-1 CD-ROM (x1) TQBH9013 Power cord secure lock (x1) TTRA0182 * The protectors for lost accessories. ENGLISH - 11
Important Information Precautions with regard to an Authorized Service Center for enclosed products, such as a plug cover or foam cartons, must be treated properly. * Contact to safety Accessories Make sure the following accessories are provided with your projector. Remote control (x1) N2QAYB000371 AA batteries for remote control (x2) Safety cable TTRA0214 Attachment screw (x1) Safety cable (x1) Power cord (x1) K2CG3FZ00008 Projector lens cover (x1) TKKL5244-1 CD-ROM (x1) TQBH9013 Power cord secure lock (x1) TTRA0182 * The protectors for lost accessories. ENGLISH - 11
PTD6000U User Guide
Page 12
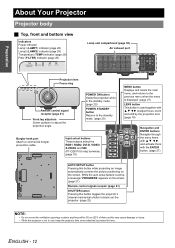
...items with F G I H to protect the lens. Input select buttons These buttons select the RGB1, RGB2, DVI-D, VIDEO, S-VIDEO and SDI (PT-DZ6710U only) terminals. (page 19) MENU button Displays and clears the main menu, and returns to the previous menu when the menu is displayed. ...27) LENS button This button is not in the standby mode. (page 20) POWER STANDBY button Returns to adjust the projection angle. Preparation About Your Projector Projector body J Top, front and bottom view Indicators Power indicator Lamp1 (LAMP1) indicator (page 28) Lamp2 (LAMP2) indicator (page 28) Temperature (TEMP...
...items with F G I H to protect the lens. Input select buttons These buttons select the RGB1, RGB2, DVI-D, VIDEO, S-VIDEO and SDI (PT-DZ6710U only) terminals. (page 19) MENU button Displays and clears the main menu, and returns to the previous menu when the menu is displayed. ...27) LENS button This button is not in the standby mode. (page 20) POWER STANDBY button Returns to adjust the projection angle. Preparation About Your Projector Projector body J Top, front and bottom view Indicators Power indicator Lamp1 (LAMP1) indicator (page 28) Lamp2 (LAMP2) indicator (page 28) Temperature (TEMP...
PTD6000U User Guide
Page 13
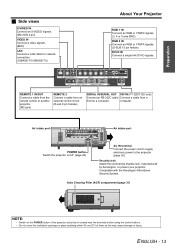
...S-VIDEO signals. (Mini DIN 4 pin) VIDEO IN Connect a video signals. (BNC) LAN Connect a LAN cable for network connection. (10BASE-T/100BASE-TX) About Your Projector RGB 1 IN Connect an RGB or YPBPR signals. (3, 4 or 5 wire BNC) RGB 2 IN Connect an RGB or YPBPR signals. (D-SUB 15 pin female) ... 2 Connect a cable from an external control circuit. (D-sub 9 pin female) SERIAL IN/SERIAL OUT SDI IN (PT-DZ6710U only) Connect an RS-232C cable Connect a cable from a from/to protect your projector. Auto Cleaning Filter (ACF) compartment (page 31) NOTE: • Switch on /off. (page 20) AC IN...
...S-VIDEO signals. (Mini DIN 4 pin) VIDEO IN Connect a video signals. (BNC) LAN Connect a LAN cable for network connection. (10BASE-T/100BASE-TX) About Your Projector RGB 1 IN Connect an RGB or YPBPR signals. (3, 4 or 5 wire BNC) RGB 2 IN Connect an RGB or YPBPR signals. (D-SUB 15 pin female) ... 2 Connect a cable from an external control circuit. (D-sub 9 pin female) SERIAL IN/SERIAL OUT SDI IN (PT-DZ6710U only) Connect an RS-232C cable Connect a cable from a from/to protect your projector. Auto Cleaning Filter (ACF) compartment (page 31) NOTE: • Switch on /off. (page 20) AC IN...
PTD6000U User Guide
Page 14
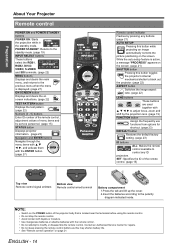
...- 9) buttons Enter ID number of the remote control, adjustment values of menu items and by service personnel. (page 15) STATUS button Displays projector information. (page 23) Navigation and ENTER buttons Navigate through the menu items with F G I H to adjust focus, zoom and shift by pressing any...an image automatically corrects the picture positioning on the screen. (page 21) SHUTTER button Pressing this button toggles the projector's internal mechanical shutter to black out the projector. (page 22) ASPECT button Switches the image aspect ratio. (page 22) LENS buttons These buttons are used ...
...- 9) buttons Enter ID number of the remote control, adjustment values of menu items and by service personnel. (page 15) STATUS button Displays projector information. (page 23) Navigation and ENTER buttons Navigate through the menu items with F G I H to adjust focus, zoom and shift by pressing any...an image automatically corrects the picture positioning on the screen. (page 21) SHUTTER button Pressing this button toggles the projector's internal mechanical shutter to black out the projector. (page 22) ASPECT button Switches the image aspect ratio. (page 22) LENS buttons These buttons are used ...
PTD6000U User Guide
Page 15
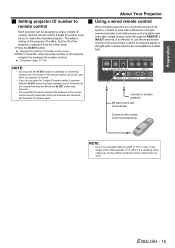
... be set the same ID number again. ID number range: 01 - 64 About Your Projector J Using a wired remote control When multiple projectors are replaced, set to match the intended projector. Connect to another projector M3 stereo mini jack (commercial) Connect to use the wired remote control in the environment ...number on the screen. 2.Within 5 seconds, enter the same number of 15 m or less. Preparation J Setting projector ID number to remote control Each projector can be set even when no projector is around. • If you do not enter the 2 digits ID number within 5 seconds after the ID ...
... be set the same ID number again. ID number range: 01 - 64 About Your Projector J Using a wired remote control When multiple projectors are replaced, set to match the intended projector. Connect to another projector M3 stereo mini jack (commercial) Connect to use the wired remote control in the environment ...number on the screen. 2.Within 5 seconds, enter the same number of 15 m or less. Preparation J Setting projector ID number to remote control Each projector can be set even when no projector is around. • If you do not enter the 2 digits ID number within 5 seconds after the ID ...
PTD6000U User Guide
Page 16
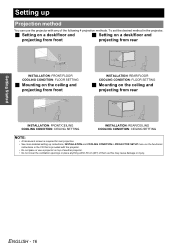
...required for rear projection. • See more detailed setting up Projection method You can use the projector with the projector. • Do not place or use a projector on the ceiling and projecting from front INSTALLATION: REAR/FLOOR COOLING CONDITION: FLOOR SETTING J Mounting...of the following 4 projection methods. ENGLISH - 16 Getting Started Setting up instructions, INSTALLATION and COOLING CONDITION in PROJECTOR SETUP menu on the functional instructions in the projector, J Setting on a desk/floor and J Setting on a desk/floor and projecting from front projecting from ...
...required for rear projection. • See more detailed setting up Projection method You can use the projector with the projector. • Do not place or use a projector on the ceiling and projecting from front INSTALLATION: REAR/FLOOR COOLING CONDITION: FLOOR SETTING J Mounting...of the following 4 projection methods. ENGLISH - 16 Getting Started Setting up instructions, INSTALLATION and COOLING CONDITION in PROJECTOR SETUP menu on the functional instructions in the projector, J Setting on a desk/floor and J Setting on a desk/floor and projecting from front projecting from ...
PTD6000U User Guide
Page 17
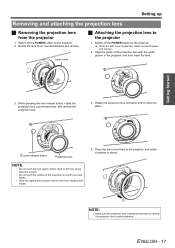
...and remove. Lens cover J Attaching the projection lens to attach. Align the guide of the projection lens with the guide groove in the projector, and then insert the lens. Lens release button Projection lens NOTE: • Do not touch the lens signal contact. Place the lens... cover back to the projector, and rotate clockwise to the projector 1. Getting Started 3. Dust or dirt may cause defective contact. • Do not touch the surface of the projection lens ...
...and remove. Lens cover J Attaching the projection lens to attach. Align the guide of the projection lens with the guide groove in the projector, and then insert the lens. Lens release button Projection lens NOTE: • Do not touch the lens signal contact. Place the lens... cover back to the projector, and rotate clockwise to the projector 1. Getting Started 3. Dust or dirt may cause defective contact. • Do not touch the surface of the projection lens ...
PTD6000U User Guide
Page 18
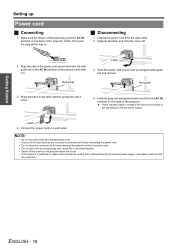
... 3. Place the latch to the latch catcher and press until it may cause fire or electrical hazards. • Switch off the power to the projector when not in use other than the provided power cord. • Ensure all the way in. Connect the power cord to start the projection. ...NOTE: • Do not use . • If the projector is switched on again while the internal cooling fan is still operating by the internal power supply, it clicks. 4. Depress the latch and slide the...
... 3. Place the latch to the latch catcher and press until it may cause fire or electrical hazards. • Switch off the power to the projector when not in use other than the provided power cord. • Ensure all the way in. Connect the power cord to start the projection. ...NOTE: • Do not use . • If the projector is switched on again while the internal cooling fan is still operating by the internal power supply, it clicks. 4. Depress the latch and slide the...
PTD6000U User Guide
Page 19
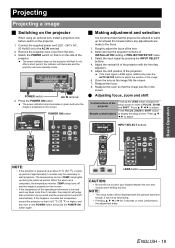
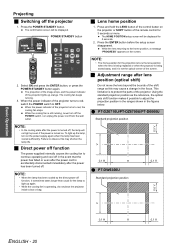
... using an optional lens, install a projection lens before any adjustments are made to adjust the position of the image. 6. The power indicator lamp on the projector will flash in green and soon the image is 0 °C (32 °F) or higher, and then turn on the screen. • If the... IN terminal. 2. up period. Switch the POWER switch on the side of the lens. 2. After a short period, the indicator will illuminate and the projector will be displayed with the front leg adjusters. 5. Press the POWER ON button The power indicator lamp illuminates in red. Roughly adjust the focus of...
... using an optional lens, install a projection lens before any adjustments are made to adjust the position of the image. 6. The power indicator lamp on the projector will flash in green and soon the image is 0 °C (32 °F) or higher, and then turn on the screen. • If the... IN terminal. 2. up period. Switch the POWER switch on the side of the lens. 2. After a short period, the indicator will illuminate and the projector will be displayed with the front leg adjusters. 5. Press the POWER ON button The power indicator lamp illuminates in red. Roughly adjust the focus of...
PTD6000U User Guide
Page 20
... screen disappeared. The cooling fan keeps running , never turn on the projector or SHIFT button of the control button on the power supply again when the lamp has been cooled sufficiently. Q PT-DZ6710U/PT-DZ6700U/PT-D6000U Standard projection position NOTE: • In the cooling state after ...the power has been turned off the projector 1. Select OK and press the ENTER button, or press the POWER STANDBY ...
... screen disappeared. The cooling fan keeps running , never turn on the projector or SHIFT button of the control button on the power supply again when the lamp has been cooled sufficiently. Q PT-DZ6710U/PT-DZ6700U/PT-D6000U Standard projection position NOTE: • In the cooling state after ...the power has been turned off the projector 1. Select OK and press the ENTER button, or press the POWER STANDBY ...
PTD6000U User Guide
Page 21
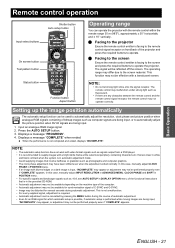
Q Facing to the projector Ensure the remote control emitter is facing to the screen and press the required buttons to operate. that are... Ensure the remote control emitter is facing to the remote control signal receptor on the machine type of the projector and press the required buttons to operate the projector. This function may not be performed properly even if "COMPLETE" appears. Displays a message "PROGRESS". 4. ...screen button Test pattern button Status button Function button Aspect button Operating range You can operate the projector with a translucent screen.
Q Facing to the projector Ensure the remote control emitter is facing to the screen and press the required buttons to operate. that are... Ensure the remote control emitter is facing to the remote control signal receptor on the machine type of the projector and press the required buttons to operate the projector. This function may not be performed properly even if "COMPLETE" appears. Displays a message "PROGRESS". 4. ...screen button Test pattern button Status button Function button Aspect button Operating range You can operate the projector with a translucent screen.
PTD6000U User Guide
Page 22
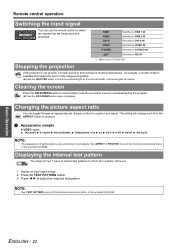
... operation Switching the input signal You can toggle through an appropriate set . 1. Switches to resume. Displaying the internal test pattern The projector has 7 types of internal test patterns to check the condition of the set of the functional instructions that is in the provided CD...remote control to input signals. NOTE: • See TEST PATTERN menu of aspect ratios for PT-DZ6710U. Switches to VIDEO IN. Display an input signal image. 2. Stopping the projection If the projector is not used for example, a shutter mode is available that are being input and projected...
... operation Switching the input signal You can toggle through an appropriate set . 1. Switches to resume. Displaying the internal test pattern The projector has 7 types of internal test patterns to check the condition of the set of the functional instructions that is in the provided CD...remote control to input signals. NOTE: • See TEST PATTERN menu of aspect ratios for PT-DZ6710U. Switches to VIDEO IN. Display an input signal image. 2. Stopping the projection If the projector is not used for example, a shutter mode is available that are being input and projected...


