Functional Instructions
Page 2
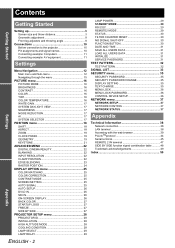
...Setting up 3 Screen size and throw distance 3 Geometric adjustment 8 Front leg adjusters and throwing angle 9 Connections 10 Before connection to the projector 10 Pin assignments and signal names 10 Connecting example: Computers 11 Connecting example: AV equipment 11 Settings Menu Navigation 12 Main menu and Sub... SYSTEM SELECTOR 17 POSITION menu 18 SHIFT 18 ASPECT 18 ZOOM 19 CLOCK PHASE 19 GEOMETRY 19 KEYSTONE 21 ADVANCED MENU 22 DIGITAL CINEMA REALITY 22 BLANKING 22 INPUT RESOLUTION 22 CLAMP POSITION 22 EDGE BLENDING 23 RASTER POSITION 24 DISPLAY OPTION menu 25 COLOR ...
...Setting up 3 Screen size and throw distance 3 Geometric adjustment 8 Front leg adjusters and throwing angle 9 Connections 10 Before connection to the projector 10 Pin assignments and signal names 10 Connecting example: Computers 11 Connecting example: AV equipment 11 Settings Menu Navigation 12 Main menu and Sub... SYSTEM SELECTOR 17 POSITION menu 18 SHIFT 18 ASPECT 18 ZOOM 19 CLOCK PHASE 19 GEOMETRY 19 KEYSTONE 21 ADVANCED MENU 22 DIGITAL CINEMA REALITY 22 BLANKING 22 INPUT RESOLUTION 22 CLAMP POSITION 22 EDGE BLENDING 23 RASTER POSITION 24 DISPLAY OPTION menu 25 COLOR ...
Functional Instructions
Page 3
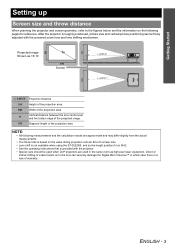
... of warranty. SD Diagonal length of the projected image. SH Getting Started Setting up Screen size and throw distance When planning the projector and screen geometry, refer to the figures below and the information on the following measurements and the calculation results are approximate and may... on to the lens can severely damage the Digital Mirror Devices™ in which case there is roughly positioned, picture size and vertical picture positioning can be finely adjusted with the projector. • Special care should be used when DLP projectors are used in the same room as 16:...
... of warranty. SD Diagonal length of the projected image. SH Getting Started Setting up Screen size and throw distance When planning the projector and screen geometry, refer to the figures below and the information on the following measurements and the calculation results are approximate and may... on to the lens can severely damage the Digital Mirror Devices™ in which case there is roughly positioned, picture size and vertical picture positioning can be finely adjusted with the projector. • Special care should be used when DLP projectors are used in the same room as 16:...
Functional Instructions
Page 10
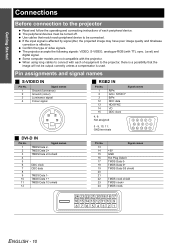
... - 10 The peripheral devices must be output correctly unless a compensator is effective. Level) and digital signal. Getting Started Connections Before connection to the projector Read and follow the operating and connecting instructions of each peripheral device to the projector, there is a possibility that match each peripheral device. Use cables that the image will...
... - 10 The peripheral devices must be output correctly unless a compensator is effective. Level) and digital signal. Getting Started Connections Before connection to the projector Read and follow the operating and connecting instructions of each peripheral device to the projector, there is a possibility that match each peripheral device. Use cables that the image will...
Functional Instructions
Page 19
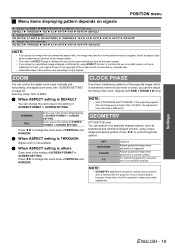
... factory default setting of SCREEN FORMAT in SCREEN SETTING. GEOMETRY (PT-DZ6710E only) You can project on to specially shaped screens, such as moire or noise, you can control the digital zoom scale vertically and horizontally, and digital zoom area. ZOOM You can fine adjust the timing of the...other terminals VID AUTO H THROUGH H 16:9 H 4:3 H H-FIT H V-FIT H HV-FIT H VID AUTO NOTE: • If you project an image with the projector or by a service person because a high level of skill is required to make a difference. Select an aspect ratio which preserves the intention of the image...
... factory default setting of SCREEN FORMAT in SCREEN SETTING. GEOMETRY (PT-DZ6710E only) You can project on to specially shaped screens, such as moire or noise, you can control the digital zoom scale vertically and horizontally, and digital zoom area. ZOOM You can fine adjust the timing of the...other terminals VID AUTO H THROUGH H 16:9 H 4:3 H H-FIT H V-FIT H HV-FIT H VID AUTO NOTE: • If you project an image with the projector or by a service person because a high level of skill is required to make a difference. Select an aspect ratio which preserves the intention of the image...

Functional Instructions
Page 44
...PROJECTOR NAME in progress 12 = RGB2 22 = S-VIDEO 32 = SDI (PT-DZ6710E only) 30 = Shutter mode off , 1 = Lamp 2 on The following are returned as follows. 0 = No error known 1 = Warning 2 = Error 1st digits (1 - 5 digits): Lamp 1 cumulative operating time 2nd digit: 0 = Lamp 1 off, 1 = Lamp 1 on 3rd digits (1 - 5 digits): Lamp 2 cumulative operating time 4th digit...name query "Panasonic" is a pending trademark in Japan, the United States, and other errors, range 0 - 2. For specifications regarding PJLink™, refer to perform projector setting and projector status query ...
...PROJECTOR NAME in progress 12 = RGB2 22 = S-VIDEO 32 = SDI (PT-DZ6710E only) 30 = Shutter mode off , 1 = Lamp 2 on The following are returned as follows. 0 = No error known 1 = Warning 2 = Error 1st digits (1 - 5 digits): Lamp 1 cumulative operating time 2nd digit: 0 = Lamp 1 off, 1 = Lamp 1 on 3rd digits (1 - 5 digits): Lamp 2 cumulative operating time 4th digit...name query "Panasonic" is a pending trademark in Japan, the United States, and other errors, range 0 - 2. For specifications regarding PJLink™, refer to perform projector setting and projector status query ...
Functional Instructions
Page 50
... Computers 11 Network 38 Serial 45 CONTRAST 16 CONTRAST MODE 25 CONTROL DEVICE SETUP 36 CONTROL PANEL 36 COOLING CONDITION 28 D DATE 31 DIGITAL CINEMA REALITY 22 DISPLAY LANGUAGE 12 DISPLAY OPTION 25 DISPLAY SETTING 35 DVI EDID 26 DVI SIGNAL LEVEL 26 DVI-D IN 26 E EDGE...PICTURE MODE 16 Pin assignments DVI-D 10 REMOTE2 47 RGB2 10 S-VIDEO 10 PJLink Control commands 44 Security authorization 44 POSITION 18 Projector Control Window 39 PROJECTOR ID 28 PROJECTOR SETUP 28 R RASTER POSITION 24 REMOTE 2 IN terminal 47 REMOTE CONTROLLER 36 REMOTE2 MODE 29 RS-232C 29 S SAVE ...
... Computers 11 Network 38 Serial 45 CONTRAST 16 CONTRAST MODE 25 CONTROL DEVICE SETUP 36 CONTROL PANEL 36 COOLING CONDITION 28 D DATE 31 DIGITAL CINEMA REALITY 22 DISPLAY LANGUAGE 12 DISPLAY OPTION 25 DISPLAY SETTING 35 DVI EDID 26 DVI SIGNAL LEVEL 26 DVI-D IN 26 E EDGE...PICTURE MODE 16 Pin assignments DVI-D 10 REMOTE2 47 RGB2 10 S-VIDEO 10 PJLink Control commands 44 Security authorization 44 POSITION 18 Projector Control Window 39 PROJECTOR ID 28 PROJECTOR SETUP 28 R RASTER POSITION 24 REMOTE 2 IN terminal 47 REMOTE CONTROLLER 36 REMOTE2 MODE 29 RS-232C 29 S SAVE ...

Operating Instructions
Page 15
... the light path or where devices are left exhausted. ENGLISH - 15 Displays the projector ID number on the remote control can be assigned a unique 2 digits ID number, and the remote control 2 digits ID number must be set the same ID number again. If the length of the cable exceeds 15 m ... advance from the menu items. 1.Press the ID SET button. Preparation J Setting projector ID number to remote control Each projector can be set even when no projector is around. • If you do not enter the 2 digits ID number within 5 seconds after the ID SET button has been pressed, the ...
... the light path or where devices are left exhausted. ENGLISH - 15 Displays the projector ID number on the remote control can be assigned a unique 2 digits ID number, and the remote control 2 digits ID number must be set the same ID number again. If the length of the cable exceeds 15 m ... advance from the menu items. 1.Press the ID SET button. Preparation J Setting projector ID number to remote control Each projector can be set even when no projector is around. • If you do not enter the 2 digits ID number within 5 seconds after the ID SET button has been pressed, the ...

Operating Instructions
Page 24
... See the functional indications in the CD-ROM that is provided with F G I H buttons. See "Navigating through the menu with the projector. PICTURE PICTURE MODE STANDARD CINEMA NATURAL DYNAMIC GRAPHIC CONTRAST (Default: 0) BRIGHTNESS (Default: 0) COLOR (Default: 0) TINT (Default: 0) COLOR...KEYSTONE HORIZONTAL KEYSTONE VERTICAL ARC HORIZONTAL ARC VERTICAL BALANCE HORIZONTAL BALANCE KEYSTONE (PT-DZ6700U/PT-DW6300U/PT-D6000U only) VERTICAL KEYSTONE VERTICAL SUB KEYSTONE LINEARITY ADVANCED MENU DIGITAL CINEMA REALITY AUTO 25p FIXED OFF 30p FIXED BLANKING UPPER LEFT LOWER ...
... See the functional indications in the CD-ROM that is provided with F G I H buttons. See "Navigating through the menu with the projector. PICTURE PICTURE MODE STANDARD CINEMA NATURAL DYNAMIC GRAPHIC CONTRAST (Default: 0) BRIGHTNESS (Default: 0) COLOR (Default: 0) TINT (Default: 0) COLOR...KEYSTONE HORIZONTAL KEYSTONE VERTICAL ARC HORIZONTAL ARC VERTICAL BALANCE HORIZONTAL BALANCE KEYSTONE (PT-DZ6700U/PT-DW6300U/PT-D6000U only) VERTICAL KEYSTONE VERTICAL SUB KEYSTONE LINEARITY ADVANCED MENU DIGITAL CINEMA REALITY AUTO 25p FIXED OFF 30p FIXED BLANKING UPPER LEFT LOWER ...


