User Manual
Page 4
...on rear panel ..........12 Side-mounted connection terminals 13 Using the remote control unit 14 Loading dry cells 14 Effective range of remote control operation 14 Setting projector ID number to remote control 15 Connect to the projector to use with a cable 15 Installation 16 Projection schemes 16 ...to use ADVANCED MENU 32 DIGITAL CINEMA REALITY 32 BLANKING 32 INPUT RESOLUTION 33 CLAMP POSITION 33 EDGE BLENDING 33 RASTER POSITION 34 XGA MODE 34 SXGA MODE 34 Changing the display language 34 OPTION1 settings 35 COLOR MATCHING 35 Adjusting the color matching using a ...
...on rear panel ..........12 Side-mounted connection terminals 13 Using the remote control unit 14 Loading dry cells 14 Effective range of remote control operation 14 Setting projector ID number to remote control 15 Connect to the projector to use with a cable 15 Installation 16 Projection schemes 16 ...to use ADVANCED MENU 32 DIGITAL CINEMA REALITY 32 BLANKING 32 INPUT RESOLUTION 33 CLAMP POSITION 33 EDGE BLENDING 33 RASTER POSITION 34 XGA MODE 34 SXGA MODE 34 Changing the display language 34 OPTION1 settings 35 COLOR MATCHING 35 Adjusting the color matching using a ...
User Manual
Page 6
... face, or objects which can cause burns, fire or damage to disconnect the power cord plug from the remote control at least one hour before moving the projector. • Moving the projector with an old battery or mix different types of the air outlet port. In this may cause the...- Make sure the polarities (+ and -) are correct when inserting the batteries. - When replacing the lamp, allow at least 50 cm (19.7") of the projector which can result. Caution When disconnecting the power cord, hold the plug, not the cord. • If the power cord itself is not done. Do...
... face, or objects which can cause burns, fire or damage to disconnect the power cord plug from the remote control at least one hour before moving the projector. • Moving the projector with an old battery or mix different types of the air outlet port. In this may cause the...- Make sure the polarities (+ and -) are correct when inserting the batteries. - When replacing the lamp, allow at least 50 cm (19.7") of the projector which can result. Caution When disconnecting the power cord, hold the plug, not the cord. • If the power cord itself is not done. Do...
User Manual
Page 7
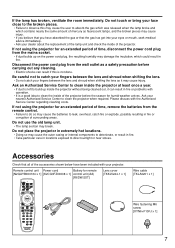
... regarding cleaning costs. Disconnect the power cord plug from the remote control. • Failure to catch your fingers between the lens and shroud when shifting the lens. • Do not catch your projector. If not using the projector for humid weather arrives. Do not use the old lamp ...the replacement of the lamp unit and check the inside of the projector before carrying out any cleaning. • Electric shocks can result in fire. Please discuss with operation. • It is not done. Remote control unit Power cord Battery for an extended period of the accessories...
... regarding cleaning costs. Disconnect the power cord plug from the remote control. • Failure to catch your fingers between the lens and shroud when shifting the lens. • Do not catch your projector. If not using the projector for humid weather arrives. Do not use the old lamp ...the replacement of the lamp unit and check the inside of the projector before carrying out any cleaning. • Electric shocks can result in fire. Please discuss with operation. • It is not done. Remote control unit Power cord Battery for an extended period of the accessories...
User Manual
Page 9
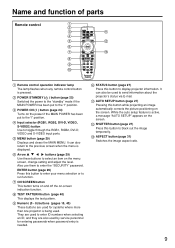
...(page 29) Use these buttons to the "l" position. Numeric (0 - 9) buttons (pages 15, 40) These buttons are also used to display projector information. STATUS button (page 27) Press this button while projecting an image automatically corrects the picture positioning on the screen. AUTO SETUP button (page ...service personnel for systems where more than one projector is displayed. ON SCREEN button This button turns on and off the on the menu screen, change setting and adjust the level. Name and function of parts Remote control Remote control operation indicator lamp The lamp flashes ...
...(page 29) Use these buttons to the "l" position. Numeric (0 - 9) buttons (pages 15, 40) These buttons are also used to display projector information. STATUS button (page 27) Press this button while projecting an image automatically corrects the picture positioning on the screen. AUTO SETUP button (page ...service personnel for systems where more than one projector is displayed. ON SCREEN button This button turns on and off the on the menu screen, change setting and adjust the level. Name and function of parts Remote control Remote control operation indicator lamp The lamp flashes ...
User Manual
Page 10
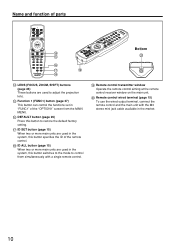
...FUNC1) button (page 37) This button can control the functions set in the market. 10 Remote control wired terminal (page 15) To use the wired output terminal, connect the remote control and the main unit with a single remote control. Name and function of parts Bottom LENS (FOCUS, ZOOM, SHIFT) buttons (page 26...the system, this button switches to the mode to control them simultaneously with the M3 stereo mini jack cable available in "FUNC1" of the remote control. ID SET button (page 15) When two or more main units are used to restore the default factory setting. DEFAULT button (page ...
...FUNC1) button (page 37) This button can control the functions set in the market. 10 Remote control wired terminal (page 15) To use the wired output terminal, connect the remote control and the main unit with a single remote control. Name and function of parts Bottom LENS (FOCUS, ZOOM, SHIFT) buttons (page 26...the system, this button switches to the mode to control them simultaneously with the M3 stereo mini jack cable available in "FUNC1" of the remote control. ID SET button (page 15) When two or more main units are used to restore the default factory setting. DEFAULT button (page ...
User Manual
Page 11
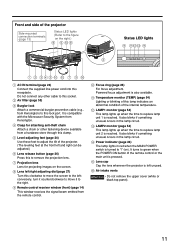
...the remote control or the main unit is pressed. Powered focus adjustment is compatible with the Microsaver Security System from Kensington) to this clamp. It also blinks if something unusual occurs in the lamp circuit. It turns to green when the POWER ON button of the projector Side... lights AC IN terminal (page 24) Connect the supplied line power cord into this to the right. Lens cap Cap the lens whenever the projector is reached. Air filter (page 55) Burglar lock Attach a commercial burglar prevention cable (e.g., from Kensington. Projection lens Lens for attaching anti-theft...
...the remote control or the main unit is pressed. Powered focus adjustment is compatible with the Microsaver Security System from Kensington) to this clamp. It also blinks if something unusual occurs in the lamp circuit. It turns to green when the POWER ON button of the projector Side... lights AC IN terminal (page 24) Connect the supplied line power cord into this to the right. Lens cap Cap the lens whenever the projector is reached. Air filter (page 55) Burglar lock Attach a commercial burglar prevention cable (e.g., from Kensington. Projection lens Lens for attaching anti-theft...
User Manual
Page 12
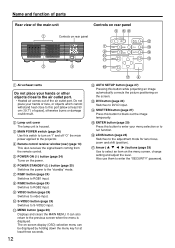
...page 24) Use this button while projecting an image automatically corrects the picture positioning on -screen display (OSD) selection menu can also return to the projector. S-VIDEO button (page 24) Switches to RGB2 input. The on the screen. Arrow ( ) buttons (page 29) Use to select an item... "standby" mode. POWER STANDBY ( ) button (page 25) Switches the power to RGB1 input. Remote control receiver window (rear) (page 14) This also receives the signal beam coming from the remote control. It can be displayed by holding down the menu key for lens focus, zoom and shift ...
...page 24) Use this button while projecting an image automatically corrects the picture positioning on -screen display (OSD) selection menu can also return to the projector. S-VIDEO button (page 24) Switches to RGB2 input. The on the screen. Arrow ( ) buttons (page 29) Use to select an item... "standby" mode. POWER STANDBY ( ) button (page 25) Switches the power to RGB1 input. Remote control receiver window (rear) (page 14) This also receives the signal beam coming from the remote control. It can be displayed by holding down the menu key for lens focus, zoom and shift ...
User Manual
Page 13
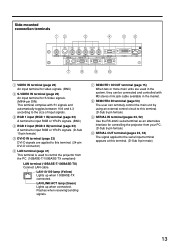
... OUT RGB 1 IN REMOTE 2 IN RGB 2 IN IN SERIAL OUT DVI-D IN LAN VIDEO IN terminal (page 23) An input terminal for video signals. (BNC) S-VIDEO IN terminal (page 23) An input terminal for controlling the projector from the PC. (10BASE-T/100BASE-TX compliant) LAN terminal (10BASE-T/100BASE-TX) ...23) A terminal to input RGB or YPBPR signals. (D-Sub 15-pin female) DVI-D IN terminal (page 23) DVI-D signals are used to control the projector from your PC. (D-Sub 9-pin female) SERIAL OUT terminal (pages 23, 52) The signal applied to the serial input terminal appears at this terminal. (D-...
... OUT RGB 1 IN REMOTE 2 IN RGB 2 IN IN SERIAL OUT DVI-D IN LAN VIDEO IN terminal (page 23) An input terminal for video signals. (BNC) S-VIDEO IN terminal (page 23) An input terminal for controlling the projector from the PC. (10BASE-T/100BASE-TX compliant) LAN terminal (10BASE-T/100BASE-TX) ...23) A terminal to input RGB or YPBPR signals. (D-Sub 15-pin female) DVI-D IN terminal (page 23) DVI-D signals are used to control the projector from your PC. (D-Sub 9-pin female) SERIAL OUT terminal (pages 23, 52) The signal applied to the serial input terminal appears at this terminal. (D-...
User Manual
Page 14
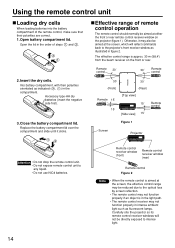
...; control 15˚ [Top view] 15˚ [Side view] 15˚ Remote control Figure 1 Screen Projector Attention • Do not drop the remote control unit. • Do not expose remote control unit to the projector's front receiver window as fluorescent lamps. Using the remote control unit Loading dry cells When loading batteries into the battery compartment...
...; control 15˚ [Top view] 15˚ [Side view] 15˚ Remote control Figure 1 Screen Projector Attention • Do not drop the remote control unit. • Do not expose remote control unit to the projector's front receiver window as fluorescent lamps. Using the remote control unit Loading dry cells When loading batteries into the battery compartment...
User Manual
Page 15
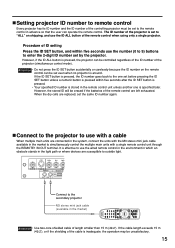
...light. R/PR G/Y B/PB VIDEO IN S-VIDEO IN REMOTE 1 IN OUT RGB 1 IN REMOTE 2 IN Connect to the secondary projector M3 stereo mini jack cable (available in the market) Attention • Use two-core shielded cable of the remote control are connected in the system, connect the units ...SET button unless a numeric button is pressed, the projector can operate the remote control. Setting projector ID number to remote control Every projector has its ID number and the ID number of the controlling projector must be set to the remote control in advance so that the user can be ...
...light. R/PR G/Y B/PB VIDEO IN S-VIDEO IN REMOTE 1 IN OUT RGB 1 IN REMOTE 2 IN Connect to the secondary projector M3 stereo mini jack cable (available in the market) Attention • Use two-core shielded cable of the remote control are connected in the system, connect the units ...SET button unless a numeric button is pressed, the projector can operate the remote control. Setting projector ID number to remote control Every projector has its ID number and the ID number of the controlling projector must be set to the remote control in advance so that the user can be ...

User Manual
Page 23
... player Video deck DVD player Digital Hi-vision video deck with DVI/HDMI terminal R/PR G/Y B/PB SYNC/HD VD VIDEO IN S-VIDEO IN REMOTE 1 IN OUT RGB 1 IN REMOTE 2 IN RGB 2 IN IN SERIAL OUT DVI-D IN LAN DVI-D Cable or HDMI-DVI conversion cable (available in the market) Control PC Red... Attention • When connecting with a video deck, be sure to use the one with a built-in time base corrector (TBC) or use a TBC between the projector and the video deck. • The EDID settings may be needed depending on the equipment connected when DVI-D signals are input. (Refer to page 37...
... player Video deck DVD player Digital Hi-vision video deck with DVI/HDMI terminal R/PR G/Y B/PB SYNC/HD VD VIDEO IN S-VIDEO IN REMOTE 1 IN OUT RGB 1 IN REMOTE 2 IN RGB 2 IN IN SERIAL OUT DVI-D IN LAN DVI-D Cable or HDMI-DVI conversion cable (available in the market) Control PC Red... Attention • When connecting with a video deck, be sure to use the one with a built-in time base corrector (TBC) or use a TBC between the projector and the video deck. • The EDID settings may be needed depending on the equipment connected when DVI-D signals are input. (Refer to page 37...
User Manual
Page 24
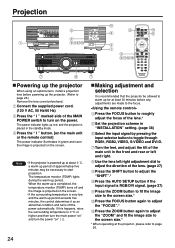
...the temperature monitor (TEMP) turns off the power automatically. Projection R/PR G/Y B/PB SYNC/HD VD VIDEO IN S-VIDEO IN REMOTE 1 IN OUT RGB 1 IN REMOTE 2 IN IN SE Powering up the projector When using an optional lens, install a projection lens before any adjustments are made to 0 °C or higher and then... turn the main power "on" and turn on the main unit or the remote control] The power indicator illuminates in the standby mode. The power indicator lights up red, and the projector is RGB/DVI signal. (page 27) Press the ZOOM button to fit the image size...
...the temperature monitor (TEMP) turns off the power automatically. Projection R/PR G/Y B/PB SYNC/HD VD VIDEO IN S-VIDEO IN REMOTE 1 IN OUT RGB 1 IN REMOTE 2 IN IN SE Powering up the projector When using an optional lens, install a projection lens before any adjustments are made to 0 °C or higher and then... turn the main power "on" and turn on the main unit or the remote control] The power indicator illuminates in the standby mode. The power indicator lights up red, and the projector is RGB/DVI signal. (page 27) Press the ZOOM button to fit the image size...
User Manual
Page 26
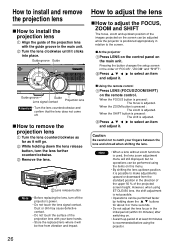
... the order of the projection lens with your fingers between the lens and shroud when shifting the lens. However, when using the projector. 26 Guide groove Guide Guide groove Guide Lens signal contact Projection lens Attention • Turn the lens counterclockwise and confirm that the... lens signal contact. Remove the lens. Press to select an item and adjust it clicks into place. At the projector Press LENS on the control panel on the remote control. When the FOCUS button is pressed : The focus is adjusted. Lens release button Note • Before replacing...
... the order of the projection lens with your fingers between the lens and shroud when shifting the lens. However, when using the projector. 26 Guide groove Guide Guide groove Guide Lens signal contact Projection lens Attention • Turn the lens counterclockwise and confirm that the... lens signal contact. Remove the lens. Press to select an item and adjust it clicks into place. At the projector Press LENS on the control panel on the remote control. When the FOCUS button is pressed : The focus is adjusted. Lens release button Note • Before replacing...
User Manual
Page 27
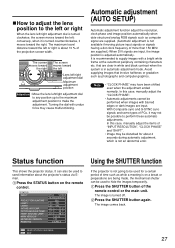
Turning the dial with blurred edges or dark images are input. It is about 10 % of the projection screen width. Status function This shows the projector status. AROUND LAMP MAIN VERSION NETWORK VERSION REMOTE2 NTSC VIDEO 15.73kHz/59.94Hz 33h 13h/ ON/ 13h/ ON/ 25 °C / 77 °F 37 &#...adjustment is not available if moving picture input signals or signals having a dot clock frequency of time such as while a meeting is on the remote control. Press the SHUTTER button again. The image comes back. 27 The maximum travel distance toward the left or right is recommended to supply ...
Turning the dial with blurred edges or dark images are input. It is about 10 % of the projection screen width. Status function This shows the projector status. AROUND LAMP MAIN VERSION NETWORK VERSION REMOTE2 NTSC VIDEO 15.73kHz/59.94Hz 33h 13h/ ON/ 13h/ ON/ 25 °C / 77 °F 37 &#...adjustment is not available if moving picture input signals or signals having a dot clock frequency of time such as while a meeting is on the remote control. Press the SHUTTER button again. The image comes back. 27 The maximum travel distance toward the left or right is recommended to supply ...

User Manual
Page 36
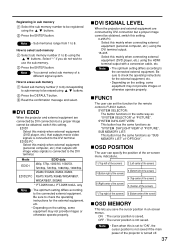
... screen is displayed can be adjusted automatically without pressing the AUTO SETUP button on the remote control each of a desired color Press to select "TARGET DATA". BLUE : Set ...for the same kind of the images being used at a conference. LOGO2 : The Panasonic logo is projected. The Panasonic logo is projected. Consult your dealer. The "COLOR MATCHING:MEASURE" screen will be...for adjusting the adjustment color is automatically displayed. • Set "PICTURE MODE" to the projector. CONTRAST MODE There are made, discrepancies sometimes occur in order to create the pictures to ...
... screen is displayed can be adjusted automatically without pressing the AUTO SETUP button on the remote control each of a desired color Press to select "TARGET DATA". BLUE : Set ...for the same kind of the images being used at a conference. LOGO2 : The Panasonic logo is projected. The Panasonic logo is projected. Consult your dealer. The "COLOR MATCHING:MEASURE" screen will be...for adjusting the adjustment color is automatically displayed. • Set "PICTURE MODE" to the projector. CONTRAST MODE There are made, discrepancies sometimes occur in order to create the pictures to ...
User Manual
Page 37
...VGA60, SVGA60, XGA50, XGA60, XGA70, XGA75, XGA85, WXGA768/50*, WXGA768/60*, SXGA60 * PT-DW5100U, PT-DW5100UL only Note • The optimum setting differs according to 8. FUNC1 The user can specify ...from 1 to the connected external equipment. Press the ENTER button. DVI EDID When the projector and external equipment are connected by DVI connection but a proper image cannot be obtained,... not provide images or otherwise operate properly. Be sure to check the operating instructions for the remote control's FUNC1 button. ON : The cursor position is not saved. Select "-" if you...
...VGA60, SVGA60, XGA50, XGA60, XGA70, XGA75, XGA85, WXGA768/50*, WXGA768/60*, SXGA60 * PT-DW5100U, PT-DW5100UL only Note • The optimum setting differs according to 8. FUNC1 The user can specify ...from 1 to the connected external equipment. Press the ENTER button. DVI EDID When the projector and external equipment are connected by DVI connection but a proper image cannot be obtained,... not provide images or otherwise operate properly. Be sure to check the operating instructions for the remote control's FUNC1 button. ON : The cursor position is not saved. Select "-" if you...
User Manual
Page 38
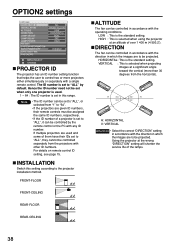
... a significant angle toward the vertical (more projectors either simultaneously or separately with the operating conditions. If multiple projectors are to be controlled in this setting according to the projector installation method. VERTICAL : This is set to "ALL" by the remote control or the PC with other ID numbers... page 15. FRONT-FLOOR FRONT-CEILING REAR-FLOOR REAR-CEILING ALTITUDE The fan can be set when only one projector is used and some of them have their remote controls must be assigned the same ID numbers, respectively. • If the ID number of the lamps. ...
... a significant angle toward the vertical (more projectors either simultaneously or separately with the operating conditions. If multiple projectors are to be controlled in this setting according to the projector installation method. VERTICAL : This is set to "ALL" by the remote control or the PC with other ID numbers... page 15. FRONT-FLOOR FRONT-CEILING REAR-FLOOR REAR-CEILING ALTITUDE The fan can be set when only one projector is used and some of them have their remote controls must be assigned the same ID numbers, respectively. • If the ID number of the lamps. ...

User Manual
Page 40
... black Color bars Flag Window (inversion) Black on white ground 16:9 frame* 40 Window White on the remote control. SYSTEM INFORMATION MAIN VERSION NETWORK VERSION PROJECTOR RUNTIME LAMP1 LOW HIGH TOTAL LAMP2 LOW HIGH TOTAL LAMP1 ON LAMP2 ON RETURN 1.00.00 1.00 300h ...set in above are input for the projector's internal clock. OPTION2 settings SYSTEM INFORMATION The projector's system information can be reflected in test patterns. DISABLE: This is the standard setting. Press the TEST PATTERN button on black ground * The PT-DW5100U and PT-DW5100UL support the 4:3 frame format.
... black Color bars Flag Window (inversion) Black on white ground 16:9 frame* 40 Window White on the remote control. SYSTEM INFORMATION MAIN VERSION NETWORK VERSION PROJECTOR RUNTIME LAMP1 LOW HIGH TOTAL LAMP2 LOW HIGH TOTAL LAMP1 ON LAMP2 ON RETURN 1.00.00 1.00 300h ...set in above are input for the projector's internal clock. OPTION2 settings SYSTEM INFORMATION The projector's system information can be reflected in test patterns. DISABLE: This is the standard setting. Press the TEST PATTERN button on black ground * The PT-DW5100U and PT-DW5100UL support the 4:3 frame format.

User Manual
Page 41
...Type : Category 5 compatible straight cable Length: 100 m (328.1') or less Attention • If you are stored in order to control the projector. SUBNET MASK : Enter the subnet mask if DHCP server is not used . Setting the network Connecting the PC The settings required for the network... all settings of IP address, subnet mask, and gateway, ask the network administrator. Connection example Projector Personal computer R/PR G/Y B/PB SYNC/HD VD VIDEO IN S-VIDEO IN REMOTE 1 IN OUT RGB 1 IN REMOTE 2 IN RGB 2 IN IN SERIAL OUT DVI-D IN LAN 10BASE-T or 100BASE-TX LAN ...
...Type : Category 5 compatible straight cable Length: 100 m (328.1') or less Attention • If you are stored in order to control the projector. SUBNET MASK : Enter the subnet mask if DHCP server is not used . Setting the network Connecting the PC The settings required for the network... all settings of IP address, subnet mask, and gateway, ask the network administrator. Connection example Projector Personal computer R/PR G/Y B/PB SYNC/HD VD VIDEO IN S-VIDEO IN REMOTE 1 IN OUT RGB 1 IN REMOTE 2 IN RGB 2 IN IN SERIAL OUT DVI-D IN LAN 10BASE-T or 100BASE-TX LAN ...
User Manual
Page 51
... projected images all the time. TEXT : The text display is projected. LOGO1 : The picture registered by inputting it again. LOGO2 : The Panasonic logo is enabled. TEXT CHANGE The text which has been set to 8 buttons can be set ). Press the ENTER button. Select the text... using the projector for the POWER button can be input in this option is to 22 alphanumerics can be projected. ENABLE : Remote control operation is enabled DISABLE : Remote control operation is displayed. To change the setting, input the security ...
... projected images all the time. TEXT : The text display is projected. LOGO1 : The picture registered by inputting it again. LOGO2 : The Panasonic logo is enabled. TEXT CHANGE The text which has been set to 8 buttons can be set ). Press the ENTER button. Select the text... using the projector for the POWER button can be input in this option is to 22 alphanumerics can be projected. ENABLE : Remote control operation is enabled DISABLE : Remote control operation is displayed. To change the setting, input the security ...
