Dlp Projector- English/french
Page 1
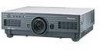
TQBJ 0200 PT-D5600UL PT-DW5000U PT-DW5000UL Read these instructions completely before operating this unit. Operating Instructions DLPTM Based Projector Commercial Use PT-D5600U Model No.
TQBJ 0200 PT-D5600UL PT-DW5000U PT-DW5000UL Read these instructions completely before operating this unit. Operating Instructions DLPTM Based Projector Commercial Use PT-D5600U Model No.
Dlp Projector- English/french
Page 2
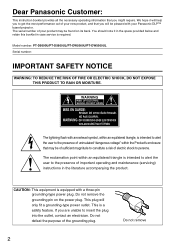
The serial number of your Panasonic DLPTM based projector. ZUR VERMEIDUNG EINES ELEKTRISCHEN SCHLAGES GERÄT NICHT ÖFFNEN...Do not defeat the purpose of your new product, and that you might require. Model number: PT-D5600U/PT-D5600UL/PT-DW5000U/PT-DW5000UL Serial number: IMPORTANT SAFETY NOTICE WARNING: TO REDUCE THE RISK OF FIRE OR ELECTRIC SHOCK... it in the space provided below and retain this booklet in the literature accompanying the product. Dear Panasonic Customer: This instruction booklet provides all the necessary operating information that you will be found on the ...
The serial number of your Panasonic DLPTM based projector. ZUR VERMEIDUNG EINES ELEKTRISCHEN SCHLAGES GERÄT NICHT ÖFFNEN...Do not defeat the purpose of your new product, and that you might require. Model number: PT-D5600U/PT-D5600UL/PT-DW5000U/PT-DW5000UL Serial number: IMPORTANT SAFETY NOTICE WARNING: TO REDUCE THE RISK OF FIRE OR ELECTRIC SHOCK... it in the space provided below and retain this booklet in the literature accompanying the product. Dear Panasonic Customer: This instruction booklet provides all the necessary operating information that you will be found on the ...
Dlp Projector- English/french
Page 4
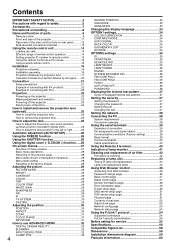
...KEYSTONE 31 How to use ADVANCED MENU 32 DIGITAL CINEMA REALITY 32 BLANKING 32 INPUT RESOLUTION 32 CLAMP POS 32 4 RASTER POSITION 33 XGA MODE 33 SXGA MODE 33 Changing the display language 33 OPTION1 settings 34 COLOR CORRECTION 34 CONTRAST MODE 34 AUTO SIGNAL 34 BACK ... 2 Precautions with regard to safety 5 Accessories 7 Precautions on handling 8 Name and function of parts 9 Remote control 9 Front and side of the projector 11 Rear view of the main unit/Controls on rear panel ..........12 Side-mounted connection terminals 13 Using the remote control unit 14 Loading dry...
...KEYSTONE 31 How to use ADVANCED MENU 32 DIGITAL CINEMA REALITY 32 BLANKING 32 INPUT RESOLUTION 32 CLAMP POS 32 4 RASTER POSITION 33 XGA MODE 33 SXGA MODE 33 Changing the display language 33 OPTION1 settings 34 COLOR CORRECTION 34 CONTRAST MODE 34 AUTO SIGNAL 34 BACK ... 2 Precautions with regard to safety 5 Accessories 7 Precautions on handling 8 Name and function of parts 9 Remote control 9 Front and side of the projector 11 Rear view of the main unit/Controls on rear panel ..........12 Side-mounted connection terminals 13 Using the remote control unit 14 Loading dry...

Dlp Projector- English/french
Page 5
... it in any inspection, adjustment and repair work (such as this can easily become wet. • Failure to observe this may cause the projector to overheat, which are coming loose from the wall. Insert the power cord plug securely into a wall outlet that injury or electric shocks may..., by a qualified technician. • If installation is not carried out correctly, there is the danger that is connected to earth. Do not place the projector into a bundle. • If the power cord is used while damaged, electric shocks, short-circuits or fire may result. • Ask an Authorized ...
... it in any inspection, adjustment and repair work (such as this can easily become wet. • Failure to observe this may cause the projector to overheat, which are coming loose from the wall. Insert the power cord plug securely into a wall outlet that injury or electric shocks may..., by a qualified technician. • If installation is not carried out correctly, there is the danger that is connected to earth. Do not place the projector into a bundle. • If the power cord is used while damaged, electric shocks, short-circuits or fire may result. • Ask an Authorized ...

Dlp Projector- English/french
Page 6
...disconnect the power plug from metallic objects. Do not place your hands or other objects close to this unit. • The objects or projectors may lose their balance or fall or sustain damage, and possibly result in possible malfunctioning. Always disconnect all cables before handling it to ... or electric shocks could cause fire or electric shocks to overheat, leak, explode or catch fire, and burns or other projectors on top of this port [allow at least one projector directly on top of time. 6 Do not bring your hands or face, or objects which could result. •...
...disconnect the power plug from metallic objects. Do not place your hands or other objects close to this unit. • The objects or projectors may lose their balance or fall or sustain damage, and possibly result in possible malfunctioning. Always disconnect all cables before handling it to ... or electric shocks could cause fire or electric shocks to overheat, leak, explode or catch fire, and burns or other projectors on top of this port [allow at least one projector directly on top of time. 6 Do not bring your hands or face, or objects which could result. •...

Dlp Projector- English/french
Page 7
...the gas has got into this is not done. If the lamp has broken, ventilate the room immediately. Disconnect the power cord plug from the projector's lens. Remote control unit [N2QAYA000005 x 1] Power cord [K2CG3FZ00008 x 1] Battery for the openings beside the optical lens, during horizontal or ...Do not look directly into your eyes or mouth, seek medical advice immediately. • Ask your nearest Authorized Service Center to clean the projector when required. Use only the Specified battery. • If incorrect batteries are used, they may explode or leak, and fire, injury or...
...the gas has got into this is not done. If the lamp has broken, ventilate the room immediately. Disconnect the power cord plug from the projector's lens. Remote control unit [N2QAYA000005 x 1] Power cord [K2CG3FZ00008 x 1] Battery for the openings beside the optical lens, during horizontal or ...Do not look directly into your eyes or mouth, seek medical advice immediately. • Ask your nearest Authorized Service Center to clean the projector when required. Use only the Specified battery. • If incorrect batteries are used, they may explode or leak, and fire, injury or...

Dlp Projector- English/french
Page 8
...ask a specialized technician when to install the product to damage the internal parts, causing failure. ET-PKD55) (for installation. Do not place the projector over 1 400 m (4 605.3') above sea level, set the "Fan Control1", described on the screen. When using it may be shortened. Use... illumination interferes the screen surface. If a vinyl sheet sucked up and blocks the air filter intake port, the internal temperature of the projector may burst with fuzzy or dusty cloth. ET-PKD55S) and call the dealer or a specialized dealer. Precautions on the screen. Do ...
...ask a specialized technician when to install the product to damage the internal parts, causing failure. ET-PKD55) (for installation. Do not place the projector over 1 400 m (4 605.3') above sea level, set the "Fan Control1", described on the screen. When using it may be shortened. Use... illumination interferes the screen surface. If a vinyl sheet sucked up and blocks the air filter intake port, the internal temperature of the projector may burst with fuzzy or dusty cloth. ET-PKD55S) and call the dealer or a specialized dealer. Precautions on the screen. Do ...

Dlp Projector- English/french
Page 9
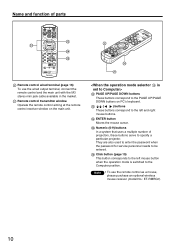
...(- LENS button (page 25) Switches to enter the "SECURITY" password. Input selector (RGB1, RGB2, DVI, VIDEO, S-VIDEO) button Use to Projector > Remote control operation indicator lamp The lamp flashes when any remote control button is pressed. FREEZE button (page 26) Press this button specifies the ... button (page 26) Pressing this button to run function. ENTER button (page 28) Press this selector to the right position to control the projector and to the left position to the "l" position. POWER ON ( I ) button (page 23) Turns on the menu screen, change setting...
...(- LENS button (page 25) Switches to enter the "SECURITY" password. Input selector (RGB1, RGB2, DVI, VIDEO, S-VIDEO) button Use to Projector > Remote control operation indicator lamp The lamp flashes when any remote control button is pressed. FREEZE button (page 26) Press this button specifies the ... button (page 26) Pressing this button to run function. ENTER button (page 28) Press this selector to the right position to control the projector and to the left position to the "l" position. POWER ON ( I ) button (page 23) Turns on the menu screen, change setting...
Dlp Projector- English/french
Page 10
... to enter the password when the password for service personnel needs to the left and right mouse buttons. Name and function of projectors, these buttons serve to specify a particular projector. PAGE UP/PAGE DOWN buttons These buttons correspond to the PAGE UP/PAGE DOWN buttons on the main unit. Click button (page...
... to enter the password when the password for service personnel needs to the left and right mouse buttons. Name and function of projectors, these buttons serve to specify a particular projector. PAGE UP/PAGE DOWN buttons These buttons correspond to the PAGE UP/PAGE DOWN buttons on the main unit. Click button (page...

Dlp Projector- English/french
Page 11
...images on ). Focus ring (page 25) For focus adjustment. Lens cap Cap the lens whenever the projector is reached. Level-adjusting feet (page 23) Use these feet to adjust the tilt of the projector. (The leveling feet at the front left unused. Powered focus adjustment is pressed. Front and side ...of the projector Side-mounted connection terminals (page 13) Status LED lights (Refer to the figure on the ...
...images on ). Focus ring (page 25) For focus adjustment. Lens cap Cap the lens whenever the projector is reached. Level-adjusting feet (page 23) Use these feet to adjust the tilt of the projector. (The leveling feet at the front left unused. Powered focus adjustment is pressed. Front and side ...of the projector Side-mounted connection terminals (page 13) Status LED lights (Refer to the figure on the ...
Dlp Projector- English/french
Page 12
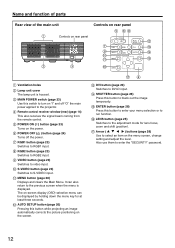
... applied to select an item on the screen. MENU button (page 28) Displays and clears the Main Menu. Arrow ( ) buttons (page 28) Use to the projector. MAIN POWER switch (page 23) Use this button while projecting an image automatically corrects the picture positioning on the menu screen, change setting and adjust...
... applied to select an item on the screen. MENU button (page 28) Displays and clears the Main Menu. Arrow ( ) buttons (page 28) Use to the projector. MAIN POWER switch (page 23) Use this button while projecting an image automatically corrects the picture positioning on the menu screen, change setting and adjust...

Dlp Projector- English/french
Page 13
...to this terminal. (D-SUB 9-pin female) SERIAL IN terminal (pages 22, 39) Use the RS232C serial terminal as an alternative interface for controlling the projector from the PC. (10Base-T/100Base-TX compliant) LAN terminal (10Base-T/100Base-TX) Connect LAN cable. LAN 10/100 lamp (Yellow) Lights up when ...) A terminal to input RGB or YPBPR signals. (D-SUB 15-pin female) DVI-D IN terminal (page 22) DVI-D signals are used to control the projector from your PC. (D-SUB 9-pin female) SERIAL OUT terminal (pages 22, 39) The signal applied to the serial input terminal appears at this terminal. ...
...to this terminal. (D-SUB 9-pin female) SERIAL IN terminal (pages 22, 39) Use the RS232C serial terminal as an alternative interface for controlling the projector from the PC. (10Base-T/100Base-TX compliant) LAN terminal (10Base-T/100Base-TX) Connect LAN cable. LAN 10/100 lamp (Yellow) Lights up when ...) A terminal to input RGB or YPBPR signals. (D-SUB 15-pin female) DVI-D IN terminal (page 22) DVI-D signals are used to control the projector from your PC. (D-SUB 9-pin female) SERIAL OUT terminal (pages 22, 39) The signal applied to the serial input terminal appears at this terminal. ...
Dlp Projector- English/french
Page 14
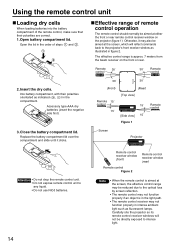
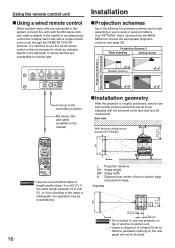
...Remote 30˚ control 30˚ Remote control 2. Accessory type-AAA dry batteries (insert the negative side first). 3. Carefully site the projector so its remote control receiver windows will reflect commands back to intense light. 14 Remote control receiver window (front) Remote control Figure 2... Remote control receiver window (rear) Note • When the remote control is approx. 7 meters from the beam receiver on the projector (figure 1). Open the lid in intense ambient light such as fluorescent lamps. The effective control range is aimed at the screen, which ...
...Remote 30˚ control 30˚ Remote control 2. Accessory type-AAA dry batteries (insert the negative side first). 3. Carefully site the projector so its remote control receiver windows will reflect commands back to intense light. 14 Remote control receiver window (front) Remote control Figure 2... Remote control receiver window (rear) Note • When the remote control is approx. 7 meters from the beam receiver on the projector (figure 1). Open the lid in intense ambient light such as fluorescent lamps. The effective control range is aimed at the screen, which ...
Dlp Projector- English/french
Page 15
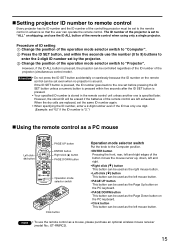
...so that the user can be controlled regardless of the ID number of the projector (simultaneous control mode). Note • To use the ID ALL button of the remote control when using only... mode selector switch to "Computer". However, if the ID ALL button is pressed, the projector can be used as the Page Down button on shipping, and use the remote control as...has only one is specified later. Setting projector ID number to remote control Every projector has its ID number and the ID number of the controlling projector must be set even when no projector is around. However, the stored ID will...
...so that the user can be controlled regardless of the ID number of the projector (simultaneous control mode). Note • To use the ID ALL button of the remote control when using only... mode selector switch to "Computer". However, if the ID ALL button is pressed, the projector can be used as the Page Down button on shipping, and use the remote control as...has only one is specified later. Setting projector ID number to remote control Every projector has its ID number and the ID number of the controlling projector must be set even when no projector is around. However, the stored ID will...
Dlp Projector- English/french
Page 16
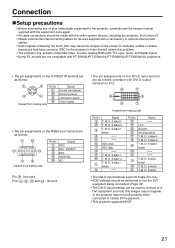
... ;VIDEO IN S-VIDEO IN REMOTE 1 Projection Scheme 1 Rear projection Front projection IN OUT RGB 1 IN REMOTE 2 Connect to the secondary projector M3 stereo mini jack cable (available in the light path or where devices are connected in the system, connect the units with the M3 stereo... (7 3/32) (10 9/32) L H Screen L : Projection distance SH : Image height SW : Image width H : Distance from the MAIN MENU) to use one projector on top of another projection unit. • Leave a clearance of the following four projection schemes can be blocked. Projection schemes Any of at least 50...
... ;VIDEO IN S-VIDEO IN REMOTE 1 Projection Scheme 1 Rear projection Front projection IN OUT RGB 1 IN REMOTE 2 Connect to the secondary projector M3 stereo mini jack cable (available in the light path or where devices are connected in the system, connect the units with the M3 stereo... (7 3/32) (10 9/32) L H Screen L : Projection distance SH : Image height SW : Image width H : Distance from the MAIN MENU) to use one projector on top of another projection unit. • Leave a clearance of the following four projection schemes can be blocked. Projection schemes Any of at least 50...
Dlp Projector- English/french
Page 21
... composite-video, S-video, analog-RGB (with TTL sync. level), and digital signal. • Some PC models are not compatible with PT-D5600U/PT-D5600UL/PT-DW5000U/PT-DW5000UL projectors. • The pin assignments on the RGB2 input terminal are as follows: Viewed from mating side Pin No. Signal +5 V Ground ... be used . T. M. M. D. M. Connection Setup precautions • Before connecting any of your video/audio equipment to the projector, carefully read the owners manual supplied with the equipment once again. • All cable connections should be performed to suit the DVI...
... composite-video, S-video, analog-RGB (with TTL sync. level), and digital signal. • Some PC models are not compatible with PT-D5600U/PT-D5600UL/PT-DW5000U/PT-DW5000UL projectors. • The pin assignments on the RGB2 input terminal are as follows: Viewed from mating side Pin No. Signal +5 V Ground ... be used . T. M. M. D. M. Connection Setup precautions • Before connecting any of your video/audio equipment to the projector, carefully read the owners manual supplied with the equipment once again. • All cable connections should be performed to suit the DVI...

Dlp Projector- English/french
Page 22
... D-SUB 9-pin straight cable Digital Hi-vision video deck Attention • When connecting with a video deck, be sure to use a TBC between the projector and the video deck. • The EDID settings suited to the equipment connected must be performed when DVI-D signals are input. (Refer to the SYNC...has the resume feature (last memory), the computer may be lost when the SYNC ON RGB signal is the case, connect a TBC between the projector and the video deck. • If nonstandard burst signals are connected, the image may not function properly until the resume capability is disabled. ...
... D-SUB 9-pin straight cable Digital Hi-vision video deck Attention • When connecting with a video deck, be sure to use a TBC between the projector and the video deck. • The EDID settings suited to the equipment connected must be performed when DVI-D signals are input. (Refer to the SYNC...has the resume feature (last memory), the computer may be lost when the SYNC ON RGB signal is the case, connect a TBC between the projector and the video deck. • If nonstandard burst signals are connected, the image may not function properly until the resume capability is disabled. ...

Dlp Projector- English/french
Page 23
... in the front and rear or left /right adjustment dial to adjust the direction of the lens on " ( | ). • It is recommended that the projector be allowed to warm up for at about 0 ˚C, a warm-up period of approximately five minutes may be necessary to start projection. Press the LENS... warm-up period. Projection R/PR G/Y B/PB SYNC/HD VD VIDEO IN S-VIDEO IN REMOTE 1 IN OUT RGB 1 IN REMOTE 2 IN SE Powering up the projector When using an optional lens, install a projection lens before any adjustments are made to the focus. 23 Press the " I " marked side of the MAIN POWER...
... in the front and rear or left /right adjustment dial to adjust the direction of the lens on " ( | ). • It is recommended that the projector be allowed to warm up for at about 0 ˚C, a warm-up period of approximately five minutes may be necessary to start projection. Press the LENS... warm-up period. Projection R/PR G/Y B/PB SYNC/HD VD VIDEO IN S-VIDEO IN REMOTE 1 IN OUT RGB 1 IN REMOTE 2 IN SE Powering up the projector When using an optional lens, install a projection lens before any adjustments are made to the focus. 23 Press the " I " marked side of the MAIN POWER...
Dlp Projector- English/french
Page 24
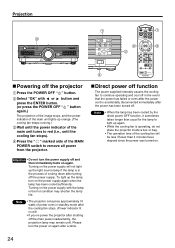
...be less if fewer than usual for the lamp to continue operating and cool off . Attention • Do not turn the power supply off the projector Press the POWER OFF " " button. Please turn on the power supply again when the lamp has been cooled sufficiently. To light up orange. ... button again.) The projection of the image stops, and the power indicator of the main unit turns to remove all power from the projector. Note • The projector consumes approximately 10 watts of power even in standby mode after the cooling fan stops. (Power indicator lit in the process of the MAIN...
...be less if fewer than usual for the lamp to continue operating and cool off . Attention • Do not turn the power supply off the projector Press the POWER OFF " " button. Please turn on the power supply again when the lamp has been cooled sufficiently. To light up orange. ... button again.) The projection of the image stops, and the power indicator of the main unit turns to remove all power from the projector. Note • The projector consumes approximately 10 watts of power even in standby mode after the cooling fan stops. (Power indicator lit in the process of the MAIN...

Dlp Projector- English/french
Page 25
... Guide groove Guide Lens signal contact Projection lens Attention • Turn the lens counterclockwise and confirm that the lens does not come off the projector's power. • Do not touch the lens signal contact. Lens lock button Note • Before replacing the lens, turn the lens ...is positioned appropriately in the direction of the upper 50 % of the projected screen height. • Operations can be adjusted while the projector is possible to make adjustments upward or downward from the standard position in relation to catch your bare hands. • Store the ...
... Guide groove Guide Lens signal contact Projection lens Attention • Turn the lens counterclockwise and confirm that the lens does not come off the projector's power. • Do not touch the lens signal contact. Lens lock button Note • Before replacing the lens, turn the lens ...is positioned appropriately in the direction of the upper 50 % of the projected screen height. • Operations can be adjusted while the projector is possible to make adjustments upward or downward from the standard position in relation to catch your bare hands. • Store the ...


