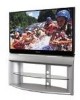
Multi Media Display
Page 66
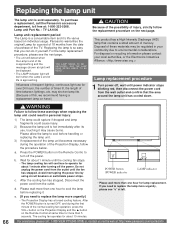
... minute of the TV. For assistance, please call the Panasonic accessory department, toll free at right) will continue to replace the lamp more urgently] • The Projection Display has a forced cooling feature. Lamp unit Part No. : TY-LA1000 Lamp unit replacement period The Lamp is so easy ...is hot immediately after turning off the power. THE LAMP NEEDS TO BE REPLACED, AND THE LAMP HOUR METER NEEDS TO BE RESET. • The LAMP indicator light will detect when the Lamp's end of mercury. Replacing the lamp unit The lamp unit is approaching and the message (shown at :...
... minute of the TV. For assistance, please call the Panasonic accessory department, toll free at right) will continue to replace the lamp more urgently] • The Projection Display has a forced cooling feature. Lamp unit Part No. : TY-LA1000 Lamp unit replacement period The Lamp is so easy ...is hot immediately after turning off the power. THE LAMP NEEDS TO BE REPLACED, AND THE LAMP HOUR METER NEEDS TO BE RESET. • The LAMP indicator light will detect when the Lamp's end of mercury. Replacing the lamp unit The lamp unit is approaching and the message (shown at :...
Multi Media Display
Page 67
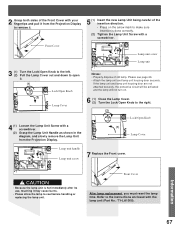
...screwdriver. Information 67 2 Grasp both sides of old lamp. Please see page 66. • Attach the lamp unit and lamp unit housing door securely. Front Cover After lamp replacement, you must reset the lamp time. If the lamp unit and lamp unit housing door are not attached securely, the protective...right. (2) Lock/Open Knob 4 (1) Loosen the Lamp Unit Screw with a screwdriver. (2) Grasp the Lamp Unit Handle as shown in the diagram, and slowly remove the Lamp Unit from the Projection Display to remove it. 5 (1) Insert the new Lamp Unit being careful of the insertion direction. •...
...screwdriver. Information 67 2 Grasp both sides of old lamp. Please see page 66. • Attach the lamp unit and lamp unit housing door securely. Front Cover After lamp replacement, you must reset the lamp time. If the lamp unit and lamp unit housing door are not attached securely, the protective...right. (2) Lock/Open Knob 4 (1) Loosen the Lamp Unit Screw with a screwdriver. (2) Grasp the Lamp Unit Handle as shown in the diagram, and slowly remove the Lamp Unit from the Projection Display to remove it. 5 (1) Insert the new Lamp Unit being careful of the insertion direction. •...
Multi Media Display
Page 79
...32, 38, 43 HDMI input terminals 11, 22 HDTV 8 I Input 1, 2, 3 terminals 11, 15 J JPEG 8, 49-53 JPEG thumbnail 50 L LAMP indicator 10, 65-68 Left screen 37 LIGHT button 9 M MPAA 8, 45-46 MSO 7, 8 MUTE button 9, 34 N NTSC 8 Number keys 9,...(Unit 10, 24, 65 R R-TUNE button 9, 32 RECALL button 9, 33 Remote Control Sensor 10 Reset All Memory Functions 7 RGB cable 20 Right screen 37 S SAP button 9, 35 SD Card 49-53... 44 Sound mute 34 Stereo System 18 SVGA 21 T TEMP indicator 10, 65 TV/VIDEO button 9, 10, 32 V VCR connections 15, 17 VGA 21 Volume +/- buttons 9, 10, 33...
...32, 38, 43 HDMI input terminals 11, 22 HDTV 8 I Input 1, 2, 3 terminals 11, 15 J JPEG 8, 49-53 JPEG thumbnail 50 L LAMP indicator 10, 65-68 Left screen 37 LIGHT button 9 M MPAA 8, 45-46 MSO 7, 8 MUTE button 9, 34 N NTSC 8 Number keys 9,...(Unit 10, 24, 65 R R-TUNE button 9, 32 RECALL button 9, 33 Remote Control Sensor 10 Reset All Memory Functions 7 RGB cable 20 Right screen 37 S SAP button 9, 35 SD Card 49-53... 44 Sound mute 34 Stereo System 18 SVGA 21 T TEMP indicator 10, 65 TV/VIDEO button 9, 10, 32 V VCR connections 15, 17 VGA 21 Volume +/- buttons 9, 10, 33...


