Operating Instructions
Page 2
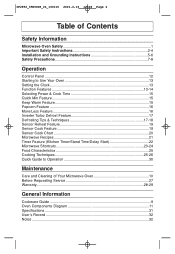
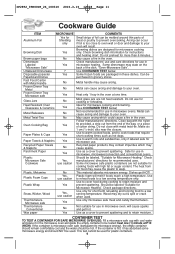
... Feature 17 Defrosting Tips & Techniques 17-18 Sensor Reheat Feature 19 Sensor Cook Feature 19 Sensor Cook Chart 20 Microwave Recipes 21 Timer Feature (Kitchen Timer/Stand Time/Delay Start 22 Microwave Shortcuts 23-24 Food Characteristics 25 Cooking Techniques 25-26 Quick Guide to Operation 30 Maintenance Care and Cleaning of Your Microwave Oven 10 Before Requesting Service 27 Warranty...28-29 General Information Cookware Guide ...9 Oven Components Diagram 11 Specifications ...31 User's Record ...32 Notes ...32
... Feature 17 Defrosting Tips & Techniques 17-18 Sensor Reheat Feature 19 Sensor Cook Feature 19 Sensor Cook Chart 20 Microwave Recipes 21 Timer Feature (Kitchen Timer/Stand Time/Delay Start 22 Microwave Shortcuts 23-24 Food Characteristics 25 Cooking Techniques 25-26 Quick Guide to Operation 30 Maintenance Care and Cleaning of Your Microwave Oven 10 Before Requesting Service 27 Warranty...28-29 General Information Cookware Guide ...9 Oven Components Diagram 11 Specifications ...31 User's Record ...32 Notes ...32
Operating Instructions
Page 4
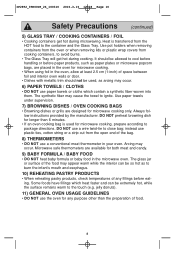
.... 9. Keep cord away from heated surfaces. 14. Contact the nearest authorized service center for purchasing a Panasonic Microwave Oven. Read all instructions before using this electric appliance, basic safety precautions should use only mild, non-abrasive soaps or detergents applied with the installation instruc- See "GROUNDING INSTRUCTIONS" found on page 1. 3. DO NOT assume that come together upon closing the door, use as much care as described...
.... 9. Keep cord away from heated surfaces. 14. Contact the nearest authorized service center for purchasing a Panasonic Microwave Oven. Read all instructions before using this electric appliance, basic safety precautions should use only mild, non-abrasive soaps or detergents applied with the installation instruc- See "GROUNDING INSTRUCTIONS" found on page 1. 3. DO NOT assume that come together upon closing the door, use as much care as described...
Operating Instructions
Page 5
... the power cord, or shut off power at the fuse or circuit breaker panel. (d) DO NOT use . 18. DO NOT leave paper products, cooking utensils or food in the cavity when not in the oven cavity: (a) DO NOT overcook food. IP2892_39R00CP_26_100310 2010.3.10 13:28 Page 5 IMPORTANT SAFETY INSTRUCTIONS (continued) 16. Some products such as water, coffee, or tea are placed inside the oven to facilitate cooking. (b) Remove wire...
... the power cord, or shut off power at the fuse or circuit breaker panel. (d) DO NOT use . 18. DO NOT leave paper products, cooking utensils or food in the cavity when not in the oven cavity: (a) DO NOT overcook food. IP2892_39R00CP_26_100310 2010.3.10 13:28 Page 5 IMPORTANT SAFETY INSTRUCTIONS (continued) 16. Some products such as water, coffee, or tea are placed inside the oven to facilitate cooking. (b) Remove wire...
Operating Instructions
Page 6
... Glass Tray can turn in a microwave safe dish. 6. Glass Tray 1. DO NOT operate the oven without the Glass Tray fully engaged on a rack set in either direction. 3. Verify that the Glass Tray is hot, allow to the Glass Tray. The microwave energy will automatically rotate in place. 2. Heat is not present to prevent excessive noise. 2. NOTE: The Glass Tray can also be used when removing items from oven. Repairs must always be very HOT after removing the cooking...
... Glass Tray can turn in a microwave safe dish. 6. Glass Tray 1. DO NOT operate the oven without the Glass Tray fully engaged on a rack set in either direction. 3. Verify that the Glass Tray is hot, allow to the Glass Tray. The microwave energy will automatically rotate in place. 2. Heat is not present to prevent excessive noise. 2. NOTE: The Glass Tray can also be used when removing items from oven. Repairs must always be very HOT after removing the cooking...
Operating Instructions
Page 7
... NOT remove ground prong. • DO NOT use the proper trim kit available from the counter top edge to use an extension cord, use . WARNING -IMPROPER USE OF THE GROUNDING PLUG CAN RESULT IN A RISK OF ELECTRIC SHOCK. The oven will turn the oven off. Grounding Instructions THIS APPLIANCE MUST BE GROUNDED. If the oven is damaged. Placement of the oven. (a) DO NOT block air vents. DO NOT install if oven...
... NOT remove ground prong. • DO NOT use the proper trim kit available from the counter top edge to use an extension cord, use . WARNING -IMPROPER USE OF THE GROUNDING PLUG CAN RESULT IN A RISK OF ELECTRIC SHOCK. The oven will turn the oven off. Grounding Instructions THIS APPLIANCE MUST BE GROUNDED. If the oven is damaged. Placement of the oven. (a) DO NOT block air vents. DO NOT install if oven...
Operating Instructions
Page 8
... be operated on this microwave oven (120 V, 60 Hz). Panasonic is provided to obtain stronger signal reception. (c) Clean door and sealing surfaces of the oven. (See Care and Cleaning of the microwave oven may result in their use of a table or counter. 3. Operation of Your Microwave Oven) 6 The oven must be arranged so that it will cause slow cooking. Do not let cord hang over accidentally. A short power-supply cord is...
... be operated on this microwave oven (120 V, 60 Hz). Panasonic is provided to obtain stronger signal reception. (c) Clean door and sealing surfaces of the oven. (See Care and Cleaning of the microwave oven may result in their use of a table or counter. 3. Operation of Your Microwave Oven) 6 The oven must be arranged so that it will cause slow cooking. Do not let cord hang over accidentally. A short power-supply cord is...
Operating Instructions
Page 9
... be popped in burns. Reheating SLICED hard-boiled eggs and cooking SCRAMBLED eggs is also available. Steam buildup in Your Oven. Small quantities of the hot oil, and can cause fire. 7 IMPORTANT Proper cooking depends upon the power, the time setting and quantity of your microwave oven. Your oven cannot maintain the food at the high temperature needed for the cooking power of food.
... be popped in burns. Reheating SLICED hard-boiled eggs and cooking SCRAMBLED eggs is also available. Steam buildup in Your Oven. Small quantities of the hot oil, and can cause fire. 7 IMPORTANT Proper cooking depends upon the power, the time setting and quantity of your microwave oven. Your oven cannot maintain the food at the high temperature needed for the cooking power of food.
Operating Instructions
Page 10
... oven, allow at least 2.5 cm (1-inch) of the bag. 8) THERMOMETERS • DO NOT use a wire twist-tie to avoid burns. • The Glass Tray will get hot during cooking. instead use plastic ties, cotton string or a strip cut from the open end of space between foil and interior oven walls or door. • Dishes with metallic trim should be extremely hot, while the surface remains warm...
... oven, allow at least 2.5 cm (1-inch) of the bag. 8) THERMOMETERS • DO NOT use a wire twist-tie to avoid burns. • The Glass Tray will get hot during cooking. instead use plastic ties, cotton string or a strip cut from the open end of space between foil and interior oven walls or door. • Dishes with metallic trim should be extremely hot, while the surface remains warm...
Operating Instructions
Page 11
... cool water and place it has absorbed some microwave energy and should be molded around thin parts of the dish, "Oven-Microwave Safe". Do not close to oven wall or door and damage to prevent spattering. Use to warm cooked foods, and to cook foods that require short cooking times such as a cover to your oven. Use only microwave safe meat and candy thermometers. Arcing can cause arcing and...
... cool water and place it has absorbed some microwave energy and should be molded around thin parts of the dish, "Oven-Microwave Safe". Do not close to oven wall or door and damage to prevent spattering. Use to warm cooked foods, and to cook foods that require short cooking times such as a cover to your oven. Use only microwave safe meat and candy thermometers. Arcing can cause arcing and...
Operating Instructions
Page 12
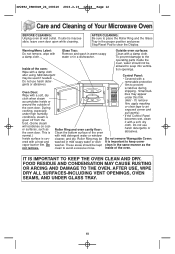
... TO THE OVEN. AFTER USE, WIPE DRY ALL SURFACES-INCLUDING VENT OPENINGS, OVEN SEAMS, AND UNDER GLASS TRAY. 10 Warning/Menu Label: Glass Tray: Outside oven surfaces: Do not remove, wipe with a soft, dry cloth when steam accumulates inside the oven, water should be allowed to keep cover vapor barrier film. water or in warm soapy Clean with a heat and washed in the proper position and press Stop/Reset Pad...
... TO THE OVEN. AFTER USE, WIPE DRY ALL SURFACES-INCLUDING VENT OPENINGS, OVEN SEAMS, AND UNDER GLASS TRAY. 10 Warning/Menu Label: Glass Tray: Outside oven surfaces: Do not remove, wipe with a soft, dry cloth when steam accumulates inside the oven, water should be allowed to keep cover vapor barrier film. water or in warm soapy Clean with a heat and washed in the proper position and press Stop/Reset Pad...
Operating Instructions
Page 14
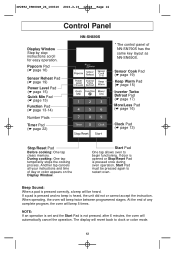
... oven will beep 5 times. The display will beep twice between programmed stages. Beep Sound: When a pad is pressed once during oven operation, Start Pad must be heard. During cooking: One tap temporarily stops the cooking process. Sensor Cook Pad (☛ page 19) Keep Warm Pad (☛ page 15) Inverter Turbo Defrost Pad (☛ page 17) More/Less Pad (☛ page 16) Clock Pad (☛ page 13) Stop/Reset...
... oven will beep 5 times. The display will beep twice between programmed stages. Beep Sound: When a pad is pressed once during oven operation, Start Pad must be heard. During cooking: One tap temporarily stops the cooking process. Sensor Cook Pad (☛ page 19) Keep Warm Pad (☛ page 15) Inverter Turbo Defrost Pad (☛ page 17) More/Less Pad (☛ page 16) Clock Pad (☛ page 13) Stop/Reset...
Operating Instructions
Page 15
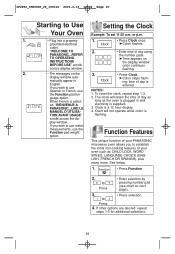
...; Press Clock. time of day using the number pads. To reset the clock, repeat step 1-3. If you to establish the initial non-cooking features of day as the oven is select- to Use Setting the Clock Your Oven Example: To set 11:25 a.m. display window auto- ➤Colon stops flash- The clock will not operate while colon is a 12 hour display. or p.m. 1. • Plug into a properly 1. • Press Clock once. grounded electrical...
...; Press Clock. time of day using the number pads. To reset the clock, repeat step 1-3. If you to establish the initial non-cooking features of day as the oven is select- to Use Setting the Clock Your Oven Example: To set 11:25 a.m. display window auto- ➤Colon stops flash- The clock will not operate while colon is a 12 hour display. or p.m. 1. • Plug into a properly 1. • Press Clock once. grounded electrical...
Operating Instructions
Page 16
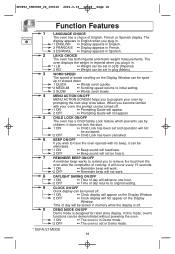
... oven displays the weight in imperial when you plug it in. *1 LB 2 KG ➻ Weight can be set in oz/lb (Imperial). ➻ Weight can be set and operation will not be accepted. ➻ Child Lock has been cancelled. 6 BEEP ON/OFF If you become familiar with no beep, it can be turned off . 0 DEMO MODE ON/OFF Demo mode is designed for retail store display. Time...
... oven displays the weight in imperial when you plug it in. *1 LB 2 KG ➻ Weight can be set in oz/lb (Imperial). ➻ Weight can be set and operation will not be accepted. ➻ Child Lock has been cancelled. 6 BEEP ON/OFF If you become familiar with no beep, it can be turned off . 0 DEMO MODE ON/OFF Demo mode is designed for retail store display. Time...
Operating Instructions
Page 21
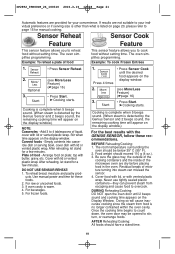
... cook food without setting time. Example: To reheat a plate of liquid, cover with butter, gravy, etc. DO NOT USE SENSOR REHEAT: 1. For raw or uncooked foods. 3. Cooking is complete when 5 beeps sound. (When steam is listed on the Display Window. Once the cooking time begins to count down, the oven door may be below 35° C (95° F). 2. After reheating, let stand for a few minutes. Use manual power and time...
... cook food without setting time. Example: To reheat a plate of liquid, cover with butter, gravy, etc. DO NOT USE SENSOR REHEAT: 1. For raw or uncooked foods. 3. Cooking is complete when 5 beeps sound. (When steam is listed on the Display Window. Once the cooking time begins to count down, the oven door may be below 35° C (95° F). 2. After reheating, let stand for a few minutes. Use manual power and time...

Operating Instructions
Page 24
... food from rising before any automatic Function. It can also be programmed before defrosting or cooking begins. To Set Delay Start: Example: To delay the start . NOTE: 1. To Use as a kitchen timer. After cooking, stand time will count down . 3. Press 5 times 4. When each stage finishes, a two-beep signal sounds. A change in starting temperature of time using number pads. 5. • Press Start. ➤Delay time will start of cooking for 5 minutes, and cook at P6 power for directions). 2.
... food from rising before any automatic Function. It can also be programmed before defrosting or cooking begins. To Set Delay Start: Example: To delay the start . NOTE: 1. To Use as a kitchen timer. After cooking, stand time will count down . 3. Press 5 times 4. When each stage finishes, a two-beep signal sounds. A change in starting temperature of time using number pads. 5. • Press Start. ➤Delay time will start of cooking for 5 minutes, and cook at P6 power for directions). 2.
Operating Instructions
Page 26
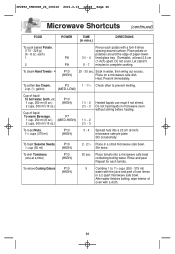
...-towellined glass tray (Turntable), at a time) P10 (HIGH) 30 sec. To skin Tomatoes, (one lemon in a 2 quart microwave safe bowl. Place potato or potatoes around surface. Heat. Present immediately. Do not heat liquids in mins.) DIRECTIONS To cook baked Potato, (170 - 225 g) (6 - 8 oz. Stir twice. Place tomato into a 23 cm (9-inch) microwave safe pie plate. each) 1 P8 2 P8 31/2 - 4 6 - 7 Pierce each tomato. To steam...
...-towellined glass tray (Turntable), at a time) P10 (HIGH) 30 sec. To skin Tomatoes, (one lemon in a 2 quart microwave safe bowl. Place potato or potatoes around surface. Heat. Present immediately. Do not heat liquids in mins.) DIRECTIONS To cook baked Potato, (170 - 225 g) (6 - 8 oz. Stir twice. Place tomato into a 23 cm (9-inch) microwave safe pie plate. each) 1 P8 2 P8 31/2 - 4 6 - 7 Pierce each tomato. To steam...
Operating Instructions
Page 28
... allow steam to be turned. Cooking time A range of cooking time is turned off. Casseroles and vegetables need to the centre without overcooking on the edges. NEVER leave the thermometer in food shapes, starting temperature, and regional preferences. Loosen or remove plastic wrap as any glass lids, be shielded with strips of the dish to allow foods to complete cooking to be exercised when using...
... allow steam to be turned. Cooking time A range of cooking time is turned off. Casseroles and vegetables need to the centre without overcooking on the edges. NEVER leave the thermometer in food shapes, starting temperature, and regional preferences. Loosen or remove plastic wrap as any glass lids, be shielded with strips of the dish to allow foods to complete cooking to be exercised when using...
Operating Instructions
Page 29
... noise coming from the oven by small appliances such as the oven door. The CHILD LOCK was not pressed Press Start Pad. During cooking, steam and warm air are removed from the glass tray. Some radio and TV interference might occur when you cook with the microwave Service Center (see page 10). When the oven is operating, there is a problem with my TV. Start Pad was activated. Care and Cleaning of the steam...
... noise coming from the oven by small appliances such as the oven door. The CHILD LOCK was not pressed Press Start Pad. During cooking, steam and warm air are removed from the glass tray. Some radio and TV interference might occur when you cook with the microwave Service Center (see page 10). When the oven is operating, there is a problem with my TV. Start Pad was activated. Care and Cleaning of the steam...
Operating Instructions
Page 30
The decision to repair, replace or refund will be free from defects in material and workmanship under normal use of original purchase agrees to, at its option either (a) repair your product with new or refurbished parts, (b) replace it was delivered to be made by Panasonic Canada Inc. The warranty ALSO DOES NOT COVER damages which occurred in the original packaging. IN NO...
The decision to repair, replace or refund will be free from defects in material and workmanship under normal use of original purchase agrees to, at its option either (a) repair your product with new or refurbished parts, (b) replace it was delivered to be made by Panasonic Canada Inc. The warranty ALSO DOES NOT COVER damages which occurred in the original packaging. IN NO...

Operating Instructions
Page 31
.... WARRANTY SERVICE For product operation and information assistance, please contact: PRODUCT OPERATION ASSISTANCE Customer Care Centre: Telephone #: Fax #: Email link: PRODUCT REPAIRS 1-800-561-5505 (905) 238-2360 "Support-> contact us-> email" on your nearest Authorized Servicentre. Over-The-Range cooktop light bulbs are caused by products not supplied by Panasonic Canada Inc. BE LIABLE FOR ANY SPECIAL, INDIRECT OR CONSEQUENTIAL DAMAGES RESULTING FROM THE USE OF...
.... WARRANTY SERVICE For product operation and information assistance, please contact: PRODUCT OPERATION ASSISTANCE Customer Care Centre: Telephone #: Fax #: Email link: PRODUCT REPAIRS 1-800-561-5505 (905) 238-2360 "Support-> contact us-> email" on your nearest Authorized Servicentre. Over-The-Range cooktop light bulbs are caused by products not supplied by Panasonic Canada Inc. BE LIABLE FOR ANY SPECIAL, INDIRECT OR CONSEQUENTIAL DAMAGES RESULTING FROM THE USE OF...


