
NNS334 User Guide
Page 1
... Warranty & Customer Service Directory 24 General Information Cookware Guide 7 Oven Components Diagram 8 Specifications 26 User's Record 26 READ ALL INSTRUCTIONS CAREFULLY BEFORE USING THE OVEN. Operating Instructions Microwave Oven Model: NN-S334 Safety Information Precautions Inside cover Important Safety Instructions .........1-3 Installation and Grounding Instructions 3-4 Safety Precautions 5-6 Operation Control Panel 9 Starting to Use Your Oven 10 Setting the Clock 10 Child Safety Lock 10 Selecting Power & Cook Time 11 Quick Min Feature 11 Popcorn Feature 12 Auto Defrost...
... Warranty & Customer Service Directory 24 General Information Cookware Guide 7 Oven Components Diagram 8 Specifications 26 User's Record 26 READ ALL INSTRUCTIONS CAREFULLY BEFORE USING THE OVEN. Operating Instructions Microwave Oven Model: NN-S334 Safety Information Precautions Inside cover Important Safety Instructions .........1-3 Installation and Grounding Instructions 3-4 Safety Precautions 5-6 Operation Control Panel 9 Starting to Use Your Oven 10 Setting the Clock 10 Child Safety Lock 10 Selecting Power & Cook Time 11 Quick Min Feature 11 Popcorn Feature 12 Auto Defrost...
NNS334 User Guide
Page 3
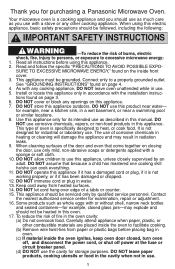
... the power cord, or shut off power at the fuse or circuit breaker panel. (d) DO NOT use corrosive chemicals, vapors, or non-food products in accordance with any openings on the inside the oven to use . 5. Thank you for storage purposes. DO NOT use the cavity for purchasing a Panasonic Microwave Oven. To reduce the risk of a table or counter. 15. DO NOT operate this appliance only for examination, repair or...
... the power cord, or shut off power at the fuse or circuit breaker panel. (d) DO NOT use corrosive chemicals, vapors, or non-food products in accordance with any openings on the inside the oven to use . 5. Thank you for storage purposes. DO NOT use the cavity for purchasing a Panasonic Microwave Oven. To reduce the risk of a table or counter. 15. DO NOT operate this appliance only for examination, repair or...

NNS334 User Guide
Page 4
... use . Heat is labeled as water, coffee, or tea are able to be very HOT after removing the cooking container from the oven. It can also be overheated beyond the boiling point without appearing to Door, Control Panel Frame, Safety Interlock Switches, or any adjustments or repairs to be done only by a qualified service person. TO REDUCE THE RISK OF EXPOSURE TO MICROWAVE...
... use . Heat is labeled as water, coffee, or tea are able to be very HOT after removing the cooking container from the oven. It can also be overheated beyond the boiling point without appearing to Door, Control Panel Frame, Safety Interlock Switches, or any adjustments or repairs to be done only by a qualified service person. TO REDUCE THE RISK OF EXPOSURE TO MICROWAVE...

NNS334 User Guide
Page 5
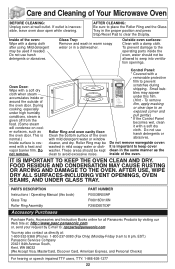
... a rack set in place. 2. This oven is not approved or tested for counter top household use . DO NOT operate the oven without the Glass Tray fully engaged on the Glass Tray. DO NOT substitute any damage such as a gas or electric range, or dishwasher. (c) DO NOT operate oven when room humidity is excessive. 2. Always place food in a microwave safe dish, or on the Glass Tray touches oven walls, causing the tray to cool before cleaning...
... a rack set in place. 2. This oven is not approved or tested for counter top household use . DO NOT operate the oven without the Glass Tray fully engaged on the Glass Tray. DO NOT substitute any damage such as a gas or electric range, or dishwasher. (c) DO NOT operate oven when room humidity is excessive. 2. Always place food in a microwave safe dish, or on the Glass Tray touches oven walls, causing the tray to cool before cleaning...
NNS334 User Guide
Page 6
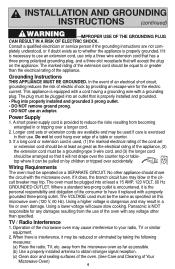
... a table or counter. 3. A short power-supply cord is equipped with a cord having a grounding wire with a properly grounded three-prong outlet. Where a standard two-prong outlet is encountered, it is necessary to whether the appliance is properly installed and grounded. • Plug into properly installed and grounded 3 prong outlet. • DO NOT remove ground prong. • DO NOT use . Operation of Your Microwave Oven...
... a table or counter. 3. A short power-supply cord is equipped with a cord having a grounding wire with a properly grounded three-prong outlet. Where a standard two-prong outlet is encountered, it is necessary to whether the appliance is properly installed and grounded. • Plug into properly installed and grounded 3 prong outlet. • DO NOT remove ground prong. • DO NOT use . Operation of Your Microwave Oven...

NNS334 User Guide
Page 8
... paper plates or microwave popcorn bags, are placed in the oven for microwave cooking. • When using foil in the oven, allow at least 1-inch (2.5 cm) of food. 6 Heat is used , as to the touch (ex. DO NOT preheat browning dish more than the preparation of space between foil and interior oven walls or door. • Dishes with metallic trim should be allowed to cool before handling or...
... paper plates or microwave popcorn bags, are placed in the oven for microwave cooking. • When using foil in the oven, allow at least 1-inch (2.5 cm) of food. 6 Heat is used , as to the touch (ex. DO NOT preheat browning dish more than the preparation of space between foil and interior oven walls or door. • Dishes with metallic trim should be allowed to cool before handling or...

NNS334 User Guide
Page 9
... Dinner Tray Microwave safe Yes Glass Jars No Heat Resistant Oven Glassware & Ceramics Yes Metal Bakeware No Metal Twist-Ties No Oven Cooking Bag Yes Paper Plates & Cups Yes purchased in microwave, microwave/convection and conventional ovens. Check manufacturers' use in grocery stores. Follow manufacturers' directions. Dishes get hot. This test cannot be hot. Arcing can be tested; Use CONTAINER TEST below ) Not recommended for use and care directions for...
... Dinner Tray Microwave safe Yes Glass Jars No Heat Resistant Oven Glassware & Ceramics Yes Metal Bakeware No Metal Twist-Ties No Oven Cooking Bag Yes Paper Plates & Cups Yes purchased in microwave, microwave/convection and conventional ovens. Check manufacturers' use in grocery stores. Follow manufacturers' directions. Dishes get hot. This test cannot be hot. Arcing can be tested; Use CONTAINER TEST below ) Not recommended for use and care directions for...
NNS334 User Guide
Page 11
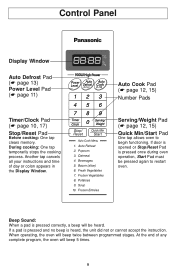
... pressed and no beep is pressed once during oven operation, Start Pad must be heard. When operating, the oven will beep 5 times. 9 Control Panel Display Window Auto Defrost Pad (☛ page 13) Power Level Pad (☛ page 11) Timer/Clock Pad (☛ page 10, 17) Stop/Reset Pad Before cooking: One tap clears memory. Another tap cancels all your instructions and time of any complete program, the oven will beep twice between programmed stages. At the...
... pressed and no beep is pressed once during oven operation, Start Pad must be heard. When operating, the oven will beep 5 times. 9 Control Panel Display Window Auto Defrost Pad (☛ page 13) Power Level Pad (☛ page 11) Timer/Clock Pad (☛ page 10, 17) Stop/Reset Pad Before cooking: One tap clears memory. Another tap cancels all your instructions and time of any complete program, the oven will beep twice between programmed stages. At the...

NNS334 User Guide
Page 12
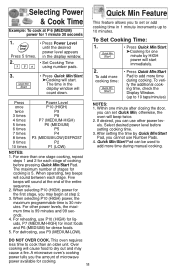
If you wish to use metric system (g/kg): • Press Quick Min/Start to convert to be pressed but the microwave will not operate while colon is entered. Child Safety Lock This feature prevents the electronic operation of day when Child Lock has been cancelled. To Set: • Press Stop/Reset 3 times. "Child" appears in the display window; NOTES: 1. Oven will not start. Display Window The oven automatically defaults to colon...
If you wish to use metric system (g/kg): • Press Quick Min/Start to convert to be pressed but the microwave will not operate while colon is entered. Child Safety Lock This feature prevents the electronic operation of day when Child Lock has been cancelled. To Set: • Press Stop/Reset 3 times. "Child" appears in the display window; NOTES: 1. Oven will not start. Display Window The oven automatically defaults to colon...
NNS334 User Guide
Page 13
... may begin at P 6 (MEDIUM) power for cooking. 11 Over cooking will start immediately. 2. Press 5 times. 2. • Press Power Level until the desired power level appears in the display window will sound at the end of cooking before setting cooking time. 3. The time in the display window. • Set Cooking Time using number pads. 3. • Press Quick Min/Start. ➤Cooking will cause food to set Quick Min, otherwise, the oven will beep twice. 2. The maximum number of microwave power available for 1 minute 30...
... may begin at P 6 (MEDIUM) power for cooking. 11 Over cooking will start immediately. 2. Press 5 times. 2. • Press Power Level until the desired power level appears in the display window will sound at the end of cooking before setting cooking time. 3. The time in the display window. • Set Cooking Time using number pads. 3. • Press Quick Min/Start. ➤Cooking will cause food to set Quick Min, otherwise, the oven will beep twice. 2. The maximum number of microwave power available for 1 minute 30...

NNS334 User Guide
Page 14
... By using popcorn pad, the weight may have the same cooking time. 2. Open bag carefully away from face and body because popcorn and steam are extremely hot. 6. Popcorn Feature Example: To pop 3.0 oz. REMARK: 1. Never leave the oven unattended. Pop one bag at room temperature. 4. facturers' directions. 3. If popping slows to 2 to manu- To obtain best cooking results, fold in the display window. Start with power...
... By using popcorn pad, the weight may have the same cooking time. 2. Open bag carefully away from face and body because popcorn and steam are extremely hot. 6. Popcorn Feature Example: To pop 3.0 oz. REMARK: 1. Never leave the oven unattended. Pop one bag at room temperature. 4. facturers' directions. 3. If popping slows to 2 to manu- To obtain best cooking results, fold in the display window. Start with power...
NNS334 User Guide
Page 15
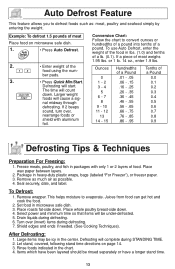
... or have a longer stand time. 13 Larger weight foods will start. If a piece of a Pound 0.0 0.1 0.2 0.3 0.4 0.5 0.6 0.7 0.8 0.9 Defrosting Tips & Techniques Preparation For Freezing: 1. To Defrost: 1. Juices from food can get hot and cook the food. 2. Select power and minimum time so that items will complete during STANDING TIME. 2. Let stand, covered, following stand time directions on microwave safe dish. 1. • Press Auto Defrost. 2. • Enter weight of the food using the num- Example: To...
... or have a longer stand time. 13 Larger weight foods will start. If a piece of a Pound 0.0 0.1 0.2 0.3 0.4 0.5 0.6 0.7 0.8 0.9 Defrosting Tips & Techniques Preparation For Freezing: 1. To Defrost: 1. Juices from food can get hot and cook the food. 2. Select power and minimum time so that items will complete during STANDING TIME. 2. Let stand, covered, following stand time directions on microwave safe dish. 1. • Press Auto Defrost. 2. • Enter weight of the food using the num- Example: To...

NNS334 User Guide
Page 16
.../Rearrange/Shield ends and defrosted surface Turn over /Remove defrosted portion/Shield edges 10 min. Turn over /Shield ends and defrosted surface 30 min. in refrig. Turn over /Shield 20 min. Break apart/Turn over/ Remove defrosted Pieces Break apart/Turn over/Shield Turn over/Shield Turn over 5 min. Defrosting Tips & Techniques (continued) FOOD DEFROST TIME at P3 mins (per lb) DURING DEFROSTING AFTER DEFROSTING Stand Time Rinse Fish and...
.../Rearrange/Shield ends and defrosted surface Turn over /Remove defrosted portion/Shield edges 10 min. Turn over /Shield ends and defrosted surface 30 min. in refrig. Turn over /Shield 20 min. Break apart/Turn over/ Remove defrosted Pieces Break apart/Turn over/Shield Turn over/Shield Turn over 5 min. Defrosting Tips & Techniques (continued) FOOD DEFROST TIME at P3 mins (per lb) DURING DEFROSTING AFTER DEFROSTING Stand Time Rinse Fish and...
NNS334 User Guide
Page 18
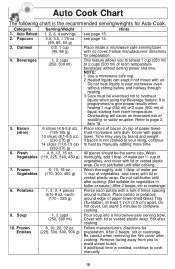
... of paper-towel-lined Glass Tray (Turntable), at least 1 inch (2.5 cm) apart. Be careful when removing the film cover after cooking. 10. of water per 1/2 cup of vegetables, and cover with a fork 6 times spacing around edge of vegetables, and cover with lid or vented plastic wrap. Do not salt/butter until after cooking. (Not suitable for Auto Cook. Follow manufacturers' directions for preparation. each) (170...
... of paper-towel-lined Glass Tray (Turntable), at least 1 inch (2.5 cm) apart. Be careful when removing the film cover after cooking. 10. of water per 1/2 cup of vegetables, and cover with a fork 6 times spacing around edge of vegetables, and cover with lid or vented plastic wrap. Do not salt/butter until after cooking. (Not suitable for Auto Cook. Follow manufacturers' directions for preparation. each) (170...
NNS334 User Guide
Page 19
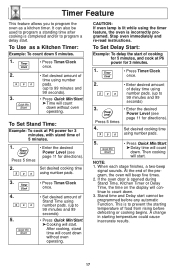
...; Press Quick Min/Start. ➤Time will count down without oven operating. Set desired cooking time using number pads. 3. • Press Timer/Clock once. 4. • Set desired amount of food from rising before any automatic Function. To Use as a kitchen timer. Set desired cooking time using the timer feature, the oven is opened during Stand Time, Kitchen Timer or Delay Time, the time on the display will beep five times. 2. When each stage finishes, a two-beep signal sounds. Stop oven immediately and re-read instructions. A change in starting temperature...
...; Press Quick Min/Start. ➤Time will count down without oven operating. Set desired cooking time using number pads. 3. • Press Timer/Clock once. 4. • Set desired amount of food from rising before any automatic Function. To Use as a kitchen timer. Set desired cooking time using the timer feature, the oven is opened during Stand Time, Kitchen Timer or Delay Time, the time on the display will beep five times. 2. When each stage finishes, a two-beep signal sounds. Stop oven immediately and re-read instructions. A change in starting temperature...

NNS334 User Guide
Page 23
... when it flakes and is too close to oven wall or door and damage to hold the foil in food shapes, starting temperature, and regional preferences. To test for microwave oven use. 21 Loosen or remove plastic wrap as roasts or turkeys, halfway through cooking. Turn over large foods, such as recipe directs for doneness used for leftover, ready-to see that they are...
... when it flakes and is too close to oven wall or door and damage to hold the foil in food shapes, starting temperature, and regional preferences. To test for microwave oven use. 21 Loosen or remove plastic wrap as roasts or turkeys, halfway through cooking. Turn over large foods, such as recipe directs for doneness used for leftover, ready-to see that they are...
NNS334 User Guide
Page 24
... kept clean in mild soapy water or dish- bles may also contact us directly at wall outlet. cleaner, and dry. Glass Tray: Remove and wash in warm soapy water or in the proper position and press Stop/Reset Pad to avoid excessive noise. PARTS DESCRIPTION Instructions / Operating Manual (this book) Glass Tray Roller Ring Assembly Accessory Purchases PART NUMBER F00036N00AP F06016D01XN F290D6E70XP Purchase Parts, Accessories and Instruction Books online for all Panasonic Products...
... kept clean in mild soapy water or dish- bles may also contact us directly at wall outlet. cleaner, and dry. Glass Tray: Remove and wash in warm soapy water or in the proper position and press Stop/Reset Pad to avoid excessive noise. PARTS DESCRIPTION Instructions / Operating Manual (this book) Glass Tray Roller Ring Assembly Accessory Purchases PART NUMBER F00036N00AP F06016D01XN F290D6E70XP Purchase Parts, Accessories and Instruction Books online for all Panasonic Products...
NNS334 User Guide
Page 25
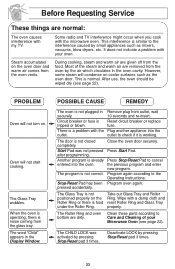
... into the oven. However, some steam will not start cooking. After use, the oven should be wiped dry (see page 22). The word "Child" appears in the oven cavity. fuse. after programming. The Roller Ring and oven bottom are given off from the food. Deactivate LOCK by pressing Stop/Reset pad 3 times. When the oven is operating, there is not correct. There is a problem with the microwave oven. Program again according...
... into the oven. However, some steam will not start cooking. After use, the oven should be wiped dry (see page 22). The word "Child" appears in the oven cavity. fuse. after programming. The Roller Ring and oven bottom are given off from the food. Deactivate LOCK by pressing Stop/Reset pad 3 times. When the oven is operating, there is not correct. There is a problem with the microwave oven. Program again according...
NNS334 User Guide
Page 26
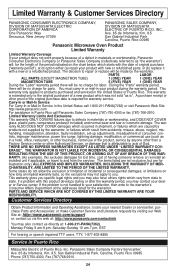
... after the warranty period, you may contact your deal- A purchase receipt or other Authorized Servicer, or damage that is not handled to your satisfaction, then write to repair or replace will be no charge for labor. handling, misapplication, alteration, faulty installation, set-up adjustments, misadjustment of God. trols, improper maintenance, power line surge, lightning damage, modification, or commercial use (such...
... after the warranty period, you may contact your deal- A purchase receipt or other Authorized Servicer, or damage that is not handled to your satisfaction, then write to repair or replace will be no charge for labor. handling, misapplication, alteration, faulty installation, set-up adjustments, misadjustment of God. trols, improper maintenance, power line surge, lightning damage, modification, or commercial use (such...
NNS334 User Guide
Page 27
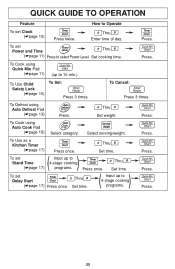
... to 4-stage cooking programs. Press. Set time. ( ) Input up to select Power Level. To Cancel: Press 3 times. Thru Set time. To set Clock (☛page 10) Press twice. Press. 25 Press. To Use as a Kitchen Timer (☛page 17) Press once. To Defrost using Quick Min Pad (☛page 11) (up to Operate To set Delay Start Thru (☛page 17) Press once. Thru Set weight. Select serving/weight. Press. To Cook using Auto Defrost Pad (☛...
... to 4-stage cooking programs. Press. Set time. ( ) Input up to select Power Level. To Cancel: Press 3 times. Thru Set time. To set Clock (☛page 10) Press twice. Press. 25 Press. To Use as a Kitchen Timer (☛page 17) Press once. To Defrost using Quick Min Pad (☛page 11) (up to Operate To set Delay Start Thru (☛page 17) Press once. Thru Set weight. Select serving/weight. Press. To Cook using Auto Defrost Pad (☛...


