Fax
Page 3
...shortly after printing. Do not touch or scratch the black drum surface. - Do not expose the drum unit to the unit - L The unit should also be exposed to direct sunlight. L The unit should never be caused by a non-Panasonic toner cartridge or drum unit: - L Do not place any dust build-up ... 1 1 Routine care L Wipe the outer surface of the drum unit. For assistance, please visit http://www.panasonic.com/help For best performance Toner cartridge and drum unit L When replacing the toner cartridge or drum unit, do not position the unit near dust or dirt, or in a high humidity area. -...
...shortly after printing. Do not touch or scratch the black drum surface. - Do not expose the drum unit to the unit - L The unit should also be exposed to direct sunlight. L The unit should never be caused by a non-Panasonic toner cartridge or drum unit: - L Do not place any dust build-up ... 1 1 Routine care L Wipe the outer surface of the drum unit. For assistance, please visit http://www.panasonic.com/help For best performance Toner cartridge and drum unit L When replacing the toner cartridge or drum unit, do not position the unit near dust or dirt, or in a high humidity area. -...
Fax
Page 4
... features 57 9.5 PC print features 58 9.6 Scan features 60 9.7 LAN features 61 9.8 Network features (LAN connection only)......63 10.Useful Information Useful Information 10.1 Character entry 64 10.2...manually - Display 68 Troubleshooting 11.3 When a function does not work 70 Printer Printer 3.1 Printing from undesired callers 45 6.10 Receiving a fax into your computer 42 Receiving Faxes... Button descriptions 7 1.4 Overview 8 Installation 1.5 Toner cartridge and drum unit 9 1.6 Document tray 11 1.7 Output tray 12 1.8 Recording paper 13 2. Copier Copy 5.1 Making a copy...
... features 57 9.5 PC print features 58 9.6 Scan features 60 9.7 LAN features 61 9.8 Network features (LAN connection only)......63 10.Useful Information Useful Information 10.1 Character entry 64 10.2...manually - Display 68 Troubleshooting 11.3 When a function does not work 70 Printer Printer 3.1 Printing from undesired callers 45 6.10 Receiving a fax into your computer 42 Receiving Faxes... Button descriptions 7 1.4 Overview 8 Installation 1.5 Toner cartridge and drum unit 9 1.6 Document tray 11 1.7 Output tray 12 1.8 Recording paper 13 2. Copier Copy 5.1 Making a copy...

Fax
Page 6
...) 237-9080 Include: - Note: L Save the original carton and packing materials for future shipping and transportation of Panasonic toner cartridge and drum unit. 1. To ensure that the unit operates properly, we recommend the use of the unit. 6 For assistance, please visit http://www.panasonic.com/help 1.1 Supplied accessories 1 Power cord 2 CD-ROM 3 Output tray 4 Document tray...
...) 237-9080 Include: - Note: L Save the original carton and packing materials for future shipping and transportation of Panasonic toner cartridge and drum unit. 1. To ensure that the unit operates properly, we recommend the use of the unit. 6 For assistance, please visit http://www.panasonic.com/help 1.1 Supplied accessories 1 Power cord 2 CD-ROM 3 Output tray 4 Document tray...

Fax
Page 9
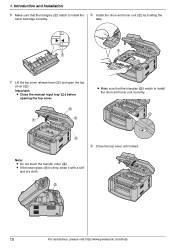
... into position. 5 Turn the two green levers (1) on the toner cartridge firmly. 1 2 Remove the toner cartridge and drum unit from the use of a non-Panasonic toner cartridge and drum unit. Do not expose the drum unit to light may occur from the protection bags. 1 L Do not touch or scratch the black...toner cartridge out of print quality which may damage the drum. For assistance, please visit http://www.panasonic.com/help 9 Caution: L Read the following instructions before you have opened the protection bag: - Do not place the drum unit near dust or dirt, or in a high humidity ...
... into position. 5 Turn the two green levers (1) on the toner cartridge firmly. 1 2 Remove the toner cartridge and drum unit from the use of a non-Panasonic toner cartridge and drum unit. Do not expose the drum unit to light may occur from the protection bags. 1 L Do not touch or scratch the black...toner cartridge out of print quality which may damage the drum. For assistance, please visit http://www.panasonic.com/help 9 Caution: L Read the following instructions before you have opened the protection bag: - Do not place the drum unit near dust or dirt, or in a high humidity ...
Fax
Page 10
... 8 Install the drum and toner unit (1) by holding the tabs. 1 1 7 Lift the top cover release lever (1) and open the top cover (2). L If the lower glass (5) is dirty, clean it with a soft and dry cloth. 5 10 For assistance, please visit http://www.panasonic.com/help Important:... L Close the manual input tray (3) before opening the top cover. 2 1 4 L Make sure that the triangles (1) match to install the drum and toner unit correctly. 2 3 9 Close the top cover until locked. Note: ...
... 8 Install the drum and toner unit (1) by holding the tabs. 1 1 7 Lift the top cover release lever (1) and open the top cover (2). L If the lower glass (5) is dirty, clean it with a soft and dry cloth. 5 10 For assistance, please visit http://www.panasonic.com/help Important:... L Close the manual input tray (3) before opening the top cover. 2 1 4 L Make sure that the triangles (1) match to install the drum and toner unit correctly. 2 3 9 Close the top cover until locked. Note: ...

Fax
Page 11
...printer test list (page 88) and refer to put your hands under conditions which meet all national and local environmental regulations. If printing quality is still poor or "REPLACE DRUM" appears on page 53). KX-FA86). For assistance, please visit http://www.panasonic.com/help 11 L To ensure that the unit... operates properly, we recommend you want to reduce toner consumption, set the toner save feature If you to ON (feature #482 on the display, replace the toner cartridge and drum unit. 1. Introduction and...
...printer test list (page 88) and refer to put your hands under conditions which meet all national and local environmental regulations. If printing quality is still poor or "REPLACE DRUM" appears on page 53). KX-FA86). For assistance, please visit http://www.panasonic.com/help 11 L To ensure that the unit... operates properly, we recommend you want to reduce toner consumption, set the toner save feature If you to ON (feature #482 on the display, replace the toner cartridge and drum unit. 1. Introduction and...
Fax
Page 68
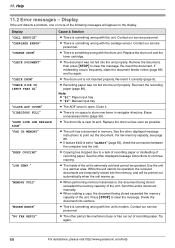
... When making a copy, the document being stored exceeded the memory capacity of the unit. Press {STOP} to clear the message. Try again. 68 For assistance, please visit http://www.panasonic.com/help Display If the unit detects a problem, one or more of recording paper. Note: L "#1": Paper ...cold and cannot be printed out automatically when the unit warms up. Replace the drum unit and the toner cartridge. L The document was not fed into the unit properly. Re-insert the document. L Recording paper was not fed into the unit properly. Re-insert the recording paper (page 80...
... When making a copy, the document being stored exceeded the memory capacity of the unit. Press {STOP} to clear the message. Try again. 68 For assistance, please visit http://www.panasonic.com/help Display If the unit detects a problem, one or more of recording paper. Note: L "#1": Paper ...cold and cannot be printed out automatically when the unit warms up. Replace the drum unit and the toner cartridge. L The document was not fed into the unit properly. Re-insert the document. L Recording paper was not fed into the unit properly. Re-insert the recording paper (page 80...
Fax
Page 69
... documents due to "ALWAYS" (page 56), check the connection between the computer and the unit. L The drum unit's service life is finished. L If feature #442 is busy or has run out of the unit is installed in the manual input tray when trying to remove the document. Press {STOP}... size paper (page 89). Try again. For assistance, please visit http://www.panasonic.com/help 69 Reinstall paper (page 13, 26). L The toner's service life is finished. L The unit is not inserted completely. Replace the drum unit immediately. L The paper input tray is not installed or is warming up ....
... documents due to "ALWAYS" (page 56), check the connection between the computer and the unit. L The drum unit's service life is finished. L If feature #442 is busy or has run out of the unit is installed in the manual input tray when trying to remove the document. Press {STOP}... size paper (page 89). Try again. For assistance, please visit http://www.panasonic.com/help 69 Reinstall paper (page 13, 26). L The toner's service life is finished. L The unit is not inserted completely. Replace the drum unit immediately. L The paper input tray is not installed or is warming up ....

Fax
Page 71
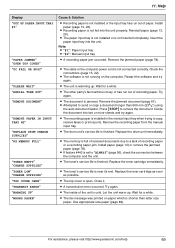
...remaining toner is still poor, replace the toner cartridge and drum unit. L The glass or rollers are dirty with a cotton and/or fiber content that colored text will be accepted. If your CDROM drive) For more details, refer to: http://panasonic.co.jp/pcc/cs/en/telecom/mfp-faq.htm 11.3.3.... It may have used paper with correction fluid, etc. For assistance, please visit http://www.panasonic.com/help 71 Colored text is over . L To check the drum life and quality, please print the printer test list (page 88). If printing quality is low. Clean them (page 83, 86). ...
...remaining toner is still poor, replace the toner cartridge and drum unit. L The glass or rollers are dirty with a cotton and/or fiber content that colored text will be accepted. If your CDROM drive) For more details, refer to: http://panasonic.co.jp/pcc/cs/en/telecom/mfp-faq.htm 11.3.3.... It may have used paper with correction fluid, etc. For assistance, please visit http://www.panasonic.com/help 71 Colored text is over . L To check the drum life and quality, please print the printer test list (page 88). If printing quality is low. Clean them (page 83, 86). ...
Fax
Page 79
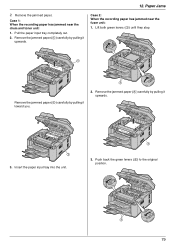
...2. Remove the jammed paper (1) carefully by pulling it upwards. 1 3. Insert the paper input tray into the unit. 1 3. Case 2: When the recording paper has jammed near the drum and toner unit: 1. Push back the green levers (1) to the original position. 1 79 Remove the jammed paper (1) carefully... by pulling it toward you. 2. Case 1: When the recording paper has jammed near the fuser unit: 1. Paper Jams 2 Remove the...
...2. Remove the jammed paper (1) carefully by pulling it upwards. 1 3. Insert the paper input tray into the unit. 1 3. Case 2: When the recording paper has jammed near the drum and toner unit: 1. Push back the green levers (1) to the original position. 1 79 Remove the jammed paper (1) carefully... by pulling it toward you. 2. Case 1: When the recording paper has jammed near the fuser unit: 1. Paper Jams 2 Remove the...
Fax
Page 83
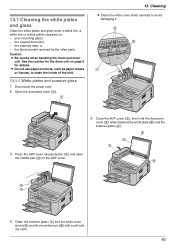
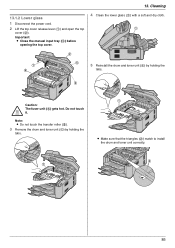
... or a dirty pattern appears on page 9 for details. the original document, - the scanned data, or - your recording paper, - See the caution for the drum unit on : - the fax document received by the other party. L Do not use paper products, such as paper towels or tissues, to avoid damaging it. 2 ...3 1 3 Press the ADF cover release button (1) and open the middle part (2) of the unit. 13.1.1 White plates and scanner glass 1 Disconnect the power cord. 2 Open the document cover (1). 1 13. Cleaning L Clean the white cover sheet carefully...
... or a dirty pattern appears on page 9 for details. the original document, - the scanned data, or - your recording paper, - See the caution for the drum unit on : - the fax document received by the other party. L Do not use paper products, such as paper towels or tissues, to avoid damaging it. 2 ...3 1 3 Press the ADF cover release button (1) and open the middle part (2) of the unit. 13.1.1 White plates and scanner glass 1 Disconnect the power cord. 2 Open the document cover (1). 1 13. Cleaning L Clean the white cover sheet carefully...
Fax
Page 85
... with a soft and dry cloth. 1 2 1 4 5 5 Reinstall the drum and toner unit (1) by holding the tabs. 3 Caution: The fuser unit (4) gets hot. Note: L Do not touch the transfer roller (5). 3 Remove the drum and toner unit (1) by holding the tabs. 1 L Make sure that the triangles (2) match to... install the drum and toner unit correctly. 2 1 85 Cleaning 13.1.2 Lower glass...
... with a soft and dry cloth. 1 2 1 4 5 5 Reinstall the drum and toner unit (1) by holding the tabs. 3 Caution: The fuser unit (4) gets hot. Note: L Do not touch the transfer roller (5). 3 Remove the drum and toner unit (1) by holding the tabs. 1 L Make sure that the triangles (2) match to... install the drum and toner unit correctly. 2 1 85 Cleaning 13.1.2 Lower glass...
Fax
Page 88
...and drum unit. - "CALLER ID LIST" - Automatic Fallback ■ Operating environment: 10 °C - 32.5 °C (50 °F - 90.5 °F), 20 % - 70 % RH (Relative Humidity) ■ Dimensions: Approx. i {MENU} 88 Specifications 14.2 Specifications ■ Applicable lines: Public Switched Telephone Network ... lines/inch)-in super fine resolution ■ Photo resolution: 64-level ■ Scanner type: Color Contact Image Sensor ■ Printer type: Laser Printer ■ Data compression system: Modified Huffman (MH), Modified READ (MR), Modified Modified READ (MMR) ■ Modem speed: ...
...and drum unit. - "CALLER ID LIST" - Automatic Fallback ■ Operating environment: 10 °C - 32.5 °C (50 °F - 90.5 °F), 20 % - 70 % RH (Relative Humidity) ■ Dimensions: Approx. i {MENU} 88 Specifications 14.2 Specifications ■ Applicable lines: Public Switched Telephone Network ... lines/inch)-in super fine resolution ■ Photo resolution: 64-level ■ Scanner type: Color Contact Image Sensor ■ Printer type: Laser Printer ■ Data compression system: Modified Huffman (MH), Modified READ (MR), Modified Modified READ (MMR) ■ Modem speed: ...
Fax
Page 90
...Installing Multi-Function Station 4.3 Starting Multi-Function Station Printing 4.4 Using the unit as a printer Scanning 4.5 Using the unit as a copy machine. Copy / Copying 3.1 Using the unit as a scannerRemote Control 4.6 Operating the unit from your computer. 4.7 Fax sending/receiving using Multi-Function Station 4.8 ...your future reference Date of purchase Serial number (found on the amount of the characters. Drum life The drum unit is often used for purchasing a Panasonic fax machine. Things you for printing small number sheets per print job. Preparation 2.1 Connections...
...Installing Multi-Function Station 4.3 Starting Multi-Function Station Printing 4.4 Using the unit as a printer Scanning 4.5 Using the unit as a copy machine. Copy / Copying 3.1 Using the unit as a scannerRemote Control 4.6 Operating the unit from your computer. 4.7 Fax sending/receiving using Multi-Function Station 4.8 ...your future reference Date of purchase Serial number (found on the amount of the characters. Drum life The drum unit is often used for purchasing a Panasonic fax machine. Things you for printing small number sheets per print job. Preparation 2.1 Connections...
Fax
Page 99
... 59 PCL font list: 88 PC print features: 58 Power failure: 76 Power save (Feature #403): 52 Printer test list: 88 Programming: 50 Pull scan: 31 Push scan: 29 Q Quick scan: 38 Quick setup (...Printer test: 88 Setup: 88 Telephone number: 88 Reset fax features (Feature #459): 56 Resolution: 32, 37 99 Display Contrast (Feature #145): 51 Error messages: 68 Distinctive Ring service (Feature #430): 49 DNS server #1 (Feature #504): 61 DNS server #2 (Feature #505): 61 Document size: 17 Drum life: 90 Drum unit... N Navigator directory Sending faxes: 39 Storing: 38 Network features: 63 O OCR software: 30 15.
... 59 PCL font list: 88 PC print features: 58 Power failure: 76 Power save (Feature #403): 52 Printer test list: 88 Programming: 50 Pull scan: 31 Push scan: 29 Q Quick scan: 38 Quick setup (...Printer test: 88 Setup: 88 Telephone number: 88 Reset fax features (Feature #459): 56 Resolution: 32, 37 99 Display Contrast (Feature #145): 51 Error messages: 68 Distinctive Ring service (Feature #430): 49 DNS server #1 (Feature #504): 61 DNS server #2 (Feature #505): 61 Document size: 17 Drum life: 90 Drum unit... N Navigator directory Sending faxes: 39 Storing: 38 Network features: 63 O OCR software: 30 15.
Fax - Spanish
Page 91
... Thank you for purchasing a Panasonic fax machine. 14. KX-FA87/KX-FA85). Table of buttons.1.4 Overview Installation1.5 Toner cartridge and drum unit 1.6 Document tray 1.7 Output tray1.8 Recording paper2. PC Operations/ Setup 4.1 Connecting to a computer 4.2 Installing Multi-Function Station 4.3 Starting Multi-Function Station Printing 4.4 Using the unit as a printer Scanning 4.5 Using the unit as a copy machine. Table...
... Thank you for purchasing a Panasonic fax machine. 14. KX-FA87/KX-FA85). Table of buttons.1.4 Overview Installation1.5 Toner cartridge and drum unit 1.6 Document tray 1.7 Output tray1.8 Recording paper2. PC Operations/ Setup 4.1 Connecting to a computer 4.2 Installing Multi-Function Station 4.3 Starting Multi-Function Station Printing 4.4 Using the unit as a printer Scanning 4.5 Using the unit as a copy machine. Table...


