
Telephone Equipment
Page 6
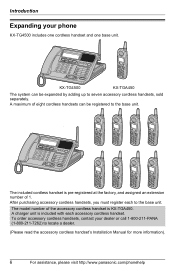
... each accessory cordless handset. To order accessory cordless handsets, contact your phone KX-TG4500 includes one cordless handset and one base unit. 1 4 7 2 5 8 3 6 9 0 ANSWER O N SSPP--PPHONEE KX-TG4500 KX-TGA450 The system can be expanded by adding up to seven accessory cordless handsets.... A charger unit is KX-TGA450. Introduction Expanding your dealer or call 1-800-211-PANA (1-800-211-7262) to locate a dealer. (Please read the accessory cordless handset's Installation Manual for more information). 6 For assistance, please visit http://www.panasonic.com/phonehelp
... each accessory cordless handset. To order accessory cordless handsets, contact your phone KX-TG4500 includes one cordless handset and one base unit. 1 4 7 2 5 8 3 6 9 0 ANSWER O N SSPP--PPHONEE KX-TG4500 KX-TGA450 The system can be expanded by adding up to seven accessory cordless handsets.... A charger unit is KX-TGA450. Introduction Expanding your dealer or call 1-800-211-PANA (1-800-211-7262) to locate a dealer. (Please read the accessory cordless handset's Installation Manual for more information). 6 For assistance, please visit http://www.panasonic.com/phonehelp
Telephone Equipment
Page 8
... using equipment that could be taken to external RF (radio frequency) energy. 8 For assistance, please visit http://www.panasonic.com/phonehelp Check with wet hands. These conditions can range from 0.04 to do not expose this unit from external ... a lightning storm. L Use caution when installing or modifying telephone lines. Ensure that smoke has stopped and contact the Panasonic Call Center at the network interface. They may cause burns or injury to persons, read and follow these instructions. The... fire or injury to the eyes or skin. Do not use with this manual.
... using equipment that could be taken to external RF (radio frequency) energy. 8 For assistance, please visit http://www.panasonic.com/phonehelp Check with wet hands. These conditions can range from 0.04 to do not expose this unit from external ... a lightning storm. L Use caution when installing or modifying telephone lines. Ensure that smoke has stopped and contact the Panasonic Call Center at the network interface. They may cause burns or injury to persons, read and follow these instructions. The... fire or injury to the eyes or skin. Do not use with this manual.
Telephone Equipment
Page 46
..., press and hold {CLEAR}. 6 Press Save . This feature can be used, for character entry. L Pressing {CLEAR} erases the digit to dial manually. L To erase more items, repeat from step 2. Using the cordless handset 1 During a conversation, press {f} or {g} to enter the Phonebook. 2.... 3 Edit the name, if necessary. L Pressing {CLEAR} erases the character to dial the number. 46 For assistance, please visit http://www.panasonic.com/phonehelp L Confirmation tone is heard. L To erase the entire Phonebook, refer to display the desired item. L Confirmation tone is heard. 7...
..., press and hold {CLEAR}. 6 Press Save . This feature can be used, for character entry. L Pressing {CLEAR} erases the digit to dial manually. L To erase more items, repeat from step 2. Using the cordless handset 1 During a conversation, press {f} or {g} to enter the Phonebook. 2.... 3 Edit the name, if necessary. L Pressing {CLEAR} erases the character to dial the number. 46 For assistance, please visit http://www.panasonic.com/phonehelp L Confirmation tone is heard. L To erase the entire Phonebook, refer to display the desired item. L Confirmation tone is heard. 7...
Telephone Equipment
Page 83
You can also select a line manually regardless of the line selection mode by pressing {}, then press {ENTER}. 4 Press {} to "Line selection" by pressing a line key. Consult your telephone exchange or host ...", "110ms", "250ms", "300ms", "400ms", "600ms", or "700ms". "Line1": LINE 1 is selected, if available. "Line4": LINE 4 is selected, if available. For assistance, please visit http://www.panasonic.com/phonehelp 83 The default setting for the correct setting. L Confirmation tone is "700ms". 1 Press {MENU}. 2 Scroll to "Initial setting" by pressing {}, then press {ENTER...
You can also select a line manually regardless of the line selection mode by pressing {}, then press {ENTER}. 4 Press {} to "Line selection" by pressing a line key. Consult your telephone exchange or host ...", "110ms", "250ms", "300ms", "400ms", "600ms", or "700ms". "Line1": LINE 1 is selected, if available. "Line4": LINE 4 is selected, if available. For assistance, please visit http://www.panasonic.com/phonehelp 83 The default setting for the correct setting. L Confirmation tone is "700ms". 1 Press {MENU}. 2 Scroll to "Initial setting" by pressing {}, then press {ENTER...
Telephone Equipment
Page 89
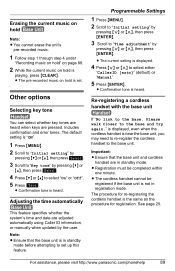
...Unit This feature specifies whether the system's time and date are pressed. L Confirmation tone is heard. For assistance, please visit http://www.panasonic.com/phonehelp 89 See page 25. L Confirmation tone is heard. Note: L Ensure that the base unit and cordless handset are in standby...current setting is near the base unit, you may need to re-register the cordless handset to select either "CallerID [auto]" (default) or "Manual". 5 Press {ENTER}. The procedure for re-registering the cordless handset is set up this feature. L Registration must be registered if the base...
...Unit This feature specifies whether the system's time and date are pressed. L Confirmation tone is heard. For assistance, please visit http://www.panasonic.com/phonehelp 89 See page 25. L Confirmation tone is heard. Note: L Ensure that the base unit and cordless handset are in standby...current setting is near the base unit, you may need to re-register the cordless handset to select either "CallerID [auto]" (default) or "Manual". 5 Press {ENTER}. The procedure for re-registering the cordless handset is set up this feature. L Registration must be registered if the base...


