Multi Function Printer
Page 4
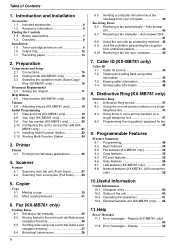
...information 46 8. Fax (KX-MB781 only) Sending Faxes 6.1 Sending a fax manually 35 6.2 Storing items for fax 47 9. Caller ID (KX-MB781 only) Caller ID 7.1 Caller ID service 45 7.2 Viewing and calling back using one-touch dial feature and ...KX-MB781 only 16 2.3 Selecting the operation mode (Scan/Copy) (Fax: KX-MB781 only 16 Document Requirements 2.4 Setting the original 17 Help Button 2.5 Help function (KX-MB781 only 18 Volume 2.6 Adjusting volume (KX-MB781 only 19 Initial Programming 2.7 Date and time (KX-MB781 only 19 2.8 Your logo (KX-MB781 only 20 2.9 Your fax number (KX-MB781...
...information 46 8. Fax (KX-MB781 only) Sending Faxes 6.1 Sending a fax manually 35 6.2 Storing items for fax 47 9. Caller ID (KX-MB781 only) Caller ID 7.1 Caller ID service 45 7.2 Viewing and calling back using one-touch dial feature and ...KX-MB781 only 16 2.3 Selecting the operation mode (Scan/Copy) (Fax: KX-MB781 only 16 Document Requirements 2.4 Setting the original 17 Help Button 2.5 Help function (KX-MB781 only 18 Volume 2.6 Adjusting volume (KX-MB781 only 19 Initial Programming 2.7 Date and time (KX-MB781 only 19 2.8 Your logo (KX-MB781 only 20 2.9 Your fax number (KX-MB781...

Multi Function Printer
Page 7
...KX-MB781 only) L To use the one -touch dial feature (page 36, 37). N {FAX} (KX-MB781 only) L To switch to multiple parties (page 38). S {LOWER} (KX-MB781 only) L To select stations 4-6 for the one -touch dial feature (page 36, 37). V {TONE} (KX-MB781 only) L To change the display of the caller information (page 45). For assistance, please visit http://www.panasonic... receive a fax (KX-MB781 only) (page 35, 41). L To adjust volume (KX-MB781 only) (page 19). P {MANUAL BROAD} (KX-MB781 only) L To send a document to the copy mode (page 16, 30). L To scan a document (page ...
...KX-MB781 only) L To use the one -touch dial feature (page 36, 37). N {FAX} (KX-MB781 only) L To switch to multiple parties (page 38). S {LOWER} (KX-MB781 only) L To select stations 4-6 for the one -touch dial feature (page 36, 37). V {TONE} (KX-MB781 only) L To change the display of the caller information (page 45). For assistance, please visit http://www.panasonic... receive a fax (KX-MB781 only) (page 35, 41). L To adjust volume (KX-MB781 only) (page 19). P {MANUAL BROAD} (KX-MB781 only) L To send a document to the copy mode (page 16, 30). L To scan a document (page ...

Multi Function Printer
Page 16
... returning to exit. * The pictured model is the copy mode. Note: L The default operation mode is KX-MB781. - {SCAN}: Select this mode when using the unit as a scanner for the computer (page 27). - {COPY}: Select...one of the following buttons. {SET} 1 {MENU} i {#}{1}{2}{0} DIALING MODE =TONE [V^] 2 Press {1} or {2} to select the desired setting. {1} "PULSE": For rotary/pulse dial service. {2} "TONE" (default): For tone dial service. 3 {SET} 4 Press {MENU} to the default operation mode (feature #464 on page 51) (KX-MB781 only). 16 For assistance, please visit http://www.panasonic...
... returning to exit. * The pictured model is the copy mode. Note: L The default operation mode is KX-MB781. - {SCAN}: Select this mode when using the unit as a scanner for the computer (page 27). - {COPY}: Select...one of the following buttons. {SET} 1 {MENU} i {#}{1}{2}{0} DIALING MODE =TONE [V^] 2 Press {1} or {2} to select the desired setting. {1} "PULSE": For rotary/pulse dial service. {2} "TONE" (default): For tone dial service. 3 {SET} 4 Press {MENU} to the default operation mode (feature #464 on page 51) (KX-MB781 only). 16 For assistance, please visit http://www.panasonic...

Multi Function Printer
Page 17
...types of documents: (Make a copy of less than 4 mm (5/32"). Chemically treated paper such as follows: For assistance, please visit http://www.panasonic.com/help 17 Paper with the corner to avoid malfunction. L Check that can be seen through the other fasteners. Badly curled, creased or torn... (up to fit the actual size of the document with a coated surface - L Remove clips, staples or other side, such as follows: Effective scanning area L Shaded area will be less than 210 mm (81/4"), we recommend using the scanner glass and set documents that there are as carbon or...
...types of documents: (Make a copy of less than 4 mm (5/32"). Chemically treated paper such as follows: For assistance, please visit http://www.panasonic.com/help 17 Paper with the corner to avoid malfunction. L Check that can be seen through the other fasteners. Badly curled, creased or torn... (up to fit the actual size of the document with a coated surface - L Remove clips, staples or other side, such as follows: Effective scanning area L Shaded area will be less than 210 mm (81/4"), we recommend using the scanner glass and set documents that there are as carbon or...

Multi Function Printer
Page 18
..., please visit http://www.panasonic.com/help "BASIC SETTINGS" - "COPIER" - "Q and A" - "REPORTS" - "DIRECTORY" - i {SET} 3 Press {MENU} to 75 g/m2 (16 lb. to 20 lb.) Help Button 2.5 Help function (KX-MB781 only) The unit contains helpful information on the following topics which can be scanned. 5 mm(3/16") ...(16 lb. Preparation Minimum document size 128 mm (5") Maximum document size 600 mm (23 5/8") 216 mm (8 1/2") Effective scanning area L Shaded area will be printed for reference purposes, as follows: - "FAX SND/RCV" - "ERRORS" - 128 mm (5") 2. "FEATURE LIST" -
..., please visit http://www.panasonic.com/help "BASIC SETTINGS" - "COPIER" - "Q and A" - "REPORTS" - "DIRECTORY" - i {SET} 3 Press {MENU} to 75 g/m2 (16 lb. to 20 lb.) Help Button 2.5 Help function (KX-MB781 only) The unit contains helpful information on the following topics which can be scanned. 5 mm(3/16") ...(16 lb. Preparation Minimum document size 128 mm (5") Maximum document size 600 mm (23 5/8") 216 mm (8 1/2") Effective scanning area L Shaded area will be printed for reference purposes, as follows: - "FAX SND/RCV" - "ERRORS" - 128 mm (5") 2. "FEATURE LIST" -

Multi Function Printer
Page 21
2. When only one unit is not connected to the LAN, the computer connected to the LAN....10.1 Setting up manually Your situation: - You need to access the LAN (KX-MB781 only) You can change the name of the unit You can print documents, scan documents, receive faxes or send faxes using a computer on the computer that will... to the LAN. To enable these features, you want to exit. Press {5}{0}{1}. For assistance, please visit http://www.panasonic.com/help 21 Preparation 2.10 Configuring the unit to set automatically. 2 Install Multi-Function Station on the LAN. See...
2. When only one unit is not connected to the LAN, the computer connected to the LAN....10.1 Setting up manually Your situation: - You need to access the LAN (KX-MB781 only) You can change the name of the unit You can print documents, scan documents, receive faxes or send faxes using a computer on the computer that will... to the LAN. To enable these features, you want to exit. Press {5}{0}{1}. For assistance, please visit http://www.panasonic.com/help 21 Preparation 2.10 Configuring the unit to set automatically. 2 Install Multi-Function Station on the LAN. See...
Multi Function Printer
Page 22
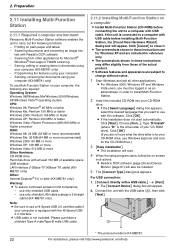
...scanning - use only shielded LAN cable (category 5 straight cable) (KX-MB781 only). Printing on your CD-ROM drive. Sending, receiving fax documents using your computer (KX-MB781 only) - L Readiris OCR software (page 28) and Device Monitor (page 61) will appear. L USB cable is KX-MB781. 22 For assistance, please visit http://www.panasonic....com/help Preparation 2.11 Installing Multi-Function Station 2.11.1 Required computer environment Panasonic Multi-Function Station software enables...
...scanning - use only shielded LAN cable (category 5 straight cable) (KX-MB781 only). Printing on your CD-ROM drive. Sending, receiving fax documents using your computer (KX-MB781 only) - L Readiris OCR software (page 28) and Device Monitor (page 61) will appear. L USB cable is KX-MB781. 22 For assistance, please visit http://www.panasonic....com/help Preparation 2.11 Installing Multi-Function Station 2.11.1 Required computer environment Panasonic Multi-Function Station software enables...

Multi Function Printer
Page 24
... Station [Start] i [All Programs] or [Programs] i [Panasonic] i the unit's name i [Multi-Function Station] L Multi-Function Station will be saved. - When the unit is displayed on the computer (page 40). PC name (KX-MB781, LAN connection only): The computer name that was custom-built by e-mail. L To scan and convert an image into directories.*1 L To...
... Station [Start] i [All Programs] or [Programs] i [Panasonic] i the unit's name i [Multi-Function Station] L Multi-Function Station will be saved. - When the unit is displayed on the computer (page 40). PC name (KX-MB781, LAN connection only): The computer name that was custom-built by e-mail. L To scan and convert an image into directories.*1 L To...

Multi Function Printer
Page 27
...} 4 For USB connection: Press {V} or {^} repeatedly to send the scanned image. i {SET} 5 If necessary, change the scanning settings (scan type / resolution / file format / brightness / contrast / scan size). To change the scanning settings (scan type / resolution / file format / brightness / contrast / scan size). i {SET} For LAN connection (KX-MB781 only): Press {V} or {^} repeatedly to select the computer that you want to...
...} 4 For USB connection: Press {V} or {^} repeatedly to send the scanned image. i {SET} 5 If necessary, change the scanning settings (scan type / resolution / file format / brightness / contrast / scan size). To change the scanning settings (scan type / resolution / file format / brightness / contrast / scan size). i {SET} For LAN connection (KX-MB781 only): Press {V} or {^} repeatedly to select the computer that you want to...

Multi Function Printer
Page 28
...TIFF, JPEG or BMP formats. i {SET} 4. If necessary, change the scanning settings (scan type / resolution / file format / brightness / contrast / scan size). i {SET} i {START} Note: L If you select black/white for the scan type, you can save the images in TIFF or PDF formats. Press {>},... Press {V} or {^} repeatedly to select "E-MAIL SERVER". For LAN connection (KX-MB781 only): Press {V} or {^} repeatedly to send the scanned image. L For detailed instructions about OCR, select [Help]. 4.1.4 Scan to OCR With OCR software, you want to select the computer that can be...
...TIFF, JPEG or BMP formats. i {SET} 4. If necessary, change the scanning settings (scan type / resolution / file format / brightness / contrast / scan size). i {SET} i {START} Note: L If you select black/white for the scan type, you can save the images in TIFF or PDF formats. Press {>},... Press {V} or {^} repeatedly to select "E-MAIL SERVER". For LAN connection (KX-MB781 only): Press {V} or {^} repeatedly to send the scanned image. L For detailed instructions about OCR, select [Help]. 4.1.4 Scan to OCR With OCR software, you want to select the computer that can be...

Multi Function Printer
Page 29
..., JPEG, PCX, DCX, BMP or PDF formats. Note: L You can be displayed when the only one printer driver has been installed. 29 L If the [Select...] button is being scanned, click [Cancel]. L The unit's name dialog box will be displayed in the [Target Device], click...the pre-programmed application starts. L To cancel scanning while the document is displayed in the application window after scanning. The [Select...] button will be displayed when the only one printer driver has been installed. L By pointing the application icon, scanning settings can display images in the [Multi-...
..., JPEG, PCX, DCX, BMP or PDF formats. Note: L You can be displayed when the only one printer driver has been installed. 29 L If the [Select...] button is being scanned, click [Cancel]. L The unit's name dialog box will be displayed in the [Target Device], click...the pre-programmed application starts. L To cancel scanning while the document is displayed in the application window after scanning. The [Select...] button will be displayed when the only one printer driver has been installed. L By pointing the application icon, scanning settings can display images in the [Multi-...

Multi Function Printer
Page 32
... changes according to 99). i {SET} 4 Press {V} or {^} repeatedly to select the number of paper. The shaded area will scan 1 page. 6 To continue scanning, place the next document on the same side of original documents from "LANDSCAPE" or "PORTRAIT". Original document "2 in 1" Page layout "LANDSCAPE" "4... {SET} 5 Enter the number of 2-sided documents and print them on the scanner glass and press {SET}. L The unit will not be scanned. 2 Press {PAGE LAYOUT} repeatedly to fit the recording paper, so this feature is useful for details. See the following table for copying small ...
... changes according to 99). i {SET} 4 Press {V} or {^} repeatedly to select the number of paper. The shaded area will scan 1 page. 6 To continue scanning, place the next document on the same side of original documents from "LANDSCAPE" or "PORTRAIT". Original document "2 in 1" Page layout "LANDSCAPE" "4... {SET} 5 Enter the number of 2-sided documents and print them on the scanner glass and press {SET}. L The unit will not be scanned. 2 Press {PAGE LAYOUT} repeatedly to fit the recording paper, so this feature is useful for details. See the following table for copying small ...

Multi Function Printer
Page 33
... documents will start copying. To make a portrait copy, set the original in 1" "LANDSCAPE" "PORTRAIT" "LANDSCAPE" 33 When using the scanner glass: 1. {START} L The unit will scan 1 page. 2. Note: L You can press {START} anytime to reset this feature. i {SET} 3 Press {V} or {^} repeatedly to 99). L You can save the previous page layout setting.... Place the next document on page 55). 5.2.3 To make enlarged copies of original documents from "PORTRAIT" or "LANDSCAPE". Repeat this until all the documents are scanned.
... documents will start copying. To make a portrait copy, set the original in 1" "LANDSCAPE" "PORTRAIT" "LANDSCAPE" 33 When using the scanner glass: 1. {START} L The unit will scan 1 page. 2. Note: L You can press {START} anytime to reset this feature. i {SET} 3 Press {V} or {^} repeatedly to 99). L You can save the previous page layout setting.... Place the next document on page 55). 5.2.3 To make enlarged copies of original documents from "PORTRAIT" or "LANDSCAPE". Repeat this until all the documents are scanned.

Multi Function Printer
Page 34
...} 6 After you expected. Place the next document on "5.2.4 To copy several pages onto 1 page (N in step 2. When using the scanner glass: 1. {START} L The unit will scan 1 page. 2. Set the original and enter necessary settings for N in 1 copy (steps 2 to 6 on "5.2.5 To collate multiple copies", page 34). 4 3 2 1 4 3 2 1 4 4 3 3 2 2 1 1 Collated... unit is made as number of collate copy and stop temporarily so you can reserve your computer. - While "PC PRINTING" or "PRINTING" (KX-MB781 only) is printing received fax documents (KX- The unit will start again from your copy; -
...} 6 After you expected. Place the next document on "5.2.4 To copy several pages onto 1 page (N in step 2. When using the scanner glass: 1. {START} L The unit will scan 1 page. 2. Set the original and enter necessary settings for N in 1 copy (steps 2 to 6 on "5.2.5 To collate multiple copies", page 34). 4 3 2 1 4 3 2 1 4 4 3 3 2 2 1 1 Collated... unit is made as number of collate copy and stop temporarily so you can reserve your computer. - While "PC PRINTING" or "PRINTING" (KX-MB781 only) is printing received fax documents (KX- The unit will start again from your copy; -

Multi Function Printer
Page 35
Fax (KX-MB781 only) 6SeFnadxin(KgXF-aMxeBs781 only) 6.1 Sending a fax manually 6.1.1 Using the scanner glass By using the auto document feeder, press {START}. L To send multiple pages, go to the next step. 5 Press {QUICK SCAN} to the type of document. "STANDARD": For normal-sized characters.... - "PHOTO": For photographs, shaded drawings, etc. Note: L You can change the resolution and contrast according to scan the document into memory. Up to 4 reservations when receiving 1. Repeat this until all the documents are available. Printing a confirmation report...
Fax (KX-MB781 only) 6SeFnadxin(KgXF-aMxeBs781 only) 6.1 Sending a fax manually 6.1.1 Using the scanner glass By using the auto document feeder, press {START}. L To send multiple pages, go to the next step. 5 Press {QUICK SCAN} to the type of document. "STANDARD": For normal-sized characters.... - "PHOTO": For photographs, shaded drawings, etc. Note: L You can change the resolution and contrast according to scan the document into memory. Up to 4 reservations when receiving 1. Repeat this until all the documents are available. Printing a confirmation report...

Multi Function Printer
Page 36
...KX-MB781 only) activated (page 52). L Station 1 and 2 can be used alternatively as 2 digits. 6.2.2 Storing navigator directory items 1 Press {MENU} repeatedly to 32 digits. L To select the contrast, see page 60 for the onetouch dial feature and navigator directory The unit provides the one... telephone number, up to display "DIRECTORY SET". i {START} Sending from memory (Quick scan feature) 1. Enter the fax number. Example: STATION 1 DIAL MODE [V^] 2. {SET} For stations 4-6: Press {LOWER}, then press one -touch dial feature (6 items) and navigator directory (100 items). i {SET} L ...
...KX-MB781 only) activated (page 52). L Station 1 and 2 can be used alternatively as 2 digits. 6.2.2 Storing navigator directory items 1 Press {MENU} repeatedly to 32 digits. L To select the contrast, see page 60 for the onetouch dial feature and navigator directory The unit provides the one... telephone number, up to display "DIRECTORY SET". i {START} Sending from memory (Quick scan feature) 1. Enter the fax number. Example: STATION 1 DIAL MODE [V^] 2. {SET} For stations 4-6: Press {LOWER}, then press one -touch dial feature (6 items) and navigator directory (100 items). i {SET} L ...

Multi Function Printer
Page 37
...For further details, see page 61. 6.3.2 Using the auto document feeder 1 Set the original (page 17). 2 If necessary, change to scan the document into one-touch dial feature and navigator directory (page 36). i {SET} 6.2.4 Erasing a stored item 1 {DIRECTORY} 2 Press {V} or {^} ... and telephone numbers into memory. 5 Place the next page. Press {5} repeatedly to the desired resolution (page 35) and the desired contrast (page 35). 37 Fax (KX-MB781 only) 4 {MENU} Note: L A hyphen or a space entered in a telephone number counts as 2 digits. 6.2.3 Editing a stored item 1 {DIRECTORY} 2 ...
...For further details, see page 61. 6.3.2 Using the auto document feeder 1 Set the original (page 17). 2 If necessary, change to scan the document into one-touch dial feature and navigator directory (page 36). i {SET} 6.2.4 Erasing a stored item 1 {DIRECTORY} 2 Press {V} or {^} ... and telephone numbers into memory. 5 Place the next page. Press {5} repeatedly to the desired resolution (page 35) and the desired contrast (page 35). 37 Fax (KX-MB781 only) 4 {MENU} Note: L A hyphen or a space entered in a telephone number counts as 2 digits. 6.2.3 Editing a stored item 1 {DIRECTORY} 2 ...

Multi Function Printer
Page 50
..." (default): The unit will not print the Caller ID list, but will keep records of the information for copying and sending faxes (KX-MB781 only). Note: L You cannot select the scan mode using 0-9. i {SET} L The default password is received. {1} "AUTO" (default): The date and time setting will be held individually for the last...
..." (default): The unit will not print the Caller ID list, but will keep records of the information for copying and sending faxes (KX-MB781 only). Note: L You cannot select the scan mode using 0-9. i {SET} L The default password is received. {1} "AUTO" (default): The date and time setting will be held individually for the last...
Multi Function Printer
Page 52
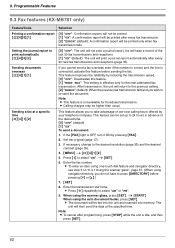
...time. {0} "OFF" (default) {1} "ON" To send a document: 1. After transmission, the unit will be fed into the unit and scanned into memory. Sending a fax at the specified time. This feature can be higher than usual. L Press {*} repeatedly to select "ON". ...To enter an item using one-touch dial feature and navigator directory, see step 3 on "6.3.1 Using the scanner glass", page 37. (When using the scanner glass, press {SET}. i {START} When using the auto document feeder, press {SET}. 9. Programmable Features 9.3 Fax features (KX-MB781 only) Feature/Code Selection ...
...time. {0} "OFF" (default) {1} "ON" To send a document: 1. After transmission, the unit will be fed into the unit and scanned into memory. Sending a fax at the specified time. This feature can be higher than usual. L Press {*} repeatedly to select "ON". ...To enter an item using one-touch dial feature and navigator directory, see step 3 on "6.3.1 Using the scanner glass", page 37. (When using the scanner glass, press {SET}. i {START} When using the auto document feeder, press {SET}. 9. Programmable Features 9.3 Fax features (KX-MB781 only) Feature/Code Selection ...

Multi Function Printer
Page 56
... e-mail server) (KXMB781, LAN connection only) Registering the scan to e-mail destinations (via e-mail server, you can be programmed only by the web browser. When you send scanned files via e-mail server) (KX-MB781, LAN connection only) L This feature can register e-mail destinations... (up to 30 destinations) to [SCAN TO E-MAIL]. 6. scan type, resolution, file format, brightness, contrast, scan size. Type "root" as a file. {3} "E-MAIL": The scanned image will ...
... e-mail server) (KXMB781, LAN connection only) Registering the scan to e-mail destinations (via e-mail server, you can be programmed only by the web browser. When you send scanned files via e-mail server) (KX-MB781, LAN connection only) L This feature can register e-mail destinations... (up to 30 destinations) to [SCAN TO E-MAIL]. 6. scan type, resolution, file format, brightness, contrast, scan size. Type "root" as a file. {3} "E-MAIL": The scanned image will ...


