Operating Instructions
Page 6
... 18 Detaching and attaching the lens hood ..... 18 The remote control 19 Insert the battery 19 Remote control setup 19 Turn on/off the camera 20 Tally lamp 20 Viewfinder 21 Using the viewfinder 21 Using the LCD 22 Emphasizing outlines 22 Adjusting the screen display... 25 Shooting in auto mode 25 Checking photos taken (REC CHECK 26 P2 card access lamps 26 Protecting against a possible erasure 26 Formatting P2 cards 27 Recording times 27 Remove the P2 card 28 Basic shooting operations (Cassette tape 29 Preparing to shoot using a tape 29 Shooting in auto mode 29 ...
... 18 Detaching and attaching the lens hood ..... 18 The remote control 19 Insert the battery 19 Remote control setup 19 Turn on/off the camera 20 Tally lamp 20 Viewfinder 21 Using the viewfinder 21 Using the LCD 22 Emphasizing outlines 22 Adjusting the screen display... 25 Shooting in auto mode 25 Checking photos taken (REC CHECK 26 P2 card access lamps 26 Protecting against a possible erasure 26 Formatting P2 cards 27 Recording times 27 Remove the P2 card 28 Basic shooting operations (Cassette tape 29 Preparing to shoot using a tape 29 Shooting in auto mode 29 ...
Operating Instructions
Page 7
...in battery 59 Setting the time code 59 Specifying the time code (TC PRESET).......... 59 Setting user information 60 Playback Basic playback operations (P2 card 62 Basic playback operations (Tape 63 Thumbnail screen 64 Basic thumbnail screen operations 64 Adding shot marks to clips 66 Clearing the ... (P2 card/Tape 87 Analog output (P2 card/Tape 88 Analog input (Tape 89 Displays Screen displays 90 Regular displays 90 Warnings 93 Setting the DISPLAY items 95 Menus Using the setup menus 96 Using the menus 96 Initializing the menu settings 97 Setup menu structure 98 Camera mode...
...in battery 59 Setting the time code 59 Specifying the time code (TC PRESET).......... 59 Setting user information 60 Playback Basic playback operations (P2 card 62 Basic playback operations (Tape 63 Thumbnail screen 64 Basic thumbnail screen operations 64 Adding shot marks to clips 66 Clearing the ... (P2 card/Tape 87 Analog output (P2 card/Tape 88 Analog input (Tape 89 Displays Screen displays 90 Regular displays 90 Warnings 93 Setting the DISPLAY items 95 Menus Using the setup menus 96 Using the menus 96 Initializing the menu settings 97 Setup menu structure 98 Camera mode...
Operating Instructions
Page 8
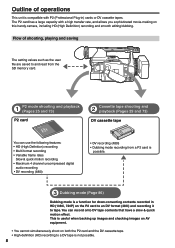
...Dubbing mode is a function for down-converting contents recorded in ) cards or DV cassette tapes. The P2 card has a large capacity with P2 (Professional Plug-in HD (1080i, 720P) on this handy camera, including HD (High Definition) recording and smooth editing/dubbing. This is useful when backing up... images and checking images on AV equipment. • You cannot simultaneously shoot on both the P2 card and the DV cassette tape. •...
...Dubbing mode is a function for down-converting contents recorded in ) cards or DV cassette tapes. The P2 card has a large capacity with P2 (Professional Plug-in HD (1080i, 720P) on this handy camera, including HD (High Definition) recording and smooth editing/dubbing. This is useful when backing up... images and checking images on AV equipment. • You cannot simultaneously shoot on both the P2 card and the DV cassette tape. •...

Operating Instructions
Page 10
... beam to light from a laser beam. For details, refer to check and set and check the calendar and time zone. (Page 24) Panasonic makes no guarantees for your recordings. • Please understand that the sound and images have recorded for private use any purpose other than 1/4-20UNC.... Be sure to the respective pages. • P2 card (Page 27) • Digital video cassette tape (Page 30) • SD memory card (Page 32) Mounting the camera-recorder on the lens. Remember that restrictions apply to the shooting of the terminal, and...
... beam to light from a laser beam. For details, refer to check and set and check the calendar and time zone. (Page 24) Panasonic makes no guarantees for your recordings. • Please understand that the sound and images have recorded for private use any purpose other than 1/4-20UNC.... Be sure to the respective pages. • P2 card (Page 27) • Digital video cassette tape (Page 30) • SD memory card (Page 32) Mounting the camera-recorder on the lens. Remember that restrictions apply to the shooting of the terminal, and...
Operating Instructions
Page 11
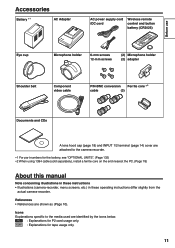
... cover are attached to the media used are shown as (Page 10). References • References are identified by the icons below. P2 : Explanations for the battery, see "OPTIONAL UNITS". (Page 132) 2 When using 1394 cable (sold separately), install a ferrite core on the... the PC. (Page 78) About this manual Note concerning illustrations in these instructions • Illustrations (camera-recorder, menu screens, etc.) in these operating instructions differ slightly from the actual camera-recorder. TAPE : Explanations for tape usage only. 11 Icons Explanations specific to the...
... cover are attached to the media used are shown as (Page 10). References • References are identified by the icons below. P2 : Explanations for the battery, see "OPTIONAL UNITS". (Page 132) 2 When using 1394 cable (sold separately), install a ferrite core on the... the PC. (Page 78) About this manual Note concerning illustrations in these instructions • Illustrations (camera-recorder, menu screens, etc.) in these operating instructions differ slightly from the actual camera-recorder. TAPE : Explanations for tape usage only. 11 Icons Explanations specific to the...

Operating Instructions
Page 16
... lamp and CHARGE lamp on the AC adapter goes out. 4 Slide the battery and remove it . The camera-recorder itself also becomes hot during use. • The recordable time reduces if you may take longer at... Continuous recording time Approx. 330 min. Shortcircuiting may occur across the terminals, causing the battery to the camera-recorder from it with the battery or AC adapter. Contact your dealer. • The battery takes longer...keep radios at , and slide it in the DVCPRO HD mode on a P2 card while using the battery, fully charge it . • The AC adapter may be something wrong with...
... lamp and CHARGE lamp on the AC adapter goes out. 4 Slide the battery and remove it . The camera-recorder itself also becomes hot during use. • The recordable time reduces if you may take longer at... Continuous recording time Approx. 330 min. Shortcircuiting may occur across the terminals, causing the battery to the camera-recorder from it with the battery or AC adapter. Contact your dealer. • The battery takes longer...keep radios at , and slide it in the DVCPRO HD mode on a P2 card while using the battery, fully charge it . • The AC adapter may be something wrong with...
Operating Instructions
Page 20
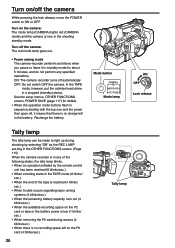
...; When the remaining battery capacity runs out (4 blinks/sec.) • When the available recording space on the camera: The mode lamp (CAMERA) lights red (CAMERA mode) and the camera is now in the battery. Turn on the P2 card or tape or the battery power is low (1 blinks/ sec.) • When removing the... (4 blinks/sec.) • When there is no charge left on the P2 card (4 blinks/sec.) 20 Tally lamp ON: The camera recorder turns off the camera: The red mode lamp goes out. • Power saving mode The camera-recorder performs as the REC LAMP set-ting in the OTHER FUNCTIONS screen. ...
...; When the remaining battery capacity runs out (4 blinks/sec.) • When the available recording space on the camera: The mode lamp (CAMERA) lights red (CAMERA mode) and the camera is now in the battery. Turn on the P2 card or tape or the battery power is low (1 blinks/ sec.) • When removing the... (4 blinks/sec.) • When there is no charge left on the P2 card (4 blinks/sec.) 20 Tally lamp ON: The camera recorder turns off the camera: The red mode lamp goes out. • Power saving mode The camera-recorder performs as the REC LAMP set-ting in the OTHER FUNCTIONS screen. ...

Operating Instructions
Page 25
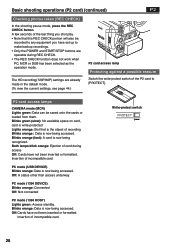
...(Page 20) 3 Lift up the viewfinder and open the card slot cover. 4 Insert the P2 card securely in the card slot. • There are adjusted automatically. 3 Press the START/STOP button... (Red) on the POWER switch to start shooting. • Press again to return to the camera to the shooting standby mode. • Use the handle START/STOP button to operate the MEDIA switch, the ...then switch it easier to shoot from low angles. 2 LCD side AUTO MANUAL Handle START/STOP button P2 TAPE Do not operate the MEDIA switch when the power is lighted red. If not, press the mode...
...(Page 20) 3 Lift up the viewfinder and open the card slot cover. 4 Insert the P2 card securely in the card slot. • There are adjusted automatically. 3 Press the START/STOP button... (Red) on the POWER switch to start shooting. • Press again to return to the camera to the shooting standby mode. • Use the handle START/STOP button to operate the MEDIA switch, the ...then switch it easier to shoot from low angles. 2 LCD side AUTO MANUAL Handle START/STOP button P2 TAPE Do not operate the MEDIA switch when the power is lighted red. If not, press the mode...
Operating Instructions
Page 26
... Data is now being accessed. The HD recording(720P/60P) settings are operable during access Off: Cards have set up to [PROTECT]. P2 card access lamps CAMERA mode (MCR) Lights green: Data can be recorded to any equipment you shot play. • Note that is the object of recording... orange (fast): A card is now being recognized. Off: A status other than access underway. Insertion of incompatible card. A few seconds of the P2 card to make backup recordings. • Only the POWER and START/STOP buttons are already made in the default mode. (To view the current settings...
... Data is now being accessed. The HD recording(720P/60P) settings are operable during access Off: Cards have set up to [PROTECT]. P2 card access lamps CAMERA mode (MCR) Lights green: Data can be recorded to any equipment you shot play. • Note that is the object of recording... orange (fast): A card is now being recognized. Off: A status other than access underway. Insertion of incompatible card. A few seconds of the P2 card to make backup recordings. • Only the POWER and START/STOP buttons are already made in the default mode. (To view the current settings...
Operating Instructions
Page 27
...into which you press the MENU button, the menu display disappears. approx. 8 min. approx. 10 min. https://eww.pavc.panasonic.co.jp/pro-av/ 27 Formatting P2 cards 1 Press the mode button and set it to be formatted. Select the number of at the following table, recording ...125) • For the latest information not available in the Operating Instructions, visit the P2 Support Desk at least 8 GB in the camera-recorder may need to cancel the formatting. • When you inserted the P2 card to MCR mode (the MCR/VCR lamp lights). • Thumbnails are displayed individually...
...into which you press the MENU button, the menu display disappears. approx. 8 min. approx. 10 min. https://eww.pavc.panasonic.co.jp/pro-av/ 27 Formatting P2 cards 1 Press the mode button and set it to be formatted. Select the number of at the following table, recording ...125) • For the latest information not available in the Operating Instructions, visit the P2 Support Desk at least 8 GB in the camera-recorder may need to cancel the formatting. • When you inserted the P2 card to MCR mode (the MCR/VCR lamp lights). • Thumbnails are displayed individually...
Operating Instructions
Page 29
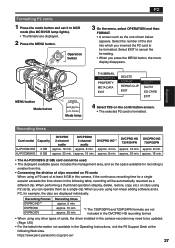
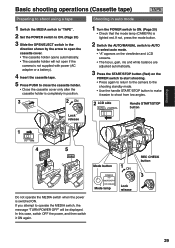
... switch in position. 3 2 ON Lock release 1 Turn the POWER switch to shoot from low angles. 2 LCD side AUTO MANUAL Handle START/STOP button 1 P2 TAPE 4 5 PUSH PUSH Do not operate the MEDIA switch when the power is switched ON. In this case, switch OFF the power, and then switch... shown by the arrow to open the cassette cover. • The cassette holder opens automatically. • The cassette holder will be displayed. Mode button CAMERA MCR VCR PC DUB Mode lamp 1 ON Lock release REC CHECK button 3 29 If not, press the mode button. 2 Switch the AUTO/MANUAL switch...
... switch in position. 3 2 ON Lock release 1 Turn the POWER switch to shoot from low angles. 2 LCD side AUTO MANUAL Handle START/STOP button 1 P2 TAPE 4 5 PUSH PUSH Do not operate the MEDIA switch when the power is switched ON. In this case, switch OFF the power, and then switch... shown by the arrow to open the cassette cover. • The cassette holder opens automatically. • The cassette holder will be displayed. Mode button CAMERA MCR VCR PC DUB Mode lamp 1 ON Lock release REC CHECK button 3 29 If not, press the mode button. 2 Switch the AUTO/MANUAL switch...

Operating Instructions
Page 30
...REC CHECK) In the shooting pause mode, press the REC CHECK button. 1 A few seconds of the last thing you shot play, and then the camera returns to the shooting pause mode. • The REC CHECK function cannot be used unless the recording is at least one second long. • When...cassette cover. • The cassette holder opens automatically. • The cassette holder will not open if the camera is not supplied with power (AC adapter or battery). • A tape cannot be ejected in P2 mode or during recording in TAPE mode. 2 Remove the cassette. 3 Press PUSH to close the cassette ...
...REC CHECK) In the shooting pause mode, press the REC CHECK button. 1 A few seconds of the last thing you shot play, and then the camera returns to the shooting pause mode. • The REC CHECK function cannot be used unless the recording is at least one second long. • When...cassette cover. • The cassette holder opens automatically. • The cassette holder will not open if the camera is not supplied with power (AC adapter or battery). • A tape cannot be ejected in P2 mode or during recording in TAPE mode. 2 Remove the cassette. 3 Press PUSH to close the cassette ...

Operating Instructions
Page 31
...if you shoot in position. Tape loading and unloading • Tapes cannot be performed in SP mode) Do not use tapes with this camera-recorder. Block noise and feature limitations occur in the following mini DV cassette tapes with this mark . Preventing accidental erasure To prevent erasing ...the recordings on a tape by accident, set to P2. • Do not try to insert or eject the tape by just holding the cassette cover. • Insert and remove cassette tapes after...
...if you shoot in position. Tape loading and unloading • Tapes cannot be performed in SP mode) Do not use tapes with this camera-recorder. Block noise and feature limitations occur in the following mini DV cassette tapes with this mark . Preventing accidental erasure To prevent erasing ...the recordings on a tape by accident, set to P2. • Do not try to insert or eject the tape by just holding the cassette cover. • Insert and remove cassette tapes after...
Operating Instructions
Page 34
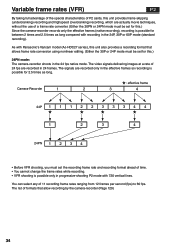
... conversion using nonlinear editing. (Either the 30P or 24P mode must be set for this .) 24PN mode: The camera-recorder shoots in the 24 fps native mode. As with Panasonic's Varicam model (AJ-HDC27 series), this unit also provides a recording format that allow recording by the... camera-recorder (Page 129) 34 Variable frame rates (VFR) P2 By taking full advantage of the special characteristics of P2 cards, this unit provides frame skipping ...
... conversion using nonlinear editing. (Either the 30P or 24P mode must be set for this .) 24PN mode: The camera-recorder shoots in the 24 fps native mode. As with Panasonic's Varicam model (AJ-HDC27 series), this unit also provides a recording format that allow recording by the... camera-recorder (Page 129) 34 Variable frame rates (VFR) P2 By taking full advantage of the special characteristics of P2 cards, this unit provides frame skipping ...
Operating Instructions
Page 35
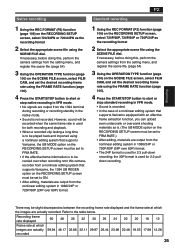
...36 32 30 26 24 22 20 18 12 Frame rate at which images are actually recorded. If necessary, before doing this, perform the camera settings from a nonlinear editing system that supports Varicams equipped with an effective frame extraction function, you can upload even undercrank or overcrank shooting ... must be set to FRM.RATE. • If the effective frame information is to be carried over 60P) format. 1 Using the REC FORMAT (P2) function (page 106) on the RECORDING SETUP screen, select 720/30PN or 720/24PN as the recording format 2 Select the appropriate scene file...
...36 32 30 26 24 22 20 18 12 Frame rate at which images are actually recorded. If necessary, before doing this, perform the camera settings from a nonlinear editing system that supports Varicams equipped with an effective frame extraction function, you can upload even undercrank or overcrank shooting ... must be set to FRM.RATE. • If the effective frame information is to be carried over 60P) format. 1 Using the REC FORMAT (P2) function (page 106) on the RECORDING SETUP screen, select 720/30PN or 720/24PN as the recording format 2 Select the appropriate scene file...

Operating Instructions
Page 46
... media in this unit is almost finished. When ON has been set up to receive 1394 signals before you operate the camera-recorder. • If you use the camera-recorder with the PAGE, AUDIO MON/VAR button. • To adjust the recording level (Page 53) Backup recording If you have ...CONTROL (page 114) to "CHAIN". • Note that images are recorded even when you perform a rec check if a P2 card is being used: When a tape is used : • If either of the P2 card: Interval recording, One-shot recording and Loop recording. (Pages 47 and 48) • Backup recording does not work...
... media in this unit is almost finished. When ON has been set up to receive 1394 signals before you operate the camera-recorder. • If you use the camera-recorder with the PAGE, AUDIO MON/VAR button. • To adjust the recording level (Page 53) Backup recording If you have ...CONTROL (page 114) to "CHAIN". • Note that images are recorded even when you perform a rec check if a P2 card is being used: When a tape is used : • If either of the P2 card: Interval recording, One-shot recording and Loop recording. (Pages 47 and 48) • Backup recording does not work...
Operating Instructions
Page 47
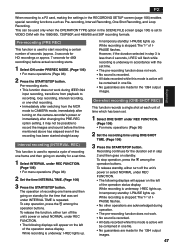
... and then going on standby for the 1394 output images. While recording is active will appear on the camera-recorder's power or immediately after switching from playback to a P2 card, making the settings in the RECORDING SETUP screen (page 106) enables special recording functions such as ... under PREREC MODE. (Page 106) • For menu operations (Page 96) 2 Press the START/STOP button. This can be possible to CAMERA mode, immediately after turning on the left of the operation status display. The operation of IPAUSE flashes. • No other operations are made...
... and then going on standby for the 1394 output images. While recording is active will appear on the camera-recorder's power or immediately after switching from playback to a P2 card, making the settings in the RECORDING SETUP screen (page 106) enables special recording functions such as ... under PREREC MODE. (Page 106) • For menu operations (Page 96) 2 Press the START/STOP button. This can be possible to CAMERA mode, immediately after turning on the left of the operation status display. The operation of IPAUSE flashes. • No other operations are made...
Operating Instructions
Page 90
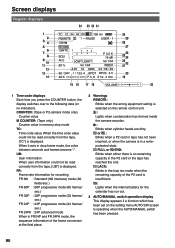
...;nal place. 2 Warnings REMOTE: Blinks when the wrong equipment setting is operating when the AUTO/MANUAL switch has been pressed. 90 COUNTER: (Tape or P2-camera mode only) Counter value M COUNTER: (Tape only) Counter value in drop frame mode, the colon between seconds and frames become ".". UB: User information... correctly from the tape, [TC*] is displayed. P2 FULL or END: Blinks when either there is in the P2 card or the tape has reached the end. P2 or : Blinks when a P2 card or tape has not been inserted, or when the camera is no indication). FR: Frame rate information for ...
...;nal place. 2 Warnings REMOTE: Blinks when the wrong equipment setting is operating when the AUTO/MANUAL switch has been pressed. 90 COUNTER: (Tape or P2-camera mode only) Counter value M COUNTER: (Tape only) Counter value in drop frame mode, the colon between seconds and frames become ".". UB: User information... correctly from the tape, [TC*] is displayed. P2 FULL or END: Blinks when either there is in the P2 card or the tape has reached the end. P2 or : Blinks when a P2 card or tape has not been inserted, or when the camera is no indication). FR: Frame rate information for ...
Functions Guide
Page 13
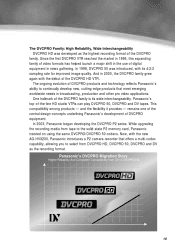
.... The DVCPRO Family: High Reliability, Wide Interchangeability DVCPRO HD was introduced, with its wide interchangeability. Panasonic's top-of DVCPRO equipment. Now, with the new AG-HVX200, Panasonic introduces a P2 camera-recorder that meet emerging worldwide needs in the use of the DVCPRO HD VTR. This compatibility among products - In 1998, DVCPRO 50 was developed...
.... The DVCPRO Family: High Reliability, Wide Interchangeability DVCPRO HD was introduced, with its wide interchangeability. Panasonic's top-of DVCPRO equipment. Now, with the new AG-HVX200, Panasonic introduces a P2 camera-recorder that meet emerging worldwide needs in the use of the DVCPRO HD VTR. This compatibility among products - In 1998, DVCPRO 50 was developed...

Functions Guide
Page 22
...the U.S., is extremely safe and reliable. Image Acquisition with P2 Camera-Recorders The P2 card is provided as an example of the kind of NY1, an all-news station located in Recording with the P2 Card 3-2 The New P2 Card Workflow Panasonic has provided an SD (Standard Definition)based news gathering ...system using the P2 card since 2003. The P2 card also helps to prevent shooting mistakes because you can be achieved...
...the U.S., is extremely safe and reliable. Image Acquisition with P2 Camera-Recorders The P2 card is provided as an example of the kind of NY1, an all-news station located in Recording with the P2 Card 3-2 The New P2 Card Workflow Panasonic has provided an SD (Standard Definition)based news gathering ...system using the P2 card since 2003. The P2 card also helps to prevent shooting mistakes because you can be achieved...


