
Operating Instructions
Page 1
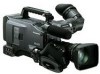
AG-HPX500P Model No. AG-HPX500E FRANÇAIS Pour des explications en français, veuillez vous reporter au CD-ROM fourni. S0407T1067 -P D Printed in Japan ENGLISH VQT1G18-1 Before operating this product, please read the instructions carefully and save this manual for future use. Operating Instructions Memory Card Camera-Recorder Model No.
AG-HPX500P Model No. AG-HPX500E FRANÇAIS Pour des explications en français, veuillez vous reporter au CD-ROM fourni. S0407T1067 -P D Printed in Japan ENGLISH VQT1G18-1 Before operating this product, please read the instructions carefully and save this manual for future use. Operating Instructions Memory Card Camera-Recorder Model No.
Operating Instructions
Page 2
... 15 of this first! CAUTION: In order to radio communications. FCC Note: This equipment has been tested and found to comply with the instruction manual, may cause harmful interference to maintain adequate ventilation, do not obstruct the ventilation. Do not disassemble the product. ● Do not point the eyepiece directly...
... 15 of this first! CAUTION: In order to radio communications. FCC Note: This equipment has been tested and found to comply with the instruction manual, may cause harmful interference to maintain adequate ventilation, do not obstruct the ventilation. Do not disassemble the product. ● Do not point the eyepiece directly...
Operating Instructions
Page 3
... www.dtsc.ca/gov/hazardouswaste.perchlorate. NETHERLANDS ● Voor de primaire voeding en het reservegeheugen van het apparaat wordt gebruikgemaakt van een batterij. Read this manual. ● If a battery made by any other manufacturer is uitgeput, mag u deze niet gewoon weggooien, maar dient u deze als klein chemisch afval weg te doen...
... www.dtsc.ca/gov/hazardouswaste.perchlorate. NETHERLANDS ● Voor de primaire voeding en het reservegeheugen van het apparaat wordt gebruikgemaakt van een batterij. Read this manual. ● If a battery made by any other manufacturer is uitgeput, mag u deze niet gewoon weggooien, maar dient u deze als klein chemisch afval weg te doen...
Operating Instructions
Page 15
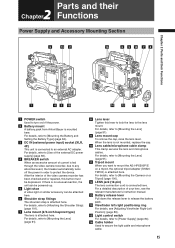
... 84). 3 DC IN (external power input) socket (XLR, 4P) This unit is connected here. After the interior of your lens, see the relevant manufacturer's instruction manual. 13 Battery release lever Pull down the release lever to release the battery pack. 14 Viewfinder left-right positioning ring For details, see...
... 84). 3 DC IN (external power input) socket (XLR, 4P) This unit is connected here. After the interior of your lens, see the relevant manufacturer's instruction manual. 13 Battery release lever Pull down the release lever to release the battery pack. 14 Viewfinder left-right positioning ring For details, see...
Operating Instructions
Page 16
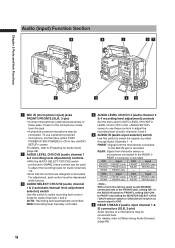
... 2 connector is recorded. For adjustment, each control must be depressed while turning. 3 AUDIO SELECT CH1/CH2 (audio channel 1 & 2 automatic/manual level adjustment selector) switch Use this jack. • A phantom-powered microphone may be connected. FRONT: Signal from the microphone connected to select ... these controls can be locked. REAR2 jack - REAR: Signal from this switch to the MIC IN jack is recorded. MAN: Recording level manually controlled. 4 AUDIO LEVEL CH3/CH 4 (audio channel 3 & 4 recording level adjustment) controls Set the menu option AUTO LEVEL CH3/AUTO...
... 2 connector is recorded. For adjustment, each control must be depressed while turning. 3 AUDIO SELECT CH1/CH2 (audio channel 1 & 2 automatic/manual level adjustment selector) switch Use this jack. • A phantom-powered microphone may be connected. FRONT: Signal from the microphone connected to select ... these controls can be locked. REAR2 jack - REAR: Signal from this switch to the MIC IN jack is recorded. MAN: Recording level manually controlled. 4 AUDIO LEVEL CH3/CH 4 (audio channel 3 & 4 recording level adjustment) controls Set the menu option AUTO LEVEL CH3/AUTO...
Operating Instructions
Page 56
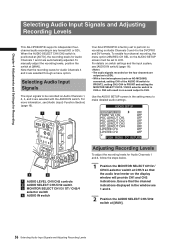
... AUDIO IN switch to FRONT2, setting CH2-CH4 to FRONT and setting the MONITOR SELECT CH1/2 / CH3/4 selector switch to make detailed audio settings. To manually adjust the recording levels, position the switch at [MAN]. Chapter 4 Adjustments and Settings for Audio Channels 1 and 2 are 1 and 2. 2 Position the AUDIO SELECT CH1/CH2...
... AUDIO IN switch to FRONT2, setting CH2-CH4 to FRONT and setting the MONITOR SELECT CH1/2 / CH3/4 selector switch to make detailed audio settings. To manually adjust the recording levels, position the switch at [MAN]. Chapter 4 Adjustments and Settings for Audio Channels 1 and 2 are 1 and 2. 2 Position the AUDIO SELECT CH1/CH2...
Operating Instructions
Page 69
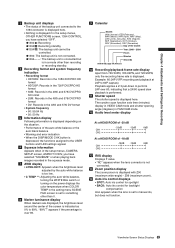
...Viewfinder Screen Status Displays Example: 60:24P (VFR recording and playback at 24P to 60P capture) Playback applies a 2:3 pull-down to manual iris, but is in a mode other than recording or recording standby. 4 Recording format and system frequency indication • Recording format • ...HD1080i: Records in the 1080i DVCPRO HD format • HD720P: Records in the 720P DVCPRO HD format • 50M: Records in the 480i and 576i DVCPRO 50 format ...
...Viewfinder Screen Status Displays Example: 60:24P (VFR recording and playback at 24P to 60P capture) Playback applies a 2:3 pull-down to manual iris, but is in a mode other than recording or recording standby. 4 Recording format and system frequency indication • Recording format • ...HD1080i: Records in the 1080i DVCPRO HD format • HD720P: Records in the 720P DVCPRO HD format • 50M: Records in the 480i and 576i DVCPRO 50 format ...

Operating Instructions
Page 84
..., but system compatibility is not guaranteed. • Charge the battery pack with the battery charger before using it. (Please refer to the battery charger's instruction manual for information about charging.) Mounting the Battery and Setting the Battery Type Using an Anton/Bauer Battery Pack 1 Mount an Anton/Bauer battery pack. Power...
..., but system compatibility is not guaranteed. • Charge the battery pack with the battery charger before using it. (Please refer to the battery charger's instruction manual for information about charging.) Mounting the Battery and Setting the Battery Type Using an Anton/Bauer Battery Pack 1 Mount an Anton/Bauer battery pack. Power...

Operating Instructions
Page 91
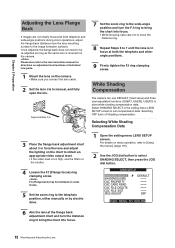
... to protect the device. 91 Mounting and Adjusting the Lens LENS Connector 5 Adjust the lens flange back. • Please refer to the lens instruction manual for guidance on lens handling. • When the lens is removed, install the mount cap to clamp the lens.
... to protect the device. 91 Mounting and Adjusting the Lens LENS Connector 5 Adjust the lens flange back. • Please refer to the lens instruction manual for guidance on lens handling. • When the lens is removed, install the mount cap to clamp the lens.
Operating Instructions
Page 92
... lighting on the camera. Selecting OFF turns off shading compensation. For details on some lenses. 5 Set the zoom ring to the telephoto position, either manually or by electric drive. 1 Open the setting menu LENS SETUP screen. F.b (Flange back) may be re-adjusted as long as the same lens...). 2 Use the JOG dial button to bring the chart into focus. 92 Mounting and Adjusting the Lens Please also refer to the lens instruction manual for directions on adjustment and locations of individual lens parts. 1 Mount the lens on the camera. • Make sure you connect the lens cable...
... lighting on the camera. Selecting OFF turns off shading compensation. For details on some lenses. 5 Set the zoom ring to the telephoto position, either manually or by electric drive. 1 Open the setting menu LENS SETUP screen. F.b (Flange back) may be re-adjusted as long as the same lens...). 2 Use the JOG dial button to bring the chart into focus. 92 Mounting and Adjusting the Lens Please also refer to the lens instruction manual for directions on adjustment and locations of individual lens parts. 1 Mount the lens on the camera. • Make sure you connect the lens cable...

Operating Instructions
Page 94
Chapter 5 Preparation 2 Set the image. (1) Shoot a solid white sheet of paper. (2) Set the lens iris to manual and adjust the iris so that a zebra pattern fills the entire viewfinder screen. • When the piece of paper is automatically stored ...
Chapter 5 Preparation 2 Set the image. (1) Shoot a solid white sheet of paper. (2) Set the lens iris to manual and adjust the iris so that a zebra pattern fills the entire viewfinder screen. • When the piece of paper is automatically stored ...

Operating Instructions
Page 127
... the following battery types selected in BATTERY SELECT. PROPAC14, TRIMPAC14, HYTRON50, HYTRON140, DIONIC90, DIONIC160, NP-L7, ENDURA7, ENDURA10, ENDURA-D, PAG L95, BP-GL65/95 ●MANUAL: Manually enter near end warning or not. NEAR END CANCEL ●ON/OFF / When set to cancel battery near end voltage.
... the following battery types selected in BATTERY SELECT. PROPAC14, TRIMPAC14, HYTRON50, HYTRON140, DIONIC90, DIONIC160, NP-L7, ENDURA7, ENDURA10, ENDURA-D, PAG L95, BP-GL65/95 ●MANUAL: Manually enter near end warning or not. NEAR END CANCEL ●ON/OFF / When set to cancel battery near end voltage.

Operating Instructions
Page 131
... cannot be performed when the PC MODE is set the menu option PC MODE to External Devices Using USB2.0 Port (PC mode) Select AG-HPX500 for establishing a connection with a PC 1 Connect the USB cable to end menu operations. Connecting to External 8 Chapter Devices Connecting to External ... using a USB cable shorter than 3 meters. Procedures for the USB driver during USB connection. For details on menu operation, refer to the Installation Manual for AGHPX500P/E on the PC. • For details, refer to the Operating Instructions supplied with the PC. Refer to [Using the menus] (...
... cannot be performed when the PC MODE is set the menu option PC MODE to External Devices Using USB2.0 Port (PC mode) Select AG-HPX500 for establishing a connection with a PC 1 Connect the USB cable to end menu operations. Connecting to External 8 Chapter Devices Connecting to External ... using a USB cable shorter than 3 meters. Procedures for the USB driver during USB connection. For details on menu operation, refer to the Installation Manual for AGHPX500P/E on the PC. • For details, refer to the Operating Instructions supplied with the PC. Refer to [Using the menus] (...

Operating Instructions
Page 138
...the zoom operation. • Check that the image changes to telephoto and wide angle. 2 Set the zoom to manual zoom mode and check the zoom operation. • Turn the manual zoom lever to check that the image changes to telephoto and wide angle. 3 Set the iris to automatic adjustment... with different degrees of brightness, to check that the automatic iris adjustment operates normally. 4 Set the iris to manual adjustment mode and turn the iris ring, to check the manual iris adjustment. 5 While holding down the instant iris automatic adjustment button, aim the lens at objects with different ...
...the zoom operation. • Check that the image changes to telephoto and wide angle. 2 Set the zoom to manual zoom mode and check the zoom operation. • Turn the manual zoom lever to check that the image changes to telephoto and wide angle. 3 Set the iris to automatic adjustment... with different degrees of brightness, to check that the automatic iris adjustment operates normally. 4 Set the iris to manual adjustment mode and turn the iris ring, to check the manual iris adjustment. 5 While holding down the instant iris automatic adjustment button, aim the lens at objects with different ...
Operating Instructions
Page 139
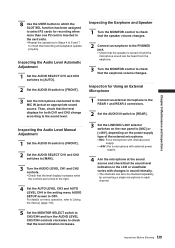
... CH2 switches to [AUTO]. 2 Set the AUDIO IN switch to [FRONT]. 3 Aim the microphone connected to [Using the menus] (page 116). Inspecting the Audio Level Manual Adjustment 1 Set the AUDIO IN switch to [FRONT]. 2 Set the AUDIO SELECT CH1 and CH2 switches to [MAN]. 3 Turn the AUDIO LEVEL CH1 and CH2...
... CH2 switches to [AUTO]. 2 Set the AUDIO IN switch to [FRONT]. 3 Aim the microphone connected to [Using the menus] (page 116). Inspecting the Audio Level Manual Adjustment 1 Set the AUDIO IN switch to [FRONT]. 2 Set the AUDIO SELECT CH1 and CH2 switches to [MAN]. 3 Turn the AUDIO LEVEL CH1 and CH2...

