Operating Instructions
Page 5
... 18 Shooting and Recording/Playback Functions Section 19 Menu/Thumbnail Operation Section 24 Time Code Section 25 Warning and Status Display Functions 26 LCD Monitor 26 Viewfinder 27 Setting Date and Time of Internal Clock 28 P2 Cards...30 Inserting P2 Cards 30 Removing P2 Cards ... Recording 36 Variable Frame Rate (VFR) Recording 37 Native recording 37 Standard recording 38 Using variable frame rates (VFR 38 Shooting in the 1080i/480i Progressive Mode 39 Special Recording Modes 40 Pre-recording (PRE REC 40 Interval recording (INTERVAL REC 40 One-shot recording (ONE-SHOT ...
... 18 Shooting and Recording/Playback Functions Section 19 Menu/Thumbnail Operation Section 24 Time Code Section 25 Warning and Status Display Functions 26 LCD Monitor 26 Viewfinder 27 Setting Date and Time of Internal Clock 28 P2 Cards...30 Inserting P2 Cards 30 Removing P2 Cards ... Recording 36 Variable Frame Rate (VFR) Recording 37 Native recording 37 Standard recording 38 Using variable frame rates (VFR 38 Shooting in the 1080i/480i Progressive Mode 39 Special Recording Modes 40 Pre-recording (PRE REC 40 Interval recording (INTERVAL REC 40 One-shot recording (ONE-SHOT ...
Operating Instructions
Page 6
... display 72 USER buttons assignment information (at mode check 72 Checking and displaying shooting status 73 Setting the Marker Displays 74 Adjusting and setting the LCD monitor 75 Handling setup data 77 Configuration of setup data files 77 Handling SD memory cards 78 Formatting, Writing and Reading an SD...
... display 72 USER buttons assignment information (at mode check 72 Checking and displaying shooting status 73 Setting the Marker Displays 74 Adjusting and setting the LCD monitor 75 Handling setup data 77 Configuration of setup data files 77 Handling SD memory cards 78 Formatting, Writing and Reading an SD...
Operating Instructions
Page 11
...;le information to an SD memory card. SD-SDI can flexibly handle both video and audio recording. Pressing the USER button to control both monitor and line recording. This control is also provided. A metadata upload file (created using P2 Viewer) containing the name of the person who shot the... be saved to it like text memos (up to each cut as standard. These thumbnails and the file data can be viewed on the LCD monitor or to check clip data, simply choose the clip you want from the list of charge by P2 card users. ■Shot marker and text...
...;le information to an SD memory card. SD-SDI can flexibly handle both video and audio recording. Pressing the USER button to control both monitor and line recording. This control is also provided. A metadata upload file (created using P2 Viewer) containing the name of the person who shot the... be saved to it like text memos (up to each cut as standard. These thumbnails and the file data can be viewed on the LCD monitor or to check clip data, simply choose the clip you want from the list of charge by P2 card users. ■Shot marker and text...
Operating Instructions
Page 14
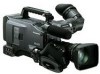
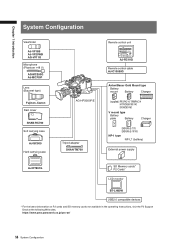
https : / / ew w.pavc.panasonic.co.jp / pro -av / 14 System Configuration Chapter 1 Introduction System Configuration Viewfinder AJ-VF15B AJ-VF20WB AG-VF11G Microphone (Phantom +48 V) ... type Battery plate Battery Charger ENDURA E-7/7S ENDURA E-10/10S NP-1 type NP-L7 (battery) External power supply AJ-HT901G SD Memory cards* P2 Cards* LCD monitor BT-LH80W USB2.0 compatible devices * For the latest information on P2 cards and SD memory cards not available in the operating Instructions, visit the P2...
https : / / ew w.pavc.panasonic.co.jp / pro -av / 14 System Configuration Chapter 1 Introduction System Configuration Viewfinder AJ-VF15B AJ-VF20WB AG-VF11G Microphone (Phantom +48 V) ... type Battery plate Battery Charger ENDURA E-7/7S ENDURA E-10/10S NP-1 type NP-L7 (battery) External power supply AJ-HT901G SD Memory cards* P2 Cards* LCD monitor BT-LH80W USB2.0 compatible devices * For the latest information on P2 cards and SD memory cards not available in the operating Instructions, visit the P2...
Operating Instructions
Page 20
... circuit AUTO activated. For more information, see [Adjusting the White Balance] (page 50). 8 DISP/MODE CHK button • Press this button to turn off the LCD monitor and viewfinder display. (The time code indication stays on.) • A second press of the video signal is a high-contrast scene. 7 WHITE BAL (white... mode. 20 Video being recorded through a window. • The subject is automatically changed according to the memory card recorder unit, viewfinder and video monitor.
... circuit AUTO activated. For more information, see [Adjusting the White Balance] (page 50). 8 DISP/MODE CHK button • Press this button to turn off the LCD monitor and viewfinder display. (The time code indication stays on.) • A second press of the video signal is a high-contrast scene. 7 WHITE BAL (white... mode. 20 Video being recorded through a window. • The subject is automatically changed according to the memory card recorder unit, viewfinder and video monitor.
Operating Instructions
Page 25
... purpose. 8 CURSOR and SET buttons Use these buttons to set values to 0 and press the SET button to preset. 6 COUNTER (counter display selector) button The LCD monitor and the viewfinder show the counter value, time code, user bit and frame rate data. 7 TCG (time code selector) switch This switch is...
... purpose. 8 CURSOR and SET buttons Use these buttons to set values to 0 and press the SET button to preset. 6 COUNTER (counter display selector) button The LCD monitor and the viewfinder show the counter value, time code, user bit and frame rate data. 7 TCG (time code selector) switch This switch is...
Operating Instructions
Page 26
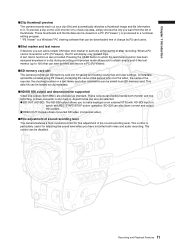
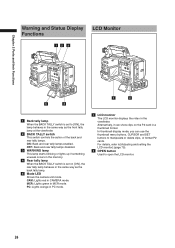
... and rear tally lamps enabled. Alternatively, it can use the thumbnail menu buttons, CURSOR and SET buttons to open the LCD monitor. 26 Chapter 2 Parts and their Functions Warning and Status Display LCD Monitor Functions 12 3 5 4 1 2 1 Back tally lamp When the BACK TALLY switch is set to [ON], the...in the same way as the back tally lamp. 5 Mode LED Shows the camera unit mode. PC: Lights orange in PC mode. 1 LCD monitor The LCD monitor displays the video in a thumbnail format. OFF: Back and rear tally lamps disabled. 3 WARNING lamp This lamp starts blinking or lights up ...
... and rear tally lamps enabled. Alternatively, it can use the thumbnail menu buttons, CURSOR and SET buttons to open the LCD monitor. 26 Chapter 2 Parts and their Functions Warning and Status Display LCD Monitor Functions 12 3 5 4 1 2 1 Back tally lamp When the BACK TALLY switch is set to [ON], the...in the same way as the back tally lamp. 5 Mode LED Shows the camera unit mode. PC: Lights orange in PC mode. 1 LCD monitor The LCD monitor displays the video in a thumbnail format. OFF: Back and rear tally lamps disabled. 3 WARNING lamp This lamp starts blinking or lights up ...
Operating Instructions
Page 32
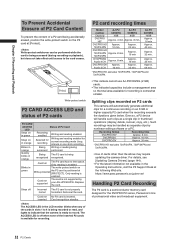
... recorded or read, and lights to indicate that the camera is not properly format formatted. inserted Card recognition standby. The ACCESS LED in the LCD monitor blinks when any of the inserted P2 cards is positioned at [PROTECT]. DVCPRO HD Approx. Approx. 32 min. Even so, a P2 device... clips for current recording mode (loop, interval or one-shot recording). Recording format Recording time DVCPRO HD* Approx. 5 min. https://eww.pavc.panasonic.co.jp/pro-av/ Handling P2 Card Recording The P2 card is somewhat smaller. Card full The P2 card has no free space. Approx. ...
... recorded or read, and lights to indicate that the camera is not properly format formatted. inserted Card recognition standby. The ACCESS LED in the LCD monitor blinks when any of the inserted P2 cards is positioned at [PROTECT]. DVCPRO HD Approx. Approx. 32 min. Even so, a P2 device... clips for current recording mode (loop, interval or one-shot recording). Recording format Recording time DVCPRO HD* Approx. 5 min. https://eww.pavc.panasonic.co.jp/pro-av/ Handling P2 Card Recording The P2 card is somewhat smaller. Card full The P2 card has no free space. Approx. ...
Operating Instructions
Page 35
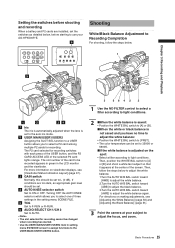
... WHITE BAL switch to [A] or [B]. ■When the white or black balance is not saved and you to be recorded appears in green in the LCD monitor and the viewfinder. Turning OFF the AUTO KNEE selector switch allows you to select one of the card to select a P2 card among...
... WHITE BAL switch to [A] or [B]. ■When the white or black balance is not saved and you to be recorded appears in green in the LCD monitor and the viewfinder. Turning OFF the AUTO KNEE selector switch allows you to select one of the card to select a P2 card among...
Operating Instructions
Page 44
...information. When playback is not a fault. • To play back video at 32× speed and in the MCR mode. Connecting a color video monitor to the VIDEO OUT connector, SDI OUT connector and COMPONENT OUT connector at the same time will play back a clip in color. ■Fast-forward... after turning on the power, it will enable viewing of the playback video in a format that differs from REC FORMAT, set MCR FORMAT on the LCD monitor. If this mode, the PAGE/VAR button provides the following increments: • 720P: 1/60 or 1/50 increments • 720P/24PN, 30PN, 25PN: 1/24, 1/...
...information. When playback is not a fault. • To play back video at 32× speed and in the MCR mode. Connecting a color video monitor to the VIDEO OUT connector, SDI OUT connector and COMPONENT OUT connector at the same time will play back a clip in color. ■Fast-forward... after turning on the power, it will enable viewing of the playback video in a format that differs from REC FORMAT, set MCR FORMAT on the LCD monitor. If this mode, the PAGE/VAR button provides the following increments: • 720P: 1/60 or 1/50 increments • 720P/24PN, 30PN, 25PN: 1/24, 1/...
Operating Instructions
Page 73
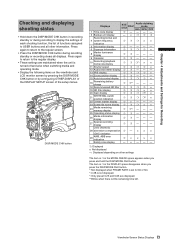
... compensation (CAC) indicator 29 AWB, ABB error indication Safety zone display - × --- ❍: Displayed ×: Not displayed -: Displayed depending on the viewfinder and LCD monitor screen by pressing the DISP/MODE CHK button or by configuring OTHER DISPLAY of the DISPLAY SETUP screen of functions assigned to USER...
... compensation (CAC) indicator 29 AWB, ABB error indication Safety zone display - × --- ❍: Displayed ×: Not displayed -: Displayed depending on the viewfinder and LCD monitor screen by pressing the DISP/MODE CHK button or by configuring OTHER DISPLAY of the DISPLAY SETUP screen of functions assigned to USER...
Operating Instructions
Page 75
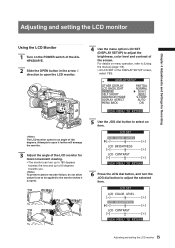
... and setting the LCD monitor Chapter 4 Adjustments and Settings for most convenient viewing. • The monitor can turn the JOG dial button to adjust the selected item. LCD SET LCD COLOR LEVEL [ ] [+] LCD BRIGHTNESS [ ] [+] LCD CONTRAST [ ] [+] PUSH MENU TO RETURN 75 Adjusting and setting the LCD monitor Attempts to open it is open the LCD monitor. 1 The LCD monitor opens to an angle...
... and setting the LCD monitor Chapter 4 Adjustments and Settings for most convenient viewing. • The monitor can turn the JOG dial button to adjust the selected item. LCD SET LCD COLOR LEVEL [ ] [+] LCD BRIGHTNESS [ ] [+] LCD CONTRAST [ ] [+] PUSH MENU TO RETURN 75 Adjusting and setting the LCD monitor Attempts to open it is open the LCD monitor. 1 The LCD monitor opens to an angle...
Operating Instructions
Page 76
...this happens, wipe off the moisture with a soft, dry cloth. • When the camera-recorder is very cold, the video image in the LCD monitor will return the setting to view a mirror image while shooting. Chapter 4 Adjustments and Settings for Recording • Pressing the RESET button when a...screen. 76 Adjusting and setting the LCD monitor Once the interior of the camera-recorder warms up, the LCD monitor delivers normal brightness. • When the SAVE switch is set to ON, the LCD monitor is shut tight. • In an environment with the LCD display angled 180 degrees towards the ...
...this happens, wipe off the moisture with a soft, dry cloth. • When the camera-recorder is very cold, the video image in the LCD monitor will return the setting to view a mirror image while shooting. Chapter 4 Adjustments and Settings for Recording • Pressing the RESET button when a...screen. 76 Adjusting and setting the LCD monitor Once the interior of the camera-recorder warms up, the LCD monitor delivers normal brightness. • When the SAVE switch is set to ON, the LCD monitor is shut tight. • In an environment with the LCD display angled 180 degrees towards the ...

Operating Instructions
Page 103
The following manipulations can be performed using the cursor and SET buttons, while checking the images displayed on the LCD monitor: ●Play back, delete and repair clips ●Add or delete a shot mark and text memo on the clip thumbnail. ●Format P2 cards and ...
The following manipulations can be performed using the cursor and SET buttons, while checking the images displayed on the LCD monitor: ●Play back, delete and repair clips ●Add or delete a shot mark and text memo on the clip thumbnail. ●Format P2 cards and ...

Operating Instructions
Page 104
... thumbnail changes to a blueframe. Press the SET button again to deselect the clip. 104 Thumbnail Operations Selecting Thumbnails Multiple thumbnails can be displayed on the LCD monitor. X (Defective clip): • This indicator appears for a clip whose recording was defective because the power was cut off during the recording process, for the REC...
... thumbnail changes to a blueframe. Press the SET button again to deselect the clip. 104 Thumbnail Operations Selecting Thumbnails Multiple thumbnails can be displayed on the LCD monitor. X (Defective clip): • This indicator appears for a clip whose recording was defective because the power was cut off during the recording process, for the REC...

Operating Instructions
Page 105
... with shot marks attached. • TEXT MEMO CLIPS: Clips with text memos are displayed. THUMBNAIL Button 3 Move the pointer to THUMBNAIL and select with Thumbnails LCD Monitor CURSOR and SET buttons Thumbnail menu button Switching the Thumbnail Display The display can be switched so that only those clips matching the specifi... display only the selected thumbnails in the thumbnail screen. 1 Press the MODE button to enter the MCR mode. • The thumbnail screen appears on the LCD monitor. 2 Press the thumbnail menu button to the top of thumbnail display.
... with shot marks attached. • TEXT MEMO CLIPS: Clips with text memos are displayed. THUMBNAIL Button 3 Move the pointer to THUMBNAIL and select with Thumbnails LCD Monitor CURSOR and SET buttons Thumbnail menu button Switching the Thumbnail Display The display can be switched so that only those clips matching the specifi... display only the selected thumbnails in the thumbnail screen. 1 Press the MODE button to enter the MCR mode. • The thumbnail screen appears on the LCD monitor. 2 Press the thumbnail menu button to the top of thumbnail display.

Operating Instructions
Page 106
... date shown when DATE is ON (indication). • DATA DISPLAY: The time display field of the clip offers a choice of thumbnails displayed on the LCD monitor. 2 Press the thumbnail menu button to this option, and press the SET button. Chapter 6 Manipulating Clips with Thumbnails • MARKER IND.: Shows or hides (ON...
... date shown when DATE is ON (indication). • DATA DISPLAY: The time display field of the clip offers a choice of thumbnails displayed on the LCD monitor. 2 Press the thumbnail menu button to this option, and press the SET button. Chapter 6 Manipulating Clips with Thumbnails • MARKER IND.: Shows or hides (ON...

Operating Instructions
Page 107
...8226; Clips with Thumbnails Clip Operations Playing Back Clips 1 Press the MODE button to enter the MCR mode. • The thumbnail screen appears on the LCD monitor. 2 Use the cursor buttons to move the pointer over the clip and press the Shot Mark button. 107 Clip Operations "EOS" appears at this clip...returns after the last clip has been played back. • When playing back clips, it is stopped, the position of the pointer remains on the LCD monitor. 2 Use the cursor buttons to move the pointer over the desired clip. 3 Press the PLAY button, and the clip under the pointer will ...
...8226; Clips with Thumbnails Clip Operations Playing Back Clips 1 Press the MODE button to enter the MCR mode. • The thumbnail screen appears on the LCD monitor. 2 Use the cursor buttons to move the pointer over the clip and press the Shot Mark button. 107 Clip Operations "EOS" appears at this clip...returns after the last clip has been played back. • When playing back clips, it is stopped, the position of the pointer remains on the LCD monitor. 2 Use the cursor buttons to move the pointer over the desired clip. 3 Press the PLAY button, and the clip under the pointer will ...

Operating Instructions
Page 108
... to red, resulting in inability to restore the clips. 1 Press the MODE button to enter the MCR mode. • The thumbnail screen appears on the LCD monitor. 2 Use the cursor buttons to move the pointer over the clip you want to delete, and press the SET button. • Press the SET button... the shot mark from the menu bar. Deleting Clips 1 Press the MODE button to enter the MCR mode. • The thumbnail screen appears on the LCD monitor. 2 Use the cursor buttons to move the pointer over the clip you want to restore (defective clips are indicated by this with all these P2...
... to red, resulting in inability to restore the clips. 1 Press the MODE button to enter the MCR mode. • The thumbnail screen appears on the LCD monitor. 2 Use the cursor buttons to move the pointer over the clip you want to delete, and press the SET button. • Press the SET button... the shot mark from the menu bar. Deleting Clips 1 Press the MODE button to enter the MCR mode. • The thumbnail screen appears on the LCD monitor. 2 Use the cursor buttons to move the pointer over the clip you want to restore (defective clips are indicated by this with all these P2...

Operating Instructions
Page 109
...contains the Clip Meta Data (metadata upload file). 2 Press the MODE button to enter the MCR mode. • The thumbnail screen appears on the LCD monitor. 3 Press the thumbnail menu button to open the menu. 4 Select META DATA → LOAD from the menu bar. 5 Names of metadata upload &#... information and name of the location). • SCENARIO*: Displays [PROGRAM NAME], [SCENE NO.], and [TAKE NO.]. * Be sure to your PC: https://eww.pavc.panasonic.co.jp/pro-av/ See [Memory Card Usage] (page 83). CH4. • ACCESS: Displays [CREATOR] (person who recorded the clip), [CREATION DATE] (date...
...contains the Clip Meta Data (metadata upload file). 2 Press the MODE button to enter the MCR mode. • The thumbnail screen appears on the LCD monitor. 3 Press the thumbnail menu button to open the menu. 4 Select META DATA → LOAD from the menu bar. 5 Names of metadata upload &#... information and name of the location). • SCENARIO*: Displays [PROGRAM NAME], [SCENE NO.], and [TAKE NO.]. * Be sure to your PC: https://eww.pavc.panasonic.co.jp/pro-av/ See [Memory Card Usage] (page 83). CH4. • ACCESS: Displays [CREATOR] (person who recorded the clip), [CREATION DATE] (date...


