Operating Instructions
Page 15
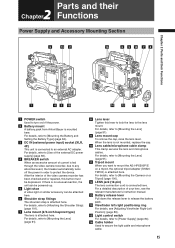
..., refer to [Mounting the Lens] (page 91). 11 Tripod mount When you want to mount the AG-HPX500P/E on a tripod, the optional tripod adapter (SHANTM700) is mounted here. Parts and their 2 Chapter Functions Power Supply and Accessory Mounting Section 6 13 2 16 6 5 14 7 8 Chapter 2 Parts and their Functions 1 4 3 15 10 12 11 9 1 POWER... (XLR, 4P) This unit is attached here. If there is no unusual reaction, the unit can be powered-up. 5 Light shoe A video light or similar accessory can be depressed. For details, refer to an external AC adapter.
..., refer to [Mounting the Lens] (page 91). 11 Tripod mount When you want to mount the AG-HPX500P/E on a tripod, the optional tripod adapter (SHANTM700) is mounted here. Parts and their 2 Chapter Functions Power Supply and Accessory Mounting Section 6 13 2 16 6 5 14 7 8 Chapter 2 Parts and their Functions 1 4 3 15 10 12 11 9 1 POWER... (XLR, 4P) This unit is attached here. If there is no unusual reaction, the unit can be powered-up. 5 Light shoe A video light or similar accessory can be depressed. For details, refer to an external AC adapter.
Operating Instructions
Page 16
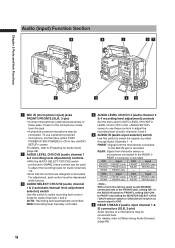
... 8 2 37 Chapter 2 Parts and their Functions 1 4 5 6 1 MIC IN (microphone input) jacks FRONT1/FRONT2 (XLR, 3-pin) • Connect microphones (optional accessories) to be locked. For details, refer to [Preparing for Audio Input] (page 98). 2 AUDIO LEVEL CH1/CH2 (audio channel 1 & 2 recording level adjustment) controls ... jack - CH3 FRONT REAR Input FRONT1 jack REAR1 jack CH4 FRONT REAR Input FRONT2 jack REAR2 jack With a front microphone (such as AG-MC200G) connected only to the FRONT2 jack, setting CH1 of audio channels 3 and 4. 5 AUDIO IN (audio input selector) switch Use...
... 8 2 37 Chapter 2 Parts and their Functions 1 4 5 6 1 MIC IN (microphone input) jacks FRONT1/FRONT2 (XLR, 3-pin) • Connect microphones (optional accessories) to be locked. For details, refer to [Preparing for Audio Input] (page 98). 2 AUDIO LEVEL CH1/CH2 (audio channel 1 & 2 recording level adjustment) controls ... jack - CH3 FRONT REAR Input FRONT1 jack REAR1 jack CH4 FRONT REAR Input FRONT2 jack REAR2 jack With a front microphone (such as AG-MC200G) connected only to the FRONT2 jack, setting CH1 of audio channels 3 and 4. 5 AUDIO IN (audio input selector) switch Use...
Operating Instructions
Page 78
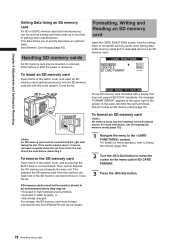
...force it may be used or stored in an environment where they may be kept inserted into the AG-HPX500P/E with the notch upward. To remove the SD memory card Open the lid of the switch...the card is not illuminated. Take hold of the switch cover, and insert an SD memory card (optional accessory) into the slot. See [Memory Card Usage] (page 83). This releases the SD memory card from the... Recording Setting Data Using an SD memory card An SD or SDHC memory card (optional accessory) can be formatted via the thumbnail screen. For storage, the SD memory card must be inserted or removed,...
...force it may be used or stored in an environment where they may be kept inserted into the AG-HPX500P/E with the notch upward. To remove the SD memory card Open the lid of the switch...the card is not illuminated. Take hold of the switch cover, and insert an SD memory card (optional accessory) into the slot. See [Memory Card Usage] (page 83). This releases the SD memory card from the... Recording Setting Data Using an SD memory card An SD or SDHC memory card (optional accessory) can be formatted via the thumbnail screen. For storage, the SD memory card must be inserted or removed,...

Operating Instructions
Page 131
...set the menu option PC MODE to [Using the menus] (page 116). When you establish the USB connection for the first time, install the accessory P2 software for the details. • A USB driver must not be removed when it is connected via USB. • While a USB connection is ... access is being carried out. • Recording, playback and clip thumbnail operations cannot be performed when the PC MODE is only compatible with USB 2.0. Select AG-HPX500 for establishing a connection with a PC 1 Connect the USB cable to the USB 2.0 port. • The USB 2.0 cable is in the PC mode. 5 ...
...set the menu option PC MODE to [Using the menus] (page 116). When you establish the USB connection for the first time, install the accessory P2 software for the details. • A USB driver must not be removed when it is connected via USB. • While a USB connection is ... access is being carried out. • Recording, playback and clip thumbnail operations cannot be performed when the PC MODE is only compatible with USB 2.0. Select AG-HPX500 for establishing a connection with a PC 1 Connect the USB cable to the USB 2.0 port. • The USB 2.0 cable is in the PC mode. 5 ...


