Hd Video Camera
Page 4
...suitable AC plug adaptor or AC cord set. But ≥ In the U.S.A. Batteries 1 Battery pack (Lithium ion battery pack) ≥ Use the specified unit to recharge the battery pack. ≥ Do not use the battery pack with equipment other foreign matter on how to an AC supply outside of...; Do not touch the plug terminals (i and j) with metal objects. ≥ Do not disassemble, remodel, heat or throw into fire. 2 Button-type battery (Lithium battery) ≥ Insert with poles aligned. ≥ Do not touch the terminals (i and j) with metal objects. ≥ Do not recharge, disassemble, remodel,...
...suitable AC plug adaptor or AC cord set. But ≥ In the U.S.A. Batteries 1 Battery pack (Lithium ion battery pack) ≥ Use the specified unit to recharge the battery pack. ≥ Do not use the battery pack with equipment other foreign matter on how to an AC supply outside of...; Do not touch the plug terminals (i and j) with metal objects. ≥ Do not disassemble, remodel, heat or throw into fire. 2 Button-type battery (Lithium battery) ≥ Insert with poles aligned. ≥ Do not touch the terminals (i and j) with metal objects. ≥ Do not recharge, disassemble, remodel,...
Hd Video Camera
Page 8
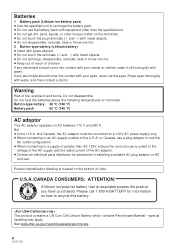
... disk drive) [HDC-TM20/ HDC-HS20 15 Handling of built-in memory [HDC-TM20 15 Handling of HDD [HDC-HS20 16 [2] Parts identification and handling ..... 17 [HDC-SD20/HDC-TM20 17 [HDC-HS20 20 Setup [1] Power supply 23 Charging the battery 23 Inserting/removing the battery 24 Charging and recording time 25 Connecting to the AC outlet 28 [2] Preparation of SD cards 29 Cards...
... disk drive) [HDC-TM20/ HDC-HS20 15 Handling of built-in memory [HDC-TM20 15 Handling of HDD [HDC-HS20 16 [2] Parts identification and handling ..... 17 [HDC-SD20/HDC-TM20 17 [HDC-HS20 20 Setup [1] Power supply 23 Charging the battery 23 Inserting/removing the battery 24 Charging and recording time 25 Connecting to the AC outlet 28 [2] Preparation of SD cards 29 Cards...
Hd Video Camera
Page 10
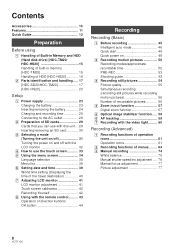
Accessories Check the accessories before using this unit. Battery pack VW-VBG070 AC adaptor VSK0697 AC cable K2CA2CA00025 DC cable K2GJYDC00004 Remote control (Built-in battery) N2QAEC000024 AV cable K2KYYYY00054 Component cable K1HY10YY0005 USB cable K1HY04YY0032 Stylus pen VFC4394 CD-ROM 10 VQT1Y00
Accessories Check the accessories before using this unit. Battery pack VW-VBG070 AC adaptor VSK0697 AC cable K2CA2CA00025 DC cable K2GJYDC00004 Remote control (Built-in battery) N2QAEC000024 AV cable K2KYYYY00054 Component cable K1HY10YY0005 USB cable K1HY04YY0032 Stylus pen VFC4394 CD-ROM 10 VQT1Y00
Hd Video Camera
Page 12
... the LCD monitor. ≥ Check that the access lamp has gone off the power, change the mode to or while pressing the lock release button A. HDC-SD20 HDC-TM20 A Insert the battery until it clicks. ∫ How to turn on the power Turn on the power by sliding the OPEN lever B. 3) Insert/remove the... SD card. ≥ Face the label side C in the direction shown in the illustration and press it straight in as far as it will go. ≥ ...
... the LCD monitor. ≥ Check that the access lamp has gone off the power, change the mode to or while pressing the lock release button A. HDC-SD20 HDC-TM20 A Insert the battery until it clicks. ∫ How to turn on the power Turn on the power by sliding the OPEN lever B. 3) Insert/remove the... SD card. ≥ Face the label side C in the direction shown in the illustration and press it straight in as far as it will go. ≥ ...
Hd Video Camera
Page 17
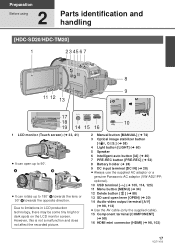
...] (l 46) 7 PRE-REC button [PRE-REC] (l 53) 8 Battery holder (l 24) 9 DC input terminal [DC IN] (l 28) ≥ Always use the supplied AC adaptor or a genuine Panasonic AC adaptor (VW-AD21PP; Preparation Before using 2 Parts identification and handling [HDC-SD20/HDC-TM20] 1 23 456 7 8 9 11 12 13 17 A/V 18 10 19... the opposite direction. optional). 10 USB terminal [ ] (l 105, 114, 125) 11 Menu button [MENU] (l 34) 12 Delete button [ ] (l 88) 13 SD card open up to 90o. ≥ It can rotate up to limitations in LCD production technology, there may be some tiny bright or dark spots...
...] (l 46) 7 PRE-REC button [PRE-REC] (l 53) 8 Battery holder (l 24) 9 DC input terminal [DC IN] (l 28) ≥ Always use the supplied AC adaptor or a genuine Panasonic AC adaptor (VW-AD21PP; Preparation Before using 2 Parts identification and handling [HDC-SD20/HDC-TM20] 1 23 456 7 8 9 11 12 13 17 A/V 18 10 19... the opposite direction. optional). 10 USB terminal [ ] (l 105, 114, 125) 11 Menu button [MENU] (l 34) 12 Delete button [ ] (l 88) 13 SD card open up to 90o. ≥ It can rotate up to limitations in LCD production technology, there may be some tiny bright or dark spots...

Hd Video Camera
Page 19
Be sure that it fits your hand. 32 Grip belt Adjust the length of the grip belt so that the grip belt stays clear of the video light B when the tripod is used as shown below. 1 Flip the belt. 2 Adjust the length. 3 Replace the belt. 33 Shoulder strap fixture 34 35 34 Battery release lever [BATT] (l 24) 35 Tripod receptacle This is a hole for attaching the unit to the optional tripod. (For details on mounting the tripod, refer to the operating instructions for the tripod.) A Camera base 19 VQT1Y00
Be sure that it fits your hand. 32 Grip belt Adjust the length of the grip belt so that the grip belt stays clear of the video light B when the tripod is used as shown below. 1 Flip the belt. 2 Adjust the length. 3 Replace the belt. 33 Shoulder strap fixture 34 35 34 Battery release lever [BATT] (l 24) 35 Tripod receptacle This is a hole for attaching the unit to the optional tripod. (For details on mounting the tripod, refer to the operating instructions for the tripod.) A Camera base 19 VQT1Y00

Hd Video Camera
Page 20
... (l 60) 5 Speaker 6 Intelligent auto button [iA] (l 46) 7 PRE-REC button [PRE-REC] (l 53) 8 Battery holder (l 24) 9 DC input terminal [DC IN] (l 28) ≥ Always use the supplied AC adaptor or a genuine Panasonic AC adaptor (VW-AD21PP; optional). 10 USB terminal [ ] (l 105, 114, 125) 11 Menu button [MENU] (l 34...) 12 Delete button [ ] (l 88) 13 SD card open up to 180o A towards the lens or 90o B towards the opposite direction. Due to limitations in LCD production technology, there may be some tiny bright or dark spots on the LCD monitor screen. [HDC-HS20] 1 2 3 456 7 8 9 11 12 ...
... (l 60) 5 Speaker 6 Intelligent auto button [iA] (l 46) 7 PRE-REC button [PRE-REC] (l 53) 8 Battery holder (l 24) 9 DC input terminal [DC IN] (l 28) ≥ Always use the supplied AC adaptor or a genuine Panasonic AC adaptor (VW-AD21PP; optional). 10 USB terminal [ ] (l 105, 114, 125) 11 Menu button [MENU] (l 34...) 12 Delete button [ ] (l 88) 13 SD card open up to 180o A towards the lens or 90o B towards the opposite direction. Due to limitations in LCD production technology, there may be some tiny bright or dark spots on the LCD monitor screen. [HDC-HS20] 1 2 3 456 7 8 9 11 12 ...

Hd Video Camera
Page 22
Be sure that it fits your hand. 33 Grip belt Adjust the length of the grip belt so that the grip belt stays clear of the video light B when the tripod is used as shown below. 1 Flip the belt. 2 Adjust the length. 3 Replace the belt. 34 Shoulder strap fixture 35 36 35 Battery release lever [BATT] (l 24) 36 Tripod receptacle This is a hole for attaching the unit to the optional tripod. (For details on mounting the tripod, refer to the operating instructions for the tripod.) A Camera base 22 VQT1Y00
Be sure that it fits your hand. 33 Grip belt Adjust the length of the grip belt so that the grip belt stays clear of the video light B when the tripod is used as shown below. 1 Flip the belt. 2 Adjust the length. 3 Replace the belt. 34 Shoulder strap fixture 35 36 35 Battery release lever [BATT] (l 24) 36 Tripod receptacle This is a hole for attaching the unit to the optional tripod. (For details on mounting the tripod, refer to the operating instructions for the tripod.) A Camera base 22 VQT1Y00
Hd Video Camera
Page 23
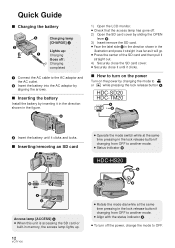
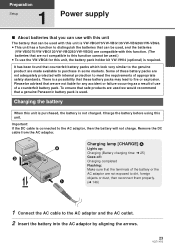
... available to purchase in some markets. Please be advised that we would recommend that a genuine Panasonic battery pack is used. Important: If the DC cable is connected to fire or explosion. Charging lamp [CHARGE] A Lights up: Charging (Battery charging time: l 25) Goes off: Charging completed Flashing: Make sure that the terminals of a counterfeit...
... available to purchase in some markets. Please be advised that we would recommend that a genuine Panasonic battery pack is used. Important: If the DC cable is connected to fire or explosion. Charging lamp [CHARGE] A Lights up: Charging (Battery charging time: l 25) Goes off: Charging completed Flashing: Make sure that the terminals of a counterfeit...

Hd Video Camera
Page 24
... using Panasonic batteries (l 10, 25, 26, 152). ≥ If you use other batteries, we cannot guarantee the quality of this product. ≥ Do not heat or expose to flame. ≥ Do not leave the battery(ies) in an automobile exposed to direct sunlight for a long period of used batteries according ...with doors and windows closed. Dispose of time with the same or equivalent type recommended by the manufacturer. Inserting/removing the battery Install the battery by inserting it in the direction shown in the direction indicated by holding onto it clicks and locks. BATT CAUTION Danger ...
... using Panasonic batteries (l 10, 25, 26, 152). ≥ If you use other batteries, we cannot guarantee the quality of this product. ≥ Do not heat or expose to flame. ≥ Do not leave the battery(ies) in an automobile exposed to direct sunlight for a long period of used batteries according ...with doors and windows closed. Dispose of time with the same or equivalent type recommended by the manufacturer. Inserting/removing the battery Install the battery by inserting it in the direction shown in the direction indicated by holding onto it clicks and locks. BATT CAUTION Danger ...
Hd Video Camera
Page 25
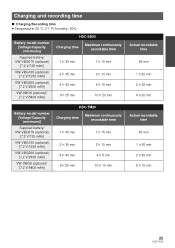
... min Actual recordable time 45 min 1 h 20 min 2 h 35 min 6 h 20 min Battery model number [Voltage/Capacity (minimum)] Supplied battery/ VW-VBG070 (optional) [7.2 V/725 mAh] VW-VBG130 (optional) [7.2 V/1250 mAh] VW-VBG260 (optional) [7.2 V/2500 mAh] VW-VBG6 (optional)* [7.2 V/5400 mAh] HDC-TM20 Charging time Maximum continuously recordable time 1 h 35 min 1 h 15 min 2 h 35 min...
... min Actual recordable time 45 min 1 h 20 min 2 h 35 min 6 h 20 min Battery model number [Voltage/Capacity (minimum)] Supplied battery/ VW-VBG070 (optional) [7.2 V/725 mAh] VW-VBG130 (optional) [7.2 V/1250 mAh] VW-VBG260 (optional) [7.2 V/2500 mAh] VW-VBG6 (optional)* [7.2 V/5400 mAh] HDC-TM20 Charging time Maximum continuously recordable time 1 h 35 min 1 h 15 min 2 h 35 min...

Hd Video Camera
Page 26
...HDC-HS20 Battery model number [Voltage/Capacity (minimum)] Charging time Recording destination Recording mode Maximum continuously recordable time Actual recordable time Supplied battery/ VW-VBG070 (optional) [7.2 V/725 mAh] 1 h 35 min HDD SD HA/HG/HX/ HE HA/HG/HX/ HE 1 h 10 min 1 h 15 min 40 min 45 min VW-VBG130 (optional) [7.2 V/1250 mAh] 2 h 35 min HDD SD...VW-VBG6 (optional)* [7.2 V/5400 mAh] 9 h 25 min HDD SD HA/HG/HX HE HA/HG/HX/ HE 9 h 10 min 9 h 25 min 9 h 55 min 5 h 40 min 5 h 50 min 6 h 5 min * The battery pack holder kit VW-VH04 (optional) is necessary. ≥ ...
...HDC-HS20 Battery model number [Voltage/Capacity (minimum)] Charging time Recording destination Recording mode Maximum continuously recordable time Actual recordable time Supplied battery/ VW-VBG070 (optional) [7.2 V/725 mAh] 1 h 35 min HDD SD HA/HG/HX/ HE HA/HG/HX/ HE 1 h 10 min 1 h 15 min 40 min 45 min VW-VBG130 (optional) [7.2 V/1250 mAh] 2 h 35 min HDD SD...VW-VBG6 (optional)* [7.2 V/5400 mAh] 9 h 25 min HDD SD HA/HG/HX HE HA/HG/HX/ HE 9 h 10 min 9 h 25 min 9 h 55 min 5 h 40 min 5 h 50 min 6 h 5 min * The battery pack holder kit VW-VH04 (optional) is necessary. ≥ ...

Hd Video Camera
Page 27
... falls below 9 hours 59 minutes. ≥ When changing modes, the time indication will turn off momentarily in order to recalculate the remaining battery capacity time. ≥ When using the Panasonic battery that you can vary depending on your actual use for this unit. It may take time to be shown. 27 VQT1Y00 The...
... falls below 9 hours 59 minutes. ≥ When changing modes, the time indication will turn off momentarily in order to recalculate the remaining battery capacity time. ≥ When using the Panasonic battery that you can vary depending on your actual use for this unit. It may take time to be shown. 27 VQT1Y00 The...

Hd Video Camera
Page 28
... AC adaptor. 3 Connect the DC cable to the DC input terminal [DC IN]. ≥ Make sure to set the mode to the AC adaptor, the battery will not charge. ≥ Do not use the AC cable from other equipment as it is turned off when disconnecting the AC adaptor. 28 VQT1Y00...
... AC adaptor. 3 Connect the DC cable to the DC input terminal [DC IN]. ≥ Make sure to set the mode to the AC adaptor, the battery will not charge. ≥ Do not use the AC cable from other equipment as it is turned off when disconnecting the AC adaptor. 28 VQT1Y00...

Hd Video Camera
Page 36
jPRE-REC is counting down. SETUP [DISPLAY] The screen indications are selected as shown in Memory] or [SD CARD]. PICTURE [QUALITY] [HI-SPEED BURST]*1 [SELF TIMER] [FLASH] [FLASH LEVEL]*1 [RED EYE]*1 [SHTR SOUND] MEDIA SELECT*2*3 (l 55) (l 70) (l 71) (l 71) (l 71) (l 72) (l 72) ... to AC adaptor jusing the USB cable for PC, DVD burner, printer etc. Media to record can be set to [HDD] or [SD CARD]. When this unit automatically turns off to save battery life. ≥ The power save function will not activate when: jconnected to [Built-in the illustration below. [OFF] [ON] A R ...
jPRE-REC is counting down. SETUP [DISPLAY] The screen indications are selected as shown in Memory] or [SD CARD]. PICTURE [QUALITY] [HI-SPEED BURST]*1 [SELF TIMER] [FLASH] [FLASH LEVEL]*1 [RED EYE]*1 [SHTR SOUND] MEDIA SELECT*2*3 (l 55) (l 70) (l 71) (l 71) (l 71) (l 72) (l 72) ... to AC adaptor jusing the USB cable for PC, DVD burner, printer etc. Media to record can be set to [HDD] or [SD CARD]. When this unit automatically turns off to save battery life. ≥ The power save function will not activate when: jconnected to [Built-in the illustration below. [OFF] [ON] A R ...
Hd Video Camera
Page 39
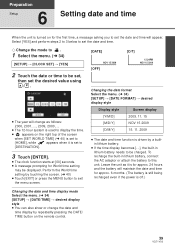
... button to set the date and time will appear. Preparation Setup 6 Setting date and time When the unit is turned on for approx. 6 months. (The battery is still being recharged even if the power is off.) Changing the date and time display mode Select the menu. (l 34) [SETUP] # [DATE/TIME] # ... appears on the remote control. 39 VQT1Y00 Select [YES] and perform steps 2 to 3 below to exit the menu screen. To recharge the built-in lithium battery needs to be set, then set the desired value using /. [DATE] NOV 15 2009 [OFF] [D/T] 12:34PM NOV 15 2009 Changing the date format Select...
... button to set the date and time will appear. Preparation Setup 6 Setting date and time When the unit is turned on for approx. 6 months. (The battery is still being recharged even if the power is off.) Changing the date and time display mode Select the menu. (l 34) [SETUP] # [DATE/TIME] # ... appears on the remote control. 39 VQT1Y00 Select [YES] and perform steps 2 to 3 below to exit the menu screen. To recharge the built-in lithium battery needs to be set, then set the desired value using /. [DATE] NOV 15 2009 [OFF] [D/T] 12:34PM NOV 15 2009 Changing the date format Select...

Hd Video Camera
Page 43
...recommended by the power on/off button when 36 hours have passed after the power is turned off when it with a new battery (part number: CR2025). The battery should normally last about 1 year, however this depends on the unit. Preparation Setup 8 Using with the remote control Select the... in the same manner as the corresponding buttons on how frequently the unit is incorrectly replaced. Dispose of explosion if battery is used batteries according to prevent swallowing. 43 VQT1Y00 Remove the insulation sheet A before using. CAUTION Danger of used . ≥ Keep the button-...
...recommended by the power on/off button when 36 hours have passed after the power is turned off when it with a new battery (part number: CR2025). The battery should normally last about 1 year, however this depends on the unit. Preparation Setup 8 Using with the remote control Select the... in the same manner as the corresponding buttons on how frequently the unit is incorrectly replaced. Dispose of explosion if battery is used batteries according to prevent swallowing. 43 VQT1Y00 Remove the insulation sheet A before using. CAUTION Danger of used . ≥ Keep the button-...

Hd Video Camera
Page 44
... the unit can also be operated by pressing the OK button. CR2025 only. Use of another battery may not operate properly even within the usable ranges. ≥ Selected item will disappear. 2 Select the item with Panasonic PART NO. STILL ADV PAUSE STILL ADV SKIP STOP SKIP MENU OK ≥ Selection/confirmation of...
... the unit can also be operated by pressing the OK button. CR2025 only. Use of another battery may not operate properly even within the usable ranges. ≥ Selected item will disappear. 2 Select the item with Panasonic PART NO. STILL ADV PAUSE STILL ADV SKIP STOP SKIP MENU OK ≥ Selection/confirmation of...

Hd Video Camera
Page 52
... is paused once when the recording time for one DVD disc (4.7 GB). ≥ Recordable time using the battery (l 25) ≥ Mosaic-pattern noise may appear on a playback image in the following cases. Select the menu.... (l 34) [RECORD SETUP] # [REC MODE] # desired setting SD card 1 GB 2 GB 4 GB 6 GB 8 GB 12 GB 16 GB 32 GB HA*1 7 ...or DVD disc. (l 105, 117) 52 VQT1Y00 jWhen there is a complicated pattern in memory or HDD is moved too fast jWhen a subject with normal picture quality. *4 1440k1080: Motion pictures can be...
... is paused once when the recording time for one DVD disc (4.7 GB). ≥ Recordable time using the battery (l 25) ≥ Mosaic-pattern noise may appear on a playback image in the following cases. Select the menu.... (l 34) [RECORD SETUP] # [REC MODE] # desired setting SD card 1 GB 2 GB 4 GB 6 GB 8 GB 12 GB 16 GB 32 GB HA*1 7 ...or DVD disc. (l 105, 117) 52 VQT1Y00 jWhen there is a complicated pattern in memory or HDD is moved too fast jWhen a subject with normal picture quality. *4 1440k1080: Motion pictures can be...
Hd Video Camera
Page 60
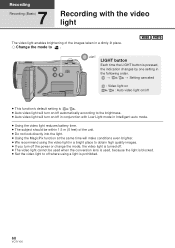
... blocked. ≥ Set the video light to . Recording 7 Recording (Basic) Recording with Low Light mode in Intelligent auto mode. ≥ Using the video light reduces battery time. ≥ The subject should be within 1.5 m (5 feet) of the images taken in a bright place to obtain high quality images. ≥ If you turn on...
... blocked. ≥ Set the video light to . Recording 7 Recording (Basic) Recording with Low Light mode in Intelligent auto mode. ≥ Using the video light reduces battery time. ≥ The subject should be within 1.5 m (5 feet) of the images taken in a bright place to obtain high quality images. ≥ If you turn on...


