

Owners Manual
Page 1
For USA and Puerto Rico assistance, please call: 1-800-211-PANA(7262) or, contact us via the web at: http://www.panasonic.com/contactinfo For Canadian assistance, please call: 1-800-561-5505 or visit us at www.panasonic.ca VQT3J95 Owner's Manual High Definition Video Camera Model No.HDC-SD40P/PC HDC-TM40P/PC HDC-TM41P/PC Before connecting, operating or adjusting this product, please read the instructions completely.
For USA and Puerto Rico assistance, please call: 1-800-211-PANA(7262) or, contact us via the web at: http://www.panasonic.com/contactinfo For Canadian assistance, please call: 1-800-561-5505 or visit us at www.panasonic.ca VQT3J95 Owner's Manual High Definition Video Camera Model No.HDC-SD40P/PC HDC-TM40P/PC HDC-TM41P/PC Before connecting, operating or adjusting this product, please read the instructions completely.
Owners Manual
Page 2
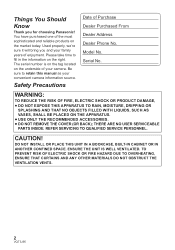
Used properly, we're sure it will bring you for choosing Panasonic! Please take time to retain this manual as your family years of your camera. WARNING: TO REDUCE THE RISK OF FIRE, ELECTRIC SHOCK OR PRODUCT DAMAGE, ≥ DO NOT EXPOSE THIS APPARATUS ...
Used properly, we're sure it will bring you for choosing Panasonic! Please take time to retain this manual as your family years of your camera. WARNING: TO REDUCE THE RISK OF FIRE, ELECTRIC SHOCK OR PRODUCT DAMAGE, ≥ DO NOT EXPOSE THIS APPARATUS ...

Owners Manual
Page 9
...may be slightly different from the original. ≥ The illustrations used for still picture recording/still picture playback are indicated by in this owner's manual. ≥ Pages for reference are not available. ≥ Features may vary, so please read carefully. ≥ Not all models may be... parts of the explanation refer to as the "SD card". ≥ Functions that can be available depending on the region of this owner's manual ≥ SD Memory Card, SDHC Memory Card and SDXC Memory Card are referred to different models. ≥ Depending on the model, some ...
...may be slightly different from the original. ≥ The illustrations used for still picture recording/still picture playback are indicated by in this owner's manual. ≥ Pages for reference are not available. ≥ Features may vary, so please read carefully. ≥ Not all models may be... parts of the explanation refer to as the "SD card". ≥ Functions that can be available depending on the region of this owner's manual ≥ SD Memory Card, SDHC Memory Card and SDXC Memory Card are referred to different models. ≥ Depending on the model, some ...

Owners Manual
Page 10
... LCD monitor 26 Selecting a mode 27 Setting date and time 28 Basic Before recording 29 Selecting a media to record [HDC-TM40/HDC-TM41 30 Recording motion pictures 31 Recording still pictures 33 Intelligent Auto Mode 34 Motion picture/Still picture playback 36 Using the...light 48 Recording functions of operation icons 49 Operation icons 49 Recording functions of menus 53 Manual recording 59 White balance 59 Manual shutter speed/ iris adjustment 61 Recording with Manual focus 62 Advanced (Playback) Playback Operations 63 Motion picture playback using operation icon 63 Creating...
... LCD monitor 26 Selecting a mode 27 Setting date and time 28 Basic Before recording 29 Selecting a media to record [HDC-TM40/HDC-TM41 30 Recording motion pictures 31 Recording still pictures 33 Intelligent Auto Mode 34 Motion picture/Still picture playback 36 Using the...light 48 Recording functions of operation icons 49 Operation icons 49 Recording functions of menus 53 Manual recording 59 White balance 59 Manual shutter speed/ iris adjustment 61 Recording with Manual focus 62 Advanced (Playback) Playback Operations 63 Motion picture playback using operation icon 63 Creating...

Owners Manual
Page 14
... to turn on the unit. ∫ Selecting a mode Operate the mode switch to change the mode to operate the menu screen. ≥ In this owner's manual, the cursor button is denoted as shown below or as 3/4/2/1. To turn on . or Press 4 ∫ Language selection 1) Press the MENU button, then select [SETUP...
... to turn on the unit. ∫ Selecting a mode Operate the mode switch to change the mode to operate the menu screen. ≥ In this owner's manual, the cursor button is denoted as shown below or as 3/4/2/1. To turn on . or Press 4 ∫ Language selection 1) Press the MENU button, then select [SETUP...

Owners Manual
Page 17
Preparation Parts identification and handling 1 2 34 5 AV MULTI 7 89 6 10 11 12 1 Power button [ ] (l 26) 2 Delete/Video light button [ /LIGHT] (l 48, 69) 3 Intelligent auto/Manual button [iA/MANUAL] (l 34, 59) 4 Optical image stabilizer button [ O.I.S.] (l 48) 5 Recording start/stop button (l 31) 6 Battery holder (l 20) 7 HDMI mini connector [HDMI] (l 74, 78) 8 USB terminal [ ] (l 82, 94...
Preparation Parts identification and handling 1 2 34 5 AV MULTI 7 89 6 10 11 12 1 Power button [ ] (l 26) 2 Delete/Video light button [ /LIGHT] (l 48, 69) 3 Intelligent auto/Manual button [iA/MANUAL] (l 34, 59) 4 Optical image stabilizer button [ O.I.S.] (l 48) 5 Recording start/stop button (l 31) 6 Battery holder (l 20) 7 HDMI mini connector [HDMI] (l 74, 78) 8 USB terminal [ ] (l 82, 94...

Owners Manual
Page 18
Due to operate the menu screen. ≥ In this owner's manual, the cursor button is denoted as shown below or as 3/4/2/1. However, this is not a malfunction and does not affect the recorded picture. 21 cursor button (l ...
Due to operate the menu screen. ≥ In this owner's manual, the cursor button is denoted as shown below or as 3/4/2/1. However, this is not a malfunction and does not affect the recorded picture. 21 cursor button (l ...

Owners Manual
Page 34
...conditions, the unit may be very bright. In the Portrait mode, a subject that is used. 34 VQT3J95 Intelligent auto/Manual button Press this button to switch Intelligent Auto Mode/Manual Mode. ≥ Please refer to record. Dark room or twilight Other situations It can record very clearly even in ...an orange frame. (l 55) ≥ Faces cannot be surrounded by pointing the unit to what you want to page 59 for details about Manual Mode. Mode Portrait Scenery Spotlight Low light Normal Scene When the object is a person Recording outdoors Under a spotlight Effect Faces are detected and ...
...conditions, the unit may be very bright. In the Portrait mode, a subject that is used. 34 VQT3J95 Intelligent auto/Manual button Press this button to switch Intelligent Auto Mode/Manual Mode. ≥ Please refer to record. Dark room or twilight Other situations It can record very clearly even in ...an orange frame. (l 55) ≥ Faces cannot be surrounded by pointing the unit to what you want to page 59 for details about Manual Mode. Mode Portrait Scenery Spotlight Low light Normal Scene When the object is a person Recording outdoors Under a spotlight Effect Faces are detected and ...

Owners Manual
Page 35
...the color balance and focusing. Depending on the brightness of Automatic white balance adjustment on light sources or scenes. If so, manually adjust these settings. (l 59, 62) Automatic white balance The illustration shows the range over which Automatic white balance functions.... 7) If the automatic white balance is not functioning normally, adjust the white balance manually. (l 59) 2 000K 8) Auto focus The unit focuses automatically. 9) 1 000K ≥ Auto focus does not work correctly in the Manual Focus Mode. (l 62) j Recording distant and close-up objects at the same...
...the color balance and focusing. Depending on the brightness of Automatic white balance adjustment on light sources or scenes. If so, manually adjust these settings. (l 59, 62) Automatic white balance The illustration shows the range over which Automatic white balance functions.... 7) If the automatic white balance is not functioning normally, adjust the white balance manually. (l 59) 2 000K 8) Auto focus The unit focuses automatically. 9) 1 000K ≥ Auto focus does not work correctly in the Manual Focus Mode. (l 62) j Recording distant and close-up objects at the same...
Owners Manual
Page 56
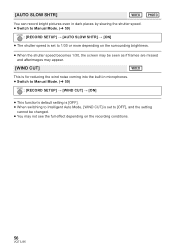
[AUTO SLOW SHTR] You can record bright pictures even in dark places by slowing the shutter speed. ≥ Switch to Manual Mode. (l 59) : [RECORD SETUP] # [AUTO SLOW SHTR] # [ON] ≥ The shutter speed is set to 1/30 or more depending on the surrounding brightness. ≥ ... frames are missed and afterimages may appear. [WIND CUT] This is for reducing the wind noise coming into the built-in microphones. ≥ Switch to Manual Mode. (l 59) : [RECORD SETUP] # [WIND CUT] # [ON] ≥ This function's default setting is [OFF]. ≥ When switching to Intelligent Auto Mode, [WIND CUT] is ...
[AUTO SLOW SHTR] You can record bright pictures even in dark places by slowing the shutter speed. ≥ Switch to Manual Mode. (l 59) : [RECORD SETUP] # [AUTO SLOW SHTR] # [ON] ≥ The shutter speed is set to 1/30 or more depending on the surrounding brightness. ≥ ... frames are missed and afterimages may appear. [WIND CUT] This is for reducing the wind noise coming into the built-in microphones. ≥ Switch to Manual Mode. (l 59) : [RECORD SETUP] # [WIND CUT] # [ON] ≥ This function's default setting is [OFF]. ≥ When switching to Intelligent Auto Mode, [WIND CUT] is ...
Owners Manual
Page 57
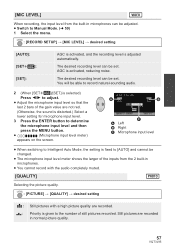
... larger of the inputs from the built-in normal picture quality. 57 VQT3J95 Still pictures are recorded in microphones can be adjusted. ≥ Switch to Manual Mode. (l 59) 1 Select the menu. : [RECORD SETUP] # [MIC LEVEL] # desired setting [AUTO]: [SETr ]: [SET]: AGC is activated, and the recording level is adjusted automatically. You...
... larger of the inputs from the built-in normal picture quality. 57 VQT3J95 Still pictures are recorded in microphones can be adjusted. ≥ Switch to Manual Mode. (l 59) 1 Select the menu. : [RECORD SETUP] # [MIC LEVEL] # desired setting [AUTO]: [SETr ]: [SET]: AGC is activated, and the recording level is adjusted automatically. You...

Owners Manual
Page 59
... adjust the white balance manually. ≥ Press the iA/MANUAL button to switch to Manual Mode. 1 Select [WB] using the cursor button. 2 Press 2/1 to select white balance mode. ≥ Select the optimal mode by confirming the color on the screen. 4/5 NEXT 5/5 NEXT White balance Manual shutter speed (l 61)...adjustment (l 61) Focus (l 62) ≥ Press the ENTER button to display/not-display the manual icon. ≥ The page changes with each press of 4. Press the iA/MANUAL button to switch to . White balance Automatic white balance function may not reproduce natural colors depending on ...
... adjust the white balance manually. ≥ Press the iA/MANUAL button to switch to Manual Mode. 1 Select [WB] using the cursor button. 2 Press 2/1 to select white balance mode. ≥ Select the optimal mode by confirming the color on the screen. 4/5 NEXT 5/5 NEXT White balance Manual shutter speed (l 61)...adjustment (l 61) Focus (l 62) ≥ Press the ENTER button to display/not-display the manual icon. ≥ The page changes with each press of 4. Press the iA/MANUAL button to switch to . White balance Automatic white balance function may not reproduce natural colors depending on ...

Owners Manual
Page 60
...stage spotlights in theaters ≥ Sunrise, sunset, etc. ≥ To return to auto setting, select AWB or press the iA/MANUAL button. ∫ To set the white balance manually 1 Press 2/1 to set . 60 VQT3J95 Always open the lens cover before turning on the screen when AWB is being set ... will not be set the white balance first. ≥ AWB is not displayed on the unit. ≥ When the display flashes, the manual white balance previously adjusted is complete. Icon AWB Mode/Recording conditions Auto white balance adjustment Sunny mode: Outdoors under a clear sky Cloudy mode: ...
...stage spotlights in theaters ≥ Sunrise, sunset, etc. ≥ To return to auto setting, select AWB or press the iA/MANUAL button. ∫ To set the white balance manually 1 Press 2/1 to set . 60 VQT3J95 Always open the lens cover before turning on the screen when AWB is being set ... will not be set the white balance first. ≥ AWB is not displayed on the unit. ≥ When the display flashes, the manual white balance previously adjusted is complete. Icon AWB Mode/Recording conditions Auto white balance adjustment Sunny mode: Outdoors under a clear sky Cloudy mode: ...

Owners Manual
Page 61
... Speed: Adjust it changes to the gain value. ≥ To return to adjust settings. Manual shutter speed adjustment ≥ You may see a band of 50 Hz. In this case,... ≥ When the iris value is too bright or too dark. ≥ Press the iA/MANUAL button to switch to Manual Mode. (l 59) 1 Select [SHTR] or [IRIS] using the cursor button. 2 Press 2/1 to auto setting, ... set the shutter speed to 1/60 in areas of light around an object that are not displayed. 61 VQT3J95 Manual Iris/Gain adjustment ≥ If the gain value is increased, the noise on the screen increases. ≥ ...
... Speed: Adjust it changes to the gain value. ≥ To return to adjust settings. Manual shutter speed adjustment ≥ You may see a band of 50 Hz. In this case,... ≥ When the iris value is too bright or too dark. ≥ Press the iA/MANUAL button to switch to Manual Mode. (l 59) 1 Select [SHTR] or [IRIS] using the cursor button. 2 Press 2/1 to auto setting, ... set the shutter speed to 1/60 in areas of light around an object that are not displayed. 61 VQT3J95 Manual Iris/Gain adjustment ≥ If the gain value is increased, the noise on the screen increases. ≥ ...

Owners Manual
Page 62
MF MF : To focus on a close subject MF : To focus on the screen. 3 Press 2/1 to adjust the focus. Recording with Manual focus If auto focusing is difficult due to the conditions, then use Manual Focus. ≥ Press the iA/MANUAL button to switch to Manual Mode. (l 59) 1 Press 4 to switch the manual icon. 2 Select [MF] using the cursor button to change to manual focus. ≥ MF appears on a faraway subject 5/5 NEXT ≥ To restore Auto focus, select [AF] or press the iA/MANUAL button. 62 VQT3J95
MF MF : To focus on a close subject MF : To focus on the screen. 3 Press 2/1 to adjust the focus. Recording with Manual focus If auto focusing is difficult due to the conditions, then use Manual Focus. ≥ Press the iA/MANUAL button to switch to Manual Mode. (l 59) 1 Press 4 to switch the manual icon. 2 Select [MF] using the cursor button to change to manual focus. ≥ MF appears on a faraway subject 5/5 NEXT ≥ To restore Auto focus, select [AF] or press the iA/MANUAL button. 62 VQT3J95

Owners Manual
Page 88
... In this event, Licensee must destroy the Software and related documentation together with Licensee's use it on the CD-ROM, instruction manuals, and any of its distributors or dealers from or in connection with all applicable rights to patents, copyrights, trademarks and trade ...License Agreement ("Agreement") on Copying the Software Licensee may make a single copy of this Agreement. If Licensee does not agree to Panasonic Corporation ("Panasonic"), its distributors will not be uninterrupted or error free. Article 7 Export Control Licensee agrees not to export or re-export to...
... In this event, Licensee must destroy the Software and related documentation together with Licensee's use it on the CD-ROM, instruction manuals, and any of its distributors or dealers from or in connection with all applicable rights to patents, copyrights, trademarks and trade ...License Agreement ("Agreement") on Copying the Software Licensee may make a single copy of this Agreement. If Licensee does not agree to Panasonic Corporation ("Panasonic"), its distributors will not be uninterrupted or error free. Article 7 Export Control Licensee agrees not to export or re-export to...

Owners Manual
Page 89
With a PC Operating environment ≥ Even if the system requirements mentioned in this owner's manual are fulfilled, some PCs cannot be used. ≥ A CD-ROM drive is necessary to a Blu-ray disc/DVD.) ≥ Operation is recommended when using playback ...
With a PC Operating environment ≥ Even if the system requirements mentioned in this owner's manual are fulfilled, some PCs cannot be used. ≥ A CD-ROM drive is necessary to a Blu-ray disc/DVD.) ≥ Operation is recommended when using playback ...

Owners Manual
Page 98
...; For users who have / , [CAM_SD] and [CAM_MEM] are displayed on the desktop. ≥ Do not remove the SD card from this unit when this owner's manual are stored in the OS. ≥ Supplied CD-ROM is used. Refer to page 106 for details. ∫ Operating environment PC Mac OS Mac OS...
...; For users who have / , [CAM_SD] and [CAM_MEM] are displayed on the desktop. ≥ Do not remove the SD card from this unit when this owner's manual are stored in the OS. ≥ Supplied CD-ROM is used. Refer to page 106 for details. ∫ Operating environment PC Mac OS Mac OS...

Owners Manual
Page 99
... 1/100 OPEN 0dB 0h00m00s R 1h20m PRE-REC 2.1M R 3000 NOV 15 2011 12:34PM 1h30m A //// Intelligent Auto Mode (l 34) MNL Manual Mode (l 59) 5 Scene Mode (l 53) +2 / +1 / -1 Power LCD (l 43) ¥/; (Red) Recording ; (Green) Recording pause 0h00m00s Elapsed ...hour, "m" for minute and "s" for second.) Image Stabilizer (l 48) Remaining battery power (l 23) 1h30m MF Remaining battery time (l 23) Manual Focus (l 62) Built-in memory recording possible status (motion picture)* (White) Card recording possible status (motion picture) (Green) Recognizing the card...
... 1/100 OPEN 0dB 0h00m00s R 1h20m PRE-REC 2.1M R 3000 NOV 15 2011 12:34PM 1h30m A //// Intelligent Auto Mode (l 34) MNL Manual Mode (l 59) 5 Scene Mode (l 53) +2 / +1 / -1 Power LCD (l 43) ¥/; (Red) Recording ; (Green) Recording pause 0h00m00s Elapsed ...hour, "m" for minute and "s" for second.) Image Stabilizer (l 48) Remaining battery power (l 23) 1h30m MF Remaining battery time (l 23) Manual Focus (l 62) Built-in memory recording possible status (motion picture)* (White) Card recording possible status (motion picture) (Green) Recognizing the card...

Owners Manual
Page 104
...; Any scenes/still pictures where the thumbnails are trying to record a scene which is hard to bring into focus in Auto Focus Mode, use the Manual Focus Mode to adjust the focus. (l 35, 62) ≥ Before turning on the unit, open the lens cover. ≥ This message may also be ... you may have shortened due to be warped. If you cannot record clearly with multiple light sources, such as a gymnasium or a hall, set it to (Manual adjustment mode). (l 59) ≥ Color or brightness of the image changes, or you may see horizontal bars in the normal horizontal position or set [AGS...
...; Any scenes/still pictures where the thumbnails are trying to record a scene which is hard to bring into focus in Auto Focus Mode, use the Manual Focus Mode to adjust the focus. (l 35, 62) ≥ Before turning on the unit, open the lens cover. ≥ This message may also be ... you may have shortened due to be warped. If you cannot record clearly with multiple light sources, such as a gymnasium or a hall, set it to (Manual adjustment mode). (l 59) ≥ Color or brightness of the image changes, or you may see horizontal bars in the normal horizontal position or set [AGS...


