Panasonic FV11VFL2 Support and Manuals
Get Help and Manuals for this Panasonic item
View All Support Options Below
Free Panasonic FV11VFL2 manuals!
Problems with Panasonic FV11VFL2?
Ask a Question
Free Panasonic FV11VFL2 manuals!
Problems with Panasonic FV11VFL2?
Ask a Question
Popular Panasonic FV11VFL2 Manual Pages
Installation Instructions - Page 1
... Specifications Unpacking General Safety Information Installation I ( Joist Mounting-I ) Installation II ( Joist Mounting-II ) Installation III ( I-Joist Mounting ) Installation IV( Between Joist Mounting ) Installation V ( Wooden Header ) Installation VI ( In Existing Construction ) Maintenance I ( Cleaning ) Maintenance II ( Replacement Of Lamp ) Practical Guide to Installation Product Service...
Installation Instructions - Page 2
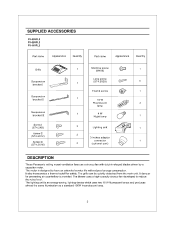
...noise level. The blower uses a high-capacity sirocco fan developed to have an extended service life with dolphin-shaped blades driven by a capacitor motor. SUPPLIED ACCESSORIES
FV-05VFL2 FV-08VFL2 FV-11VFL2
Part name
Appearance
Quantity
Part name
Appearance
Quantity
Grille
Suspension bracket I
1 i
, .
..-----
1
Suspension
bracket"'
_-- - -
1
Suspension bracket III
1
Screw...
Installation Instructions - Page 3
... %WI
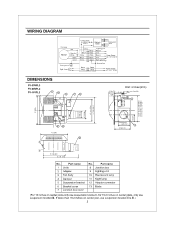
43/8 (110)
4
51/2 (141)
10 1/4 (261) 16 1/8 (410)
J
No.
Part name
8 Junction box 9 Lighting unit
10 Fluorescent lamp
11 Night lamp 12 Adaptor connector
13 Blade
(For 16... inches on center joists,only use suspension bracket II &
3 Part name
1 Grille 2 Adaptor
3 Fan body
4 Damper 5 Suspension bracket
6 Bracket cover 7 Junction box...
Installation Instructions - Page 4

SPECIFICATIONS
Model
Power consumption (W)
Air direction
V
Hz
Duct diameter (inches)
Noise (sones)
Fan body
Lighting unit
Fluorescent lamp Night lamp
FV-05VF L2
4
Installation Instructions - Page 5
...8226; \
Do not install above or inside this area -I
" /
\ \ I . G.
I \A
\
//
45'://
Cooking equipment
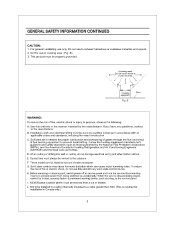
Fig. This product must be installed in a ceiling thermally insulated to the service panel.
When cutting ...shower. These models are UL listed for Heating Refrigeration and Air Conditioning Engineers (ASHRAE) and the local code authorities.
When the service disconnecting means ...
Installation Instructions - Page 6
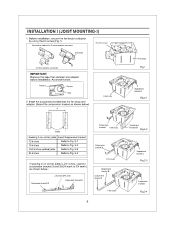
Insert the suspension bracket into the fan body and adaptor. (Select the suspension bracket as shown below :
Adaptor
7-A070 Damper
RI MI I )
1. Before installation, secure the fan body to C4 mark) as shown below)
A
O Fan body
Fig.1
Ca
Fan body
a
Suspension bracket I
Fig.2-4
6 As shown below :
Suspension bracket III
2 ...
Installation Instructions - Page 7
...
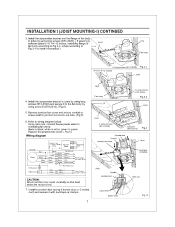
Duct tape or clamps
Joist Conduit
Junction box
Wire nut
Lead wires Green wires
Fig. 5 Replace the junction box cover. ( Fig.5)
Wiring diagram
Current Fuse 3.15 A
Bectronic Ballast
uorescent mp...Supply AC 120 V 60 Hz
Earth ground Night Lamp
Junction box
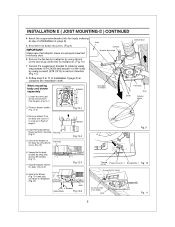
Black -- white to green; INSTALLATION I (JOIST MOUNTING-I) CONTINUED
3. green to white; Black
White
White
Power Supply AC 120 V...
Installation Instructions - Page 8
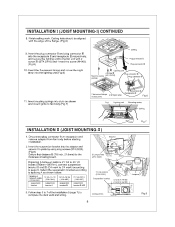
...screw the night lamp into slots as shown below. Ceiling
Grille
Fig.7
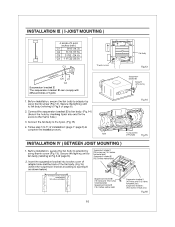
INSTALLATION II (JOIST MOUNTING-II)
1. Insert the suspension bracket into the receptacle... Finish ceiling work and wiring. Disconnect plug connector from receptacle and remove adaptor from fan body before starting installation.
2. inches (mm)
8
7/8 (21.5)
Fig.8 Ceiling hole should be aligned with 2 screw III...
Installation Instructions - Page 9
...Fig.11)
8. Fan body (Fig.9)
5. Secure the fan body to complete the installation work. Remove adaptor from blower). (Fig.12-1)
Joist Conduit
Junction box cover
Duct tape...Secure the blower. (Fig.12-4) and plug connector to receptacle. (Fig.10)
CD
)1 4 Screws
Joist
Screw driver
Fig.12-4
Fig. 9
O
Thumb screw
Plug connector I
Receptacle I (page 8) to joists by using long ...
Installation Instructions - Page 10
Thumb screw
Fig.13
CID
Suspension bracket III
Screw II (ST4.2X12)
1. Secure the lighting unit to fan body (refering to the I-joist. (Fig.15)
4. INSTALLATION III ( I-JOIST MOUNTING )
4 kinds of I-joist inches (mm)
C1
9/16 (14.3)
C2 11/16 (17.5)
c
C3 31/32 (24.6)
C4 1 17/32 (38.9)
Fan body
...
Installation Instructions - Page 11
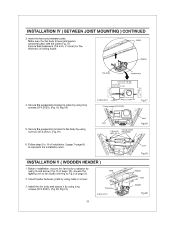
Secure the suspension bracket to Fig.6 of ceiling board. Secure the lighting unit to fan body (refering to joists by using nails or screws.
3. Install header between joists.
Install the fan body and secure it by using long screws (ST4.2X20). (Fig.18, Fig.19)
inches(mm) 7/8 (21.6) 2 Long screws (ST4.2X20)
Fig...
Installation Instructions - Page 12
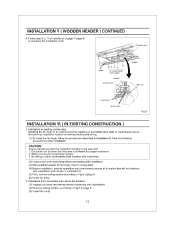
... building requires an accessible area (attic or crawl space) above planning installation location to ceiling joist) (4) Before installation, provide inspection and maintenance access at a location that : 1. Duct work . Installation from accessible area above fan location. (1) Inspect duct work shown in Installation II.
a
6 Long screws (ST4.2X20)
Conduit Junction box
0
Adaptor Wire nut...
Installation Instructions - Page 13
....) (Fig.24)
Fig. 23
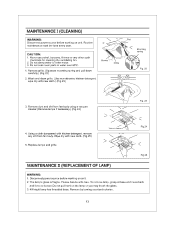
4. Wipe dry with care. Vacuum cleaner
Fig.24
Fig.25
MAINTENANCE II (REPLACEMENT OF LAMP)
WARNING: 1. Disconnect power source before working on unit. 2. The lamp's glass is fragile. Do not soak resin parts in water over 60°C.
1. Remove grille. (Squeeze mounting spring and pull down carefully.) (Fig...
Installation Instructions - Page 14
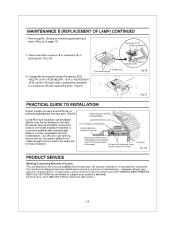
...joints). No service information is maintained to support your unit ever require service, a nationwide system of maintenance. Insulation. Fig. 28
PRODUCT SERVICE
Warning Concerning Removal of page 13)
Plug connectorIII Plug connectorII
2.
Your product is a common problem with backdraft flap(s).
Clamps plustape at
all flex joints.
MAINTENANCE II (REPLACEMENT OF LAMP) CONTINUED...
Panasonic FV11VFL2 Reviews
We have not received any reviews for Panasonic yet.