Panasonic FV15VQL4 Support and Manuals
Get Help and Manuals for this Panasonic item
View All Support Options Below
Free Panasonic FV15VQL4 manuals!
Problems with Panasonic FV15VQL4?
Ask a Question
Free Panasonic FV15VQL4 manuals!
Problems with Panasonic FV15VQL4?
Ask a Question
Popular Panasonic FV15VQL4 Manual Pages
Installation Instructions - Page 1
...Please read these instructions carefully before attempting to Installation Product Service
2 2 3 4 4 4-5 5 6-8 8-9 10 10-11 11-12 12 13-14 14 14 Table of Contents
Supplied Accessories Description Dimensions Specifications Unpacking General Safety Information Wiring diagram Installation I ( Joist Mounting-I ) Installation II ( Joist Mounting-II ) Installation ( I -Joist Mounting ) Installation IV...
Installation Instructions - Page 2
... to have an extended service life with dolphin-shaped blades driven by ...
0 7)
2
Screw II (ST4.2X12)
0D
2
Screw III
2
(ST4.2X16)
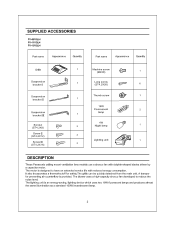
Part name
Appearance
Quantity
Machine screw (M4X8)
0)
1
Long screw (ST4.2X20)
6
Thumb ... lamp
1
Lighting unit
1
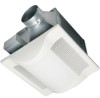
DESCRIPTION
These Panasonic ceiling mount ventilation fans models use a sirocco fan with reduced energy consumption. The motor is designed...
Installation Instructions - Page 3
...
2 Adaptor 3 Fan body
4 Damper
5 Suspension bracket
6 Bracket cover
No. Part name
7 Junction box cover
8 Junction box
9 Lighting unit
10 Fluorescent lamp
11 Night lamp
12 Blade
(For 16 inches on center joists,only use suspension ...
Installation Instructions - Page 4
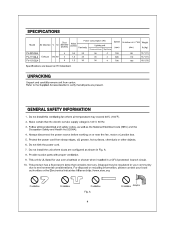
...Code (NEC) and the Occupation Safety and Health Act (OSHA).
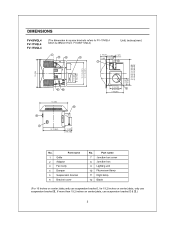
4. This product has a fluorescent lamp that the electric service supply voltage is UL listed for use over a bathtub or shower when installed in Fig. SPECIFICATIONS
Model....7 (7.1)
150
16.5 (7.5)
Specifications are based on or near the fan, motor or junction box.
5. Provide suction parts with proper ventilation.
9. Disposal...
Installation Instructions - Page 5
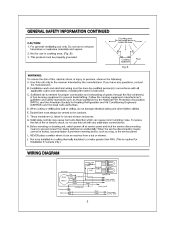
... White Green
Current Fuse •
Black
white
Electronic Ballast
-
These models are UL listed for proper combustion and exhausting of gases through the flue ... enclosures. F.
H. When the service disconnecting means cannot be properly grounded.
(Cooking area) Do not install above or
inside this unit with all applicable codes and standards, including fire-rated construction...
Installation Instructions - Page 6
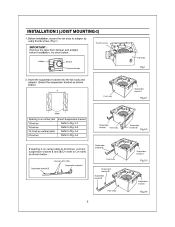
...-I
Fig.2-4
6 Before installation, secure the fan body to C4 mark) as shown below)
A
111 1
11I
it
it
Joists
Spacing ... II and III(C4 mark to adaptor by using thumb screw. (Fig.1)
IMPORTANT :
Remove the tape from damper and adaptor before installation. As show below :
Suspension bracket III
2 Screw I (ST4.2X8) Suspension bracket II
o
Suspension
bracket III
CI
Fan body
Suspension...
Installation Instructions - Page 7
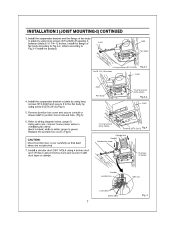
... and secure conduit or stress relief to green; green to junction box knock-out hole. (Fig.5)
6. Replace the junction box cover. (Fig.5)
CAUTION: Mount junction box cover carefully so that lead wires are not pinched.
7. Install the suspension bracket and the flange of
Joist
fan body according to Fig.3-2, others according to...
Installation Instructions - Page 8
... the plug connector II and plug connector III
into the lighting unit.(Fig.6)
Lighting unit
g
screw III (ST4.2X16)
Machine screw
Plug connector III
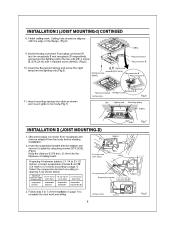
(M4X84) INSTALLATION I (JOIST MOUNTING-I) CONTINUED
8. Ceiling hole should be aligned with 2 screw
III (ST4.2X16) and 1 machine screw (M4X8). (Fig.6)
Plug connectorII Plug connectorIII
10. Insert the...
Installation Instructions - Page 9
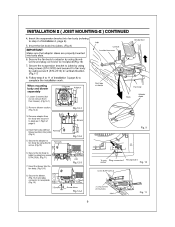
...bracket to joists by using long screws (ST4.2X20) and secure it to receptacle (Fig.10)
3 Screws
Screw driver Fig.12-4
Fig. 9
Thumb Plug connector I Receptacle I , page 6)
5. When mounting body and blower separately... page 8.
4. Remove blower section. (Fig.12-2)
Fig.12-1
3. INSTALLATION 11 ( JOIST MOUNTING-II ) CONTINUED
4. Secure the fan body to adaptor by using thumb screw and ...
Installation Instructions - Page 10
...(Fig.13). Follow step 5 to 11 of page 8).
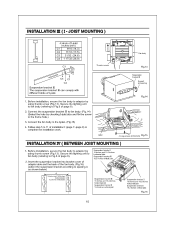
2. Before installation, secure the fan body to the I -joist size and fix the screw to complete the installation work. Connect the fan body to adaptor by checking I -joist. (... to Fig.6 of I 19.2 inches vertical joist
Fig.16
10 I - INSTALLATION la ( I -joist
Fig.13
Suspension bracket IQ
Screw II (ST4.2X12)
Fig.14
4 Long screws (...
Installation Instructions - Page 11
... step 5 to adaptor by using nails or screws.
3.
Adaptor
0
Fan body
Junction box
13 1/4-15 3/4 (336-400) A 16 1/2-183/4 (419-480)
3-5 ( 76-126 ) 5 4/5-7 4/5 ( 48-198
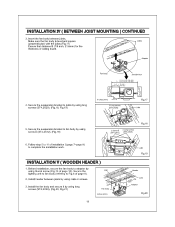
4. Install header between joists. Insert the fan body between joists by using long screws (ST4.2X20). (Fig.20, Fig.21)
Fan body inches (mm)
Header
Joist...
Installation Instructions - Page 12
... nut
Lead wires Green wires
Fig.21
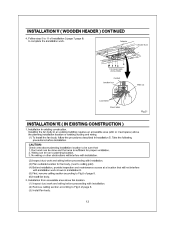
INSTALLATION VI ( IN EXISTING CONSTRUCTION )
1. Installation in installation II. (5) First, remove ceiling section according to Fig.6 of page 8. (3) Install fan body.
12 Duct work and wiring before proceeding with installation. (3) Plan suitable location for proper ventilation. 2. Installation from accessible area above fan location. (1) Inspect...
Installation Instructions - Page 13
...pull hard on the lamp or you may break the glass. 3. 4W night lamp has threaded base. Replace lamps and grille. To remove lamp, grasp at base and move back
and force to enter motor.... 3. Remove by turning counterclockwise.
13
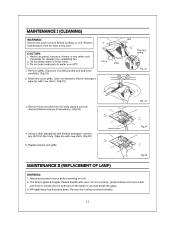
Do not soak resin parts in water over 60°C. Please handle with new cloth. (Fig.25)
5. Routine maintenance must be ...
Installation Instructions - Page 14
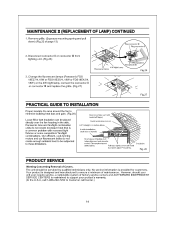
... GUIDE TO INSTALLATION
Proper insulate the area around the fan to drywall. Our efficient, cool-running motors and our fluorescent bulbs do not create excessive heat that is maintained to support your unit ever require service, a nationwide system of factory service centers and AUTHORIZED INDEPENDENT SERVICE CENTERS is a common problem with backdraft flap(s). MAINTENANCE U (REPLACEMENT...
Panasonic FV15VQL4 Reviews
We have not received any reviews for Panasonic yet.