
Operating Instructions
Page 2
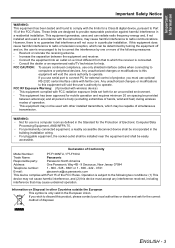
... user to the presence of your community due to 125 V, 7 A. We hope it in your new product, and that may result. If you will be used for power supplies up to environmental considerations. Model number: Serial number: PT-F100NTU / PT-F100U WARNING: TO REDUCE THE RISK OF FIRE OR ELECTRIC SHOCK, DONOT EXPOSE THIS PRODUCT TO RAIN OR MOISTURE. Do not remove Indication...
... user to the presence of your community due to 125 V, 7 A. We hope it in your new product, and that may result. If you will be used for power supplies up to environmental considerations. Model number: Serial number: PT-F100NTU / PT-F100U WARNING: TO REDUCE THE RISK OF FIRE OR ELECTRIC SHOCK, DONOT EXPOSE THIS PRODUCT TO RAIN OR MOISTURE. Do not remove Indication...
Operating Instructions
Page 3
... and shall be incorporated in other installed transmitters, which the receiver is connected. - If this equipment will void the users authority to operate. This equipment has been approved for help. Declaration of Conformity Model Number: PT-F100NTU / PT-F100U Trade Name: Panasonic Responsible party: Panasonic North America Address: One Panasonic Way 4B - 9 Secaucus, New Jersey 07094 Telephone number: 1 - 800 - 528 - 8601 or 1 - 800 - 222...
... and shall be incorporated in other installed transmitters, which the receiver is connected. - If this equipment will void the users authority to operate. This equipment has been approved for help. Declaration of Conformity Model Number: PT-F100NTU / PT-F100U Trade Name: Panasonic Responsible party: Panasonic North America Address: One Panasonic Way 4B - 9 Secaucus, New Jersey 07094 Telephone number: 1 - 800 - 528 - 8601 or 1 - 800 - 222...
Operating Instructions
Page 6
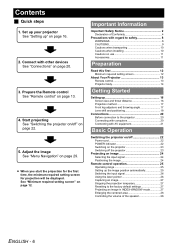
... Getting Started Setting up 16 Screen size and throw distance 16 Projection method 17 Front leg adjusters and throwing angle 17 Lens shift and positioning 18 Connections 20 Before connection to the factory default settings 27 Projecting an image in INDEX-WINDOW mode 27 Enlarging the centered area 28 Controlling the volume of the speaker 28 ENGLISH - 6 Set up your projector See "Setting up the image position automatically 25 Switching the input signal 26 Using the...
... Getting Started Setting up 16 Screen size and throw distance 16 Projection method 17 Front leg adjusters and throwing angle 17 Lens shift and positioning 18 Connections 20 Before connection to the factory default settings 27 Projecting an image in INDEX-WINDOW mode 27 Enlarging the centered area 28 Controlling the volume of the speaker 28 ENGLISH - 6 Set up your projector See "Setting up the image position automatically 25 Switching the input signal 26 Using the...
Operating Instructions
Page 10
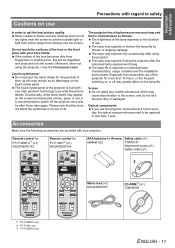
... the remote control promptly. Avoid setting up on this may result. See "TEMP indicator" on the projector. ET-PKF100H, ET-PKF100S). If you believe that you leave used batteries from the remote control. Ask an Authorized Service Center to purchase the separate installation kit (Model No. The projector lens need to clean inside the projector at the bottom securely. Do not set the HIGHLAND to sudden temperature changes, such...
... the remote control promptly. Avoid setting up on this may result. See "TEMP indicator" on the projector. ET-PKF100H, ET-PKF100S). If you believe that you leave used batteries from the remote control. Ask an Authorized Service Center to purchase the separate installation kit (Model No. The projector lens need to clean inside the projector at the bottom securely. Do not set the HIGHLAND to sudden temperature changes, such...
Operating Instructions
Page 11
... replaced in less than 10 hours, or the frequent switching on or off the projector once and try after using the projector, close the Front panel cover. The projector has a high pressure mercury lamp and that this may remain as fixed points of the lens becomes dirty from shining onto the screen. The lamp may explode if using the projector after the instructed lamp replacement timing. Especially the consecutive use of your LCD...
... replaced in less than 10 hours, or the frequent switching on or off the projector once and try after using the projector, close the Front panel cover. The projector has a high pressure mercury lamp and that this may remain as fixed points of the lens becomes dirty from shining onto the screen. The lamp may explode if using the projector after the instructed lamp replacement timing. Especially the consecutive use of your LCD...

Operating Instructions
Page 13
... flash. Preparation About Your Projector Remote control POWER button While the MAIN POWER is on, switch between stand-by means of digital zoom. (page 28) Control to adjust the volume of the speakers. (page 28) Automatically adjust the setting of DOT CLOCK, CLOCK PHASE and SIGNAL SEARCH for the projected image of COMPUTER signal. (page 25) INPUT SELECT buttons Switch the required input signal button to select. If you press any button except the LASER button, the Remote control indicator...
... flash. Preparation About Your Projector Remote control POWER button While the MAIN POWER is on, switch between stand-by means of digital zoom. (page 28) Control to adjust the volume of the speakers. (page 28) Automatically adjust the setting of DOT CLOCK, CLOCK PHASE and SIGNAL SEARCH for the projected image of COMPUTER signal. (page 25) INPUT SELECT buttons Switch the required input signal button to select. If you press any button except the LASER button, the Remote control indicator...

Operating Instructions
Page 15
... ceiling. (page 44) LAN Connect a LAN cable for input and output by Kensington, to VIDEO IN, S-VIDEO IN and COMPONENT IN. Compatible with the Kensington MicroSaver Security System. Selectable for network connection. ARF (Auto Rolling Filter) compartment (page 42) Font leg adjusters Screw up/down to adjust the projection angle. (page 17) About Your Projector Lamp unit compartment (page 43) Air exhaust port Heated air comes out of them as this opening...
... ceiling. (page 44) LAN Connect a LAN cable for input and output by Kensington, to VIDEO IN, S-VIDEO IN and COMPONENT IN. Compatible with the Kensington MicroSaver Security System. Selectable for network connection. ARF (Auto Rolling Filter) compartment (page 42) Font leg adjusters Screw up/down to adjust the projection angle. (page 17) About Your Projector Lamp unit compartment (page 43) Air exhaust port Heated air comes out of them as this opening...

Operating Instructions
Page 17
... and projecting from front projecting from rear INSTALLATION: FRONT/DESK J Mounting in the ceiling and projecting from front INSTALLATION: REAR/DESK J Mounting in the ceiling and projecting from rear INSTALLATION: FRONT/CEILING INSTALLATION: REAR/CEILING NOTE: • A translucent screen is required. • See "Ceiling mount bracket safeguards" on page 44. To set the desired method in the projector, See "INSTALLATION" on page 37.. Getting Started Setting up /down the front leg adjusters to control...
... and projecting from front projecting from rear INSTALLATION: FRONT/DESK J Mounting in the ceiling and projecting from front INSTALLATION: REAR/DESK J Mounting in the ceiling and projecting from rear INSTALLATION: FRONT/CEILING INSTALLATION: REAR/CEILING NOTE: • A translucent screen is required. • See "Ceiling mount bracket safeguards" on page 44. To set the desired method in the projector, See "INSTALLATION" on page 37.. Getting Started Setting up /down the front leg adjusters to control...
Operating Instructions
Page 22
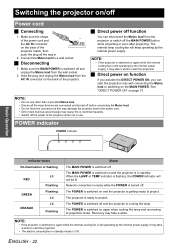
... or flashing RED GREEN ORANGE Lit Flashing Flashing Lit Lit Flashing Status The MAIN POWER is flashing, the POWER indicator will keep operating by the internal power supply, it may take a while to project. When the LAMP or TEMP indicator is switched off and unplug the Mains lead from the wall socket. 2. Connect the Mains lead to the projector when not in use other than a provided Mains lead. • Ensure all the way in standby mode...
... or flashing RED GREEN ORANGE Lit Flashing Flashing Lit Lit Flashing Status The MAIN POWER is flashing, the POWER indicator will keep operating by the internal power supply, it may take a while to project. When the LAMP or TEMP indicator is switched off and unplug the Mains lead from the wall socket. 2. Connect the Mains lead to the projector when not in use other than a provided Mains lead. • Ensure all the way in standby mode...
Operating Instructions
Page 24
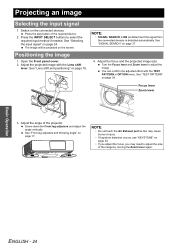
... Air Exhaust port as default and the signal from the connected devices is ON as this may need to adjust the size of the required device. 2. Basic Operation ENGLISH - 24 See "SIGNAL SEARCH" on page 24. Adjust the projected image with the TEST PATTERN in OPTION menu. Turn the Focus lever and Zoom lever to select the required input method if needed. Screw down the Front leg adjusters and adjust...
... Air Exhaust port as default and the signal from the connected devices is ON as this may need to adjust the size of the required device. 2. Basic Operation ENGLISH - 24 See "SIGNAL SEARCH" on page 24. Adjust the projected image with the TEST PATTERN in OPTION menu. Turn the Focus lever and Zoom lever to select the required input method if needed. Screw down the Front leg adjusters and adjust...
Operating Instructions
Page 27
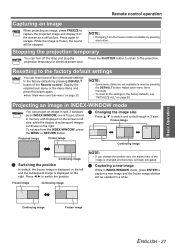
.... Resetting to the factory default settings You can turn off the lamp and stop the Press the SHUTTER button to return to the projection. Display the required sub menu or the menu items and press the button again. Adjust each menu items manually. • To reset all the settings to capture a new image and the frozen image window will be updated in 3 size. Continuing image Frozen image ENGLISH - 27 Press again to switch the position. Q Capturing a new image...
.... Resetting to the factory default settings You can turn off the lamp and stop the Press the SHUTTER button to return to the projection. Display the required sub menu or the menu items and press the button again. Adjust each menu items manually. • To reset all the settings to capture a new image and the frozen image window will be updated in 3 size. Continuing image Frozen image ENGLISH - 27 Press again to switch the position. Q Capturing a new image...
Operating Instructions
Page 29
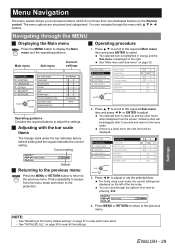
... mark under the bar indicates factory default setting and the square indicates the current setting. Settings ENGLISH - 29 Press MENU or RETURN to return to adjust the settings. Main menu Sub-menu Current settings PICTURE POSITION LANGUAGE OPTION SECURITY NETWORK SELECT RETURN ENTER PICTURE MODE CONTRAST BRIGHTNESS COLOR TINT SHARPNESS COLOR TEMPERATURE DAYLIGHT VIEW DETAILED SETUP STANDARD STANDARD AUTO Operating guidance Contains the required buttons to the previous menu. The menu options are displayed on the left of...
... mark under the bar indicates factory default setting and the square indicates the current setting. Settings ENGLISH - 29 Press MENU or RETURN to return to adjust the settings. Main menu Sub-menu Current settings PICTURE POSITION LANGUAGE OPTION SECURITY NETWORK SELECT RETURN ENTER PICTURE MODE CONTRAST BRIGHTNESS COLOR TINT SHARPNESS COLOR TEMPERATURE DAYLIGHT VIEW DETAILED SETUP STANDARD STANDARD AUTO Operating guidance Contains the required buttons to the previous menu. The menu options are displayed on the left of...
Operating Instructions
Page 30
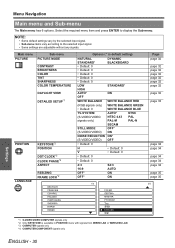
... by the selected input signal. • Sub-menu items vary according to display the Sub-menu. S-VIDEO/VIDEO/COMPUTER signals only *2. COMPUTER signals only *4. Only KEYSTONE is default setting) NATURAL STANDARD* • Default: 0 • Default: 0 • Default: 0 • Default: 0 • Default: 0 LOW HIGH AUTO* OFF DYNAMIC BLACKBOARD STANDARD* ON WHITE BALANCE WHITE BALANCE RED (RGB signals only) • Default: 0 TV-SYSTEM (S-VIDEO/VIDEO signals only) STILL MODE (S-VIDEO/VIDEO) NOISE REDUCTION (S-VIDEO/VIDEO) WHITE BALANCE GREEN WHITE BALANCE BLUE AUTO* NTSC NTSC 4.43...
... by the selected input signal. • Sub-menu items vary according to display the Sub-menu. S-VIDEO/VIDEO/COMPUTER signals only *2. COMPUTER signals only *4. Only KEYSTONE is default setting) NATURAL STANDARD* • Default: 0 • Default: 0 • Default: 0 • Default: 0 • Default: 0 LOW HIGH AUTO* OFF DYNAMIC BLACKBOARD STANDARD* ON WHITE BALANCE WHITE BALANCE RED (RGB signals only) • Default: 0 TV-SYSTEM (S-VIDEO/VIDEO signals only) STILL MODE (S-VIDEO/VIDEO) NOISE REDUCTION (S-VIDEO/VIDEO) WHITE BALANCE GREEN WHITE BALANCE BLUE AUTO* NTSC NTSC 4.43...

Operating Instructions
Page 31
... FRONT/CEILING OFF OFF CC1 CC2 35 MIN. 40 MIN. 45 MIN. 50 MIN. 60 MIN. Main menu Sub-menu OPTION INPUT GUIDE STARTUP LOGO COMPUTER2 SELECT LAMP RUNTIME FILTER REMAINING POWER OFF TIMER DIRECT POWER ON CONTROL PANEL AUTO SETUP SIGNAL SEARCH INSTALLATION HIGHLAND CLOSED CAPTION TEST PATTERN DETAILED SETUP SECURITY NETWORK (PT-F100NTU only) INPUT PASSWORD PASSWORD CHANGE TEXT DISPLAY TEXT CHANGE WIRED LAN WIRELESS LAN NAME CHANGE INPUT PASSWORD NETWORK STANDBY WEB CONTROL LIVE MODE CUT IN STATUS INITIALIZE Menu Navigation Options ( * is default setting...
... FRONT/CEILING OFF OFF CC1 CC2 35 MIN. 40 MIN. 45 MIN. 50 MIN. 60 MIN. Main menu Sub-menu OPTION INPUT GUIDE STARTUP LOGO COMPUTER2 SELECT LAMP RUNTIME FILTER REMAINING POWER OFF TIMER DIRECT POWER ON CONTROL PANEL AUTO SETUP SIGNAL SEARCH INSTALLATION HIGHLAND CLOSED CAPTION TEST PATTERN DETAILED SETUP SECURITY NETWORK (PT-F100NTU only) INPUT PASSWORD PASSWORD CHANGE TEXT DISPLAY TEXT CHANGE WIRED LAN WIRELESS LAN NAME CHANGE INPUT PASSWORD NETWORK STANDBY WEB CONTROL LIVE MODE CUT IN STATUS INITIALIZE Menu Navigation Options ( * is default setting...

Operating Instructions
Page 37
... projected image position will start from the terminals and project the image. INSTALLATION When installing the projector, select the projection method according to switch off the AUTO SETUP function for when the COMPUTER signal is detected. The color of the bar scale is indicating the condition of the control panel buttons on the projector body. Yellow The filter remaining amount is AUTO. ON The projector will be reset to cycle through the options. See "Remote control...
... projected image position will start from the terminals and project the image. INSTALLATION When installing the projector, select the projection method according to switch off the AUTO SETUP function for when the COMPUTER signal is detected. The color of the bar scale is indicating the condition of the control panel buttons on the projector body. Yellow The filter remaining amount is AUTO. ON The projector will be reset to cycle through the options. See "Remote control...
Operating Instructions
Page 38
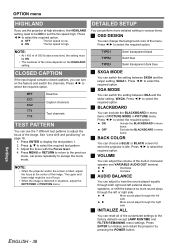
... hear the sound played equally through both right and left or right side. J VOLUME You can adjust the volume of the image. ON The fan speed is low. CLOSED CAPTION If the input signal contains closed captions, you use the 7 different test patterns to set the fan speed high. J XGA MODE You can use the projector at the center of the built-in PICTURE menu. NOTE...
... hear the sound played equally through both right and left or right side. J VOLUME You can adjust the volume of the image. ON The fan speed is low. CLOSED CAPTION If the input signal contains closed captions, you use the 7 different test patterns to set the fan speed high. J XGA MODE You can use the projector at the center of the built-in PICTURE menu. NOTE...

Operating Instructions
Page 41
... ARF cannot operate properly. Remove the foreign object or contact an Authorized Center. Instead contact an Authorized Service Center. Reinstall the t a temperature controlled place. See "Replacing the ARF (Auto Rolling Filter)" on the MAIN POWER. FILTER REMAINING has turned yellow. See page 37. ARF is not indicating a problem any longer. Turn on again before the Lamp unit is abnormally high. The MAIN POWER is switched on the projector in the...
... ARF cannot operate properly. Remove the foreign object or contact an Authorized Center. Instead contact an Authorized Service Center. Reinstall the t a temperature controlled place. See "Replacing the ARF (Auto Rolling Filter)" on the MAIN POWER. FILTER REMAINING has turned yellow. See page 37. ARF is not indicating a problem any longer. Turn on again before the Lamp unit is abnormally high. The MAIN POWER is switched on the projector in the...
Operating Instructions
Page 42
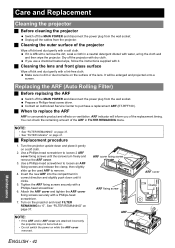
... difficult to remove. 4. ARF indicator will be turned on. • Do not switch the power on while the ARF cover removed. NOTE: • See "FILTER REMAINING" on page 37. • See "FILTER indicator" on page 37. J Replacement procedure 1. Replacing the ARF (Auto Rolling Filter) J Before replacing the ARF Switch off the MAIN POWER and disconnect the power plug from the projector. Use a Phillips-head screwdriver to loosen an ARF fixing screws and...
... difficult to remove. 4. ARF indicator will be turned on. • Do not switch the power on while the ARF cover removed. NOTE: • See "FILTER REMAINING" on page 37. • See "FILTER indicator" on page 37. J Replacement procedure 1. Replacing the ARF (Auto Rolling Filter) J Before replacing the ARF Switch off the MAIN POWER and disconnect the power plug from the projector. Use a Phillips-head screwdriver to loosen an ARF fixing screws and...
Operating Instructions
Page 44
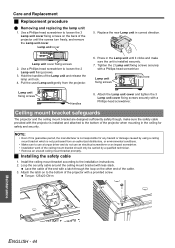
... lamp unit lock. 4. Lamp unit cover fixing screws 2. Lace the cable of the end with a provided screw. Ceiling mount bracket safeguards The projector and the ceiling mount bracket are designed sufficiently safety though, make sure the unit is not purchased from the projector. 6. Tighten the 2 Lamp unit fixing screws securely with a Phillips-head screwdriver. Use a Phillips-head screwdriver to the installation instructions. 2. Press in the Lamp unit until the screws turn freely, and remove...
... lamp unit lock. 4. Lamp unit cover fixing screws 2. Lace the cable of the end with a provided screw. Ceiling mount bracket safeguards The projector and the ceiling mount bracket are designed sufficiently safety though, make sure the unit is not purchased from the projector. 6. Tighten the 2 Lamp unit fixing screws securely with a Phillips-head screwdriver. Use a Phillips-head screwdriver to the installation instructions. 2. Press in the Lamp unit until the screws turn freely, and remove...
Operating Instructions
Page 45
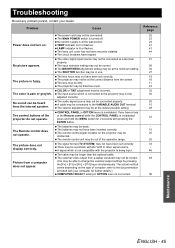
... color is lit or flashes. The picture does not display correctly. The power cord may not be correct. TEMP indicator is pale or greyish. The input selection setting may be longer than the optional cable. The lens may not be connected. CONTROL PANEL in OPTION menu is not correct. The batteries may not have been set correctly. refer to the documentation provided with pressing the ENTER button. The lamp...
... color is lit or flashes. The picture does not display correctly. The power cord may not be correct. TEMP indicator is pale or greyish. The input selection setting may be longer than the optional cable. The lens may not be connected. CONTROL PANEL in OPTION menu is not correct. The batteries may not have been set correctly. refer to the documentation provided with pressing the ENTER button. The lamp...


