

DMCFH27 User Guide
Page 1
VQT3E12 Operating Instructions for advanced features Digital Camera Model No. DMC-FH27 Before use, please read these instructions completely.
VQT3E12 Operating Instructions for advanced features Digital Camera Model No. DMC-FH27 Before use, please read these instructions completely.
DMCFH27 User Guide
Page 2
Contents Before Use Care of the camera 4 Standard Accessories 5 Names of the Components 6 How to Use the Touch Panel 8 Preparation Charging the Battery 9 • Charging 9 • Approximate operating time and number of ... good pictures 22 • Changing the settings 22 • Scene Detection 23 Taking pictures with your favourite settings (Normal Picture Mode 24 • Preventing jitter (camera shake) .......24 Focusing 25 Taking pictures using the Touch Shutter function 27 Playing Back Pictures ([Normal Play 28 Motion Picture Mode 30 Playing Back Motion...
Contents Before Use Care of the camera 4 Standard Accessories 5 Names of the Components 6 How to Use the Touch Panel 8 Preparation Charging the Battery 9 • Charging 9 • Approximate operating time and number of ... good pictures 22 • Changing the settings 22 • Scene Detection 23 Taking pictures with your favourite settings (Normal Picture Mode 24 • Preventing jitter (camera shake) .......24 Focusing 25 Taking pictures using the Touch Shutter function 27 Playing Back Pictures ([Normal Play 28 Motion Picture Mode 30 Playing Back Motion...

DMCFH27 User Guide
Page 4
...also malfunction or image may not be damaged if used in your trousers pocket or forcefully insert it may become unrepairable. - This camera is fogged up) • Condensation occurs when the ambient temperature or humidity changes. The fog will disappear naturally when the temperature ... or tight bag, etc. - Places with this unit such as accessories to the strap attached to the camera. - Attach any items such as when using the camera at location with the camera in following conditions. Be particularly careful since it causes lens or LCD monitor stains, fungus and...
...also malfunction or image may not be damaged if used in your trousers pocket or forcefully insert it may become unrepairable. - This camera is fogged up) • Condensation occurs when the ambient temperature or humidity changes. The fog will disappear naturally when the temperature ... or tight bag, etc. - Places with this unit such as accessories to the strap attached to the camera. - Attach any items such as when using the camera at location with the camera in following conditions. Be particularly careful since it causes lens or LCD monitor stains, fungus and...

DMCFH27 User Guide
Page 5
Before Use Standard Accessories Check that all the accessories are not using the camera. • The accessories and their shape will differ depending on the built-in the text. • The card is indicated as battery charger or charger ... or your nearest Service Centre if you lose the supplied accessories. (You can record or play back pictures on the country or area where the camera was purchased. You can purchase the accessories separately.) - 5 - For details on the accessories, refer to Basic Operating Instructions. • Battery Pack is indicated as battery...
Before Use Standard Accessories Check that all the accessories are not using the camera. • The accessories and their shape will differ depending on the built-in the text. • The card is indicated as battery charger or charger ... or your nearest Service Centre if you lose the supplied accessories. (You can record or play back pictures on the country or area where the camera was purchased. You can purchase the accessories separately.) - 5 - For details on the accessories, refer to Basic Operating Instructions. • Battery Pack is indicated as battery...

DMCFH27 User Guide
Page 6
Before Use Names of the Components 1 Flash (P66) 2 Lens (P4, 116) 3 Self-timer indicator (P69) AF Assist Lamp (P82) 4 Touch panel/LCD monitor (P8, 41, 112) 1 23 4 5 Strap eyelet • Be sure to attach the strap when using 5 the camera to ensure that you will not 6 drop it. 6 Lens barrel 7 [AV OUT/DIGITAL] socket (P101, 105, 7 110) - 6 -
Before Use Names of the Components 1 Flash (P66) 2 Lens (P4, 116) 3 Self-timer indicator (P69) AF Assist Lamp (P82) 4 Touch panel/LCD monitor (P8, 41, 112) 1 23 4 5 Strap eyelet • Be sure to attach the strap when using 5 the camera to ensure that you will not 6 drop it. 6 Lens barrel 7 [AV OUT/DIGITAL] socket (P101, 105, 7 110) - 6 -

DMCFH27 User Guide
Page 7
For connection details, refer to P14. 89 10 11 14 12 13 15 16 - 7 - 8 Camera ON/OFF switch (P18) 9 Zoom lever (P43) 10 Speaker (P36) 11 Microphone 12 Shutter button (P21, 24, 30) 13 [E.ZOOM] button (P45) Before Use 14 Tripod receptacle 15 Card/Battery door (P13, 14) 16 DC coupler cover (P14) • When using an AC adaptor, ensure that the Panasonic DC coupler (optional) and AC adaptor (optional) are used.
For connection details, refer to P14. 89 10 11 14 12 13 15 16 - 7 - 8 Camera ON/OFF switch (P18) 9 Zoom lever (P43) 10 Speaker (P36) 11 Microphone 12 Shutter button (P21, 24, 30) 13 [E.ZOOM] button (P45) Before Use 14 Tripod receptacle 15 Card/Battery door (P13, 14) 16 DC coupler cover (P14) • When using an AC adaptor, ensure that the Panasonic DC coupler (optional) and AC adaptor (optional) are used.

DMCFH27 User Guide
Page 9
There is a possibility that a genuine Panasonic battery pack is used. • Use the dedicated charger and battery. Charge the battery before use of a counterfeit battery pack. Connect the charger to the ... these battery packs may lead to Basic Operating Instructions about the accessory number of the battery. Charging • The battery is not charged when the camera is completed. Preparation Preparation Charging the Battery ∫ About batteries that you can use with this unit. Attach the battery paying attention to purchase in...
There is a possibility that a genuine Panasonic battery pack is used. • Use the dedicated charger and battery. Charge the battery before use of a counterfeit battery pack. Connect the charger to the ... these battery packs may lead to Basic Operating Instructions about the accessory number of the battery. Charging • The battery is not charged when the camera is completed. Preparation Preparation Charging the Battery ∫ About batteries that you can use with this unit. Attach the battery paying attention to purchase in...

DMCFH27 User Guide
Page 10
... too low. The charging time for the battery in an ambient temperature of between 10 oC to 30 oC (50 oF to 86 oF). - The camera also becomes warm during charging. The terminals of the power plug. The charging time may be longer than normal. The [CHARGE] indicator turns off: The...
... too low. The charging time for the battery in an ambient temperature of between 10 oC to 30 oC (50 oF to 86 oF). - The camera also becomes warm during charging. The terminals of the power plug. The charging time may be longer than normal. The [CHARGE] indicator turns off: The...

DMCFH27 User Guide
Page 11
... Mode • Temperature: 23 oC (73.4 oF)/Humidity: 50%RH when LCD monitor is on. • Using a Panasonic SD Memory Card (32 MB). • Starting recording 30 seconds after the camera is turned on the LCD monitor. • The indication turns red and blinks if the remaining battery power is...one picture every two minutes, then the number of pictures would be reduced to Wide or vice versa in every recording. • Turning the camera off every 10 recordings and leaving it with full flash every second recording. • Rotating the zoom lever from Tele to approximately one picture...
... Mode • Temperature: 23 oC (73.4 oF)/Humidity: 50%RH when LCD monitor is on. • Using a Panasonic SD Memory Card (32 MB). • Starting recording 30 seconds after the camera is turned on the LCD monitor. • The indication turns red and blinks if the remaining battery power is...one picture every two minutes, then the number of pictures would be reduced to Wide or vice versa in every recording. • Turning the camera off every 10 recordings and leaving it with full flash every second recording. • Rotating the zoom lever from Tele to approximately one picture...

DMCFH27 User Guide
Page 12
... number of recordable pictures is reduced. - In low-temperature environments, such as flash and zoom are used repeatedly. • When the operating time of the camera becomes extremely short even after properly charging the battery, the life of the battery may have expired.
... number of recordable pictures is reduced. - In low-temperature environments, such as flash and zoom are used repeatedly. • When the operating time of the camera becomes extremely short even after properly charging the battery, the life of the battery may have expired.

DMCFH27 User Guide
Page 13
...: Push it securely all the way until you hear a "click" while being charged. • Turn the camera off . • We recommend using a Panasonic card. Slide the card/battery door to open it. • Always use genuine Panasonic batteries. • If you hear a locking sound. ヤモンュ Note • Remove the battery...
...: Push it securely all the way until you hear a "click" while being charged. • Turn the camera off . • We recommend using a Panasonic card. Slide the card/battery door to open it. • Always use genuine Panasonic batteries. • If you hear a locking sound. ヤモンュ Note • Remove the battery...

DMCFH27 User Guide
Page 14
...using an AC adaptor, use the AC cable supplied with the designated Panasonic DC Coupler (optional). The AC adaptor (optional) cannot be attached when the DC coupler is closed . • Also read the operating instructions for this camera are not necessary, then remove them from the interior. 4 Close... Insert the DC coupler, being careful of the direction. 3 Open the DC coupler cover A. • Push open the coupler cover from the digital camera. Preparation Using an AC adaptor (optional) and a DC coupler (optional) instead of the battery The AC Adaptor (optional) can only be used with...
...using an AC adaptor, use the AC cable supplied with the designated Panasonic DC Coupler (optional). The AC adaptor (optional) cannot be attached when the DC coupler is closed . • Also read the operating instructions for this camera are not necessary, then remove them from the interior. 4 Close... Insert the DC coupler, being careful of the direction. 3 Open the DC coupler cover A. • Push open the coupler cover from the digital camera. Preparation Using an AC adaptor (optional) and a DC coupler (optional) instead of the battery The AC Adaptor (optional) can only be used with...
DMCFH27 User Guide
Page 16
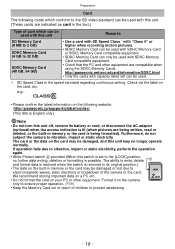
...with this unit. (These cards are indicated as card in memory or the card may be damaged, and this switch is being formatted). http://panasonic.net/avc/sdcard/information/SDXC.html • Only the cards with SDXC Memory Card compatible equipment. • Check that the PC and other ...equipment. Furthermore, do not subject the camera to prevent swallowing. - 16 - Check via the label on your PC or other equipment are compatible when using the SDXC Memory Cards. http://panasonic.jp/support/global/cs/dsc/ (This Site is possible. Format it on ...
...with this unit. (These cards are indicated as card in memory or the card may be damaged, and this switch is being formatted). http://panasonic.net/avc/sdcard/information/SDXC.html • Only the cards with SDXC Memory Card compatible equipment. • Check that the PC and other ...equipment. Furthermore, do not subject the camera to prevent swallowing. - 16 - Check via the label on your PC or other equipment are compatible when using the SDXC Memory Cards. http://panasonic.jp/support/global/cs/dsc/ (This Site is possible. Format it on ...

DMCFH27 User Guide
Page 18
Turn the camera on. • If the language select screen is shipped. Touch the items you wish to set (Year/ Month/Day/Hours/Minutes), and set . Touch [Language ... cancel the date and time settings without setting a date and time. Preparation Setting Date/Time (Clock Set) • The clock is not set when the camera is not displayed, proceed to step 4.
Turn the camera on. • If the language select screen is shipped. Touch the items you wish to set (Year/ Month/Day/Hours/Minutes), and set . Touch [Language ... cancel the date and time settings without setting a date and time. Preparation Setting Date/Time (Clock Set) • The clock is not set when the camera is not displayed, proceed to step 4.

DMCFH27 User Guide
Page 19
... Stamp]. • If the clock is set, the correct date can be printed even if the date is not displayed on the screen of the camera. - 19 -
... Stamp]. • If the clock is set, the correct date can be printed even if the date is not displayed on the screen of the camera. - 19 -

DMCFH27 User Guide
Page 20
Normal Picture Mode (P24) The subjects are recorded using settings automatically selected by the camera. ! My Scene Mode (P50) Pictures are taken using your own settings. Touch the mode icon. ∫ List of [Rec] Modes ¦ Intelligent Auto Mode (P21) ...
Normal Picture Mode (P24) The subjects are recorded using settings automatically selected by the camera. ! My Scene Mode (P50) Pictures are taken using your own settings. Touch the mode icon. ∫ List of [Rec] Modes ¦ Intelligent Auto Mode (P21) ...

DMCFH27 User Guide
Page 21
.... Please check with the focus range display on the zoom magnification. Basic [Rec] Mode: ñ Taking pictures using the automatic function (Intelligent Auto Mode) The camera will set the most appropriate settings to match the subject and the recording conditions so we recommend this mode for beginners or those who want...
.... Please check with the focus range display on the zoom magnification. Basic [Rec] Mode: ñ Taking pictures using the automatic function (Intelligent Auto Mode) The camera will set the most appropriate settings to match the subject and the recording conditions so we recommend this mode for beginners or those who want...
DMCFH27 User Guide
Page 22
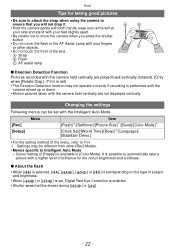
...(rotated). (Only when [Rotate Disp.] (P39) is set) • The Direction Detection function may not operate correctly if recording is performed with the camera aimed up or down. • Motion pictures taken with the Intelligent Auto Mode. [Rec] [Setup] Menu Item [Flash]¢/[Selftimer]/[Picture Size]¢/[Burst.... • When [ ] or [ ] is set, Digital Red-Eye Correction is enabled. • Shutter speed will not drop it. • Hold the camera gently with both hands, keep your arms still at your side and stand with your feet slightly apart. • Be careful not to move the...
...(rotated). (Only when [Rotate Disp.] (P39) is set) • The Direction Detection function may not operate correctly if recording is performed with the camera aimed up or down. • Motion pictures taken with the Intelligent Auto Mode. [Rec] [Setup] Menu Item [Flash]¢/[Selftimer]/[Picture Size]¢/[Burst.... • When [ ] or [ ] is set, Digital Red-Eye Correction is enabled. • Shutter speed will not drop it. • Hold the camera gently with both hands, keep your arms still at your side and stand with your feet slightly apart. • Be careful not to move the...

DMCFH27 User Guide
Page 23
.... - Take care not to the subject, the contrast of the subject, when the subject is moving - Basic Scene Detection When the camera identifies the optimum scene, the icon of the scene concerned is displayed in the appropriate Recording Mode. • The Backlight Compensation - Backlight... such as [ ], the shutter speed will be set . • When [ ] or [ ] is selected, the camera automatically detects a person's face, and it is recommended that camera shake is minimal when the Scene Mode has been identified as the ones below, a different scene may be identified for 2 seconds...
.... - Take care not to the subject, the contrast of the subject, when the subject is moving - Basic Scene Detection When the camera identifies the optimum scene, the icon of the scene concerned is displayed in the appropriate Recording Mode. • The Backlight Compensation - Backlight... such as [ ], the shutter speed will be set . • When [ ] or [ ] is selected, the camera automatically detects a person's face, and it is recommended that camera shake is minimal when the Scene Mode has been identified as the ones below, a different scene may be identified for 2 seconds...

DMCFH27 User Guide
Page 24
...on . Touch [ ]. Aim the AF area at the point you want to take pictures with your favourite settings (Normal Picture Mode) The camera automatically sets the shutter speed and the aperture value according to the brightness of the subject. Press the shutter button halfway to focus and then... press it fully to focus on the screen. You can take the picture. We recommend using a flash) ABC Preventing jitter (camera shake) When the jitter alert [ ] appears, use [Stabilizer] (P83), a tripod or the Self-timer (P69). • Shutter speed will be slower particularly...
...on . Touch [ ]. Aim the AF area at the point you want to take pictures with your favourite settings (Normal Picture Mode) The camera automatically sets the shutter speed and the aperture value according to the brightness of the subject. Press the shutter button halfway to focus and then... press it fully to focus on the screen. You can take the picture. We recommend using a flash) ABC Preventing jitter (camera shake) When the jitter alert [ ] appears, use [Stabilizer] (P83), a tripod or the Self-timer (P69). • Shutter speed will be slower particularly...


