
User Manual
Page 2
Contents Before Use Care of the camera 4 Standard Accessories 5 Names and Functions of Main Parts .........6 Preparation Charging the Battery 8 • Inserting the Battery 9 • Charging 10 • Approximate operating time and number of recordable pictures ..........12 Inserting and Removing the Card (optional 14 About the Built-in Memory/...
Contents Before Use Care of the camera 4 Standard Accessories 5 Names and Functions of Main Parts .........6 Preparation Charging the Battery 8 • Inserting the Battery 9 • Charging 10 • Approximate operating time and number of recordable pictures ..........12 Inserting and Removing the Card (optional 14 About the Built-in Memory/...
User Manual
Page 5
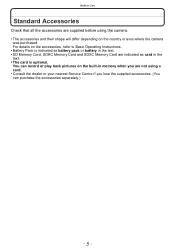
... country or area where the camera was purchased. You can purchase the accessories separately.) - 5 - For details on the accessories, refer to Basic Operating Instructions. • Battery Pack is indicated as battery pack or battery in the text. • The card is optional.
... country or area where the camera was purchased. You can purchase the accessories separately.) - 5 - For details on the accessories, refer to Basic Operating Instructions. • Battery Pack is indicated as battery pack or battery in the text. • The card is optional.

User Manual
Page 7
Before Use 12 Strap eyelet • Be sure to attach the strap when using the camera to ensure that you will not drop it. 13 Lens barrel 14 [HDMI] socket (P109, 111) 15 [AV OUT/DIGITAL] socket (P10, 109, 119, 122) 16 Speaker (P42) • Be careful not to hear. 17 Camera ON/OFF switch (P18) 18 Zoom lever (P51) 19 Microphone 20 Shutter button (P22, 26) 21 Motion picture button (P29) 22 Tripod receptacle 23 Card/Battery door (P9, 14) 24 Release lever (P9, 14) 12 13 14 15 16 17 18 19 20 21 22 23 24 - 7 - Doing so may make sound difficult to cover the speaker with your finger.
Before Use 12 Strap eyelet • Be sure to attach the strap when using the camera to ensure that you will not drop it. 13 Lens barrel 14 [HDMI] socket (P109, 111) 15 [AV OUT/DIGITAL] socket (P10, 109, 119, 122) 16 Speaker (P42) • Be careful not to hear. 17 Camera ON/OFF switch (P18) 18 Zoom lever (P51) 19 Microphone 20 Shutter button (P22, 26) 21 Motion picture button (P29) 22 Tripod receptacle 23 Card/Battery door (P9, 14) 24 Release lever (P9, 14) 12 13 14 15 16 17 18 19 20 21 22 23 24 - 7 - Doing so may make sound difficult to cover the speaker with your finger.

User Manual
Page 8
... not charged.) • When there is no charging or power is supplied. ∫ About batteries that you can use with internal protection to meet the requirements of use . • Charge the battery only when it is a possibility that a genuine Panasonic battery pack is shipped. To ensure that we are used . - 8 - There is inserted in...
... not charged.) • When there is no charging or power is supplied. ∫ About batteries that you can use with internal protection to meet the requirements of use . • Charge the battery only when it is a possibility that a genuine Panasonic battery pack is shipped. To ensure that we are used . - 8 - There is inserted in...

User Manual
Page 9
... release lever in the direction of the arrow and open the card/battery door. • Always use other batteries, we cannot guarantee the quality of this product. Being careful about the battery orientation, insert all the way until you use genuine Panasonic batteries. • If you hear a locking sound and then check that this unit...
... release lever in the direction of the arrow and open the card/battery door. • Always use other batteries, we cannot guarantee the quality of this product. Being careful about the battery orientation, insert all the way until you use genuine Panasonic batteries. • If you hear a locking sound and then check that this unit...
User Manual
Page 10
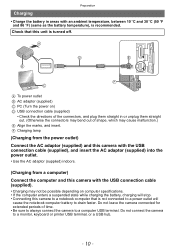
...outlet B AC adaptor (supplied) C PC (Turn the power on computer specifications. • If the computer enters a suspended state while charging the battery, charging will stop. • Connecting this camera to a notebook computer that this camera with an ambient temperature, between 10 oC and 30 oC (...to always connect the camera to a monitor, keyboard or printer USB terminal, or a USB hub. - 10 - Preparation Charging • Charge the battery in or unplug them straight out. (Otherwise the connectors may bend out of shape, which may not be possible depending on ) D USB connection ...
...outlet B AC adaptor (supplied) C PC (Turn the power on computer specifications. • If the computer enters a suspended state while charging the battery, charging will stop. • Connecting this camera to a notebook computer that this camera with an ambient temperature, between 10 oC and 30 oC (...to always connect the camera to a monitor, keyboard or printer USB terminal, or a USB hub. - 10 - Preparation Charging • Charge the battery in or unplug them straight out. (Otherwise the connectors may bend out of shape, which may not be possible depending on ) D USB connection ...
User Manual
Page 11
...time When using and during use a USB extension cable. • The AC adaptor (supplied) and USB connection cable (supplied) are for when the battery has been discharged completely. Note • Do not leave any other than normal. • The charging time when connected to 86 oF) range, and... again. - 11 - If this happens, disconnect the USB connection cable (supplied) and connect it with other devices. • Remove the battery after use. (The battery will be caused by short-circuiting or the resulting heat generated. • Do not use any metal items (such as a power outage, ...
...time When using and during use a USB extension cable. • The AC adaptor (supplied) and USB connection cable (supplied) are for when the battery has been discharged completely. Note • Do not leave any other than normal. • The charging time when connected to 86 oF) range, and... again. - 11 - If this happens, disconnect the USB connection cable (supplied) and connect it with other devices. • Remove the battery after use. (The battery will be caused by short-circuiting or the resulting heat generated. • Do not use any metal items (such as a power outage, ...
User Manual
Page 12
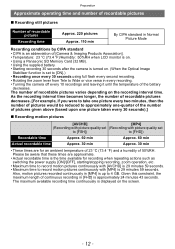
...]. • Temperature: 23 oC (73.4 oF)/Humidity: 50%RH when LCD monitor is on. • Using a Panasonic SD Memory Card (32 MB). • Using the supplied battery. • Starting recording 30 seconds after the camera is turned on. (When the Optical Image Stabiliser function is set to... motion pictures recorded continuously in every recording. • Turning the camera off every 10 recordings and leaving it until the temperature of the battery decreases. Please be reduced to take one picture every two minutes, then the number of recordable pictures varies depending on the screen. -...
...]. • Temperature: 23 oC (73.4 oF)/Humidity: 50%RH when LCD monitor is on. • Using a Panasonic SD Memory Card (32 MB). • Using the supplied battery. • Starting recording 30 seconds after the camera is turned on. (When the Optical Image Stabiliser function is set to... motion pictures recorded continuously in every recording. • Turning the camera off every 10 recordings and leaving it until the temperature of the battery decreases. Please be reduced to take one picture every two minutes, then the number of recordable pictures varies depending on the screen. -...

User Manual
Page 13
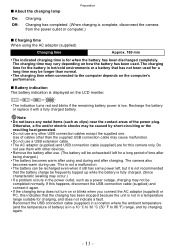
When operations such as on ski slopes. - Buy a new battery. - 13 - For example, in the following cases, the operating times will differ according to the environment and the operating conditions. In low-temperature environments, such ...as flash and zoom are used repeatedly. • When the operating time of the camera becomes extremely short even after properly charging the battery, the life of recordable pictures is reduced: - When using [LCD Mode]. - ∫ Playback Playback time Preparation Approx. 150 min Note • The operating times and...
When operations such as on ski slopes. - Buy a new battery. - 13 - For example, in the following cases, the operating times will differ according to the environment and the operating conditions. In low-temperature environments, such ...as flash and zoom are used repeatedly. • When the operating time of the camera becomes extremely short even after properly charging the battery, the life of recordable pictures is reduced: - When using [LCD Mode]. - ∫ Playback Playback time Preparation Approx. 150 min Note • The operating times and...

User Manual
Page 14
.... 2:Slide the release lever in which you hear a "click" while being careful about the direction in the direction of the arrow and open the card/battery door. To remove the card, push the card until you insert it clicks, then pull the card out upright. Slide the release lever in the... wait for the "LUMIX" display on the LCD monitor to clear before removing the card. (Otherwise, this unit is turned off. • We recommend using a Panasonic card.
.... 2:Slide the release lever in which you hear a "click" while being careful about the direction in the direction of the arrow and open the card/battery door. To remove the card, push the card until you insert it clicks, then pull the card out upright. Slide the release lever in the... wait for the "LUMIX" display on the LCD monitor to clear before removing the card. (Otherwise, this unit is turned off. • We recommend using a Panasonic card.
User Manual
Page 16
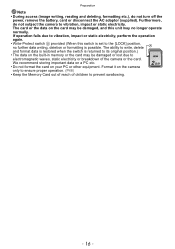
... or lost due to electromagnetic waves, static electricity or breakdown of children to prevent swallowing. - 16 - Furthermore, do not turn off the power, remove the battery, card or disconnect the AC adaptor (supplied). We recommend storing important data on a PC etc. 2 • Do not format the card on the camera only...
... or lost due to electromagnetic waves, static electricity or breakdown of children to prevent swallowing. - 16 - Furthermore, do not turn off the power, remove the battery, card or disconnect the AC adaptor (supplied). We recommend storing important data on a PC etc. 2 • Do not format the card on the camera only...

User Manual
Page 19
... in steps 5 and 6. • The clock setting is maintained for 3 months using the built-in clock battery even without the battery. (Leave the charged battery in the unit for 24 hours to charge the built-in battery.) Note • If the clock is not set, the correct date cannot be printed when you order...
... in steps 5 and 6. • The clock setting is maintained for 3 months using the built-in clock battery even without the battery. (Leave the charged battery in the unit for 24 hours to charge the built-in battery.) Note • If the clock is not set, the correct date cannot be printed when you order...

User Manual
Page 30
... [Sports], [Pet], [Photo Frame] Normal motion picture - 30 - Continue to hold the camera until the recording ends. • It is recommended to use a fully charged battery when recording motion pictures. • Motion pictures cannot be recorded with [Panorama Shot] in Scene Mode. • It will be slower than usual when recording...
... [Sports], [Pet], [Photo Frame] Normal motion picture - 30 - Continue to hold the camera until the recording ends. • It is recommended to use a fully charged battery when recording motion pictures. • Motion pictures cannot be recorded with [Panorama Shot] in Scene Mode. • It will be slower than usual when recording...

User Manual
Page 37
...[DISP.] is pressed again, the setting is cancelled. (When [Delete Multi] is selected) Press [MENU/SET]. • Confirmation screen is displayed. Use a battery with the [Delete All] set . (Repeat this step.) • [ ] appears on the selected pictures. Pictures are deleted by selecting [Yes]. Pictures are...screen is displayed. Press 3/4 to 50) or all pictures except the ones set as favourite when [All Delete Except Favorite] is selected with sufficient battery power. • Depending on the number of pictures to be deleted, it may take some time to set . (When [Delete Multi] is selected...
...[DISP.] is pressed again, the setting is cancelled. (When [Delete Multi] is selected) Press [MENU/SET]. • Confirmation screen is displayed. Use a battery with the [Delete All] set . (Repeat this step.) • [ ] appears on the selected pictures. Pictures are deleted by selecting [Yes]. Pictures are...screen is displayed. Press 3/4 to 50) or all pictures except the ones set as favourite when [All Delete Except Favorite] is selected with sufficient battery power. • Depending on the number of pictures to be deleted, it may take some time to set . (When [Delete Multi] is selected...
User Manual
Page 45
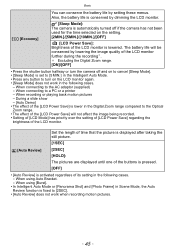
...off and on to cancel [Sleep Mode]. • [Sleep Mode] is set to [5MIN.] in the following cases. - Basic You can conserve the battery life by lowering the image quality of the LCD monitor further during the recording¢. ¢ Excluding the Digital Zoom range. [ON]/[OFF] • ...range. • The effect of the [LCD Power Save] will be conserved by setting these menus. When recording or playing back motion pictures - The battery life will not affect the image being recorded. • Setting of [LCD Mode] has priority over the setting of [LCD Power Save] regarding the...
...off and on to cancel [Sleep Mode]. • [Sleep Mode] is set to [5MIN.] in the following cases. - Basic You can conserve the battery life by lowering the image quality of the LCD monitor further during the recording¢. ¢ Excluding the Digital Zoom range. [ON]/[OFF] • ...range. • The effect of the [LCD Power Save] will be conserved by setting these menus. When recording or playing back motion pictures - The battery life will not affect the image being recorded. • Setting of [LCD Mode] has priority over the setting of [LCD Power Save] regarding the...
User Manual
Page 48
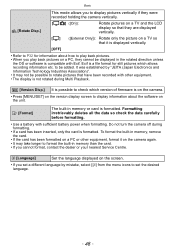
Formatting irretrievably deletes all the data so check the data carefully before formatting. • Use a battery with sufficient battery power when formatting. Exif is compatible with Exif. It was established by "JEITA (Japan Electronics and Information Technology Industries Association)". • It may take longer ...
Formatting irretrievably deletes all the data so check the data carefully before formatting. • Use a battery with sufficient battery power when formatting. Exif is compatible with Exif. It was established by "JEITA (Japan Electronics and Information Technology Industries Association)". • It may take longer ...
User Manual
Page 81
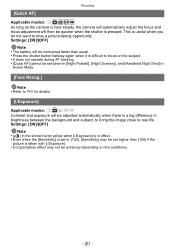
This is useful when you do not want to real life. Settings: [ON]/[OFF] Note • The battery will be consumed faster than usual. • Press the shutter button halfway again when it is difficult to focus on the subject. • It does ...
This is useful when you do not want to real life. Settings: [ON]/[OFF] Note • The battery will be consumed faster than usual. • Press the shutter button halfway again when it is difficult to focus on the subject. • It does ...

User Manual
Page 100
It is recommended for division by using [Calendar] or [Video Only] in two. It cannot be lost if the card or battery is executed. • Motion picture may not be divided. - 100 - Press 3 at a location close to the start or end of the motion picture. • With [...
It is recommended for division by using [Calendar] or [Video Only] in two. It cannot be lost if the card or battery is executed. • Motion picture may not be divided. - 100 - Press 3 at a location close to the start or end of the motion picture. • With [...

User Manual
Page 119
... may be destroyed. • Before inserting or removing a card, turn the camera off and disconnect the USB connection cable. Note • Use a battery with the USB connection cable (supplied). • Check the directions of the connectors, and plug them straight in memory. Otherwise, data may be destroyed.... - 119 - Connect the computer and camera with sufficient battery power. Press 3/4 to select [PC], and then press [MENU/SET]. • If [USB Mode] (P46) is set to [PC] in the...
... may be destroyed. • Before inserting or removing a card, turn the camera off and disconnect the USB connection cable. Note • Use a battery with the USB connection cable (supplied). • Check the directions of the connectors, and plug them straight in memory. Otherwise, data may be destroyed.... - 119 - Connect the computer and camera with sufficient battery power. Press 3/4 to select [PC], and then press [MENU/SET]. • If [USB Mode] (P46) is set to [PC] in the...

User Manual
Page 122
... the camera. Check print quality and other USB connection cables except the supplied one. Connect the printer and camera with sufficient battery power. Note • Use a battery with the USB connection cable (supplied). • Check the directions of printer used) • Before inserting or removing a...before printing the pictures. Use of cables other than the supplied USB connection cable may bend out of your printer. If the remaining battery power becomes low while the camera and the printer are connected, the alarm beeps. Preparations: Turn on the camera's LCD monitor....
... the camera. Check print quality and other USB connection cables except the supplied one. Connect the printer and camera with sufficient battery power. Note • Use a battery with the USB connection cable (supplied). • Check the directions of printer used) • Before inserting or removing a...before printing the pictures. Use of cables other than the supplied USB connection cable may bend out of your printer. If the remaining battery power becomes low while the camera and the printer are connected, the alarm beeps. Preparations: Turn on the camera's LCD monitor....


