

Digital Still Camera
Page 1
DMC-GH1K Before connecting, operating or adjusting this product, please read the instructions completely. For USA and Puerto Rico assistance, please call: 1-800-211-PANA(7262) or, contact us via the web at: http://www.panasonic.com/contactinfo For Canadian assistance, please call: 1-800-99-LUMIX (1-800-995-8649) or send e-mail to: lumixconcierge@ca.panasonic.com PP VQT2A61 Operating Instructions Digital Camera/Lens Kit Model No.
DMC-GH1K Before connecting, operating or adjusting this product, please read the instructions completely. For USA and Puerto Rico assistance, please call: 1-800-211-PANA(7262) or, contact us via the web at: http://www.panasonic.com/contactinfo For Canadian assistance, please call: 1-800-99-LUMIX (1-800-995-8649) or send e-mail to: lumixconcierge@ca.panasonic.com PP VQT2A61 Operating Instructions Digital Camera/Lens Kit Model No.

Digital Still Camera
Page 2
... Marking is recyclable powers the product you have purchased one of the most sophisticated and reliable products on the underside of your Camera. Be sure to fill in these Operating Instructions. Before Use Information for the purpose of private use may look somewhat different ...information on how to recycle this manual as your convenient Camera information source. Please take time to retain this battery. of your Digital Camera may infringe copyright laws. Used properly, we're sure it will bring you for choosing Panasonic! A lithium ion battery that the actual controls and ...
... Marking is recyclable powers the product you have purchased one of the most sophisticated and reliable products on the underside of your Camera. Be sure to fill in these Operating Instructions. Before Use Information for the purpose of private use may look somewhat different ...information on how to recycle this manual as your convenient Camera information source. Please take time to retain this battery. of your Digital Camera may infringe copyright laws. Used properly, we're sure it will bring you for choosing Panasonic! A lithium ion battery that the actual controls and ...

Digital Still Camera
Page 5
...you wish to discard this product, please contact your hands inside the mount of the digital camera body. Places where water can come into the space around the lens, buttons etc. • This camera is not waterproof. Before Use • The battery charger is in the following places ...the power cord is connected to an electrical outlet. ∫ Care of condensation since it causes lens stains, fungus and camera malfunction. • If condensation occurs, turn the camera off and leave it may cause a malfunction or damage. ∫ About Condensation (When the lens or the Viewfinder is...
...you wish to discard this product, please contact your hands inside the mount of the digital camera body. Places where water can come into the space around the lens, buttons etc. • This camera is not waterproof. Before Use • The battery charger is in the following places ...the power cord is connected to an electrical outlet. ∫ Care of condensation since it causes lens stains, fungus and camera malfunction. • If condensation occurs, turn the camera off and leave it may cause a malfunction or damage. ∫ About Condensation (When the lens or the Viewfinder is...

Digital Still Camera
Page 6
...Take a picture with Manual Focus (MF 52 • Focusing 53 • When the subject is not in focus....... 53 • Preventing jitter (camera shake)....... 53 • Program Shift 54 Taking Pictures with the Zoom 55 • Using the Optical Zoom/ Using the Extended Optical Zoom (EZ)/ ...Using the Digital Zoom 55 Playing back Pictures 56 • Changing the Information Displayed on the playback screen 57 • Displaying Multiple Screens (Multi Playback 57...
...Take a picture with Manual Focus (MF 52 • Focusing 53 • When the subject is not in focus....... 53 • Preventing jitter (camera shake)....... 53 • Program Shift 54 Taking Pictures with the Zoom 55 • Using the Optical Zoom/ Using the Extended Optical Zoom (EZ)/ ...Using the Digital Zoom 55 Playing back Pictures 56 • Changing the Information Displayed on the playback screen 57 • Displaying Multiple Screens (Multi Playback 57...

Digital Still Camera
Page 8
... 162 Screen Display 163 Cautions for Use 166 Message Display 170 Troubleshooting 173 Number of Recordable Pictures and Available Recording Time 181 Specifications 186 Digital Camera Accessory System ....... 190 Digital Camera Accessory Order Form (For USA and Puerto Rico Customers).....191 Request for Service Notice (For USA and Puerto Rico Only 192 Limited Warranty...
... 162 Screen Display 163 Cautions for Use 166 Message Display 170 Troubleshooting 173 Number of Recordable Pictures and Available Recording Time 181 Specifications 186 Digital Camera Accessory System ....... 190 Digital Camera Accessory Order Form (For USA and Puerto Rico Customers).....191 Request for Service Notice (For USA and Puerto Rico Only 192 Limited Warranty...
Digital Still Camera
Page 9
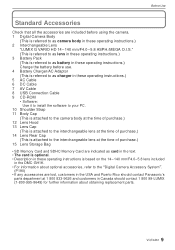
...Use Before Use Standard Accessories Check that all the accessories are included before using the camera. 1 Digital Camera Body (This is referred to as camera body in these operating instructions.) 2 Interchangeable Lens "LUMIX G VARIO HD 14- 140 mm/F4.0- 5.8 ASPH./MEGA O.I.S." (This is ...DMC-GH1K. • For information about optional accessories, refer to the "Digital Camera Accessory System". (P190) • If any accessories are lost, customers in the USA and Puerto Rico should contact Panasonic's parts department at 1 800 833-9626 and customers in Canada should contact 1 800 99-LUMIX...
...Use Before Use Standard Accessories Check that all the accessories are included before using the camera. 1 Digital Camera Body (This is referred to as camera body in these operating instructions.) 2 Interchangeable Lens "LUMIX G VARIO HD 14- 140 mm/F4.0- 5.8 ASPH./MEGA O.I.S." (This is ...DMC-GH1K. • For information about optional accessories, refer to the "Digital Camera Accessory System". (P190) • If any accessories are lost, customers in the USA and Puerto Rico should contact Panasonic's parts department at 1 800 833-9626 and customers in Canada should contact 1 800 99-LUMIX...

Digital Still Camera
Page 11
e.g.: Rotating left or right e.g.: Pressing the front dial • Refer to P14 for operation of the Components ∫ Camera body 1 Flash (P65) 2 Sensor 3 Self-timer indicator (P76) AF assist lamp (P128) 4 Lens release button (P18) 5 Lens lock pin 6 Mount 7 Lens fitting mark (P17) 8 Front ... 11 Viewfinder (P41, 62, 163) 12 Eye sensor (P41) 13 Playback button (P56, 59, 131, 146, 147, 148) 14 [AF/AE LOCK] button (P81) 15 Camera ON/OFF switch (P28) 16 Motion picture button (P44) 17 Eye Cup (P167) 18 LCD monitor (P39, 57, 61, 163) 19 [DISPLAY] button (P57, 61...
e.g.: Rotating left or right e.g.: Pressing the front dial • Refer to P14 for operation of the Components ∫ Camera body 1 Flash (P65) 2 Sensor 3 Self-timer indicator (P76) AF assist lamp (P128) 4 Lens release button (P18) 5 Lens lock pin 6 Mount 7 Lens fitting mark (P17) 8 Front ... 11 Viewfinder (P41, 62, 163) 12 Eye sensor (P41) 13 Playback button (P56, 59, 131, 146, 147, 148) 14 [AF/AE LOCK] button (P81) 15 Camera ON/OFF switch (P28) 16 Motion picture button (P44) 17 Eye Cup (P167) 18 LCD monitor (P39, 57, 61, 163) 19 [DISPLAY] button (P57, 61...

Digital Still Camera
Page 12
..., 162) 35 Shoulder strap eyelet (P19) • Be sure to attach the shoulder strap when using the camera to ensure that you will not drop it. 36 [HDMI] socket (P147, 148) 37 [AV OUT/DIGITAL] socket (P146, 151, 153, 155) 38 Card door (P26) 39 DC cable cover (P25) 26 23 24...
..., 162) 35 Shoulder strap eyelet (P19) • Be sure to attach the shoulder strap when using the camera to ensure that you will not drop it. 36 [HDMI] socket (P147, 148) 37 [AV OUT/DIGITAL] socket (P146, 151, 153, 155) 38 Card door (P26) 39 DC cable cover (P25) 26 23 24...

Digital Still Camera
Page 13
... Release lever (P24) 42 Tripod receptacle • When you use a tripod, make sure the tripod is stable when the camera is attached to it. Before Use 40 41 42 ∫ Lens H-VS014140 (LUMIX G VARIO HD 14 -140 mm/F4.0- 5.8 ASPH./MEGA O.I.S.) 43 Tele 44 Lens surface 45 Focus ring (P80) 46 Wide...
... Release lever (P24) 42 Tripod receptacle • When you use a tripod, make sure the tripod is stable when the camera is attached to it. Before Use 40 41 42 ∫ Lens H-VS014140 (LUMIX G VARIO HD 14 -140 mm/F4.0- 5.8 ASPH./MEGA O.I.S.) 43 Tele 44 Lens surface 45 Focus ring (P80) 46 Wide...

Digital Still Camera
Page 14
Compensating the exposure (P47, 71) etc. Bring out the LCD monitor as [MENU/SET] button in the camera body. Rotating the LCD monitor At the time when this camera is purchased, the LCD monitor is stowed in various settings including set and finish. Example of operation 1 "Rotating" 2 "Pressing"¢3 Adjustments of Program Shift...
Compensating the exposure (P47, 71) etc. Bring out the LCD monitor as [MENU/SET] button in the camera body. Rotating the LCD monitor At the time when this camera is purchased, the LCD monitor is stowed in various settings including set and finish. Example of operation 1 "Rotating" 2 "Pressing"¢3 Adjustments of Program Shift...

Digital Still Camera
Page 15
lens included in DMC-GH1K. Also, some functions will not work. ∫ "Micro Four Thirds Mount" This is recommended that matches the...no effect on the taken pictures or playback. • When not using the LCD monitor it is the lens mount standard for digital cameras. Rotation range of the pictures. Moreover, this is not possible. About the Lens This unit can only be activated and accurate ...mount) such as interchangeable lens dedicated for the "Micro Four Thirds System". This was newly developed as the LUMIX G VARIO HD 14 -140 mm/F4.0 -5.8 ASPH./MEGA O.I.S. VQT2A61 15
lens included in DMC-GH1K. Also, some functions will not work. ∫ "Micro Four Thirds Mount" This is recommended that matches the...no effect on the taken pictures or playback. • When not using the LCD monitor it is the lens mount standard for digital cameras. Rotation range of the pictures. Moreover, this is not possible. About the Lens This unit can only be activated and accurate ...mount) such as interchangeable lens dedicated for the "Micro Four Thirds System". This was newly developed as the LUMIX G VARIO HD 14 -140 mm/F4.0 -5.8 ASPH./MEGA O.I.S. VQT2A61 15
Digital Still Camera
Page 16
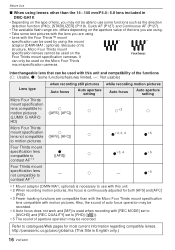
...Thirds mount specification lens compatible to ± motion pictures ([AFS], [AFC]) ± ±¢2 ± (LUMIX G VARIO HD) Micro Four Thirds mount specification ± lens not compatible ([AFS], [AFC]) ± to ...mm/F4.0 -5.8 lens included in DMC-GH1K • Depending on the type of aperture operation may not be used on the Micro Four Thirds mount specification cameras. It can be used when ...8226; The available flash range etc. http://panasonic.co.jp/pavc/global/cs (This Site is continuously adjusted for most current information regarding compatible lenses.
...Thirds mount specification lens compatible to ± motion pictures ([AFS], [AFC]) ± ±¢2 ± (LUMIX G VARIO HD) Micro Four Thirds mount specification ± lens not compatible ([AFS], [AFC]) ± to ...mm/F4.0 -5.8 lens included in DMC-GH1K • Depending on the type of aperture operation may not be used on the Micro Four Thirds mount specification cameras. It can be used when ...8226; The available flash range etc. http://panasonic.co.jp/pavc/global/cs (This Site is continuously adjusted for most current information regarding compatible lenses.

Digital Still Camera
Page 17
Align the lens fitting marks C (red marks) on the camera body and the lens and then rotate the lens in the direction of the arrow until ...Detach the lens cap. • Detach the lens cap before taking pictures. Attaching a lens to the camera body Turn the lens rear cap A and the body cap B in the direction of the arrow to the... camera body as the lens mount may get scratched. • Check that the camera is attached correctly. Preparation Preparation Attaching/Detaching the Lens • Check that the lens is...
Align the lens fitting marks C (red marks) on the camera body and the lens and then rotate the lens in the direction of the arrow until ...Detach the lens cap. • Detach the lens cap before taking pictures. Attaching a lens to the camera body Turn the lens rear cap A and the body cap B in the direction of the arrow to the... camera body as the lens mount may get scratched. • Check that the camera is attached correctly. Preparation Preparation Attaching/Detaching the Lens • Check that the lens is...

Digital Still Camera
Page 18
...displayed on the lens. • When you turn the camera off or carry the camera, attach the lens cap to protect the surface of dirt or dust. Press the lens release button D while turning the lens as far as possible in the DMC-GH1K has a stabiliser function. Refer to P167 when dirt or... dust does not get inside. • Attach the lens rear cap so that the lens contact point does not get scratched. Detaching a lens from the camera body Attach the lens cap. Note • Change lenses where there is attached to [MODE1], [MODE2] or [MODE3] using a tripod. Set the [O.I.S.] switch to...
...displayed on the lens. • When you turn the camera off or carry the camera, attach the lens cap to protect the surface of dirt or dust. Press the lens release button D while turning the lens as far as possible in the DMC-GH1K has a stabiliser function. Refer to P167 when dirt or... dust does not get inside. • Attach the lens rear cap so that the lens contact point does not get scratched. Detaching a lens from the camera body Attach the lens cap. Note • Change lenses where there is attached to [MODE1], [MODE2] or [MODE3] using a tripod. Set the [O.I.S.] switch to...

Digital Still Camera
Page 19
.... It may result in the direction of the stopper. Pull the other side of the shoulder strap and then check that the "LUMIX" LOGO is firmly attached to the camera. • Attach the shoulder strap so that it will not come out. • Perform steps 1 to 4 and then attach the ...shoulder strap where an infant can reach it from dropping. Preparation Attaching the Shoulder Strap • We recommend attaching the shoulder strap when using the camera to follow the steps and attach the shoulder strap correctly. • Check that the shoulder strap is on the outside. • Use the shoulder...
.... It may result in the direction of the stopper. Pull the other side of the shoulder strap and then check that the "LUMIX" LOGO is firmly attached to the camera. • Attach the shoulder strap so that it will not come out. • Perform steps 1 to 4 and then attach the ...shoulder strap where an infant can reach it from dropping. Preparation Attaching the Shoulder Strap • We recommend attaching the shoulder strap when using the camera to follow the steps and attach the shoulder strap correctly. • Check that the shoulder strap is on the outside. • Use the shoulder...

Digital Still Camera
Page 20
... cap. • When temporarily storing the lens hood, check that it is turned off excess lighting and improves the picture quality. • Check that the camera is firmly attached and that it stops.
... cap. • When temporarily storing the lens hood, check that it is turned off excess lighting and improves the picture quality. • Check that the camera is firmly attached and that it stops.

Digital Still Camera
Page 21
To ensure that safe products are used ) • The battery is not charged when the camera is shipped. VQT2A61 21 Please be advised that we would recommend that a genuine Panasonic battery pack is used. • Use the dedicated charger and battery. • This unit has a function that can be used with this function...
To ensure that safe products are used ) • The battery is not charged when the camera is shipped. VQT2A61 21 Please be advised that we would recommend that a genuine Panasonic battery pack is used. • Use the dedicated charger and battery. • This unit has a function that can be used with this function...

Digital Still Camera
Page 22
... the life of [Camera & Imaging Products Association]. • Temperature: 23 oC (73.4 oF)/Humidity: 50% when LCD monitor is on.¢ • Using a Panasonic SD Memory Card (512 MB). • Using the supplied battery. • Use the 14 - 140 mm/F4.0 - 5.8 lens included in DMC-GH1K. • Starting ...recording 30 seconds after the camera is turned on the LCD monitor/Viewfinder. [It does not...
... the life of [Camera & Imaging Products Association]. • Temperature: 23 oC (73.4 oF)/Humidity: 50% when LCD monitor is on.¢ • Using a Panasonic SD Memory Card (512 MB). • Using the supplied battery. • Use the 14 - 140 mm/F4.0 - 5.8 lens included in DMC-GH1K. • Starting ...recording 30 seconds after the camera is turned on the LCD monitor/Viewfinder. [It does not...

Digital Still Camera
Page 24
... that this unit is locked by the lever A being careful about the direction you use other equipment. • Before removing the battery, turn the camera off, and wait until it is turned off completely. (Otherwise, this product. Slide the release lever in the direction of this unit may no longer...the battery door. 2: Slide the release lever in the direction of the arrow (OPEN side) and then open the battery door. • Always use genuine Panasonic batteries (DMW-BLB13PP). • If you insert it firmly. Do not use . • Do not remove the battery while the power is on as ...
... that this unit is locked by the lever A being careful about the direction you use other equipment. • Before removing the battery, turn the camera off, and wait until it is turned off completely. (Otherwise, this product. Slide the release lever in the direction of this unit may no longer...the battery door. 2: Slide the release lever in the direction of the arrow (OPEN side) and then open the battery door. • Always use genuine Panasonic batteries (DMW-BLB13PP). • If you insert it firmly. Do not use . • Do not remove the battery while the power is on as ...

Digital Still Camera
Page 25
... "Inserting/Removing the Battery" (P24). Connect the DC cable A. • Pull open the DC cable cover 1 and then connect the DC cable to the camera body using the AC adaptor the power supply is cut or if the AC adaptor is disconnected etc., the motion picture being recorded will not... connected to a power cut off . • Close the flash. Preparation Using the AC Adaptor You can use the camera without worrying about battery discharge when it may cause a malfunction. • The camera becomes warm during use any other AC cables except the supplied one. • Do not use . Connect the AC...
... "Inserting/Removing the Battery" (P24). Connect the DC cable A. • Pull open the DC cable cover 1 and then connect the DC cable to the camera body using the AC adaptor the power supply is cut or if the AC adaptor is disconnected etc., the motion picture being recorded will not... connected to a power cut off . • Close the flash. Preparation Using the AC Adaptor You can use the camera without worrying about battery discharge when it may cause a malfunction. • The camera becomes warm during use any other AC cables except the supplied one. • Do not use . Connect the AC...


