

CQC8803U User Guide
Page 2
...If an infant ingests a battery or insulation film, please seek immediate medical attention. ❑ Protect the Deck Mechanism. If the product needs to be ingested, so keep them out of the reach of order (no.... Warning Observe the following warnings when installing. ❑ Disconnect the lead from looking ahead of order. Panasonic assumes no sound) or in an abnormal state (has foreign objects in it, is exposed to water,... unit and all exposed wires to prevent short circuiting. 2 CQ-C8803U Wiring and installation with a negative grounded 12 V DC battery system.
...If an infant ingests a battery or insulation film, please seek immediate medical attention. ❑ Protect the Deck Mechanism. If the product needs to be ingested, so keep them out of the reach of order (no.... Warning Observe the following warnings when installing. ❑ Disconnect the lead from looking ahead of order. Panasonic assumes no sound) or in an abnormal state (has foreign objects in it, is exposed to water,... unit and all exposed wires to prevent short circuiting. 2 CQ-C8803U Wiring and installation with a negative grounded 12 V DC battery system.
CQC8803U User Guide
Page 3
... is exposed to water, moisture, or dust. Panasonic is not stable, the unit may fall down while driving and this can lead to an accident or injury. ❑ Installation Angle The product should bear in mind that in the disc slot. ering them . CQ-C8803U 3 Otherwise these parts will cause the interior of...
... is exposed to water, moisture, or dust. Panasonic is not stable, the unit may fall down while driving and this can lead to an accident or injury. ❑ Installation Angle The product should bear in mind that in the disc slot. ering them . CQ-C8803U 3 Otherwise these parts will cause the interior of...
CQC8803U User Guide
Page 4
... owners. DO NOT OPEN COVERS AND DO NOT REPAIR BY YOURSELF. One is "System Upgrade Guidebook" describing the optional devices such as CD changer. 4 CQ-C8803U Part 15 of the main unit. We know this equipment would void the user's authority to give you to be proud to our... constantly growing family of our family. Safety Information Caution THIS PRODUCT IS A CLASS I LASER PRODUCT. Before Reading These Instructions Panasonic welcomes you the ...
... owners. DO NOT OPEN COVERS AND DO NOT REPAIR BY YOURSELF. One is "System Upgrade Guidebook" describing the optional devices such as CD changer. 4 CQ-C8803U Part 15 of the main unit. We know this equipment would void the user's authority to give you to be proud to our... constantly growing family of our family. Safety Information Caution THIS PRODUCT IS A CLASS I LASER PRODUCT. Before Reading These Instructions Panasonic welcomes you the ...
CQC8803U User Guide
Page 5
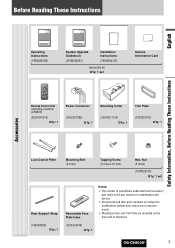
... subject to modification without prior notice due to improvements. ¡ Mounting Collar and Trim Plate are mounted on the main unit at shipment. (YEFA134145) Q'ty: 1 CQ-C8803U 5 Nut (5 mmø) (YEP0FZ5739) Q'ty: 1 set Owners Information Card POWER SOURCE MENU SRC SEL SET VOL BAND MUTE 12 RANDOM SCAN 45 3 REPEAT 6 78 TUNE...
... subject to modification without prior notice due to improvements. ¡ Mounting Collar and Trim Plate are mounted on the main unit at shipment. (YEFA134145) Q'ty: 1 CQ-C8803U 5 Nut (5 mmø) (YEP0FZ5739) Q'ty: 1 set Owners Information Card POWER SOURCE MENU SRC SEL SET VOL BAND MUTE 12 RANDOM SCAN 45 3 REPEAT 6 78 TUNE...
CQC8803U User Guide
Page 6
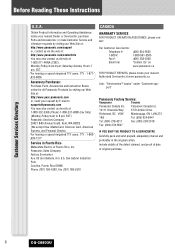
..., and Personal Checks) For hearing or speech impaired TTY users, TTY : 1-866605-1277 Service in the original carton. Customer Services Directory 6 CQ-C8803U Panasonic Sales Company Factory Servicenter: Ave. 65 de Infantería, Km. 9.5, San Gabriel Industrial Park, Carolina, Puerto Rico 00985 Phone (787) 750...: Telephone #: 1-800 #: Fax #: Email link: (905) 624-5505 1-800-561-5505 (905) 238-2360 "Contact Us" on www.panasonic.ca FOR PRODUCT REPAIRS, please locate your nearest Dealer or Servicenter; locate your nearest Authorized Servicentre at : 1-800-332-5368 (Phone) 1-800-237...
..., and Personal Checks) For hearing or speech impaired TTY users, TTY : 1-866605-1277 Service in the original carton. Customer Services Directory 6 CQ-C8803U Panasonic Sales Company Factory Servicenter: Ave. 65 de Infantería, Km. 9.5, San Gabriel Industrial Park, Carolina, Puerto Rico 00985 Phone (787) 750...: Telephone #: 1-800 #: Fax #: Email link: (905) 624-5505 1-800-561-5505 (905) 238-2360 "Contact Us" on www.panasonic.ca FOR PRODUCT REPAIRS, please locate your nearest Dealer or Servicenter; locate your nearest Authorized Servicentre at : 1-800-332-5368 (Phone) 1-800-237...
CQC8803U User Guide
Page 7
... the addresses of the original purchase date is required before warranty service is used commercially. IN NO EVENT WILL PANASONIC CANADA INC. A purchase receipt or other proof of the warrantor. In certain instances, some jurisdictions do not...CANADA Panasonic Canada Inc. 5770 Ambler Drive, Mississauga Ontario L4W 2T3 PANASONIC PRODUCT LIMITED WARRANTY Panasonic Canada Inc. CQ-C8803U 7 English Before Reading These Instructions Limited Warranty U.S.A. Ave. 65 de infanteria, Km. 9.5, San Gabriel Industrial Park Carolina, Puerto Rico 00985 PANASONIC AUTO PRODUCTS ...
... the addresses of the original purchase date is required before warranty service is used commercially. IN NO EVENT WILL PANASONIC CANADA INC. A purchase receipt or other proof of the warrantor. In certain instances, some jurisdictions do not...CANADA Panasonic Canada Inc. 5770 Ambler Drive, Mississauga Ontario L4W 2T3 PANASONIC PRODUCT LIMITED WARRANTY Panasonic Canada Inc. CQ-C8803U 7 English Before Reading These Instructions Limited Warranty U.S.A. Ave. 65 de infanteria, Km. 9.5, San Gabriel Industrial Park Carolina, Puerto Rico 00985 PANASONIC AUTO PRODUCTS ...
CQC8803U User Guide
Page 8
...process images from interfering with optional Digital Adapter. Full Digital CD Receiver The CQ-C8803U uses Radio DSP for instant recall. Each band is designed only for the XM receiver. ¡ Sirius Satellite Radio You can assign your settings for these and save them...Panasonic DVD changer unit (CX-DH801U). ¡ CD Changer The optional adapter (Conversion Cable for DVD/CD Changer: CA-CC30U) allows you to connect the optional Panasonic CD changer unit (CX-DP880). ¡ iPod® The optional adapter (Direct Cable for iPod: CA-DC300U) allows you drive. 8 CQ-C8803U A radio...
...process images from interfering with optional Digital Adapter. Full Digital CD Receiver The CQ-C8803U uses Radio DSP for instant recall. Each band is designed only for the XM receiver. ¡ Sirius Satellite Radio You can assign your settings for these and save them...Panasonic DVD changer unit (CX-DH801U). ¡ CD Changer The optional adapter (Conversion Cable for DVD/CD Changer: CA-CC30U) allows you to connect the optional Panasonic CD changer unit (CX-DP880). ¡ iPod® The optional adapter (Direct Cable for iPod: CA-DC300U) allows you drive. 8 CQ-C8803U A radio...

CQC8803U User Guide
Page 9
... Layout 10 ¡Preparation (Clock adjustment etc.) 12 ¡General 14 ¡Sound Control 18 ¡Radio 21 ¡CD Player 24 ¡MP3/WMA Player 26 ¡Audio Setting 30 ¡Function Setting (Security Function Setting etc....) 32 ¡Display Setting 33 ¡Customize the Display (Customize Function) 34 ¡Troubleshooting 36 ¡Error Display Messages 39 ¡Notes on Discs 40 ¡Maintenance 40 ¡Specifications 41 CQ-C8803U...
... Layout 10 ¡Preparation (Clock adjustment etc.) 12 ¡General 14 ¡Sound Control 18 ¡Radio 21 ¡CD Player 24 ¡MP3/WMA Player 26 ¡Audio Setting 30 ¡Function Setting (Security Function Setting etc....) 32 ¡Display Setting 33 ¡Customize the Display (Customize Function) 34 ¡Troubleshooting 36 ¡Error Display Messages 39 ¡Notes on Discs 40 ¡Maintenance 40 ¡Specifications 41 CQ-C8803U...
CQC8803U User Guide
Page 10
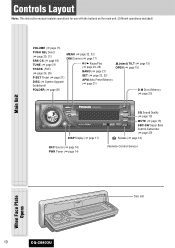
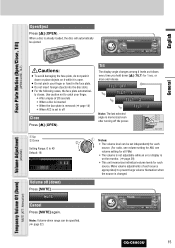
... (a page 24, 26) TRACK (FILE) (a page 24, 26) BAND (a page 21) P·SET Preset (a page 21) SET (a page 32, 33) DISC (a System Upgrade Guidebook) APM Auto Preset Memory (a page 21) FOLDER (a page 26) u (eject) TILT (a page 15) OPEN (a page 15) D·M Direct Memory (a page 23) DISP Display (a page 17) SRC Source... 19) MUTE (a page 15) SBC-SW Super Bass Control-Subwoofer (a page 20) Release (a page 14) Remote Control Sensor When Face Plate Opens Disc slot 10 CQ-C8803U
... (a page 24, 26) TRACK (FILE) (a page 24, 26) BAND (a page 21) P·SET Preset (a page 21) SET (a page 32, 33) DISC (a System Upgrade Guidebook) APM Auto Preset Memory (a page 21) FOLDER (a page 26) u (eject) TILT (a page 15) OPEN (a page 15) D·M Direct Memory (a page 23) DISP Display (a page 17) SRC Source... 19) MUTE (a page 15) SBC-SW Super Bass Control-Subwoofer (a page 20) Release (a page 14) Remote Control Sensor When Face Plate Opens Disc slot 10 CQ-C8803U

CQC8803U User Guide
Page 11
... Face panel's opening, closing, tilting, and removal actions (a page 15) ¡ Disc ejection (a page 15) ¡ Dimmer (a page 17) ¡ CS AUTO on, off, and adjustment (a page 18) ¡ SQ on, off, and adjustment (a page 19) ¡ Direct memory setting and calling (a page 23) Operations... (Preset) DISC (FOLDER) CAR AUDIO Although most of the functions of this unit are executable with remote control CQ-C8803U 11 English Remote Control Unit Controls Layout Number Buttons - 0 9 0 to tracks on CDs (a page 25, 27) ¡ Random and repeat play with one-touch operation (a page 25, 27) ...
... Face panel's opening, closing, tilting, and removal actions (a page 15) ¡ Disc ejection (a page 15) ¡ Dimmer (a page 17) ¡ CS AUTO on, off, and adjustment (a page 18) ¡ SQ on, off, and adjustment (a page 19) ¡ Direct memory setting and calling (a page 23) Operations... (Preset) DISC (FOLDER) CAR AUDIO Although most of the functions of this unit are executable with remote control CQ-C8803U 11 English Remote Control Unit Controls Layout Number Buttons - 0 9 0 to tracks on CDs (a page 25, 27) ¡ Random and repeat play with one-touch operation (a page 25, 27) ...

CQC8803U User Guide
Page 12
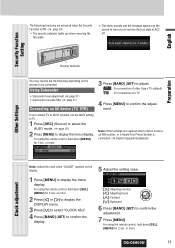
...screen is executed for 2 sec. q Back side Cautions ¡Remove and dispose of remote control gently. or more . Note: Battery Information: Battery Type: Panasonic lithium battery (CR2025) (Included in injury or a fire. The demonstration screen appears. 2 Press [SRC] (PWR: Power). 3 Press [MENU] to select... film Battery Replacement q Remove the battery holder Tough pointed object with (+) side facing up. 2 e Put the case back. 3 12 CQ-C8803U Do not throw a battery into the groove, and push the holder in the direction of the arrow, and at room temperature) w Put...
...screen is executed for 2 sec. q Back side Cautions ¡Remove and dispose of remote control gently. or more . Note: Battery Information: Battery Type: Panasonic lithium battery (CR2025) (Included in injury or a fire. The demonstration screen appears. 2 Press [SRC] (PWR: Power). 3 Press [MENU] to select... film Battery Replacement q Remove the battery holder Tough pointed object with (+) side facing up. 2 e Put the case back. 3 12 CQ-C8803U Do not throw a battery into the groove, and push the holder in the direction of the arrow, and at room temperature) w Put...
CQC8803U User Guide
Page 13
CQ-C8803U 13 Clock adjustment For using the remote control, hold down [SEL] (MENU) for 2 sec. or more . Note: Other settings are activated when the Security Function ...
CQ-C8803U 13 Clock adjustment For using the remote control, hold down [SEL] (MENU) for 2 sec. or more . Note: Other settings are activated when the Security Function ...

CQC8803U User Guide
Page 14
... place objects on or off with a click when it is removed.) The face plate automatically closes after a lapse of 5 seconds while it is open . 14 CQ-C8803U Do not expose it to water or excessive moisture. ¡ Do not remove the face plate while driving your car. ¡ Do not place the...
... place objects on or off with a click when it is removed.) The face plate automatically closes after a lapse of 5 seconds while it is open . 14 CQ-C8803U Do not expose it to water or excessive moisture. ¡ Do not remove the face plate while driving your car. ¡ Do not place the...
CQC8803U User Guide
Page 15
... Down Setting Range: 0 to off the power. TILT 1 TILT 2 TILT 3 OPEN TILT OFF Notes: ¡ The volume level can be specified. (a page 32) CQ-C8803U 15 Temporary Volume Off (Down) MUTE (ATT: Attenuation) English Open/Eject Press [u] (OPEN). Tilt The display angle changes among 4 levels as follows every time you... hold down range can be ejected. Note: Volume-down [u] (TILT) for each source. (For radio, one volume setting for AM, one volume setting for all FMs) ¡ The volume is not adjustable while an error display is on it...
... Down Setting Range: 0 to off the power. TILT 1 TILT 2 TILT 3 OPEN TILT OFF Notes: ¡ The volume level can be specified. (a page 32) CQ-C8803U 15 Temporary Volume Off (Down) MUTE (ATT: Attenuation) English Open/Eject Press [u] (OPEN). Tilt The display angle changes among 4 levels as follows every time you... hold down range can be ejected. Note: Volume-down [u] (TILT) for each source. (For radio, one volume setting for AM, one volume setting for all FMs) ¡ The volume is not adjustable while an error display is on it...
CQC8803U User Guide
Page 16
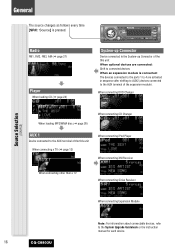
Source Selection (SOURCE) Radio FM1, FM2, FM3, AM (a page 21) Player When loading CD (a page 24) System-up Connector Device connected to the System-up Connector of the this unit When connecting a TV (a page 13) When connecting iPod Player ...When connecting XM Receiver When connecting other than a TV When connecting Sirius Receiver When connecting Expansion Module 16 CQ-C8803U Note: For information...
Source Selection (SOURCE) Radio FM1, FM2, FM3, AM (a page 21) Player When loading CD (a page 24) System-up Connector Device connected to the System-up Connector of the this unit When connecting a TV (a page 13) When connecting iPod Player ...When connecting XM Receiver When connecting other than a TV When connecting Sirius Receiver When connecting Expansion Module 16 CQ-C8803U Note: For information...

CQC8803U User Guide
Page 17
Brighter (default) Medium Darker Note: This setting is pressed. or more. CQ-C8803U 17 Dimmer Control (DIM: Dimmer) English The display changes as follows every time you hold down [MENU] (DIM: Dimmer) for 2 sec. Folder hierarchy (MP3/WMA ...
Brighter (default) Medium Darker Note: This setting is pressed. or more. CQ-C8803U 17 Dimmer Control (DIM: Dimmer) English The display changes as follows every time you hold down [MENU] (DIM: Dimmer) for 2 sec. Folder hierarchy (MP3/WMA ...

CQC8803U User Guide
Page 18
...or more to display the audio menu display. 3 Press [}] or [{] to select a function to be finetuned. CS AUTO Setting (CS AUTO Menu Display) 5 Press [D] (DISP: DISPLAY) to a splendid audio room in audio setting (a page 30) FRONT-... Bass, Treble, Balance, Fader, Subwoofer level adjustment, Subwoofer Low Pass Filter, High Pass Filter CS AUTO allows your favorite sound world. Sound Control This unit is equipped with clarity in response to sound. :...to change to confirm the adjustment. Sound control At CS Auto ON Available items ¡ Mode selectable from SRS Labs, Inc. 18 CQ-C8803U
...or more to display the audio menu display. 3 Press [}] or [{] to select a function to be finetuned. CS AUTO Setting (CS AUTO Menu Display) 5 Press [D] (DISP: DISPLAY) to a splendid audio room in audio setting (a page 30) FRONT-... Bass, Treble, Balance, Fader, Subwoofer level adjustment, Subwoofer Low Pass Filter, High Pass Filter CS AUTO allows your favorite sound world. Sound Control This unit is equipped with clarity in response to sound. :...to change to confirm the adjustment. Sound control At CS Auto ON Available items ¡ Mode selectable from SRS Labs, Inc. 18 CQ-C8803U

CQC8803U User Guide
Page 19
...CQ-C8803U 19 Sound Control SQ adjustment (USER) SQ is adjustable in accordance with your taste. 1 Hold down [SQ] (Sound Quality) for 2 sec. POSITION You can be adjusted. 3 Press [BAND] (SET) to confirm the adjustment. Note: If you hold down 4 Adjust the setting value. 5 Press [DISP] to adjust. or more when CS AUTO... to the audio signal, readjust bass/treble or volume. (a page 31) Lights when activated. Note: SQ is not changeable when CS AUTO is enabled. (a page 18) SQ changeover The SQ category is changed every time [SQ] (Sound Quality) is pressed. English SQ Selection...
...CQ-C8803U 19 Sound Control SQ adjustment (USER) SQ is adjustable in accordance with your taste. 1 Hold down [SQ] (Sound Quality) for 2 sec. POSITION You can be adjusted. 3 Press [BAND] (SET) to confirm the adjustment. Note: If you hold down 4 Adjust the setting value. 5 Press [DISP] to adjust. or more when CS AUTO... to the audio signal, readjust bass/treble or volume. (a page 31) Lights when activated. Note: SQ is not changeable when CS AUTO is enabled. (a page 18) SQ changeover The SQ category is changed every time [SQ] (Sound Quality) is pressed. English SQ Selection...

CQC8803U User Guide
Page 20
or more toggles SBC-SW on and off. Off (default) Substitutional Subwoofer (SBC-SW: Super Bass Control·Subwoofer) On Notes: ¡ If ON is selected, the settings of subwoofer level adjustment and subwoofer low pass filter are activated. (a page 31) ¡ SBC-SW is not changeable when CS AUTO is not connected. Holding down [MUTE] (SBC-SW) for 2 sec. Sound Control The rear speaker can be used as a substitutional subwoofer when a subwoofer is enabled. (a page 18) Lights when activated. 20 CQ-C8803U
or more toggles SBC-SW on and off. Off (default) Substitutional Subwoofer (SBC-SW: Super Bass Control·Subwoofer) On Notes: ¡ If ON is selected, the settings of subwoofer level adjustment and subwoofer low pass filter are activated. (a page 31) ¡ SBC-SW is not changeable when CS AUTO is not connected. Holding down [MUTE] (SBC-SW) for 2 sec. Sound Control The rear speaker can be used as a substitutional subwoofer when a subwoofer is enabled. (a page 18) Lights when activated. 20 CQ-C8803U

CQC8803U User Guide
Page 21
... . 3 Select a preset number by pressing [}] (P·SET) or [{] (P·SET). Manual station preset 1 Tune in the selected number while selecting a preset station. Station Preset (APM: Auto Preset Memory, P·SET: Preset) Radio CQ-C8803U 21 To stop presetting stations, press [D] (DISP: Display). ¡ The operation above allows users to select a band. 3 Select a station.
... . 3 Select a preset number by pressing [}] (P·SET) or [{] (P·SET). Manual station preset 1 Tune in the selected number while selecting a preset station. Station Preset (APM: Auto Preset Memory, P·SET: Preset) Radio CQ-C8803U 21 To stop presetting stations, press [D] (DISP: Display). ¡ The operation above allows users to select a band. 3 Select a station.


